There are many payment methods available in the OpenCart core itself and plenty of others are available at the OpenCart store in the form of third party extensions. Although sometimes you'll find yourself in the situation where you need something different, either there is no method available for your choice of payment gateway or you want some different logic. In either case, you're left with the only option: To create a new payment method module in OpenCart.
In this tutorial, we'll see the back-end part of the custom method. We'll see how to list your custom payment method along with the other payment methods. Further, we'll check how you can create the configuration form for your custom payment method.
We'll assume that our custom payment method name is "custom". There are at least three files you need to create in order to set up the things. Let's check the same in detail.
Setting Up the Controller
Go ahead and create the controller file at admin/controller/payment/custom.php. Paste the following contents in the newly created controller file custom.php. This file will be responsible for displaying our back-end configuration form by calling the appropriate view file and at the same time saving the post values of the form to the database.
<?php
class ControllerPaymentCustom extends Controller {
  private $error = array();

  public function index() {
    $this->language->load('payment/custom');
    $this->document->setTitle('Custom Payment Method Configuration');
    $this->load->model('setting/setting');

    if (($this->request->server['REQUEST_METHOD'] == 'POST')) {
      $this->model_setting_setting->editSetting('custom', $this->request->post);
      $this->session->data['success'] = 'Saved.';
      $this->redirect($this->url->link('extension/payment', 'token=' . $this->session->data['token'], 'SSL'));
    }

    $this->data['heading_title'] = $this->language->get('heading_title');
    $this->data['entry_text_config_one'] = $this->language->get('text_config_one');
    $this->data['entry_text_config_two'] = $this->language->get('text_config_two');
    $this->data['button_save'] = $this->language->get('text_button_save');
    $this->data['button_cancel'] = $this->language->get('text_button_cancel');
    $this->data['entry_order_status'] = $this->language->get('entry_order_status');
    $this->data['text_enabled'] = $this->language->get('text_enabled');
    $this->data['text_disabled'] = $this->language->get('text_disabled');
    $this->data['entry_status'] = $this->language->get('entry_status');

    $this->data['action'] = $this->url->link('payment/custom', 'token=' . $this->session->data['token'], 'SSL');
    $this->data['cancel'] = $this->url->link('extension/payment', 'token=' . $this->session->data['token'], 'SSL');

    if (isset($this->request->post['text_config_one'])) {
      $this->data['text_config_one'] = $this->request->post['text_config_one'];
    } else {
      $this->data['text_config_one'] = $this->config->get('text_config_one');
    }

    if (isset($this->request->post['text_config_two'])) {
      $this->data['text_config_two'] = $this->request->post['text_config_two'];
    } else {
      $this->data['text_config_two'] = $this->config->get('text_config_two');
    }

    if (isset($this->request->post['custom_status'])) {
      $this->data['custom_status'] = $this->request->post['custom_status'];
    } else {
      $this->data['custom_status'] = $this->config->get('custom_status');
    }

    if (isset($this->request->post['custom_order_status_id'])) {
      $this->data['custom_order_status_id'] = $this->request->post['custom_order_status_id'];
    } else {
      $this->data['custom_order_status_id'] = $this->config->get('custom_order_status_id');
    }

    $this->load->model('localisation/order_status');
    $this->data['order_statuses'] = $this->model_localisation_order_status->getOrderStatuses();
    $this->template = 'payment/custom.tpl';

    $this->children = array(
      'common/header',
      'common/footer'
    );

    $this->response->setOutput($this->render());
  }
}
As you can see, the class name follows the standard OpenCart naming conventions. Let's understand each section.
In the beginning of the index method we load the language file and set the value of the <title> tag.
$this->language->load('payment/custom');
$this->document->setTitle('Custom Payment Method Configuration');
In the next section, we load the model file "setting.php which will provide us the methods to save post values to the database. We also check if post values are available we'll save it to the database.
$this->load->model('setting/setting');

if (($this->request->server['REQUEST_METHOD'] == 'POST')) {
  $this->model_setting_setting->editSetting('custom', $this->request->post);
  $this->session->data['success'] = 'Saved.';
  $this->redirect($this->url->link('extension/payment', 'token=' . $this->session->data['token'], 'SSL'));
}
Further, next couple of lines of code is just used to set up the static labels which will be used in the template file.
$this->data['heading_title'] = $this->language->get('heading_title');
$this->data['entry_text_config_one'] = $this->language->get('text_config_one');
$this->data['entry_text_config_two'] = $this->language->get('text_config_two');
$this->data['button_save'] = $this->language->get('text_button_save');
$this->data['button_cancel'] = $this->language->get('text_button_cancel');
$this->data['entry_order_status'] = $this->language->get('entry_order_status');
$this->data['text_enabled'] = $this->language->get('text_enabled');
$this->data['text_disabled'] = $this->language->get('text_disabled');
$this->data['entry_status'] = $this->language->get('entry_status');
Next, we've set up the "action" variable to make sure form is submitted to our "index" method when submitted. And in the same way, user is taken back to list of payment methods if she clicks on "Cancel" button.
$this->data['action'] = $this->url->link('payment/custom', 'token=' . $this->session->data['token'], 'SSL');
$this->data['cancel'] = $this->url->link('extension/payment', 'token=' . $this->session->data['token'], 'SSL');
Furthermore, there's code to populate the default values of the configuration form fields either in add or edit mode.
if (isset($this->request->post['text_config_one'])) {
  $this->data['text_config_one'] = $this->request->post['text_config_one'];
} else {
  $this->data['text_config_one'] = $this->config->get('text_config_one');
}
...
...
if (isset($this->request->post['custom_order_status_id'])) {
  $this->data['custom_order_status_id'] = $this->request->post['custom_order_status_id'];
} else {
  $this->data['custom_order_status_id'] = $this->config->get('custom_order_status_id');
}
In the next section, we load the different order status values that area available, which will be used for the drop-down in the configuration form for the Order Status field.
$this->load->model('localisation/order_status');
$this->data['order_statuses'] = $this->model_localisation_order_status->getOrderStatuses();
Finally, we assign our custom template file custom.tpl and render the view.
$this->template = 'payment/custom.tpl';

$this->children = array(
  'common/header',
  'common/footer'
);

$this->response->setOutput($this->render());
That's the set up for the controller file.
Language and Template Files
So now that we're done with the controller file, let's create the language and template files. Go ahead and create the language file at admin/language/english/payment/custom.php. Make sure that your language file looks like code that we've provided below in our example custom.php.
<?php
$_['heading_title'] = 'Custom Payment Method';

$_['text_enabled'] = 'Enabled';
$_['text_disabled'] = 'Disabled';

$_['text_config_one'] = 'Parameter one';
$_['text_config_two'] = 'Parameter Two';

$_['entry_status'] = 'Status:';
$_['entry_order_status'] = 'Order Status:';

$_['text_button_save'] = 'Save';
$_['text_button_cancel'] = 'Cancel';
?>
As you can see we've just set up the language variables earlier used in the controller file. This is pretty simple and straightforward.
Let's create the view file. Go ahead and create the template file at admin/view/template/payment/custom.tpl. Paste the following contents in the newly created template file custom.tpl.
<?php echo $header; ?>
<div id="content">
  <div class="box">
    <div class="heading">
      <h1><img src="view/image/payment.png" alt="" /> <?php echo $heading_title; ?></h1>
      <div class="buttons"><a onclick="$('#form').submit();" class="button"><?php echo $button_save; ?></a><a href="<?php echo $cancel; ?>" class="button"><?php echo $button_cancel; ?></a></div>
    </div>
    <div class="content">
      <form action="<?php echo $action; ?>" method="post" enctype="multipart/form-data" id="form">
        <table class="form">
          <tr>
            <td><?php echo $entry_order_status; ?></td>
            <td><select name="custom_order_status_id">
                <?php foreach ($order_statuses as $order_status) { ?>
                <?php if ($order_status['order_status_id'] == $custom_order_status_id) { ?>
                <option value="<?php echo $order_status['order_status_id']; ?>" selected="selected"><?php echo $order_status['name']; ?></option>
                <?php } else { ?>
                <option value="<?php echo $order_status['order_status_id']; ?>"><?php echo $order_status['name']; ?></option>
                <?php } ?>
                <?php } ?>
              </select></td>
          </tr>

          <tr>
            <td><?php echo $entry_text_config_one; ?></td>
            <td><input type="text" name="text_config_one" value="<?php echo $text_config_one; ?>" size="10" /></td>
          </tr>

          <tr>
            <td><?php echo $entry_text_config_two; ?></td>
            <td><input type="text" name="text_config_two" value="<?php echo $text_config_two; ?>" size="10" /></td>
          </tr>

          <tr>
            <td><?php echo $entry_status; ?></td>
            <td><select name="custom_status">
                <?php if ($custom_status) { ?>
                <option value="1" selected="selected"><?php echo $text_enabled; ?></option>
                <option value="0"><?php echo $text_disabled; ?></option>
                <?php } else { ?>
                <option value="1"><?php echo $text_enabled; ?></option>
                <option value="0" selected="selected"><?php echo $text_disabled; ?></option>
                <?php } ?>
              </select></td>
          </tr>
        </table>
      </form>
    </div>
  </div>
</div>
<?php echo $footer; ?>
Again, this should be pretty easy to understand: The purpose of this template file is to provide the configuration form for our custom payment method. It uses the variables we set up earlier in the controller file.
How It Looks
We're done with the files set up. Now it's time to move on and see everything things in action. Head over to the admin section of the OpenCart and Go to Extensions > Payment. You should see that our custom method is listed just below the Cash On Delivery.
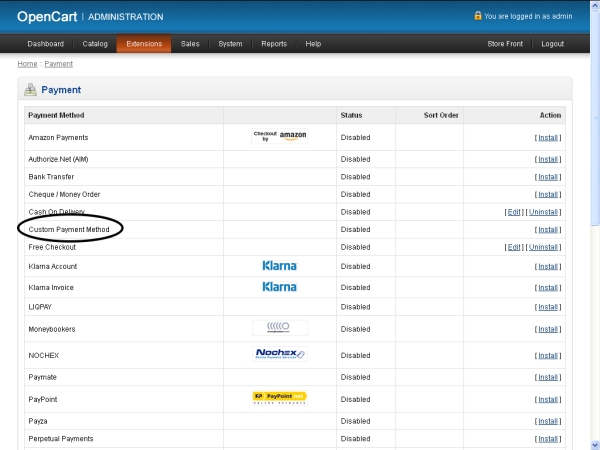
Click on the install link to install our custom payment method. After installing, you should be able to see the Edit link to open the configuration form. Click on the Edit link.
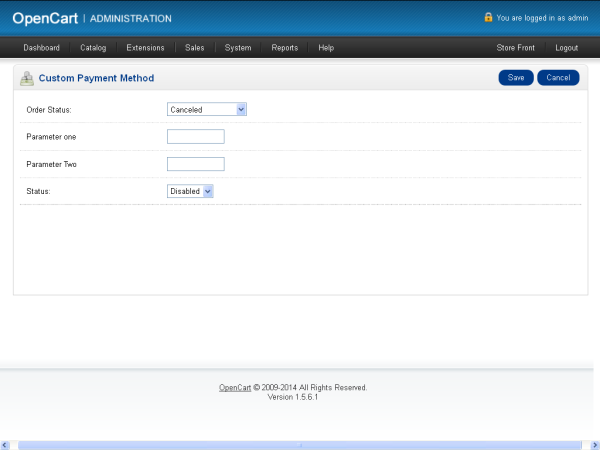
So this is the configuration form for which we've done all the hard work so far! As you can see we've provided the generic Order Status and "Status fields. In addition to that, we've just demonstrated how you could provide the custom parameters as well by setting up Parameter One and Parameter Two.
You can fill up the form and save it by clicking on the Save button. We've set up the code for this in our index method of controller so it should work out of the box! And yes, don't forget to set the status to Enabled if you want your method available in the front-end!
In the next and final part we'll see the front-end counterpart of the same. Don't forget to share your thoughts using the feed below!

Comments