Before getting started, note that we're planning specifically on jumping right into the article.
To that end, we're assuming that you have a working copy of OpenCart installed and are ready to get to work.
The Basic Workflow
OpenCart is built using the popular programming MVC pattern. There is also one more element added to this pattern named "L" - a language part - so it's called MVC-L pattern in OpenCart. I won't go into the details of the MVC pattern as it's a very popular and familiar design pattern and we've covered it in great detail in other tutorials.
That said, we still need to look at the workflow using this pattern.
First, the controller acts as an entry point for any page in which you'll define most of the application logic. The model deals with the back-end database, and the view is responsible for preparing the content to be rendered to the end user. In the context of OpenCart, you'll at least need to implement a controller and a view in order to create a new custom page.
Setting Up the Controller
First, let's try to understand the role of the controller in OpenCart. The controller is the first element that will get executed when you request any page. Primarily, it's responsible for setting up the variables which will be later on used in the view for the display. Although in the generic controller, there are a lot of things happening:
- You can load language files so that you can use language variables for the static text display.
- You can load model files so that you can use methods defined in those models to fetch data from the back-end database.
- You can define the template file which will be used by the view.
- You can set up the custom variables by assigning them content which will be used in the template file.
- You can declare the children templates which you would like to display as a part of the main template. The simplest example of this is the header and footer templates which you would like to display in your main template.
- Finally, you can also set values for the stuff like document title, meta description etc.
Enough theory, right? Let's see how our custom controller looks like. Go ahead and create a new directory custompage underneath catalog/controller. Create a new file mycustompage.php underneath catalog/controller/custompage. Paste the following code in the newly created controller file "mycustompage.php".
<?php
class ControllerCustompageMycustompage extends Controller {
  public function index() {
    // set title of the page
    $this->document->setTitle("My Custom Page");

    // define template file
    if (file_exists(DIR_TEMPLATE . $this->config->get('config_template') . '/template/custompage/mycustompage.tpl')) {
      $this->template = $this->config->get('config_template') . '/template/custompage/mycustompage.tpl';
    } else {
      $this->template = 'default/template/custompage/mycustompage.tpl';
    }

    // define children templates
    $this->children = array(
      'common/column_left',
      'common/column_right',
      'common/content_top',
      'common/content_bottom',
      'common/footer',
      'common/header'
    );

    // set data to the variable
    $this->data['my_custom_text'] = "This is my custom page.";

    // call the "View" to render the output
    $this->response->setOutput($this->render());
  }
}
?>
Let's understand the naming convention of the controller class. The controller class name is constructed by following the directory structure and camel case convention. Notice that the class name begins with "Controller" keyword followed by the directory name ("Custompage") in which the class file resides. And finally the name of class file ("Mycustompage") is appended at the end. Now let's dissect each section in detail.
First we've set the value of the html title tag for our custom page.
$this->document->setTitle("My Custom Page");
In the next section, we've defined the template file name which will be used by the "View" element. An important thing to note here is that we have first checked that if the template file is available in the custom theme set from the back-end, if it's available in the custom theme we'll use that otherwise we'll use the template file in the "default" theme.
This is the concept of template overriding.
if (file_exists(DIR_TEMPLATE . $this->config->get('config_template') . '/template/custompage/mycustompage.tpl')) {
  $this->template = $this->config->get('config_template') . '/template/custompage/mycustompage.tpl';
} else {
  $this->template = 'default/template/custompage/mycustompage.tpl';
}
We have also defined the children templates using the array. As an example, common/header maps to the template file located at catalog/view/theme/default/template/common/header.tpl and executes the same. Result of that will be assigned to $header variable which you can use in your template file to display the site header.
$this->children = array(
  'common/column_left',
  'common/column_right',
  'common/content_top',
  'common/content_bottom',
  'common/footer',
  'common/header'
);
Furthermore, we've demonstrated how you can set up the custom variables which will be available in the template file. Although we have used a simple static text here, you could assign a more sensible content, say for example a products array fetched from the
database.
$this->data['my_custom_text'] = "This is my custom page.";
Finally, the most important thing is to call view so that the actual rendering process can begin.
$this->response->setOutput($this->render());
So that's the glimpse of controller workflow.
In the front-end, you'll access this controller by using the query string variable route=custompage/mycustompage. It's important to note here is that if you define the controller method with any other name except index you need to specify that as well in the URL.
For example, if you have created method named custom, your front-end URL format should look like route=custompage/mycustompage/custom.
Let's understand how OpenCart maps any url to the specific controller file. The format of the route variable is {directory}/{filename}/{methodname}. {directory} maps to the directory under catalog/controller. {filename} maps to the name of the controller file under catalog/controller/{directory}. And finally, it'll look for the controller method named {methodname} if it's specified in the route, otherwise it'll call the default index method.
Prepare the View
In this section, we'll create the view template file which we defined earlier in the controller index method. Go ahead and create a new directory custompage underneath catalog/view/theme/default/template. Create a new file mycustompage.tpl underneath catalog/view/theme/default/template/custompage. Paste the following content in the newly created template file mycustompage.tpl.
<?php
    echo $header;
    echo $column_left;
    echo $column_right; ?>
    <div id="content">
        <?php
            echo $content_top;
            echo $my_custom_text;
            echo $content_bottom;
        ?>
    </div>
<?php echo $footer; ?>
So this is our main layout template file which is responsible for displaying the content of our custom page. In this template file, we have just used the variables we've set up in the controller's index method.
The only custom variable in this template file is $my_custom_text, rest of the variables contain the contents related to the children templates like header, footer etc. The variables $column_left, $column_right, $content_top and $content_bottom are used to display the modules assigned to our custom page from the back-end.
If you want to assign modules to our custom page, first you need to create a new layout entry from the back-end. After you have added a new layout, you would like to add a route such as custompage/mycustompage entry for that layout. Now you can assign any module to our custom page as well.
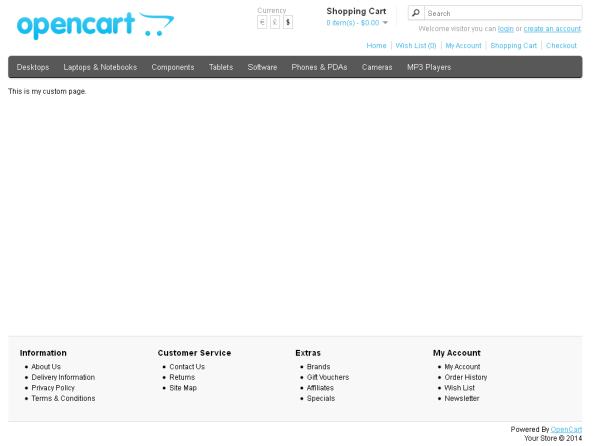
You have just built a complete custom page in the OpenCart! You can check the same at URL: http://www.yoursiteurl.com/index.php?route=custompage/mycustompage.
Conclusion
In this tutorial, we've learned how to create our own custom page in OpenCart. If you are familiar with the MVC pattern, the workflow to create a new custom page should be familiar.
Go ahead and explore few core files to get familiar with the code. I would like you to extend our example by loading model and language files in the controller and see how things work! Awaiting for the feedback, questions, and comments!

Comments