Introduction
The Core Data framework has been around for many years. It's used in thousands of applications and by millions of people, both on iOS and OS X. Core Data is maintained by Apple and very well documented. It's a mature framework that has proven it's value over and over.
Core Data takes advantage of the Objective-C language and its runtime, and neatly integrates with the Core Foundation framework. The result is an easy to use framework for managing an object graph that is elegant to use and incredibly efficient in terms of memory usage.
1. Prerequisites
Even though the Core Data framework isn't difficult per se, if you're new to iOS or OS X development, then I recommend you first go through our series about iOS development. It teaches you the fundamentals of iOS development and, at the end of the series, you will have enough knowledge to take on more complex topics, such as Core Data.
As I said, Core Data isn't as complex or difficult to pick up as most developers think. However, I've learned that a solid foundation is critical to get up to speed with Core Data. You need to have a proper understanding of the Core Data API to avoid bad practices and make sure you don't run into problems using the framework.
Every component of the Core Data framework has a specific purpose and function. If you try to use Core Data in a way it wasn't designed for, you will inevitably end up struggling with the framework.
What I cover in this series on Core Data is applicable to iOS 6+ and OS X 10.8+, but the focus will be on iOS. In this series, I will work with Xcode 5 and the iOS 7 SDK.
2. Learning Curve
The Core Data framework can seem daunting at first, but the API is intuitive and concise once you understand how the various pieces of the puzzle fit together. And that's exactly where most developers run into problems. They try to use Core Data before they've seen that proverbial puzzle, they don't know how the pieces of the puzzle fit together and relate to one another.
In this article, I will help you become familiar with the so-called Core Data stack. Once you understand the key players of the Core Data stack, the framework will feel less daunting and you will even start to enjoy and appreciate the framework's well-crafted API.
In contrast to frameworks like UIKit, which you can use without understanding the framework in its entirety, Core Data demands a proper understanding of its building blocks. It's important to set aside some time to become familiar with the framework, which we'll do in this tutorial.
3. What is Core Data?
Developers new to the Core Data framework often confuse it with and expect it to work as a database. If there's one thing I hope you'll remember from this series, it is that Core Data isn't a database and you shouldn't expect it to act like one.
What is Core Data if it isn't a database? Core Data is the model layer of your application in the broadest sense possible. It's the Model in the Model-View-Controller pattern that permeates the iOS SDK.
Core Data isn't the database of your application nor is it an API for persisting data to a database. Core Data is a framework that manages an object graph. It's as simple as that. Core Data can persist that object graph by writing it to disk, but that is not the primary goal of the framework.
4. Core Data Stack
As I mentioned earlier, the Core Data stack is the heart of Core Data. It's a collection of objects that make Core Data tick. The key objects of the stack are the managed object model, the persistent store coordinator, and one or more managed object contexts. Let's start by taking a quick look at each component.
NSManagedObjectModel
The managed object model is the data model of the application. Even though Core Data isn't a database, you can compare the managed object model to the schema of a database, that is, it contains information about the models or entities of the object graph, what attributes they have, and how they relate to one another.
The NSManagedObjectModel object knows about the data model by loading one or more data model files during its initialization. We'll take a look at how this works in a few moments.
NSPersistentStoreCoordinator
As its name indicates, the NSPersistentStoreCoordinator object persists data to disk and ensures the persistent store(s) and the data model are compatible. It mediates between the persistent store(s) and the managed object context(s) and also takes care of loading and caching data. That's right. Core Data has caching built in.
The persistent store coordinator is the conductor of the Core Data orchestra. Despite its important role in the Core Data stack, we rarely interact with it directly.
NSManagedObjectContext
The NSManagedObjectContext object manages a collection of model objects, instances of the NSManagedObject class. It's perfectly possible to have multiple managed object contexts. Each managed object context is backed by a persistent store coordinator.
You can see a managed object context as a workbench on which you work with your model objects. You load them, you manipulate them, and save them on that workbench. Loading and saving are mediated by the persistent store coordinator. You can have multiple workbenches, which is useful if your application is multithreaded, for example.
While a managed object model and persistent store coordinator can be shared across threads, managed object contexts should never be accessed from a thread different than the one they were created on. We'll discuss multithreading in more detail later in this series.
5. Exploring the Core Data Stack
Step 1: Xcode Template
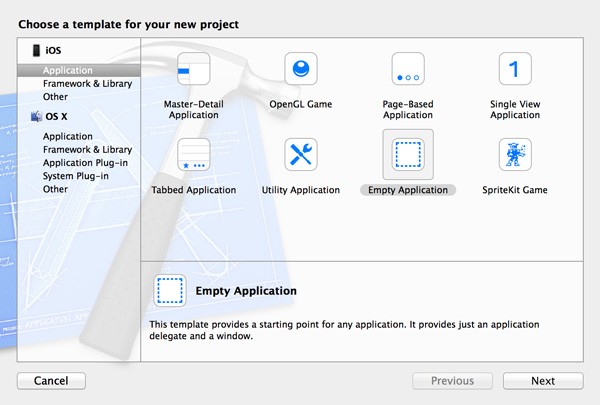
Let's explore the Core Data stack in more detail by taking a look at Apple's Xcode template for Core Data. Create a new project in Xcode 5 by selecting New > Project... from the File menu. Choose the Empty Application template from the list of iOS Application templates on the left.
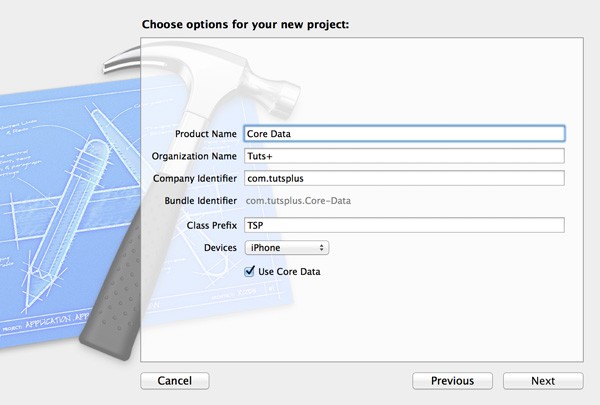
Name the project Core Data, set Devices to iPhone, and check the checkbox labeled Use Core Data. Tell Xcode where you'd like to store the project files and hit Create.
Step 2: Overview
By default, Apple puts code related to Core Data in the application's delegate class, the TSPAppDelegate class in our example. Let's start by exploring the interface of TSPAppDelegate.
#import <UIKit/UIKit.h>

@interface TSPAppDelegate : UIResponder <UIApplicationDelegate>

@property (strong, nonatomic) UIWindow *window;

@property (readonly, strong, nonatomic) NSManagedObjectContext *managedObjectContext;
@property (readonly, strong, nonatomic) NSManagedObjectModel *managedObjectModel;
@property (readonly, strong, nonatomic) NSPersistentStoreCoordinator *persistentStoreCoordinator;

- (void)saveContext;
- (NSURL *)applicationDocumentsDirectory;

@end
As you can see, the application delegate has a property for each component of the Core Data stack as well as two convenience methods, saveContext and applicationDocumentsDirectory.
Note that the Core Data properties are marked as readonly, which means that the instances cannot be modified by objects other than the application delegate itself.
The implementation of TSPAppDelegate is much more interesting and will show us how the managed object model, the persistent store coordinator, and the managed object context work together. Let's start from the top.
#import "TSPAppDelegate.h"

@implementation TSPAppDelegate

@synthesize managedObjectContext = _managedObjectContext;
@synthesize managedObjectModel = _managedObjectModel;
@synthesize persistentStoreCoordinator = _persistentStoreCoordinator;
Because the properties in the interface of the TSPAppDelegate class are declared as readonly, no setter methods are created. The first @synthesize directive tells the compiler to associate the _managedObjectContext instance variable with the managedObjectContext property we declared in the interface of the class. This is a common pattern to lazily load objects.
You can accomplish the same result by using a private class extension in the class's implementation file. Take a look at the following code snippet. The @synthesize directives are not needed if you use a private class extension.
#import "TSPAppDelegate.h"

@interface TSPAppDelegate ()

@property (strong, nonatomic) NSManagedObjectContext *managedObjectContext;
@property (strong, nonatomic) NSManagedObjectModel *managedObjectModel;
@property (strong, nonatomic) NSPersistentStoreCoordinator *persistentStoreCoordinator;

@end
Even though I usually use and prefer a private class extension, we'll stick with Apple's template for this tutorial.
Setting up the Core Data stack is actually pretty straightforward in terms of the methods that need to be implemented. Apple doesn't use special setup methods to create the Core Data stack. The three key objects of the Core Data stack are created when they are needed. In other words, they are lazily loaded or instantiated.
In practice this means that, the implementation of the TSPAppDelegate class looks similar to what you'd expect in an application delegate class with the exception of the saveContext and applicationDocumentsDirectory methods, and the getter methods of managedObjectContext, managedObjectModel, and persistentStoreCoordinator. It's in these getter methods that the magic happens. That is one of the beauties of Core Data, the setup is very simple and interacting with Core Data is just as easy.
Step 3: Managed Object Context
The class you'll use most often, apart from NSManagedObject, when interacting with Core Data is NSManagedObjectContext. Let's start by exploring its getter.
- (NSManagedObjectContext *)managedObjectContext
{
    if (_managedObjectContext != nil) {
        return _managedObjectContext;
    }

    NSPersistentStoreCoordinator *coordinator = [self persistentStoreCoordinator];
    if (coordinator != nil) {
        _managedObjectContext = [[NSManagedObjectContext alloc] init];
        [_managedObjectContext setPersistentStoreCoordinator:coordinator];
    }
    return _managedObjectContext;
}
The first three lines of its implementation are typical for a getter that lazily loads the instance variable. If the NSManagedObjectContext object isn't nil, it returns the object. The interesting bit is the actual instantiation of the NSManagedObjectContext object.
We first grab a reference to the persistence store coordinator by calling its getter method. The persistent store coordinator is also lazily loaded as we'll see in a moment. If the persistent store coordinator isn't nil, we create an NSManagedObjectContext instance and set its persistentStoreCoordinator property to the persistent store coordinator. That wasn't too difficult. Was it?
To sum up, the managed object context manages a collection of model objects, instances of the NSManagedObject class, and keeps a reference to a persistent store coordinator. Keep this in mind while reading the rest of this article.
Step 4: Persistent Store Coordinator
As we saw a moment ago, the persistentStoreCoordinator method is invoked by the managedObjectContext method. Take a look at the implementation of persistentStoreCoordinator, but don't let it scare you. It's actually not that complicated.
- (NSPersistentStoreCoordinator *)persistentStoreCoordinator
{
    if (_persistentStoreCoordinator != nil) {
        return _persistentStoreCoordinator;
    }

    NSURL *storeURL = [[self applicationDocumentsDirectory] URLByAppendingPathComponent:@"Core_Data.sqlite"];

    NSError *error = nil;
    _persistentStoreCoordinator = [[NSPersistentStoreCoordinator alloc] initWithManagedObjectModel:[self managedObjectModel]];
    if (![_persistentStoreCoordinator addPersistentStoreWithType:NSSQLiteStoreType configuration:nil URL:storeURL options:nil error:&error]) {
        /*
         Replace this implementation with code to handle the error appropriately.

         abort() causes the application to generate a crash log and terminate. You should not use this function in a shipping application, although it may be useful during development.

         Typical reasons for an error here include:
         * The persistent store is not accessible;
         * The schema for the persistent store is incompatible with current managed object model.
         Check the error message to determine what the actual problem was.


         If the persistent store is not accessible, there is typically something wrong with the file path. Often, a file URL is pointing into the application's resources directory instead of a writeable directory.

         If you encounter schema incompatibility errors during development, you can reduce their frequency by:
         * Simply deleting the existing store:
         [[NSFileManager defaultManager] removeItemAtURL:storeURL error:nil]

         * Performing automatic lightweight migration by passing the following dictionary as the options parameter:
         @{NSMigratePersistentStoresAutomaticallyOption:@YES, NSInferMappingModelAutomaticallyOption:@YES}

         Lightweight migration will only work for a limited set of schema changes; consult "Core Data Model Versioning and Data Migration Programming Guide" for details.

         */
        NSLog(@"Unresolved error %@, %@", error, [error userInfo]);
        abort();
    }

    return _persistentStoreCoordinator;
}
You will almost always want to store Core Data's object graph to disk and Apple's Xcode template uses a SQLite database to accomplish this.
When we create the persistent store coordinator in persistentStoreCoordinator, we specify the location of the store on disk. We start by creating an NSURL object that points to that location in the application's sandbox. We invoke applicationDocumentsDirectory, a helper method, which returns the location, an NSURL object, of the Documents directory in the application's sandbox. We append Core_Data.sqlite to the location and store it in storeURL for later use.
By default, the name of the store on disk is the same as the name of the project. You can change this to whatever you want though.
NSURL *storeURL = [[self applicationDocumentsDirectory] URLByAppendingPathComponent:@"Core_Data.sqlite"];
As I mentioned a moment ago, the .sqlite extension hints that the store on disk is a SQLite database. Even though Core Data supports several store types, SQLite is by far the most used store type because of its speed and reliability.
_persistentStoreCoordinator = [[NSPersistentStoreCoordinator alloc] initWithManagedObjectModel:[self managedObjectModel]];
In the next step, we instantiate the persistent store coordinator by invoking initWithManagedObjectModel: and passing a NSManagedObjectModel instance. We grab a reference to the managed object model by invoking the managedObjectModel method, which we'll explore next.
We now have an instance of the NSPersistentStoreCoordinator class, but there are no stores associated with it yet. We add a store to the persistent store coordinator by calling a pretty impressive method on it, addPersistentStoreWithType:configuration:URL:options:error:.
if (![_persistentStoreCoordinator addPersistentStoreWithType:NSSQLiteStoreType configuration:nil URL:storeURL options:nil error:&error]) {

}
The first argument specifies the store type, NSSQLiteStoreType in this example. Core Data also supports binary stores (NSBinaryStoreType) and an in memory store (NSInMemoryStoreType).
The second argument tells Core Data which configuration to use for the persistent store. We pass in nil, which tells Core Data to use the default configuration. The third argument is the location of the store, which is stored in storeURL.
The fourth argument is an NSDictionary of options that let's us alter the behavior of the persistent store. We'll revisit this aspect later in this series and pass in nil for now. The last argument is a reference to an NSError pointer.
If no errors pop up, this method returns an NSPersistentStore object. We don't keep a reference to the persistent store, because we don't need to interact with it once it's added to the persistent store coordinator.
If adding the persistent store fails, though, it means that there's a problem with the persistent store of the application and we need to take the necessary steps to resolve the problem. When this happens and why it happens is the subject of a future installment.
At the moment, abort is invoked when addPersistentStoreWithType:configuration:URL:options:error: returns nil. As the comments in the if statement explains, you should never call abort in a production environment, because it crashes the application. We will remedy this later in this series.
Step 5: Managed Object Model
The third and final piece of the puzzle is the managed object model. Let's take a look at the getter of the managedObjectModel property.
- (NSManagedObjectModel *)managedObjectModel
{
    if (_managedObjectModel != nil) {
        return _managedObjectModel;
    }
    NSURL *modelURL = [[NSBundle mainBundle] URLForResource:@"Core_Data" withExtension:@"momd"];
    _managedObjectModel = [[NSManagedObjectModel alloc] initWithContentsOfURL:modelURL];
    return _managedObjectModel;
}
The implementation is very easy. We store the location of the application's model in modelURL and pass modelURL to initWithContentsOfURL: to create an instance of the NSManagedObjectModel class.
At this point, you're probably wondering what that model is modelURL is pointing to and what the file with the .momd extension is. To answer these questions, we need to find out what else Xcode has created for us during the project's setup.
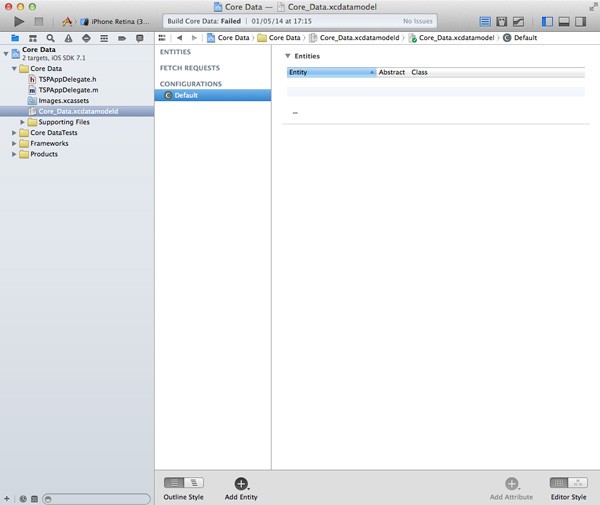
In the Project Navigator on the left, you should see a file named Core_Data.xcdatamodeld. This is the data model of the application that's compiled to a .momd file. It's that .momd file that the managed object model uses to create the application's data model.
It is possible to have several data model files. The NSManagedObjectModel class is perfectly capable of merging multiple data models into one, that is one of the more powerful and advances features of Core Data.
The Core Data framework also supports data model versioning as well as migrations. This ensures that the data stored in the persistent store(s) doesn't get corrupted. We will cover versioning and migrations later in this series.
The data model file in our project is empty at the moment, which means that our data model contains no entities. We'll remedy this in the next tutorial that will focus exclusively on the data model.
6. Putting It All Together
Before we wrap up this article, I'd like to show you a diagram that illustrates the three components of the Core Data stack.
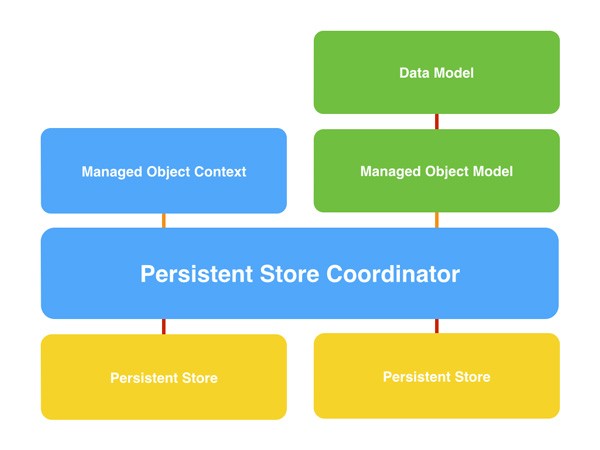
The above diagram is a visual representation of what we explored in the Xcode template a moment ago. The NSPersistentStoreCoordinator object is the brain of the Core Data stack of the application. It talks to one or more persistent stores and makes sure data is saved, loaded, and cached.
The persistent store coordinator knows about the data model, the schema of the object graph if you like, through the NSManagedObjectModel object. The managed object model creates the application's data model from one or more .momd files, binary representations of the data model.
Last but not least, the application accesses the object graph through one or more instances of the NSManagedObjectContext class. A managed object context knows about the data model through the persistent store coordinator, but it doesn't know or keep a reference to the managed object model. There is no need for that connection.
The managed object context asks the persistent coordinator for data and tells it to save data when necessary. This is all done for you by the Core Data framework and your application rarely needs to talk to the persistent store coordinator directly.
Conclusion
In this article, we covered the key players of the Core Data stack, the persistent store coordinator, the managed object model, and the managed object context. Make sure you understand the role of each component and, more importantly, how they work together to make Core Data do its magic.
In the next installment of this series on Core Data, we dive into the data model. We take a look at the data model editor in Xcode 5 and we create a few entities, attributes, and relationships.
In the meantime, if you want to improve as an iOS developer, be sure to check out the range of iOS app templates on Envato Market. With more than 1,000 items to choose from, you're sure to find something to help you with your next project.

Comments