In this tutorial, you'll learn how to consume web services using the popular kSOAP library in an Android application. kSOAP is a reputable library loved by developers who have the need to parse WSDL (Web Service Definition Language) and SOAP (Simple Object Access Protocol) messages.
Introduction
The kSOAP library is an elegant, lightweight, and efficient SOAP client library. The library is open source, easy to use, and it can save you from the hassle of coding a custom parser. It is one of the more trusted SOAP libraries currently available and it's frequently updated, which is a good sign for any open source project.
It is often risky to integrate open source software (OSS) in a project as it can cause unforeseen problems down the road. Always look for comments and reviews of other developers who have used the library. If the project isn't under active development, it may be better to look for an alternative solution.
The objective of this tutorial is to make you familiar with the kSOAP library. For demonstration purposes, we'll be using a simple web service from W3Schools. The web service is a Fahrenheit to Celsius converter. The web service accepts a value in degrees Fahrenheit and responds with the equivalent value in degrees Celsius. We'll go through the example step by step. At the end of this tutorial, we'll display the result on the user's device.
1. Getting Started
Step 1: Project Setup
Start a new Android project and configure it as you please. Feel free to use your favorite IDE, but for this tutorial I'll be using IntelliJ IDEA.
In the project's manifest file, you need to specify that the application is allowed to connect to the internet. We're also going to specify the target SDK version as well as the minimum SDK version. Take a look at the manifest file shown below.
<uses-sdk android:minSdkVersion="7" android:targetSdkVersion="17"/>
<uses-permission android:name="android.permission.INTERNET"/>
Step 2: Downloading kSOAP
Always try and use the latest stable release of a library or upgrade the library you're using in an application after a major update has been released. It's good practice to keep a project's dependencies up to date for various reasons, such as security and bug fixes. In this tutorial, we'll be using version 3.1.1 of the kSOAP library, which you can find on the project's download page. After downloading the kSOAP library, add it to your project's libs folder.
Step 3: Adding kSOAP to Your Project
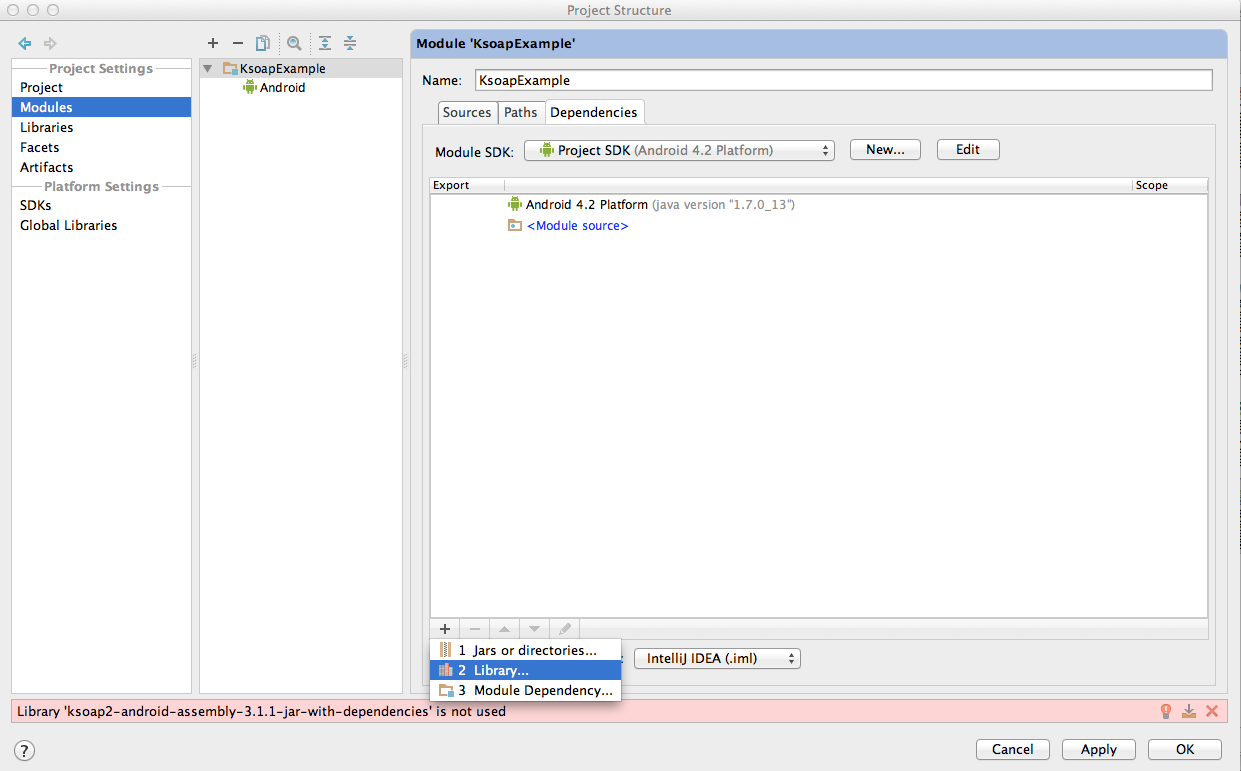
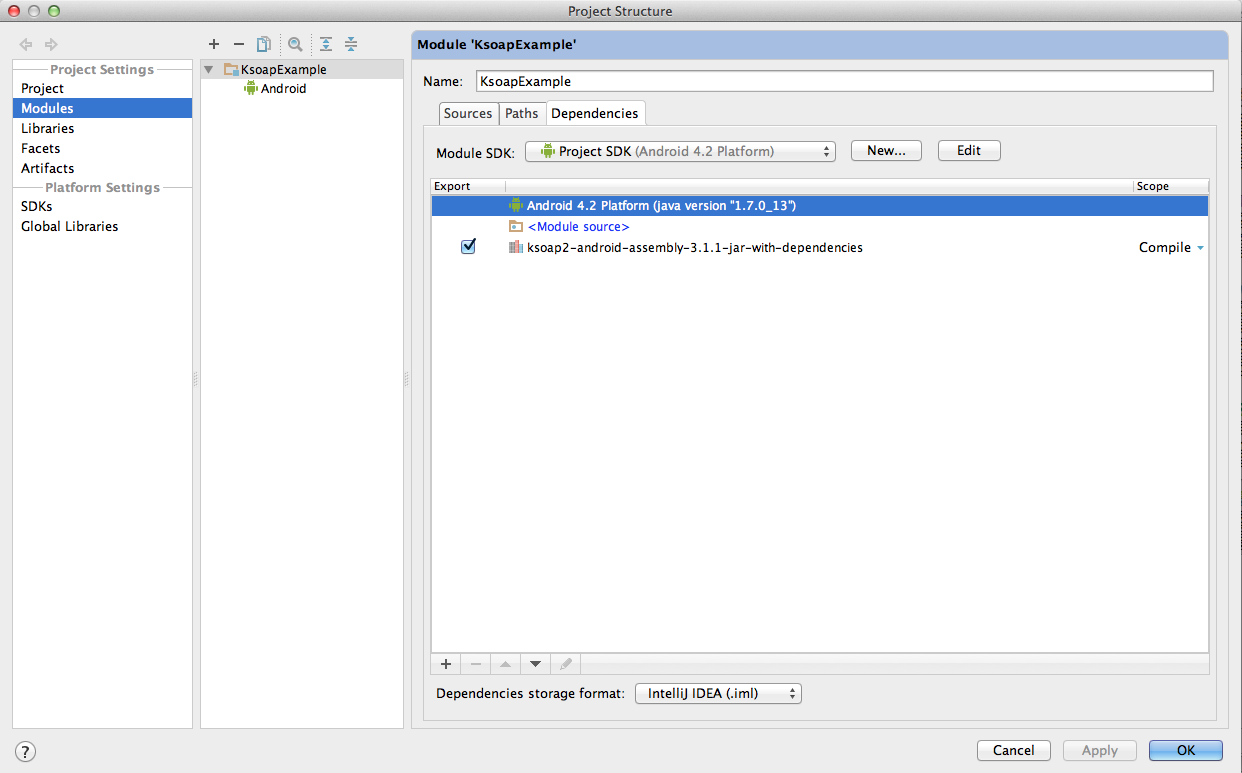
In order to use the kSOAP library in your project, you'll need to add it to your project. I'll show you how to add it using IntelliJ IDEA. The steps might be slightly different if you're using a different IDE, but the idea is the same. In IntelliJ IDEA, choose Project Structure... from the File menu, open the Modules pane, click the plus button at the bottom of the right pane, and select library. Navigate to the libs folder and select the kSOAP library. Take a look at the two images below for clarification.
The kSOAP library should now be visible as a dependency of your project. Click the check box next to the kSOAP library to add it to your project. Now that we've added the library to our project, it is time to put it to use. If you're using IntelliJ IDEA, your project should look similar to the one shown below.
2.W3Schools Web Service
Using the kSOAP library to consume a web service involves a number of steps. However, before we dive head first into using the kSOAP library, it is useful to tell you a bit more about the web service we'll be using.
Visit the website of the W3Schools web service that we'll use in this tutorial. You'll see that there are two operations, CelsiusToFahrenheit and FahrenheitToCelsius. The name of each operation is self-explanatory. The web service's URL is the base URL that we'll use to connect to the web service.
If you select an operation on the W3Schools website, you're shown an example of the request that the web service expects as well as the response of the web service. Take a look at the code snippet below, which is an example request that the web service expects. Pay close attention to the SOAPAction in the code snippet. We will use it a bit later in this tutorial.
POST /webservices/tempconvert.asmx HTTP/1.1
Host: www.w3schools.com
Content-Type: text/xml; charset=utf-8
Content-Length: length
SOAPAction: "http://www.w3schools.com/webservices/FahrenheitToCelsius"
<!--?xml version="1.0" encoding="utf-8"?-->
string
The next code snippet shows an example response of the web service.
HTTP/1.1 200 OK
Content-Type: text/xml; charset=utf-8
Content-Length: length
<!--?xml version="1.0" encoding="utf-8"?-->
string
3. Using kSOAP
Step 1: Creating an Envelope
The first thing we need to do is creating a SOAP envelope using the SoapSerializationEnvelope class (org.ksoap2.serialization.SoapSerializationEnvelope), which you need to import from the kSOAP library. Take a look at the code snippet below, in which I have initialized an instance of the SoapSerializationEnvelope class.
SoapSerializationEnvelope envelope = getSoapSerializationEnvelope(request);
The getSoapSerializationEnvelope method isn't defined in the kSOAP library. It's a helper method that I've created that to make working with the kSOAP library a bit easier. The method returns the SOAP envelope that we need for the rest of the example. Take a look at the implementation of getSoapSerializationEnvelope below.
private final SoapSerializationEnvelope getSoapSerializationEnvelope(SoapObject request) {
    SoapSerializationEnvelope envelope = new SoapSerializationEnvelope(SoapEnvelope.VER11);
    envelope.dotNet = true;
    envelope.implicitTypes = true;
    envelope.setAddAdornments(false);
    envelope.setOutputSoapObject(request);

    return envelope;
}
The getSoapSerializationEnvelope method accepts a SoapObject instance, which is the request. We'll see how to create the request in just a few minutes. When creating an instance of the SoapSerializationEnvelope class, the SoapEnvelope version is set by passing in SoapEnvelope.VER11, which tells the kSOAP library that we'll be using SOAP 1.1. We set the envelope's dotNet property to true as the web service we'll be consuming runs on Microsoft's .NET framework.
envelope.dotNet = true;
Step 2: Configuring the Envelope
It is now time to configure the SOAP envelope by setting the request information. Start by importing the SoapObject class (org.ksoap2.serialization.SoapObject) and take a look at the code snippet below to see how to configure the envelope. We start by creating an instance of the SoapObject class, which requires two parameters, a namespace and a method name. You can add additional properties to the request using the addProperty method as shown below. In our example, I use addProperty to add the value in degrees Fahrenheit to the request.
String methodname = "FahrenheitToCelsius";
SoapObject request = new SoapObject(NAMESPACE, methodname);
request.addProperty("Fahrenheit", fValue);
You may be wondering where NAMESPACE is coming from. It's a private static string that is defined elsewhere in the application as you can see below.
private static final String NAMESPACE = "http://www.w3schools.com/webservices/";
Step 3: Creating the Request
To send the request to the web service, we need to create an HTTP transport request. We'll use the HttpTransportSE class (org.ksoap2.transport.HttpTransportSE) for this. Take a look at the example below.
HttpTransportSE ht = getHttpTransportSE();
As you may have guessed, getHttpTransportSE is another helper method and allows you to quickly create an HTTP transport object. It makes it less tedious to create an HTTP transport object every time you make a web service call. Take a look at its implementation below. To create an HttpTransportSE instance, we only need the base URL of the web service, which is another private static string as you can see below.
private final HttpTransportSE getHttpTransportSE() {
    HttpTransportSE ht = new HttpTransportSE(Proxy.NO_PROXY,MAIN_REQUEST_URL,60000);
    ht.debug = true;
    ht.setXmlVersionTag("<!--?xml version=\"1.0\" encoding= \"UTF-8\" ?-->");
    return ht;
}
private static final String MAIN_REQUEST_URL = "http://www.w3schools.com/webservices/tempconvert.asmx";
In getHttpTransportSE, we also configure the HttpTransportSE object. By passing Proxy.NO_PROXY as the first argument of the constructor, we specify that no proxy is used for the request. The third argument of the constructor sets the session timeout in milliseconds. To make debugging easier, we also set the object's debug property to true. Any issues that pop up are logged to LogCat.
Step 4: Sending the Request
It is time to send the SOAP request to the web service. We do this over HTTP using the transport and envelope objects we created earlier. The HTTP transport object has a call method, which is used to add the SOAP action and envelope that we created earlier.
ht.call(SOAP_ACTION, envelope);
SOAP_ACTION is another private static string as you can see below.
private static final String SOAP_ACTION = "http://www.w3schools.com/webservices/FahrenheitToCelsius";
Step 5: Processing the Response
When the web service sends back a response, we'll need to process it and handle any errors that may have been thrown. We can then display the data to the user. Take a look at the code snippet below in which we extract the response from the response envelope using the getResponse method.
SoapPrimitive resultsString = (SoapPrimitive)envelope.getResponse();
I'm using a SoapPrimitive type, but you can also use a SoapObject instance if the response from the web service is XML. You can then use the SoapObject instance to get the response values and store them in an array. Call toString on the SoapPrimitive object to convert the response to a simple string to use it in your application.
Take a look at the next code snippet in which I've implemented a method getCelsiusConversion. The method accepts a string variable as its only argument. The variable is added as a property to the SOAP request as we saw earlier in this tutorial. The variable the method consumes is the value in degrees Fahrenheit. This value is sent to and processed by the web service and we get back a response in degrees Celsius.
public String getCelsiusConversion(String fValue) {
        String data = null;
        String methodname = "FahrenheitToCelsius";

        SoapObject request = new SoapObject(NAMESPACE, methodname);
        request.addProperty("Fahrenheit", fValue);

        SoapSerializationEnvelope envelope = getSoapSerializationEnvelope(request);

        HttpTransportSE ht = getHttpTransportSE();
        try {
            ht.call(SOAP_ACTION, envelope);
            testHttpResponse(ht);
            SoapPrimitive resultsString = (SoapPrimitive)envelope.getResponse();

            List COOKIE_HEADER = (List)      ht.getServiceConnection().getResponseProperties();

            for (int i = 0; i < COOKIE_HEADER.size(); i++) {
                String key = COOKIE_HEADER.get(i).getKey();
                String value = COOKIE_HEADER.get(i).getValue();

                if (key != null && key.equalsIgnoreCase("set-cookie")) {
                    SoapRequests.SESSION_ID = value.trim();
                    Log.v("SOAP RETURN", "Cookie :" + SoapRequests.SESSION_ID);
                    break;
                }
            }
            data = resultsString.toString();

        } catch (SocketTimeoutException t) {
            t.printStackTrace();
        } catch (IOException i) {
            i.printStackTrace();
        } catch (Exception q) {
            q.printStackTrace();
        }
   return data;
}
I use two strings in getCelsiusConversion, data and methodname. The data variable will be returned by the method after the web service sent back a response, while methodname stores the name of the operation of the the web service that we'll target and is used in the SoapObject instance.
You may have noticed the for loop in getCelsiusConversion, which isn't part of the steps we've discussed earlier. When working with more complex web services, it is important to keep track of the current session. In the snippet below, I store the session and keep track of it each time I make a call to the web service.
for (int i = 0; i < COOKIE_HEADER.size(); i++) {
    String key = COOKIE_HEADER.get(i).getKey();
    String value = COOKIE_HEADER.get(i).getValue();
    if (key != null && key.equalsIgnoreCase("set-cookie")) {
        SoapRequests.SESSION_ID = value.trim();
        Log.v("SOAP RETURN", "Cookie :" + SoapRequests.SESSION_ID);
        break;
    }
}
4. Creating the user interface
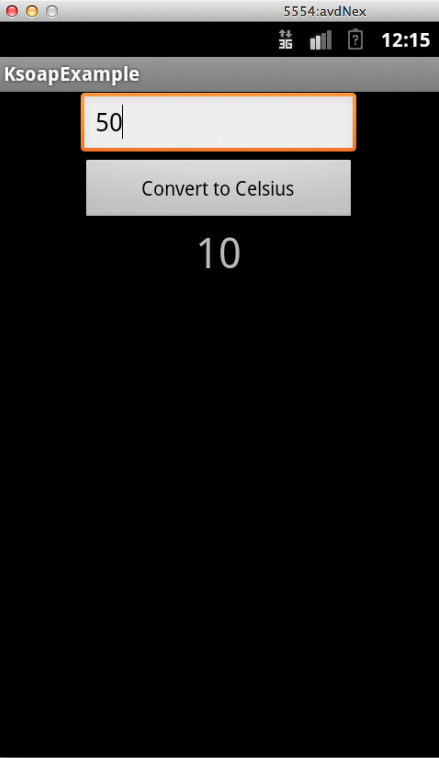
Now that the hard work is behind us, it is time to make use of what we just created. To conclude this tutorial, I'll show you how to create a simple user interface for converting a value in degrees Fahrenheit to a value in degrees Celsius and display the result on the user's device.
Step 1: Create the layout
First, we need to create an XML file in the project's layout folder. Take a look at the code snippet below. It is a simple illustration of a user interface created in XML.
<?xml version="1.0" encoding="utf-8"?>
<LinearLayout xmlns:android="http://schemas.android.com/apk/res/android"
 android:orientation="vertical"
 android:layout_width="fill_parent"
 android:layout_height="fill_parent" />
<EditText
 android:layout_width="200dp"
 android:layout_height="wrap_content"
 android:layout_gravity="center_horizontal"
 android:hint="Fahrenheit"
 android:inputType="number"
 android:id="@+id/value_to_convert" />

<Button
 android:layout_width="200dp"
 android:layout_height="wrap_content"
 android:layout_gravity="center_horizontal"
 android:text="Convert to Celsius"
 android:id="@+id/convert" />

<TextView
 android:layout_width="fill_parent"
 android:layout_height="wrap_content"
 android:gravity="center_horizontal"
 android:textSize="30dp"
 android:id="@+id/answer" />
</LinearLayout>
We create three components, an EditText instance, a Button instance, and a TextView instance. The EditText instance is used to enter and capture the value that we intend to send to the web service. The button is used to run the thread that invokes getCelsiusConversion and the text view displays the response we get back from the web service.
Step 2: Create the Activity
The next step is creating an Activity instance to display the layout we just created. Take a look at the following code snippet. This shouldn't be too surprising if you've developed Android applications before.
package com.example.KsoapExample;

import android.app.Activity;
import android.os.Bundle;

public class MyActivity extends Activity {
    /**
    * Called when the activity is first created.
    */
    @Override
    public void onCreate(Bundle savedInstanceState) {
        super.onCreate(savedInstanceState);
        setContentView(R.layout.main);
    }
}
Now that we've taken care of the user interface, we can tie everything together. Take a look at the next code snippet to see how this is done.
package com.example.KsoapExample;

import android.app.Activity;
import android.os.Bundle;

public class MyActivity extends Activity {
    private TextView txt;
    private String celsius;
    /**
     * Called when the activity is first created.
     */
    @Override
    public void onCreate(Bundle savedInstanceState) {
        super.onCreate(savedInstanceState);
        setContentView(R.layout.main);

        final EditText edt = (EditText)findViewById(R.id.value_to_convert);
        Button btn = (Button)findViewById(R.id.convert);
        txt = (TextView)findViewById(R.id.answer);

        btn.setOnClickListener(new View.OnClickListener() {
            @Override
            public void onClick(View v) {
                if (edt.length() > 0) {
                    getCelsius(edt.getText().toString());
                } else {
                    txt.setText("Fahrenheit value can not be empty.");
                }
            }
        });
    }
}
In onCreate, we set a listener on the button, btn. We also double-check that a value is entered in the input field before sending it to the web service. In the button click listener, the value passed to getCelsius is cast to a string as the web service expects a string value. The implementation of getCelsius isn't difficult as you can see below.
private final void getCelsius(final String toConvert) {
    new Thread(new Runnable() {

        @Override
        public void run() {
            SoapRequests ex = new SoapRequests();
            celsius = ex.getCelsiusConversion(toConvert);
            handler.sendEmptyMessage(0);
            }
    }).start();
}
In getCelsius, a new thread is created, which runs and creates an instance of the class that implements getCelsiusConversion. When we receive a response from the web service, we send a message to a handler to update the user interface by displaying the value in degrees Celsius to the user.
public Handler handler = new Handler(new Handler.Callback() {

    @Override
    public boolean handleMessage(Message msg) {
        switch (msg.what) {

            case 0:
                txt.setText(celsius);
                break;
        }
        return false;
    }
});
In the handler, we update the TextView instance with the value we received from the web service. Take a look at the final result below.
Conclusion
You should now be able to add the kSOAP library to a project and leverage it to make requests to a web service that uses the SOAP protocol. Working with the kSOAP library will become easier with a little practice and I therefore encourage you to try the Celsius to Fahrenheit conversion web service. Try out the example Android application that's part of the tutorial for a bit of extra help.

Comments