In this two-part tutorial series, you're learning how to create your very first Ionic 2 app. Now that you've set up your development environment and learned about the development workflow in Ionic 2, it's time to get your hands dirty by coding the app.
If you haven't yet, follow along with the first post to get your development environment set up and to bootstrap your project.

This second part will cover the things you need to know when it comes to coding apps in Ionic 2. You will learn how to create pages for the app, how to get user input, and how to use plugins to access native functionality. Once you're done, you'll be running the app in a device or emulator. But before you get to that, let's take a moment to talk about what you will be creating.
What You'll Be Creating
In this tutorial, you'll be creating a photo sharing app. The basic flow should be as follows:
- User opens the app and logs in. They'll get redirected to the page for picking an image for sharing.
- User clicks on the Pick Image button. The image picker shows up, and the user picks one image. That image will then be previewed.
- User enters a caption and clicks on the Share Image button to pass the image to the Instagram app.
This tutorial will only show you how to run the app on an Android device, but Cordova (the framework that Ionic runs on) is cross-platform. Ionic 2 has built-in themes for Android, iOS, and Windows, so it's easy to create a version of your app for those devices as well.
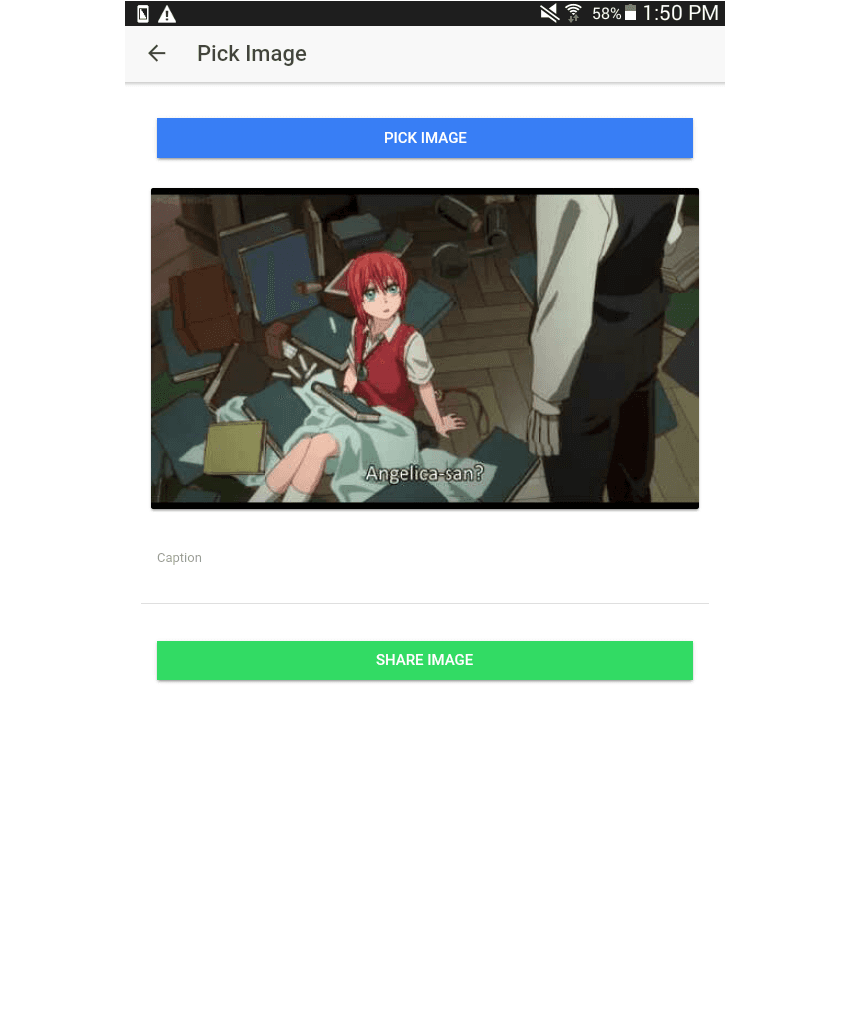
Here's what the app is going to look like:
Project Setup
If you followed along with the previous tutorial then you've already got your Ionic 2 development environment set up and your project scaffolded out. We used the following Ionic 2 CLI commands to create the project folder tree and prepare for deployment to Android:
ionic start photoSharer blank --v2 --id com.tutsplus.photosharer
ionic platform add android
We also installed a couple helpful plugins:
ionic plugin add https://github.com/Telerik-Verified-Plugins/ImagePicker
ionic plugin add cordova-instagram-plugin
Coding the Home Page
For the rest of the tutorial, you'll be primarily be working inside the src folder, so assume that the src folder is the root every time you see a file path. (If you want a refresher on the paths that are created by the Ionic starter template, take a look at the previous tutorial.)
Inside the src directory are four folders:
- app: this is where app-wide code is defined. If you need to run specific code when the app starts, or you want to update the global CSS, then this is the place to go.
- assets: this is where assets such as images used as content for the app go.
- pages: this is where the code for individual pages goes. Every page has its own folder, and inside each folder are three files which define the template (HTML), styling (CSS), and the script (TypeScript) for the page.
- themes: this is where you go if you want to modify the default Ionic 2 theme.
Home Page Template
By default, the Ionic blank starter template already comes with a home page. So all you have to do is edit it to show the content that you want. Open the pages/home/home.html file and clear its current contents. Add the following at the top of the page:
<ion-header>
  <ion-navbar>
    <ion-title>
      Login
    </ion-title>
  </ion-navbar>
</ion-header>
The code above is the boilerplate for the app's header. The <ion-navbar> component serves as a navigational toolbar. It will automatically show a back button whenever you navigate away from the default page. <ion-title> sets the title of the nav bar.
Next is the actual page content. You can define that inside the <ion-content> component. Default padding can be applied by specifying the padding option. Inside that container, create a new list which contains the input fields for entering the username and password. Creating a list to contain edit fields is a standard practice in Ionic—it allows you to stack each field neatly on top of each other. Below the list is the button for logging in.
<ion-content padding>

  <ion-list>
    <ion-item>
      <ion-label>Username</ion-label>
      <ion-input type="text" [value]="username" [(ngModel)]="username"></ion-input>
    </ion-item>

    <ion-item>
      <ion-label>Password</ion-label>
      <ion-input type="password" [value]="password" [(ngModel)]="password"></ion-input>
    </ion-item>
  </ion-list>

  <div padding>
    <button ion-button full (click)='login();'>Login</button>
  </div>
</ion-content>
Let's take a moment to look at the code for entering text and clicking a button. In Ionic, you can define a text input fields using the <ion-input> component. To bind the text field to a class property defined in your page script, use [(ngModel)]. Then the value assigned to it is the name of the class property.
To set up two-way data binding, you can set [value] to the same property name used for the [(ngModel)]. This allows you to update the value of the text field by changing the value of the model from the page script. Later on, you'll see how to define a class property inside the page script.
<ion-input type="text" [value]="username" [(ngModel)]="username"></ion-input>
To define buttons, use the standard button element in HTML. If you're wondering why it's not <ion-button>, it's because of accessibility reasons. Buttons are a crucial interface component, so the Ionic team decided to stick with the standard HTML buttons to make them accessible. The ion-button directive is instead added to provide additional functionality.
To add a click handler, you use the (click) directive, with a value specifying the function (defined in your page script) to execute when the click event happens.
<button ion-button full (click)='login();'>Login</button>
Home Page Script
Open the pages/home/home.ts file, clear all of its contents, and add the following:
import { Component } from '@angular/core';
import { NavController, AlertController } from 'ionic-angular';

//import { PickerPage } from '../../pages/picker/picker';

@Component({
  templateUrl: 'home.html'
})
export class HomePage {

  username: string;
  password: string;

  readonly APP_USERNAME: string = 'me';
  readonly APP_PASSWORD: string = 'secret';

  constructor(public navCtrl: NavController, public alertCtrl: AlertController) {

  }

  login() {
    let alert = this.alertCtrl.create({
      title: 'Login Failed',
      subTitle: 'The username or password you entered is incorrect.',
      buttons: ['OK']
    });

    if (this.username == this.APP_USERNAME && this.password == this.APP_PASSWORD) {
      this.navCtrl.push(PickerPage);
    } else {
      alert.present();
    }
    this.username = '';
    this.password = '';
  }

}
Breaking down the code above, we first import the Angular component class which has all the Ionic directives already baked in.
import { Component } from '@angular/core';
Next, we import the controllers for navigation and alerts from the ionic-angular package. This is where all the Ionic controllers are included.
import { NavController, AlertController } from 'ionic-angular';
After that, we'll import the PickerPage. You'll be creating it later, so leave it commented out for now. Remember to remove the comment once you're ready for it to be loaded.
//import { PickerPage } from '../../pages/picker/picker';
After the imports, use the @Component decorator to specify the HTML template to be used by the script:
@Component({
  templateUrl: 'home.html'
})
Now we can define the class for our home page script. We'll want to export this class so that it can be imported from other files in the app.
export class HomePage {
    ...
}
Make the NavController and AlertController available throughout the class by defining them as parameters in the constructor. This allows you to use this.navCtrl, for example, when you want to use the NavController to navigate to another page.
constructor(public navCtrl: NavController, public alertCtrl: AlertController) {

}
Now we're ready to define properties of our controller that can be referenced from the template. These properties will contain the current value of the text field for username and password:
username: string;
password: string;
To keep things simple, we'll use hard-coded values for the username and password. But for real-world apps, you would usually make a request to a server to authenticate the user.
readonly APP_USERNAME: string = 'me'; // constants in TypeScript are defined by specifying the property to be readonly
readonly APP_PASSWORD: string = 'secret';
Inside the login() function, create an alert for when the user inputs an incorrect username or password:
let alert = this.alertCtrl.create({
  title: 'Login Failed',
  subTitle: 'The username or password you entered is incorrect.',
  buttons: ['OK']
});
If the credentials are incorrect, show the alert:
alert.present();
If the username and password input by the user match the hard-coded values, use the NavController to push the Picker Page into the navigation stack. Whatever page you push into the navigation stack will become the current page, while popping a page effectively navigates to the previous page. This is how navigation works in Ionic 2.
this.navCtrl.push(PickerPage);
Picker Page
Next, you need to create the picker page. As you already know, the standard is to create a separate folder for each page, and each folder will have three files in it. Thankfully, the Ionic CLI also comes with a command that allows us to create new pages:
ionic g page pickerPage
This uses the generate command, which will create the page folder with those three files inside. Best of all, each file already comes with some boilerplate code that you can start with.
Picker Page Template
Once that's done, open the pages/picker/picker.html file and replace the boilerplate code with the following:
<ion-header>
  <ion-navbar>
    <ion-title>Pick Image</ion-title>
  </ion-navbar>
</ion-header>

<ion-content padding>

  <div padding>
    <button ion-button full (click)='pickImage();'>Pick Image</button>
  </div>

  <ion-card text-center>
    <img [src]="picked_image" />
  </ion-card>

  <div class="form-container" [hidden]="!has_picked_image">
    <ion-list>
      <ion-item>
        <ion-label stacked>Caption</ion-label>
        <ion-input type="text" [value]="caption" [(ngModel)]="caption"></ion-input>
      </ion-item>
    </ion-list>
    <div padding>
      <button ion-button full color="secondary" (click)='shareImage();'>Share Image</button>
    </div>
  </div>
</ion-content>
None of this code is really unfamiliar except for the hidden directive and the use of an <ion-card> component.
The hidden directive allows you to hide an element based on a specific value defined in your page script. So if has_picked_image is true, only then will this div be visible.
<div class="form-container" [hidden]="!has_picked_image">
    ...
</div>
The <ion-card> component is used for creating cards. Cards are a great way to display images inside apps.
Picker Page Style
Open the pages/picker/picker.scss file and add the following:
.form-container {
  padding-top: 20px;
}
Picker Page Script
Open the pages/picker/picker.ts file and add the following:
import { Component } from '@angular/core';
import { ImagePicker, Instagram } from 'ionic-native';

@Component({
  templateUrl: 'picker.html'
})
export class PickerPage {

  picked_image: string;
  has_picked_image: boolean = false;
  caption: string;
  readonly DEFAULT_IMAGE: string = 'http://placehold.it/500x500';

  constructor() {
    this.picked_image = this.DEFAULT_IMAGE;
  }

  pickImage() {
    var options = {
      maximumImagesCount: 1,
      width: 500,
      height: 500,
      quality: 50,
      outputType: 1
    };

    ImagePicker.getPictures(options).then((results) => {
      this.picked_image = 'data:image/jpeg;base64,' + results[0];
      this.has_picked_image = true;
    }, (err: any) => {
      console.log(err);
      this.has_picked_image = false;
    });

  }

  shareImage() {
    Instagram.share(this.picked_image, this.caption)
      .then(() => {
        this.picked_image = this.DEFAULT_IMAGE;
        this.has_picked_image = false;
      })
      .catch((error: any) => {
        console.error(error);
      });
  }

}
I'll break this down a bit. First we import the plugins that you installed earlier. Notice that the plugins are all installed under the same package (ionic-native). This is really nice because instead of having to import every single plugin in its own line, you can just do it in a single line.
import { ImagePicker, Instagram } from 'ionic-native';
Next we declare the class properties:
picked_image: string; // the image picked by the user
has_picked_image: boolean = false; // for easily determining whether there's currently an image picked by the user or not
caption: string; // the caption for the image
readonly DEFAULT_IMAGE: string = 'http://placehold.it/500x500'; // the default image
When the Pick Image button is clicked, define the options for the image picker. These options are pretty self-explanatory, but I've added some comments to clarify what each one does.
let options = {
  maximumImagesCount: 1, // the maximum number of images that the user can pick
  width: 500, // the maximum width in which the image will be in once it is picked
  height: 500, // the maximum height in which the image will be in once it is picked
  quality: 50, // the quality of the photo. The value can be up to 100 for 100% quality
  outputType: 1 // what format the results will be in once the user has picked an image.
                // 0 is for file URIs while 1 is for data URIs.
};
Specifying the width and the height doesn't necessarily mean that the resulting image would be using those exact width and height. What it means is that Ionic will use those dimensions as the maximum width or height in such a way that the aspect ratio is still maintained.
We're using data URI as the output type because the Instagram plugin only accepts data URIs. This means you also have to adjust the width, height, and quality to the bare minimum because data URIs can be very long if the quality is high—the entire image is encoded in a URI string! This could make the app crash, so it's always a good practice to stick with lower quality and smaller images when working with data URIs.
Next, use the Image Picker plugin to trigger the image selection screen. Since we're just expecting a single image, we can simply access the first item in the array of results. We also have to prepend the prefix for data URIs.
ImagePicker.getPictures(options).then((results) => {
  this.picked_image = 'data:image/jpeg;base64,' + results[0];
  this.has_picked_image = true;
}, (err: any) => {
  console.log(err);
  this.has_picked_image = false;
});
Finally, when the Share Image button is clicked, the share method provided by the Instagram plugin will trigger the sharing screen in the Instagram app to launch. This will already have the image pre-filled.
The caption won't be copied, though. The Instagram app disabled pre-filled captions and so the caption field will be empty once the Instagram app is opened. As a workaround, the Instagram plugin copies the caption to the clipboard instead. This means that the user can just paste it on the caption text field in the Instagram app instead.
Instagram.share(this.picked_image, this.caption)
  .then(() => {
    this.picked_image = this.DEFAULT_IMAGE;
    this.has_picked_image = false;
  })
  .catch((error: any) => {
    console.error(error);
  });
Bringing Everything Together
The final step is to open the app/app.module.ts file. This is the root module of the app where you define all the pages and providers (such as the default Ionic error handler) that you will use throughout the app.
Make sure all the pages you've created are defined, otherwise you'll get an error when you navigate to a page that hasn't been defined. By default, the HomePage is already defined here, so you just have to add the PickerPage. Just import it at the top of the file and then add it under the declarations and entryComponents array. Note that MyApp is not a page; it's a component that serves as an empty shell for the pages to be loaded in.
import { NgModule, ErrorHandler } from '@angular/core';
import { IonicApp, IonicModule, IonicErrorHandler } from 'ionic-angular';
import { MyApp } from './app.component';
import { HomePage } from '../pages/home/home';
import { PickerPage } from '../pages/picker/picker';

@NgModule({
  declarations: [
    MyApp,
    HomePage,
    PickerPage
  ],
  imports: [
    IonicModule.forRoot(MyApp)
  ],
  bootstrap: [IonicApp],
  entryComponents: [
    MyApp,
    HomePage,
    PickerPage
  ],
  providers: [{provide: ErrorHandler, useClass: IonicErrorHandler}]
})
export class AppModule {}
If you open the app/app.components.ts file, you'll see the following:
import { Component } from '@angular/core';
import { Platform } from 'ionic-angular';
import { StatusBar, Splashscreen } from 'ionic-native';

import { HomePage } from '../pages/home/home';

@Component({
  templateUrl: 'app.html'
})
export class MyApp {
  rootPage = HomePage;

  constructor(platform: Platform) {
    platform.ready().then(() => {
      // Okay, so the platform is ready and our plugins are available.
      // Here you can do any higher level native things you might need.
      StatusBar.styleDefault();
      Splashscreen.hide();
    });
  }
}
This is where you can define the root page—the page that the user will see once they open the app. In this case, the HomePage is the root page. This is also perfect for executing initialization code, since the code in here only gets executed once when the user launches the app. When initializing something (e.g. asking for permission to enable Bluetooth), you'll always want to wait until the platform.ready() event is fired. Only once that event has fired can you be sure that native functions are ready to be called.
Running the App
Now you're ready to run the app on a mobile device or emulator. You can do that by executing the following command:
ionic run android
Be sure that you have a device connected to your computer or that you have a running instance of an emulator when you execute the command above. If it still doesn't work, check that you have enabled USB debugging in your device and run adb devices. That will trigger your computer to connect to your device. Simply agree to the prompt in your device once you see the authentication prompt.
If you want to have a copy of the APK file so you can share it with a friend, you can generate one by executing the following instead:
ionic build android
This will create an android-debug.apk file in the platforms/android/build/outputs/apk folder.
Conclusion
That's it! In this tutorial, you created your very first Ionic 2 app. It's a simple app, and you might even have found it easy. But you learned how to set up an environment for developing Ionic 2 apps, and you learned some basic concepts that you can apply when developing apps in the future. These include getting the current value from a text field, responding to click events, linking images, and using plugins to access native functionality. So pat yourself on the back! You did a good job getting this far.
In the meantime, check out some of our other tutorials on Ionic 2!


If you want an in-depth and practical introduction to the Ionic 2 framework, try our course Getting Started With Ionic 2.
In this course, Reggie Dawson will teach you all about the Ionic framework and will show you how to build a mobile app from scratch. Along the way, you'll learn about the Ionic component library, about programming statically-typed JavaScript with TypeScript, and about integrating an Ionic 2 app with a rich media API.

Comments