
1. What Is Glide?
Glide is a popular open-source Android library for loading images, videos, and animated GIFs. With Glide, you can load and display media from many different sources, such as remote servers or the local file system.
By default, Glide uses a custom implementation of HttpURLConnection to load images over the internet. However, Glide also provides plugins to other popular networking libraries such as Volley or OkHttp.
2. So Why Use Glide?
Developing your own media loading and display functionality in Java can be a real pain: you have to take care of caching, decoding, managing network connections, threading, exception handling, and more. Glide is an easy to use, well planned, well documented, and thoroughly tested library that can save you a lot of precious time—and save you some headaches.
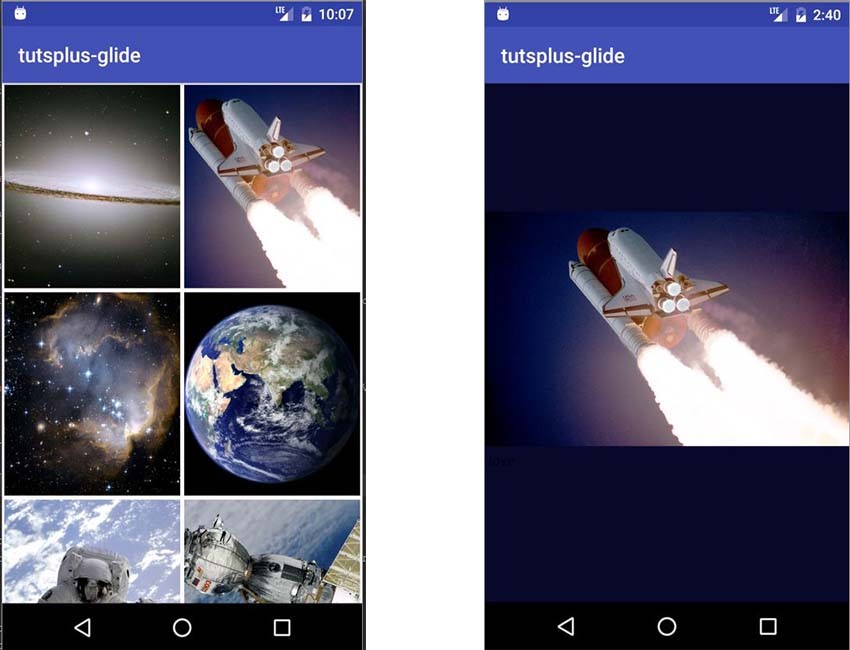
In this tutorial, we'll learn about Glide 3 by building a simple image gallery app. It will load the images via the internet and display them as thumbnails in a RecyclerView, and when a user clicks on any image, it will open a detail activity containing the larger image.
3. Create an Android Studio Project
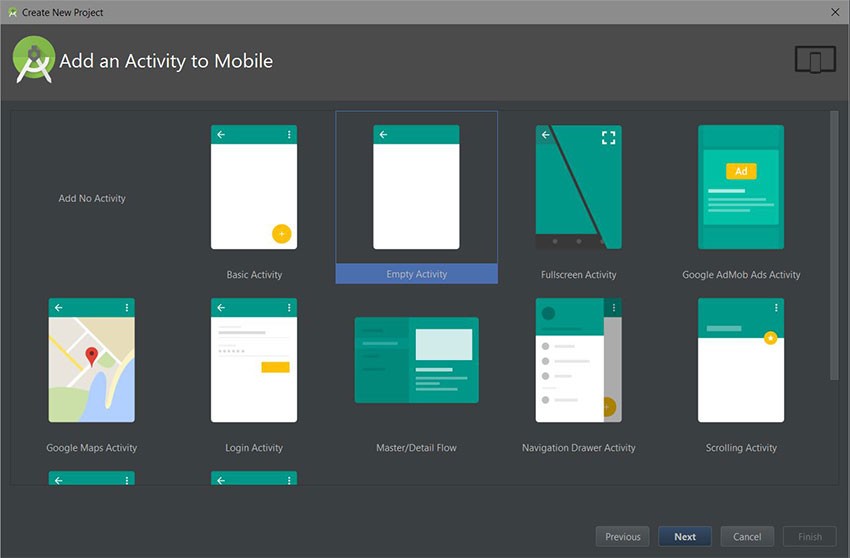
Fire up your Android Studio and create a new project with an empty activity called MainActivity.
4. Declare Dependencies
After creating a new project, specify the following dependencies in your build.gradle.
repositories {
  mavenCentral() // jcenter() works as well because it pulls from Maven Central
}

dependencies {
    // Glide
    compile 'com.github.bumptech.glide:glide:3.7.0'

    // Recyclerview
    compile 'com.android.support:recyclerview-v7:25.1.1'
}
Or with Maven:
<dependency>
  <groupId>com.github.bumptech.glide</groupId>
  <artifactId>glide</artifactId>
  <version>3.7.0</version>
</dependency>
<dependency>
  <groupId>com.google.android</groupId>
  <artifactId>support-v4</artifactId>
  <version>r7</version>
</dependency>
Make sure you sync your project after adding the Glide dependency.
Integration Libraries
If you want to use a networking library such as OkHttp or Volley in your project for network operations, it is recommended you include the specific Glide integration for the library you are using (instead of the default one which bundles HttpURLConnection).
Volley
dependencies {

    compile 'com.github.bumptech.glide:glide:3.7.0'
    compile 'com.github.bumptech.glide:volley-integration:1.4.0@aar'
    compile 'com.mcxiaoke.volley:library:1.0.8'
}
OkHttp
dependencies {

    // okhttp 3
    compile 'com.github.bumptech.glide:okhttp3-integration:1.4.0@aar'
    compile 'com.squareup.okhttp3:okhttp:3.2.0'

    // okhttp 2
    compile 'com.github.bumptech.glide:okhttp-integration:1.4.0@aar'
    compile 'com.squareup.okhttp:okhttp:2.2.0'
}
You can visit the official Glide integration libraries guide for more information.
5. Add Internet Permission
Since Glide is going to perform a network request to load images via the internet, we need to include the permission INTERNET in our AndroidManifest.xml.
<uses-permission android:name="android.permission.INTERNET" />
6. Create the Layout
We'll start by creating our RecyclerView.
<?xml version="1.0" encoding="utf-8"?>
<RelativeLayout
        xmlns:android="http://schemas.android.com/apk/res/android"
        xmlns:tools="http://schemas.android.com/tools"
        android:id="@+id/activity_main"
        android:layout_width="match_parent"
        android:layout_height="match_parent">

    <android.support.v7.widget.RecyclerView
            android:id="@+id/rv_images"
            android:layout_width="match_parent"
            android:layout_height="match_parent"/>
</RelativeLayout>
Creating the Custom Item Layout
Next, let's create the XML layout that will be used for each item (ImageView) within the RecyclerView.
<?xml version="1.0" encoding="utf-8"?>
<LinearLayout xmlns:android="http://schemas.android.com/apk/res/android"
              android:orientation="vertical"
              android:layout_width="match_parent"
              android:layout_height="wrap_content">
<ImageView
        android:id="@+id/iv_photo"
        android:adjustViewBounds="true"
        android:layout_height="200dp"
        android:scaleType="centerCrop"
        android:layout_margin="2dp"
        android:layout_width="match_parent"/>

</LinearLayout>
Now that we have created the layout, the next step is to create the RecyclerView adapter for populating data. Before we do that, though, let's create our simple data model.
7. Create a Data Model
We are going to define a simple data model for our RecyclerView. This model implements Parcelable for high-performance transport of data from one component to another. In our case, data will be transported from SpaceGalleryActivity to SpacePhotoActivity.
import android.os.Parcel;
import android.os.Parcelable;

public class SpacePhoto implements Parcelable {

    private String mUrl;
    private String mTitle;

    public SpacePhoto(String url, String title) {
        mUrl = url;
        mTitle = title;
    }

    protected SpacePhoto(Parcel in) {
        mUrl = in.readString();
        mTitle = in.readString();
    }

    public static final Creator<SpacePhoto> CREATOR = new Creator<SpacePhoto>() {
        @Override
        public SpacePhoto createFromParcel(Parcel in) {
            return new SpacePhoto(in);
        }

        @Override
        public SpacePhoto[] newArray(int size) {
            return new SpacePhoto[size];
        }
    };

    public String getUrl() {
        return mUrl;
    }

    public void setUrl(String url) {
        mUrl = url;
    }

    public String getTitle() {
        return mTitle;
    }

    public void setTitle(String title) {
        mTitle = title;
    }

    public static  SpacePhoto[] getSpacePhotos() {

        return new SpacePhoto[]{
                new SpacePhoto("http://i.imgur.com/zuG2bGQ.jpg", "Galaxy"),
                new SpacePhoto("http://i.imgur.com/ovr0NAF.jpg", "Space Shuttle"),
                new SpacePhoto("http://i.imgur.com/n6RfJX2.jpg", "Galaxy Orion"),
                new SpacePhoto("http://i.imgur.com/qpr5LR2.jpg", "Earth"),
                new SpacePhoto("http://i.imgur.com/pSHXfu5.jpg", "Astronaut"),
                new SpacePhoto("http://i.imgur.com/3wQcZeY.jpg", "Satellite"),
        };
    }

    @Override
    public int describeContents() {
        return 0;
    }

    @Override
    public void writeToParcel(Parcel parcel, int i) {
        parcel.writeString(mUrl);
        parcel.writeString(mTitle);
    }
}
8. Create the Adapter
We'll create an adapter to populate the RecyclerView with data. We'll also implement a click listener to open the detail activity—SpacePhotoActivity—passing it an instance of SpacePhoto as an extra. The detail activity will show a close-up of the image. We'll create it in a later section.
public class MainActivity extends AppCompatActivity {
    // ...
    private class ImageGalleryAdapter extends RecyclerView.Adapter<ImageGalleryAdapter.MyViewHolder>  {

        @Override
        public ImageGalleryAdapter.MyViewHolder onCreateViewHolder(ViewGroup parent, int viewType) {

            Context context = parent.getContext();
            LayoutInflater inflater = LayoutInflater.from(context);
            View photoView = inflater.inflate(R.layout.item_photo, parent, false);
            ImageGalleryAdapter.MyViewHolder viewHolder = new ImageGalleryAdapter.MyViewHolder(photoView);
            return viewHolder;
        }

        @Override
        public void onBindViewHolder(ImageGalleryAdapter.MyViewHolder holder, int position) {

            SpacePhoto spacePhoto = mSpacePhotos[position];
            ImageView imageView = holder.mPhotoImageView;
        }

        @Override
        public int getItemCount() {
            return (mSpacePhotos.length);
        }

        public class MyViewHolder extends RecyclerView.ViewHolder implements View.OnClickListener {

            public ImageView mPhotoImageView;

            public MyViewHolder(View itemView) {

                super(itemView);
                mPhotoImageView = (ImageView) itemView.findViewById(R.id.iv_photo);
                itemView.setOnClickListener(this);
            }

            @Override
            public void onClick(View view) {

                int position = getAdapterPosition();
                if(position != RecyclerView.NO_POSITION) {
                    SpacePhoto spacePhoto = mSpacePhotos[position];
                    Intent intent = new Intent(mContext, SpacePhotoActivity.class);
                    intent.putExtra(SpacePhotoActivity.EXTRA_SPACE_PHOTO, spacePhoto);
                    startActivity(intent);
                }
            }
        }

        private SpacePhoto[] mSpacePhotos;
        private Context mContext;

        public ImageGalleryAdapter(Context context, SpacePhoto[] spacePhotos) {
            mContext = context;
            mSpacePhotos = spacePhotos;
        }
    }
}
9. Loading Images From a URL
This is where we need Glide to do its job—to fetch images from the internet and display them in the individual ImageViews, using our RecyclerView onBindViewHolder() method as the user scrolls the app.
// ...
@Override
public void onBindViewHolder(MyViewHolder holder, int position) {
    Photo photo = mPhotoList.get(position);
    ImageView imageView = holder.mPhotoImageView;

     Glide.with(mContext)
            .load(spacePhoto.getUrl())
            .placeholder(R.drawable.ic_cloud_off_red)
            .into(imageView);
}
// ...
Step by step, here are what the calls to Glide are doing:
-
with(Context context): we begin the load process by first passing our context into thewith()method. -
load(String string): the image source is specified as either a directory path, a URI, or a URL. -
placeholder(int resourceId): a local application resource id, preferably a drawable, that will be a placeholder until the image is loaded and displayed.
-
into(ImageView imageView): the target image view into which the image will be placed.
Be aware that Glide can also load local images. Just pass either the Android resource id, the file path, or a URI as an argument to the load() method.
Image Resizing and Transformation
You can resize the image before it is displayed in the ImageView with Glide's .override(int width, int height) method. This is useful for creating thumbnails in your app when loading a different image size from the server. Note that the dimensions are in pixels not dp.
The following image transformations are also available:
-
fitCenter(): scales the image uniformly (maintaining the image's aspect ratio) so that the image will fit in the given area. The entire image will be visible, but there might be vertical or horizontal padding. -
centerCrop(): scales the image uniformly (maintaining the image's aspect ratio) so that the image fills up the given area, with as much of the image showing as possible. If needed, the image will be cropped horizontally or vertically to fit.
10. Initializing the Adapter
Here we create our RecyclerView with GridLayoutManager as the layout manager, initialize our adapter, and bind it to the RecyclerView.
// ...
@Override
protected void onCreate(Bundle savedInstanceState) {
    super.onCreate(savedInstanceState);
    setContentView(R.layout.activity_main);

    RecyclerView.LayoutManager layoutManager = new GridLayoutManager(this, 2);
    RecyclerView recyclerView = (RecyclerView) findViewById(R.id.rv_images);
    recyclerView.setHasFixedSize(true);
    recyclerView.setLayoutManager(layoutManager);

    ImageGalleryAdapter adapter = new ImageGalleryAdapter(this, SpacePhoto.getSpacePhotos());
    recyclerView.setAdapter(adapter);

}
// ...
11. Creating the Detail Activity
Create a new activity and name it SpacePhotoActivity. We get the SpacePhoto extra and load the image with Glide as we did before. Here we are expecting the file or URL to be a Bitmap, so we'll use asBitmap() to makes that Glide receives a Bitmap. Otherwise the load will fail and the .error() callback will be triggered—causing the drawable resource returned from the error callback to be shown.
You could also use asGif() if you wanted to ensure that your loaded image was a GIF. (I'll explain how GIFs work in Glide shortly.)
import android.graphics.Bitmap;
import android.graphics.Color;
import android.os.Bundle;
import android.support.v7.app.AppCompatActivity;
import android.support.v7.graphics.Palette;
import android.view.ViewGroup;
import android.widget.ImageView;
import com.bumptech.glide.Glide;
import com.bumptech.glide.request.RequestListener;
import com.bumptech.glide.request.target.Target;

public class SpacePhotoActivity extends AppCompatActivity {

    public static final String EXTRA_SPACE_PHOTO = "SpacePhotoActivity.SPACE_PHOTO";
    private ImageView mImageView;

    @Override
    protected void onCreate(Bundle savedInstanceState) {
        super.onCreate(savedInstanceState);
        setContentView(R.layout.activity_photo_detail);

        mImageView = (ImageView) findViewById(R.id.image);
        SpacePhoto spacePhoto = getIntent().getParcelableExtra(EXTRA_SPACE_PHOTO);

        Glide.with(this)
                .load(spacePhoto.getUrl())
                .asBitmap()
                .error(R.drawable.ic_cloud_off_red)
                .diskCacheStrategy(DiskCacheStrategy.SOURCE)
                .into(mImageView);
    }
}
Note that we also initialized a unique cache for the loaded images: DiskCacheStrategy.SOURCE. I'll explain more about caching in a later section.
The Detail Layout
Here's a layout to display the detail activity. It just displays a scrollable ImageView that will show the full-resolution version of the loaded image.
<?xml version="1.0" encoding="utf-8"?>
<LinearLayout
        xmlns:android="http://schemas.android.com/apk/res/android"
        android:layout_width="match_parent"
        android:layout_height="match_parent"
        android:orientation="vertical">

    <ScrollView
            android:layout_width="match_parent"
            android:layout_height="match_parent">

        <LinearLayout
                android:id="@+id/activity_character"
                android:layout_width="match_parent"
                android:layout_height="wrap_content"
                android:orientation="vertical"
                android:layout_gravity="center_vertical">

            <ImageView
                    android:id="@+id/image"
                    android:layout_width="match_parent"
                    android:layout_height="wrap_content"
                    android:adjustViewBounds="true"
                    android:scaleType="fitCenter"/>

        </LinearLayout>
    </ScrollView>
</LinearLayout>
12. Caching in Glide
If you watch closely, you'll see that when you revisit an image that was previously loaded, it loads even faster than before. What made it faster? Glide's caching system, that's what.
After an image has been loaded once from the internet, Glide will cache it in memory and on disk, saving repeated network requests and permitting faster retrieval of the image. So, Glide will first check if an image is available in either memory or on the disk before loading it from the network.
Depending on your application, though, you might want to avoid caching—for example if the images being displayed are likely to change often and not to be reloaded.
So How Do You Disable Caching?
You can avoid memory caching by calling .skipMemoryCache(true). But be aware that the image will still be cached on the disk—to prevent that also, you use the .diskCacheStrategy(DiskCacheStrategy strategy) method, which takes one of the following enum values:
-
DiskCacheStrategy.NONE: no data is saved to cache. -
DiskCacheStrategy.SOURCE: original data saved to cache. -
DiskCacheStrategy.RESULT: saves the result of the data after transformations to cache. -
DiskCacheStrategy.ALL: caches both original data and transformed data.
To avoid both memory and disk caching altogether, just call both methods one after the other:
Glide.with(this)
        .load(spacePhoto.getUrl())
        .asBitmap()
        .skipMemoryCache(true)
        .diskCacheStrategy(DiskCacheStrategy.NONE)
        .into(imageView);
13. Request Listeners
In Glide, you can implement a RequestListener to monitor the status of the request you made as the image loads. Only one of these methods will be called.
-
onException(): triggered whenever an exception occurs so you can handle exceptions in this method. -
onResourceReady(): fired when the image is loaded successfully.
Going back to our image gallery app, let's modify the display a little by using a RequestListener object that will set the bitmap to the ImageView and also change the background colour of the layout by extracting the dark and vibrate colour of our image using the Android Palette API.
// ...
@Override
protected void onCreate(Bundle savedInstanceState) {
    // ...
    Glide.with(this)
            .load(spacePhoto.getUrl())
            .asBitmap()
            .error(R.drawable.ic_cloud_off_red)
            .listener(new RequestListener<String, Bitmap>() {

                @Override
                public boolean onException(Exception e, String model, Target<Bitmap> target, boolean isFirstResource) {
                    return false;
                }

                @Override
                public boolean onResourceReady(Bitmap resource, String model, Target<Bitmap> target, boolean isFromMemoryCache, boolean isFirstResource) {

                    onPalette(Palette.from(resource).generate());
                    mImageView.setImageBitmap(resource);

                    return false;
                }

                public void onPalette(Palette palette) {
                    if (null != palette) {
                        ViewGroup parent = (ViewGroup) mImageView.getParent().getParent();
                        parent.setBackgroundColor(palette.getDarkVibrantColor(Color.GRAY));
                    }
                }
            })
            .diskCacheStrategy(DiskCacheStrategy.SOURCE)
            .into(mImageView);
}
// ...
Here you could also hide a progress dialog if you had one. With this last change, make sure to include the Palette dependency in your build.gradle:
dependencies {
    // ...
    compile 'com.android.support:palette-v7:25.1.1'
}
14. Testing the App
Finally, you can run the app! Click on a thumbnail to get a full-sized version of the image.
15. Animations
If you run the app, you will notice a crossfade animation that happens while the image is being displayed. Glide has this enabled by default, but you can disable it by calling dontAnimate(), which will just cause the image to be displayed without any animation.
You can also customize the crossfade animation by calling crossFade(int duration), passing the duration in milliseconds to either speed it up or slow it down—300 milliseconds is the default.
Animated GIFs
It's very simple to display an animated GIF in your app using Glide. It works the same as displaying an ordinary image.
ImageView gifImageView = (ImageView) findViewById(R.id.iv_gif);

Glide.with(this)
        .load("http://i.imgur.com/Vth6CBz.gif")
        .asGif()
        .placeholder(R.drawable.ic_cloud_off_red)
        .error(R.drawable.ic_cloud_off_red)
        .into(gifImageView);
If you are expecting the image to be a GIF, call asGif()—this makes sure that Glide receives a GIF, otherwise the load will fail and the Drawable passed to the .error() method will be shown instead.
Playing Video
Unfortunately, Glide does not support video loading and display via URL. Instead it can only load and display videos already stored on the phone. Show a video by passing its URI to the load() method.
Glide.with(context)
      .load(Uri.fromFile(new File("your/video/file/path"))
      .into(imageView)
Conclusion
Great job! In this tutorial, you've built a complete image gallery app with Glide, and along the way learned how the library works and how you can integrate it in your own project. You've also learned how to display both local and remote images, how to show animated GIFs and videos, and how to apply image transformations like resizing. Not only that, but you've seen how easy it is to enable caching, error handling, and custom request listeners.
To learn more about Glide, you can refer to its official documentation. To learn more about coding for Android, check out some of our other courses and tutorials here on Envato Tuts+!


Comments