Building Your Startup With PHP: Scheduling a Meeting
Admin 2015-12-17 11:40:50
What You'll Be Creating
This tutorial is part of the Building Your Startup With PHP series on Tuts+. In this series, I'm guiding you through launching a startup from concept to reality using my Meeting Planner app as a real life example. Every step along the way, we'll release the Meeting Planner code as open source examples you can learn from. We'll also address startup-related business issues as they arise.
All of the code for Meeting Planner is written in the Yii2 Framework for PHP. If you'd like to learn more about Yii2, check out our parallel series Programming With Yii2 at Tuts+. You may also want to check out my knowledge base site for Yii2 questions, The Yii2 Developer Exchange.
In the last six tutorials, we've laid the groundwork of application support in a variety of ways: users, places, contacts, settings, and localization. I bet you'll be as excited as I am that we're finally ready to begin building the schedule a meeting functionality. Thank you for your patience as I've built up the infrastructure for the fun, integral parts of this application.
However, the coding tutorial for supporting the schedule meeting functionality will stretch over at least four episodes. These next two episodes will focus mostly on building support for the basic user experience, choosing the participant, place and date and time for a meeting, and storing this in the database. After that, we'll cover delivering the meeting request via email. We'll return later in the series to optimize and polish the user interface, because it's critical to the success of this product; the main task for this later update will be to eliminate page refreshes in the meeting scheduling process.
Building the functionality for this tutorial required a ton of code—some auto-generated by Yii's Gii, and a lot by hand. Because of the complexity of delivering the initial parts of this feature, I focused on a fairly rudimentary user interface which I'll polish iteratively.
Building this feature touches so many aspects of programming in the Yii2 Framework: Active Record migrations, relations and validations, Gii code generation, Bootstrap, Yii2 JQuery UI extensions and widgets, AJAX, rendering partial views, DRY coding practices, etc. It was difficult to pick and choose what to cover here. You'll notice lots of changes to the repository from earlier tutorial episodes.
If you have questions or comments, please post them below. I do participate in the discussions.
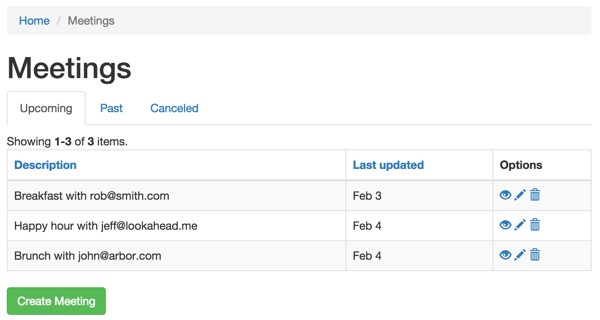
The Meetings Page
Bootstrap Tabs
One of the first things I need to do is build different tabs for Meetings future, past and canceled.
Implementing this is just another example of how great Bootstrap is and how solid the Yii2 integration is with Bootstrap 3.x. Bootstrap has pre-built tabs.
In MeetingController, we pre-load queries for each of the types of meetings and render the index view:
public function actionIndex()
{
  // add filter for upcoming or past
    $upcomingProvider = new ActiveDataProvider([
        'query' => Meeting::find()->joinWith('participants')->where(['owner_id'=>Yii::$app->user->getId()])->orWhere(['participant_id'=>Yii::$app->user->getId()])->andWhere(['Meeting.status'=>[Meeting::STATUS_PLANNING,Meeting::STATUS_CONFIRMED]]),
    ]);
    $pastProvider = new ActiveDataProvider([
        'query' => Meeting::find()->joinWith('participants')->where(['owner_id'=>Yii::$app->user->getId()])->orWhere(['participant_id'=>Yii::$app->user->getId()])->andWhere(['Meeting.status'=>Meeting::STATUS_COMPLETED]),
    ]);
    $canceledProvider = new ActiveDataProvider([
        'query' => Meeting::find()->joinWith('participants')->where(['owner_id'=>Yii::$app->user->getId()])->orWhere(['participant_id'=>Yii::$app->user->getId()])->andWhere(['Meeting.status'=>Meeting::STATUS_CANCELED]),
    ]);

    return $this->render('index', [
        'upcomingProvider' => $upcomingProvider,
        'pastProvider' => $pastProvider,
        'canceledProvider' => $canceledProvider,
    ]);
}
Then, in the index view, we implement our bootstrap code with tab panes:
As we get deeper into this series, I'm going to leave a lot of placeholders of work to do. One of those things is to implement these tab panes via AJAX so we're not loading three queries up front.
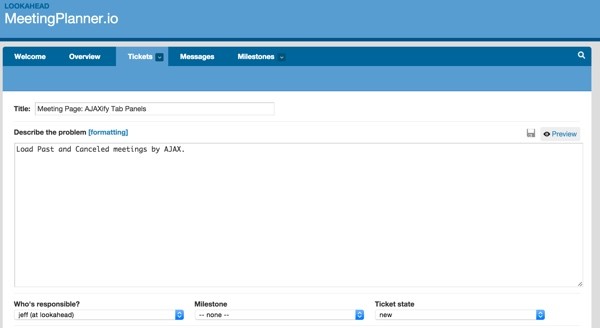
Ticket Tracking
I'm also going to start creating tickets in issue tracking application Lighthouse for my future work to make it more easily trackable. I'll talk about Lighthouse in a future tutorial.
What's Behind Scheduling a Meeting?
The simple task of creating a framework for scheduling a meeting turned out to be quite complex and detailed underneath the hood. I'm going to polish this in stages as we move through the series.
My first goal was to just build the basic framework so I could begin testing the features of meeting scheduling.
Meetings are comprised of a handful of ActiveRecord data models, e.g. Participant, MeetingTime, MeetingPlace, MeetingNote, etc. Initially, I just wanted to use Yii code generation to build out CRUD for each of these models and then integrate it into a single scheduling page.
The idea is to use MVC to build all of these actions, sticking to DRY methodology as much as possible. Initially, the interface will work through page refreshes, but later we'll come back and integrate all of these models via AJAX using the same MVC code.
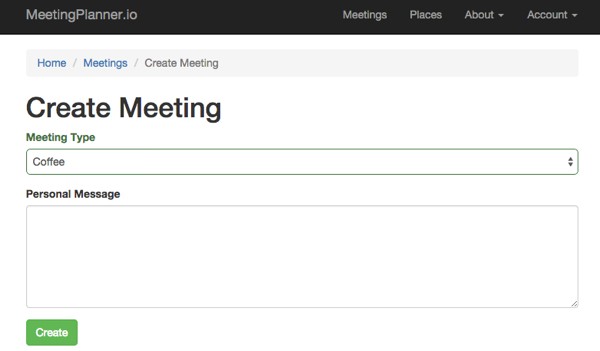
The Create a Meeting Form
For many of the models, I began by going through the process outlined in earlier tutorials of using Yii's code generator, Gii, to build CRUD. Then I customized them as needed. For now, I'm sticking with a very basic create a meeting form—it doesn't even include the participant's email address yet. This allows me to quickly create a basic meeting record and work on the scheduling page.
Once the form is submitted, you can view the Meeting page. Obviously, I will modify this form and the initial process in time.
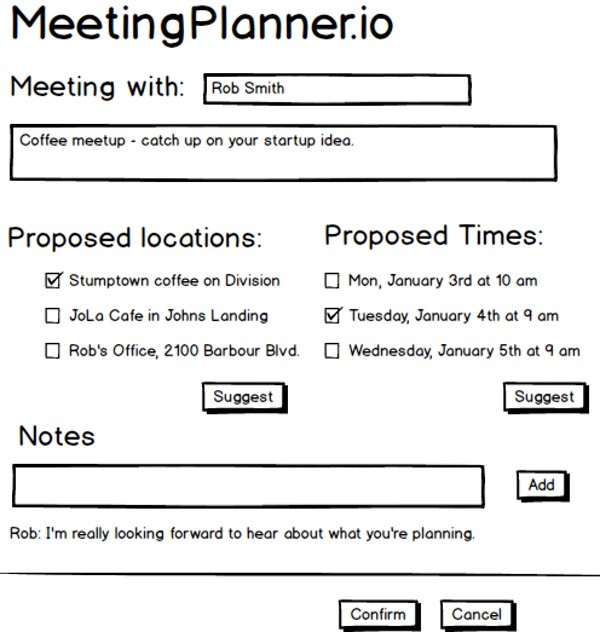
The Meeting Page
Remember my mockup for the first tutorial in this series:
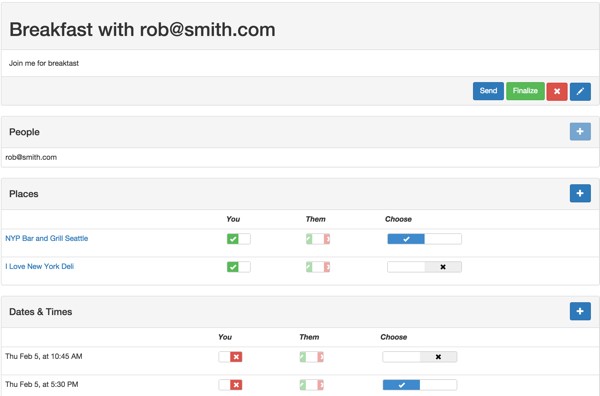
Here's an early take at the form I have working:
There's a ton of infrastructure, code (both auto-generated, manually generated) and third party widgets involved in making this happen. I'm going to walk you through it piece by piece.
Bootstrap Panels and Tables
While not likely the final design, I chose to use Bootstrap Panels to organize the page between properties, places, dates and times and notes. The page itself is rendered by the Meeting controller's View action and calls to partial views to the particular models for each of these.
I didn't have to build it this way, but I purposefully wanted to make use of all of Yii's built-in MVC framework and integrate things as much as possible. My hope was that in the future it will be easier to AJAXify the entire page, reduce page refreshes and increase source code simplicity and maintainability.
Here's how the Meeting controller View action works. It loads ActiveDataProviders for each of the models, and then renders the Meeting view file:
/**
     * Displays a single Meeting model.
     * @param integer $id
     * @return mixed
     */
    public function actionView($id)
    {
      $timeProvider = new ActiveDataProvider([
          'query' => MeetingTime::find()->where(['meeting_id'=>$id]),
      ]);

      $noteProvider = new ActiveDataProvider([
          'query' => MeetingNote::find()->where(['meeting_id'=>$id]),
      ]);

      $placeProvider = new ActiveDataProvider([
          'query' => MeetingPlace::find()->where(['meeting_id'=>$id]),
      ]);

      $participantProvider = new ActiveDataProvider([
          'query' => Participant::find()->where(['meeting_id'=>$id]),
      ]);
      $model = $this->findModel($id);
      $model->prepareView();
        return $this->render('view', [
            'model' => $model,
            'participantProvider' => $participantProvider,
            'timeProvider' => $timeProvider,
            'noteProvider' => $noteProvider,
            'placeProvider' => $placeProvider,
        ]);
    }
Partial Views
By using all the views in each of the associated models, it's fairly easy to display the entire schedule page with MVC partial views. The Meeting view renders all the _panel views for the other models. You can review documentation for Yii2's render method here.
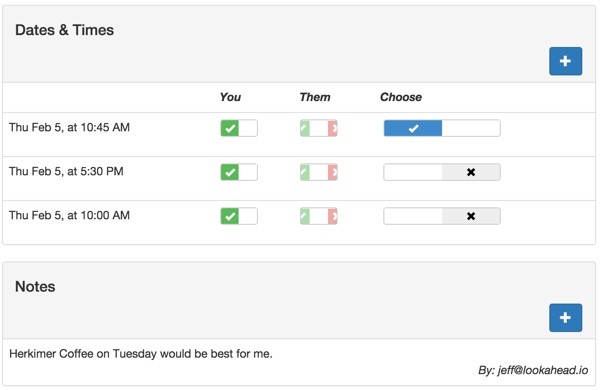
In building this functionality, I realized that I'd neglected a couple of necessary models: MeetingPlaceChoice and MeetingTimeChoice. These are required to store the organizer and participant(s) availability for specific MeetingPlaces and MeetingTimes.
Yii's ActiveRecord migrations make it easy to programmatically extend your database schema as your product progresses.
These models determine the state of the switch widgets (reflecting user availability) you see above in the rows for each place and date time. In the following tutorial, I'm going to walk you through how we initialize those widgets and use AJAX in Yii to update their state without a page refresh.
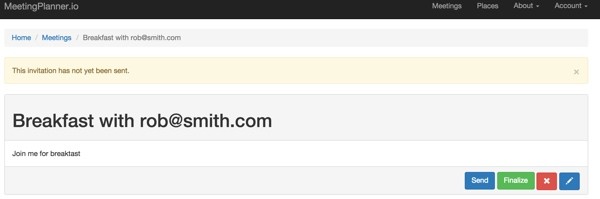
Scheduling Alerts
The PrepareView determines the status of the meeting and if necessary warns the user that the invitation hasn't been sent:
public function prepareView() {
        $this->setViewer();
        $this->canSend();
        $this->canFinalize();
        // has invitation been sent
         if ($this->canSend()) {
           Yii::$app->session->setFlash('warning', Yii::t('frontend','This invitation has not yet been sent.'));
      }
        // to do - if sent, has invitation been opened
        // to do - if not finalized, is it within 72 hrs, 48 hrs
      }
Yii has built-in support for displaying Bootstrap Alerts, called flashes:
Command Buttons
Here's the code for an example Meeting view container with the command buttons shown above:
For the cancel and edit properties buttons, I used Glyphicons. Glyphicons are beautiful and freely included with Bootstrap and integrated with Yii2.
What Do These Commands Do?
Once the user has added a participant and at least one place and date and time, he or she can send the invitation. This functionality will deliver a meeting invitation to the user via email which I'll describe in an upcoming tutorial soon.
The Finalize button allows the organizer (or participant) to change the state of the meeting from planning to upcoming. The idea is that once a place and date time is chosen, the meeting can be "finalized". Prior to this, the participant will have a chance to optionally suggest other places and date times and the organizer (or both of them) will have the option to choose the final place and date time.
The Cancel button will cancel the meeting and move it to the canceled tab on the Meetings page.
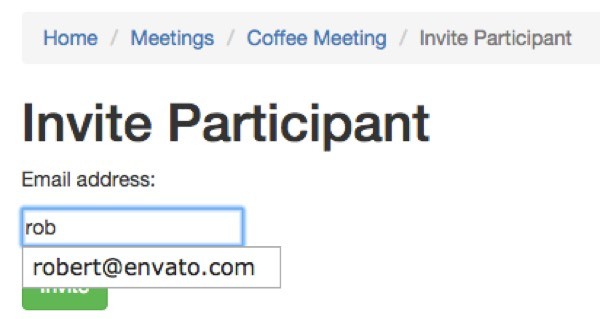
Participants
Next up, the user will add people.
Note: In my minimum viable product, only one participant is allowed but we might add more later.
If you remember the Friends table we created in an earlier tutorial, I'm allowing users to enter a new email address or speed their entry with autocomplete loaded from their existing friends and past meetings.
In the future, we'll have more user interface options here—including frequent participants.
At the top of the Participant controller, we load the friends into an array to be used by the JQuery autocomplete widget—support for which is again, built into Yii2:
/**
     * Creates a new Participant model.
     * If creation is successful, the browser will be redirected to the 'view' page.
     * @return mixed
     */
    public function actionCreate($meeting_id)
    {
      $mtg = new Meeting();
      $title = $mtg->getMeetingTitle($meeting_id);
        $model = new Participant();
        $model->meeting_id= $meeting_id;
        $model->invited_by= Yii::$app->user->getId();
        // load friends for auto complete field
        $friends = Friend::getFriendList(Yii::$app->user->getId());
Here's the _form.php in \frontend\views\participant:
I made the design decision to store all participants in the User table. I may regret this—not sure yet. But it greatly simplifies the process of allowing people to start using the site quickly and simplifying the overall data model.
When a user invites someone unknown to the system (a new email address), we register them passively in the User table.
if ($model->load(Yii::$app->request->post())) {
          if (!User::find()->where( [ 'email' => $model->email ] )->exists()) {
            // if email not already registered
            //  create new user with temporary username & password
            $temp_email_arr[] = $model->email;
            $model->username = Inflector::slug(implode('-', $temp_email_arr));
            $model->password = Yii::$app->security->generateRandomString(12);
            $model->participant_id = $model->addUser();
          } else {
            // add participant from user record
            $usr = User::find()->where( [ 'email' => $model->email ] )->one();
            $model->participant_id = $usr->id;
          }
          // validate the form against model rules
          if ($model->validate()) {
              // all inputs are valid
              $model->save();
              return $this->redirect(['/meeting/view', 'id' => $meeting_id]);
          }
We create a username based on their email address. I use Yii's slug generator in its Inflector helper. We create a random password for now using Yii's Security helper. If I was using vanilla PHP, I'd likely have to integrate other functions for these capabilities. Instead, it's built right in.
Let's move on to adding places.
Places
There are great advantages to using Yii's MVC for each controller and model rather than coding all of this functionality into the Meeting controller. It makes understanding and managing the code much simpler and more organized.
I noticed quickly, however, that I had to customize the default breadcrumbs to link back to the current meeting page rather than the index or view for a specific model.
We're actually using the MeetingPlace model to add places to meetings. In \frontend\views\meeting-place\create.php, I had to simply customize the links in the breadcrumbs area:
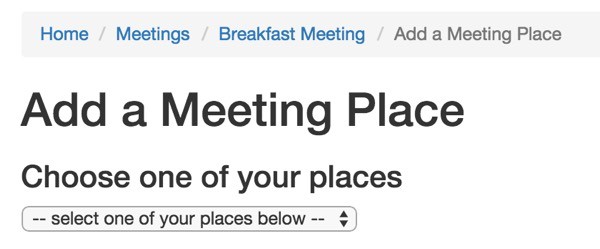
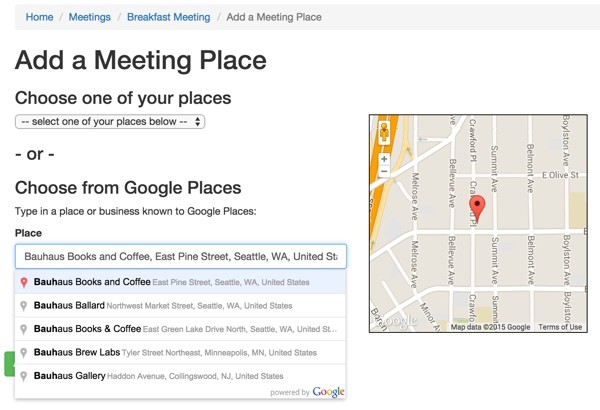
Not only did I want to customize the Place creation form for the user to add previously used places but also for them to add new Google Places on the fly.
I basically had to replicate the support we built in the Google Places tutorial here in MeetingPlace creation:
<?php
use yii\helpers\ArrayHelper;
use yii\helpers\BaseHtml;
use yii\helpers\Html;
use yii\widgets\ActiveForm;
use frontend\models\UserPlace;

use frontend\assets\MapAsset;
MapAsset::register($this);

/* @var $this yii\web\View */
/* @var $model frontend\models\MeetingPlace */
/* @var $form yii\widgets\ActiveForm */
?>

<div class="meeting-place-form">

    <?php $form = ActiveForm::begin(); ?>

    <?= $form->errorSummary($model); ?>

    <h3>Choose one of your places</h3>
    <div class="row">
      <div class="col-md-6">
    <?= Html::activeDropDownList($model, 'place_id',
          ArrayHelper::map(UserPlace::find()->all(), 'place.id', 'place.name'),['prompt'=>Yii::t('frontend','-- select one of your places below --')] ) ?>
    <h3>- or -</h3>
    <h3>Choose from Google Places</h3>
      <p>Type in a place or business known to Google Places:</p>
        <?= $form->field($model, 'searchbox')->textInput(['maxlength' => 255])->label('Place') ?>
      </div>
      <div class="col-md-6">
        <div id="map-canvas">
          <article></article>
        </div>
      </div>
      </div> <!-- end row -->
        <?= BaseHtml::activeHiddenInput($model, 'name'); ?>
        <?= BaseHtml::activeHiddenInput($model, 'google_place_id'); ?>
        <?= BaseHtml::activeHiddenInput($model, 'location'); ?>
        <?= BaseHtml::activeHiddenInput($model, 'website'); ?>
        <?= BaseHtml::activeHiddenInput($model, 'vicinity'); ?>
        <?= BaseHtml::activeHiddenInput($model, 'full_address'); ?>
    <div class="clearfix"></div>
    <div class="row vertical-pad">
      <div class="form-group">
          <?= Html::submitButton($model->isNewRecord ? Yii::t('frontend', 'Add Place') : Yii::t('frontend', 'Update'), ['class' => $model->isNewRecord ? 'btn btn-success' : 'btn btn-primary']) ?>
      </div>
    </div>

    <?php ActiveForm::end(); ?>

</div>
    public function rules()
    {
        return [
            [['meeting_id', 'place_id', 'suggested_by'], 'required'],
            [['meeting_id', 'place_id', 'suggested_by', 'status', 'created_at', 'updated_at'], 'integer'],
            [['place_id'], 'unique', 'targetAttribute' => ['place_id','meeting_id'], 'message'=>Yii::t('frontend','This place has already been suggested.')],
I also added a custom error condition in the MeetingPlaceController create action for if a user chooses places from their list as well as Google Place—although perhaps this would be an optional feature to keep in (have an opinion? post in the comments below):
     public function actionCreate($meeting_id)
     {
       $mtg = new Meeting();
       $title = $mtg->getMeetingTitle($meeting_id);
         $model = new MeetingPlace();
         $model->meeting_id= $meeting_id;
         $model->suggested_by= Yii::$app->user->getId();
         $model->status = MeetingPlace::STATUS_SUGGESTED;
         $posted_form = Yii::$app->request->post();
         if ($model->load($posted_form)) {
          // check if both are chosen and return an error
           if ($model->place_id<>'' and $posted_form['MeetingPlace']['google_place_id']<>'') {
             $model->addErrors(['place_id'=>Yii::t('frontend','Please choose one or the other')]);
             return $this->render('create', [
                  'model' => $model,
                   'title' => $title,
              ]);
           }
I also fixed a bug from episode three which was creating multiple map boxes whenever someone would change the Google Place selection. The check for the number of children existing in the article selector fixed this:
function loadMap(gps,name) {
  if (document.querySelector('article').children.length==0) {
    var mapcanvas = document.createElement('div');
    mapcanvas.id = 'mapcanvas';
    mapcanvas.style.height = '300px';
    mapcanvas.style.width = '300px';
    mapcanvas.style.border = '1px solid black';
    document.querySelector('article').appendChild(mapcanvas);
  }
In the future, this creation form will include a number of important features:
Allow users to add their current geolocation.
Suggest frequent places suggested by the user.
Provide quick access to the user's favorite places.
Suggest places nearby (equidistant) the user and participants.
Suggest sponsored places from paid advertisers.
Allow places and date times to be removed by the organizer—possibly under the condition that they've not been seen or responded to by the participant(s).
It may also be useful to allow users to make notes on specific places and date times. For example, I might designate that "this place will work well for me on Thursday morning but not Friday afternoon" or "if you choose this time, can we do it at Caffe Vita on Capitol Hill". If you have an opinion on this feature (which would add complexity) please post a comment below.
Displaying the Panels
For each of the models we use a similar hierarchy of views and Yii2 components. The Meeting Controller renders the view for _panel.php in \frontend\views\meeting-place:
The outline of the Bootstrap-compatible table is in _panel.php. Then we use the Yii2 Listview widget to display each row of data in a table form. The itemView partial is in _list.php.
Note that we pass through a custom variable called placeCount via viewParams. This is handy for configuring the buttons in the table.
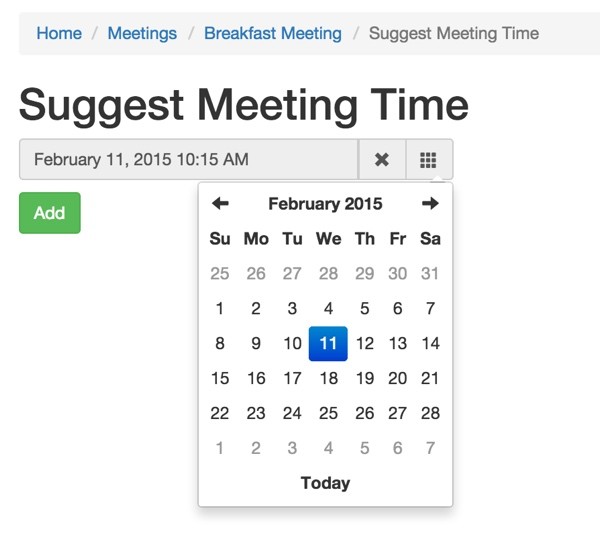
Here's the _list.php view which I'll cover in much more detail in the next tutorial, including switch input widgets and the AJAX implementation.
There are a few enhancements I'd like to make to this widget in the future. I'd like to make it open automatically on load, which it currently doesn't seem to have a setting for.
Again, we use the unique validator to ensure the specific date and time hasn't already been added to the meeting:
public function rules()
    {
        return [
            [['meeting_id', 'start', 'suggested_by'], 'required'],
            [['meeting_id', 'start', 'suggested_by', 'status', 'created_at', 'updated_at'], 'integer'],
            [['start'], 'unique', 'targetAttribute' => ['start','meeting_id'], 'message'=>Yii::t('frontend','This date and time has already been suggested.')],

        ];
    }
On the Meeting view page, the Dates & Times panel is built similarly to Places:
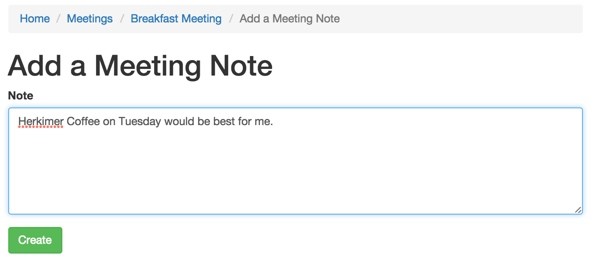
Meeting Notes allow users to communicate back and forth as they suggest and select places and date times, without having to actually email each other separately.
Here's what notes look like on the Meeting page:
The implementation of notes is nearly identical to the above implementation of Places and Date Times. You can review the MeetingNote controller and \frontend\views\meeting-note view files for more information.
What's Next?
I hope you've learned something new with this tutorial. Watch for upcoming tutorials in my Building Your Startup With PHP series—there are lots of fun features coming up.
In the next tutorial, I'll go into depth on implementing the Place and Date Time choices with AJAX. After that, we'll begin building email messages to deliver the message invitations, collect participant responses on the schedule page, and finalize meetings for the real world.
Please feel free to add your questions and comments below; I generally participate in the discussions. You can also reach me on Twitter @reifman or email me directly.


Comments