This tutorial is part of the Building Your Startup With PHP series on Envato Tuts+. In this series, I'm guiding you through launching a startup from concept to reality using my Meeting Planner app as a real-life example. Every step along the way, I'll release the Meeting Planner code as open-source examples you can learn from. I'll also address startup-related business issues as they arise.
In this tutorial, I'll explore choosing an ideal hosting platform for Meeting Planner and the initial configuration of our server. I'll be guiding you through the process as I migrate the pre-launch website to a better production environment for our upcoming alpha launch.
If you haven't tried out Meeting Planner yet, go ahead and schedule your first meeting. I do participate in the comment threads below, so tell me what you think! I'm especially interested if you want to suggest features or topics for future tutorials.
As a reminder, all of the code for Meeting Planner is written in the Yii2 Framework for PHP. If you'd like to learn more about Yii2, check out our parallel series Programming With Yii2.
Selecting a Hosting Company
For many companies, Amazon's AWS is the emerging go-to solution. When AWS goes down, so do many of the web's most well-known services. But AWS is also expensive, often overly complex, and run by a company that has a history of hostility towards employees, especially its female and warehouse workers. Additionally, Amazon has single-handedly pressed the rapid over-development of my hometown Seattle in such a way that has fundamentally changed the city forever, but not necessarily for good.
Recently, I wrote a guide to alternatives to Amazon for cloud computing services. There are a lot of competitors, none as vast, but many better, more affordable, and easier to use. As Meeting Planner grows, I may consider AWS again, but for now I want to look elsewhere.
In the near term, at most, I'll need a server or two running web and database services. For this, managed hosting companies such as Rackspace, Linode, and my favorite Digital Ocean work just fine.
For now, Meeting Planner can run on one server, but as it grows, it's possible I'll need multiple web and database servers. Based on my experience, AWS makes it easier to implement this, but experienced system administrators can easily do this with the aforementioned cloud providers.
This tutorial will guide you through launching a web and database server up in the Digital Ocean clouds.
Working With Digital Ocean
I've written a handful of tutorials about Digital Ocean at Envato Tuts+, including how to use their API for server configuration. I also recently wrote about my positive experience with the Digital Ocean affiliate program. Full disclosure: when asked, Digital Ocean provided a small account credit to cover the droplet costs for this startup series for up to six months.
Over the past two years that I've been a user there, they've consistently incrementally improved their quality of service, user experience, support and feature set. For a while now, it's been extremely rare to experience a slowdown or outage, common in the early cloud hosting market.
Let's get started configuring the initial production server for Meeting Planner.
Configuring a New Droplet
Creating a New Droplet
Digital Ocean instances are called droplets. I'm sure they thought of calling them tadpoles or fish, but we developers are often destroying them, so the non-sentient droplet is a better term.
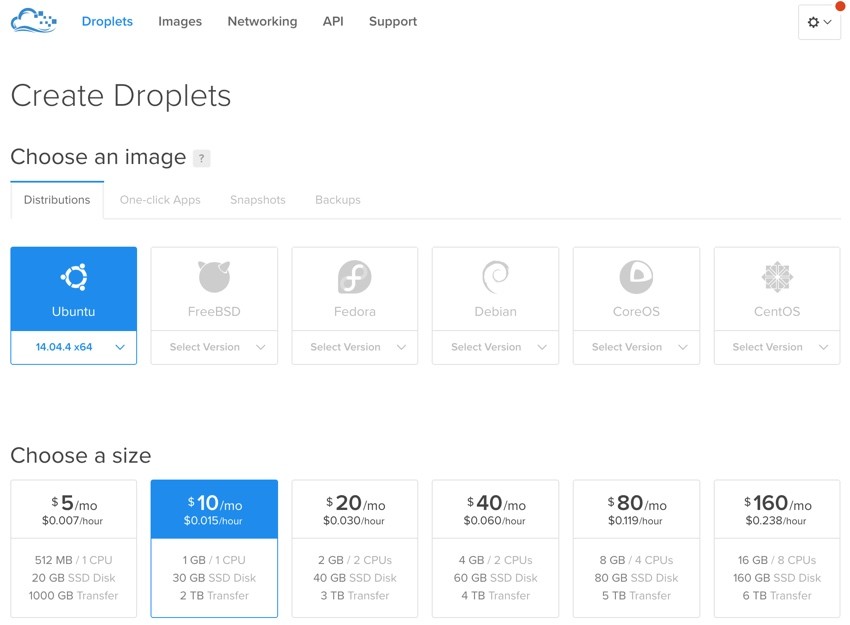
From the Droplets menu, we'll Create a Droplet. First, we choose Ubuntu 14.04 for our image and the $10 per month server option:
Next, I chose the San Francisco region because it's closest to me:
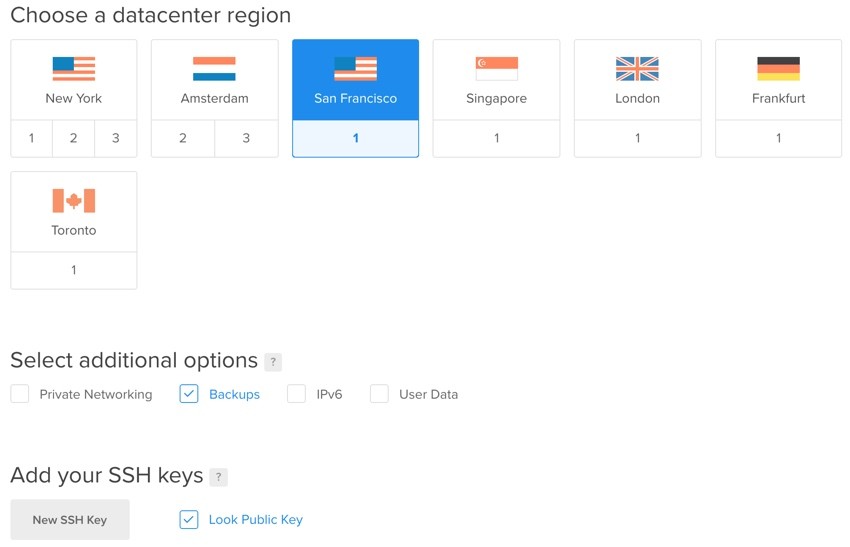
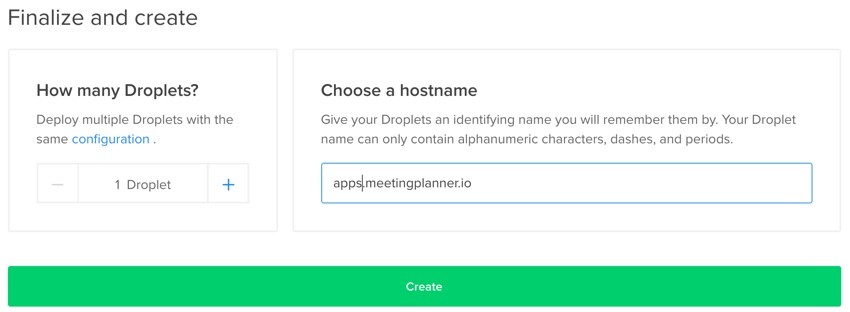
I also asked Digital Ocean to reuse my public key for establishing the login; key login is more secure than password login. Then, I chose the hostname apps.meetingplanner.io for the server:
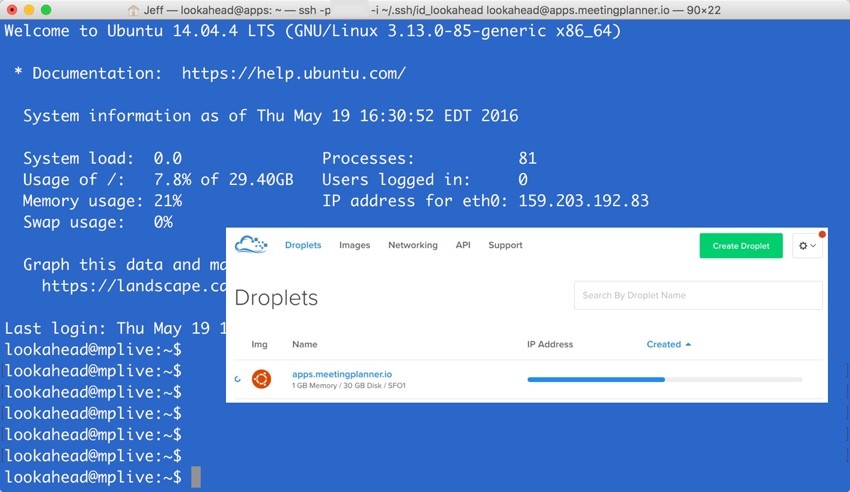
When you click Create, you'll see the droplet being formed:

Once it's ready, you'll be given an IP address, to which I mapped meetingplanner.io domain records for the initial configuration:
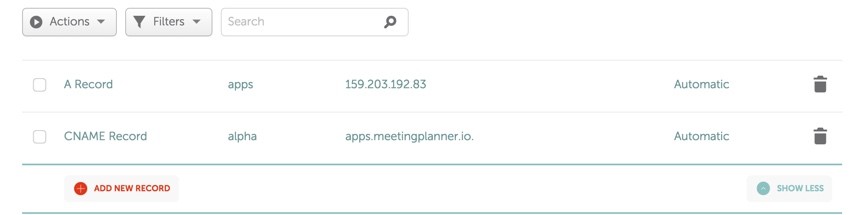
I'll wait until later to map the root meetingplanner.io domain to the new server.
Configuring the Server
Here's what you'll see when you log in to the server the first time:
$ ssh -i ~/.ssh/id_lookahead [email protected]
You are required to change your password immediately (root enforced)
Welcome to Ubuntu 14.04.4 LTS (GNU/Linux 3.13.0-85-generic x86_64)

 * Documentation:  https://help.ubuntu.com/

  System information as of Wed May 18 15:59:01 EDT 2016

  System load: 0.0               Memory usage: 5%   Processes:       54
  Usage of /:  4.2% of 29.40GB   Swap usage:   0%   Users logged in: 0

  Graph this data and manage this system at:
    https://landscape.canonical.com/

0 packages can be updated.
0 updates are security updates.


The programs included with the Ubuntu system are free software;
the exact distribution terms for each program are described in the
individual files in /usr/share/doc/*/copyright.

Ubuntu comes with ABSOLUTELY NO WARRANTY, to the extent permitted by
applicable law.

Changing password for root.
(current) UNIX password:
Enter new UNIX password:
Retype new UNIX password:
Digital Ocean offers a wide variety of helpful guides. I created a new user for my primary non-root account and deployment accounts using this explainer.
I also edited the SSH configuration to eliminate the root login and customize the default SSH port away from 22.
Then, I installed the typical UAMP server (Ubuntu, Apache, PHP and MySQL) on the server. It is possible that I just created a new child acronym of LAMP.
$ sudo apt-get install mysql-server php5-mysql php5 php5-memcached memcached php5-mcrypt
Reading package lists... Done
Building dependency tree
Reading state information... Done
The following extra packages will be installed:
  apache2 apache2-bin apache2-data libaio1 libapache2-mod-php5 libapr1
  libaprutil1 libaprutil1-dbd-sqlite3 libaprutil1-ldap libdbd-mysql-perl
  libdbi-perl libhtml-template-perl libmemcached10 libmysqlclient18
  libterm-readkey-perl mysql-client-5.5 mysql-client-core-5.5 mysql-common
  mysql-server-5.5 mysql-server-core-5.5 php-pear php5-cli php5-common
  php5-json php5-readline ssl-cert
Suggested packages:
  apache2-doc apache2-suexec-pristine apache2-suexec-custom apache2-utils
  libclone-perl libmldbm-perl libnet-daemon-perl libplrpc-perl
  libsql-statement-perl libipc-sharedcache-perl libcache-memcached-perl
  libmemcached tinyca mailx php5-dev php5-user-cache openssl-blacklist
The following NEW packages will be installed:
  apache2 apache2-bin apache2-data libaio1 libapache2-mod-php5 libapr1
  libaprutil1 libaprutil1-dbd-sqlite3 libaprutil1-ldap libdbd-mysql-perl
  libdbi-perl libhtml-template-perl libmemcached10 libmysqlclient18
  libterm-readkey-perl memcached mysql-client-5.5 mysql-client-core-5.5
  mysql-common mysql-server mysql-server-5.5 mysql-server-core-5.5 php-pear
  php5 php5-cli php5-common php5-json php5-memcached php5-mysql php5-readline
  ssl-cert
0 upgraded, 31 newly installed, 0 to remove and 0 not upgraded.
Need to get 15.7 MB of archives.
After this operation, 126 MB of additional disk space will be used.
Do you want to continue? [Y/n] y
Get:1 http://mirrors.digitalocean.com/ubuntu/ trusty/main libaio1 amd64 0.3.109-4 [6,364 B]
Get:2 http://mirrors.digitalocean.com/ubuntu/ trusty/main libapr1 amd64 1.5.0-1 [85.1 kB]
...
Enabling module mpm_prefork.
apache2_switch_mpm Switch to prefork
 * Restarting web server apache2                                                                             [ OK ]
apache2_invoke: Enable module php5
 * Restarting web server apache2                                                                             [ OK ]
Setting up php5 (5.5.9+dfsg-1ubuntu4.16) ...
Processing triggers for libc-bin (2.19-0ubuntu6.7) ...
Then, I configured my default timezone. Meeting Planner runs internally on Pacific Standard Time (PST). I edited php.ini:
sudo nano /etc/php5/apache2/php.ini
And, I added this:
date.timezone = 'America/Los_Angeles'
Now it's time to get our codebase on the server.
Migrating the Code Base and Assets
Installing Git
First, I installed git:
sudo apt-get install git
Then, as my code deployment user, I created a new SSH key to establish a secure connection with GitHub:
ssh-keygen -t rsa -C "[email protected]"
Generating public/private rsa key pair.
Enter file in which to save the key (/home/deploy/.ssh/id_rsa):
Created directory '/home/deploy/.ssh'.
Enter passphrase (empty for no passphrase):
Enter same passphrase again:
Your identification has been saved in /home/deploy/.ssh/id_rsa.
Your public key has been saved in /home/deploy/.ssh/id_rsa.pub.
The key fingerprint is:
f7:84:37:b3:e4:7b:d3:9c:0c:60:b4:b7:4c:86:53:cb [email protected]
The key's randomart image is:
+--[ RSA 2048]----+
|                 |
|           . .   |
|          . = .  |
|           Z A   |
|        + & dd.  |
|         . * X   |
|            +ooo.|
|             .ooo|
|            .. . |
+-----------------+
deploy@apps:/var/www$ eval `ssh-agent -s`
Agent pid 7827
deploy@apps:/var/www$ ssh-add ~/.ssh/id_rsa
Identity added: /home/deploy/.ssh/id_rsa (/home/deploy/.ssh/id_rsa)
deploy@apps:/var/www$ cat < ~/.ssh/id_rsa.pub
ssh-rsa AAAAB3NzaC1yc2EAAAADAQABAAABAQDM8JCAg7aPbB7The4Lmk42BpwPv9Eoc/k7As+N7nh5/JUVKK47AjxqvqeHvtntl8vbsaucNmuIM71OzH+36rbypqskfm2bbUk/bJk2qoqZK9V8Qc931Tj5i4IU9t90UOi55vwdZN0/xeEoJtzrerZn9l7xmJX2Ubarb4yKQSlSgiPHYQWYqD7QEGDtE4iUaqwwDWts/u1eajU/I+SubAyxbnT8WwwaqqA2Pm/N7PakKXgQdSquAdjh3mkvYxtL1kyTm/kFRi5tE/K3PIYfh0aLWhNiXEYnh6fQ2iXYRqT40F1IWEHF0Lv1ig5nTgFEUz2xaqzS18JDXw0lpwvZa3Sp [email protected]
deploy@apps:/var/www$ ssh -T [email protected]
The authenticity of host 'github.com (192.30.252.122)' can't be established.
RSA key fingerprint is 16:27:ac:a5:76:28:2d:36:63:1b:56:4d:eb:df:a6:48.
Are you sure you want to continue connecting (yes/no)? yes
Warning: Permanently added 'github.com,192.30.252.122' (RSA) to the list of known hosts.
Hi newscloud! You've successfully authenticated, but GitHub does not provide shell access.
You also have to paste the key into your Git account settings.
Installing Composer
Next, I installed Composer:
$ curl -sS https://getcomposer.org/installer | sudo php -- --install-dir=/usr/local/bin --filename=composer
composer
I absolutely love composer because it saves so much time, but there are days when I get annoyed with it, when it stops working out of nowhere—such as how the Yii Framework requires you install the fxp/composer-asset-plugin for proper use:
$ composer global require "fxp/composer-asset-plugin:^1.0"
$ composer update
Installing the Meeting Planner Code
Admittedly, I used GitHub to sync the latest code until I remembered that actually Yii2 configures a lot of files that GitHub ignores, including index.php. There are also local key files and uploaded user profile images. So, I used tar to compress the active codebase:
tar czf mp_may2016.tar.gz mp
Then, I used SCP to move the files to the new server, and then I extracted it:
scp -i ~/.ssh/id_lookahead -P 3327 ~/mpmigrate/mp_may2016.tar.gz [email protected]:~
tar -xzf mp_may2016.tar.gz
Ultimately, there was also some work in reviewing the local database keys (which I updated on the new server) and reviewing my file permissions.
Now, let's move the database.
Moving the MySQL Database
First, I dumped the existing database to a file:
$ mysqldump -uroot -p --opt mp > mp_may2016.sql
Then, I moved it to the new server with scp:
$ scp -i ~/.ssh/id_lookahead -P 22533 [email protected]:~/mp_may2016.sql .
On the new server, I created a new database with new details and configured some permissions for Apache:
$ mysql -u root -p
Enter password:
Welcome to the MySQL monitor.  Commands end with ; or \g.
Your MySQL connection id is 43
Server version: 5.5.49-0ubuntu0.14.04.1 (Ubuntu)
Copyright (c) 2000, 2016, Oracle and/or its affiliates. All rights reserved.
Oracle is a registered trademark of Oracle Corporation and/or its
affiliates. Other names may be trademarks of their respective
owners.
Type 'help;' or '\h' for help. Type '\c' to clear the current input statement.
mysql> create database mp_database;
Query OK, 1 row affected (0.00 sec)
mysql> grant all privileges on mp_database.* TO "mp_master"@"localhost" identified by "xYxYZxZx1a";
Query OK, 0 rows affected (0.00 sec)
mysql> flush privileges;
Query OK, 0 rows affected (0.00 sec)
mysql> exit;
Finally, I imported the sql file into the new database:
$ mysql -u root -p mp_database < ~/mp_may2016.sql
Then it was time to configure Apache.
Configuring the Web Server
I created a .conf file on the new server:
$ cd /etc/apache2/sites-available
$ sudo nano 000-mp.conf
I was able to derive much of it from the existing .conf file:
VirtualHost *:80>
 ServerName meetingplanner.io
 ServerAlias www.meetingplanner.io
 ServerAlias alpha.meetingplanner.io
DocumentRoot "/var/www/mp/frontend/web"
<Directory "/var/www/mp/frontend/web">
    # use mod_rewrite for pretty URL support
    RewriteEngine on
    # If a directory or a file exists, use the request directly
    RewriteCond %{REQUEST_FILENAME} !-f
    RewriteCond %{REQUEST_FILENAME} !-d
    # Otherwise forward the request to index.php
    RewriteRule . index.php
</Directory>
</VirtualHost>
Then, I activated the site and reloaded Apache:
sudo a2ensite 000-mp.conf
sudo service apache2 reload
As I mentioned earlier, I had to make sure that the local files with keys and environment paths were correct on the new server.
While there were definitely bumps, ultimately, everything came together.
Migrating the DNS
Finally, I re-mapped the DNS for the core Meeting Planner URL. Soon after, the new server was live:
You may notice that I used my recent tutorial about the amazingly awesome Let's Encrypt: I installed https for Meeting Planner before taking the above screenshot.
Updating cron Tasks
Meeting Planner and Let's Encrypt rely on cron for running key processes in the background. So, I moved my crontab settings over from the old server:
$ sudo crontab -e
# m h  dom mon dow   command
*/5 * * * * wget -O /dev/null http://meetingplanner.io/daemon/update
30 2 * * 1 /opt/letsencrypt/letsencrypt-auto renew >> /var/log/le-renew.log
Read this if you're wondering why I refer to cron in all lowercase.
What's Next?
Meeting Planner's made tremendous progress the past few months. I've scheduled business meetings, and a couple of personal dates chose to schedule second dates with me using the app. Yet there are still a lot of shortcomings—and feedback from early users is vital. So, in the next tutorial, I'm going to be setting up a system for collecting feedback from users, helping them get answers to common questions and learning as much as I can to make the service better before declaring MVP and an alpha launch.
I hope you've enjoyed this episode. Watch for upcoming tutorials in our Building Your Startup With PHP series—there's also lots of polish work and a few more big features coming up.
Please feel free to add your questions and comments below; I generally participate in the discussions. You can also reach me on Twitter @reifman directly.

Comments