This tutorial will teach you how to build a "Kitchen Sink" application for iScroll 4. Building this application will teach you to implement Pinch and Zoom functionality, Custom Scrollbars, Pull to Refresh actions, and Snap/Snap to Element functionality. Along the way, we'll also examine the configuration options for iScroll 4.
This tutorial will build heavily on the Introduction to iScroll 4 post that I published previously. Reading the introductory tutorial isn't strictly necessary before completing this one, but it will help if you are completely unfamiliar with iScroll.
Picking Up Where We Left Off
For this iScroll 4 tutorial, I've decided to restructure the application into a more practical architecture. In my root folder I have an assets directory which contains folders for CSS, Images, Includes, and Javascript. While these folders might not be necessary for the demo I'm building today, you might find the structure handy when building your own applications.
Go ahead and drop the CSS file from the previous tutorial into the assets directory.
Next, I've taken out the initialization of the iScroll function from the main HTML and put it into a main.js file. Make sure that the file is imported into index.html.
Next, rename the index.html file to index.php -just trust me on this for now and I'll explain why we're using PHP later.
Your directory layout should now mirror the following;
- index.php
-
assets
-
css
- styles.css
- img
- inc
-
js
- iscroll.js
- main.js
-
css
In addition to making these structural revisions, I've gone ahead and also split up the code a bit, seperating the header and the footer into the includes folder (inc), that way we don't have to copy and paste for every page we make. I'm using both PHP and SHTML for these snippits.
After being split up, your index.php (not index.html anymore) should look something like this:
<?php include("assets/inc/header.shtml"); ?>

<div id="wrapper">
    <div id="scroll-content">
        <ul>
        <li>Some Stuff</li>
        <li>More Stuff</li>
        <li>Big Stuff</li>
        <li>Small Stuff</li>
        <li>Geek Stuff</li>
        <li>Nerd Stuff</li>
        <li>Fast Stuff</li>
        <li>Slow Stuff</li>
        <li>Good Stuff</li>
        <li>Bad Stuff</li>
        <li>Your Stuff</li>
        <li>My Stuff</li>
        <li>Their Stuff</li>
        <li>Our Stuff</li>
        <li>Super Stuff</li>
        <li>Uber Stuff</li>
        <li>Stuff Stuff</li>
        <li>French Stuff</li>
        <li>German Stuff</li>
        <li>English Stuff</li>
        <li>American Stuff</li>
        <li>Stuff</li>
    </ul>
    </div>
</div>

<?php include("assets/inc/footer.shtml"); ?>
iScroll Configuration Parameters
When I first discussed iScroll, I was looking at the basic scroll functionality that it offers. What wasn't discussed were the multiple parameters that can be passed into iScroll that give you some other custom options.
When we create a new iScroll object, we have the option to pass in a second parameter as a JavaScript configuration object. The configuration options available include:
- hScroll
- vScroll
- hScrollbar
- vScrollbar
- fixedScrollbar
- fadeScrollbar
- hideScrollbar
- bounce
- momentum
- lockDirection
We pass these through to our new iScroll configuration object as the second paremeter. We can pass in just one, or multiple.
function scroll() {
    newScroll = new iScroll('wrapper', { hScrollbar : false, vScrollbar : false });
}
Remember: The options must always be passed in as a JavaScript object.
Now, let's have a look at what the configuration options do and what their default settings are.
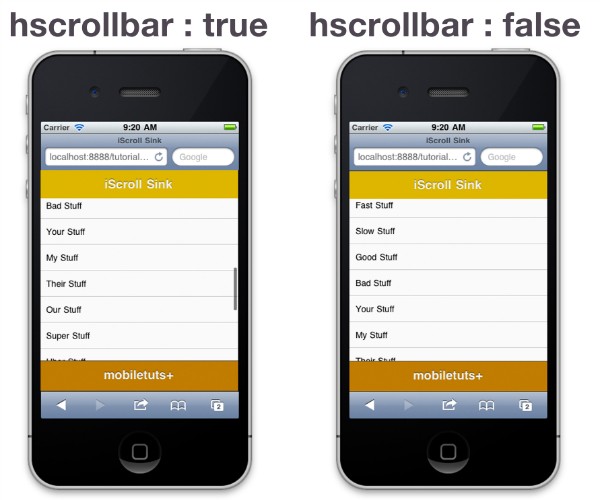
hScroll and vScroll control the horizontal and vertical scrolling (if you hadn't guessed) and by setting either one to false, you can disable them altogether. By default, these are both set to true, so if your content exceeds the wrapper, the user will have the ability to scroll to it.
hScrollbar and vScrollbar these are the options to show and hide the black scrollbar that fades-in and fades-out when scrolling.
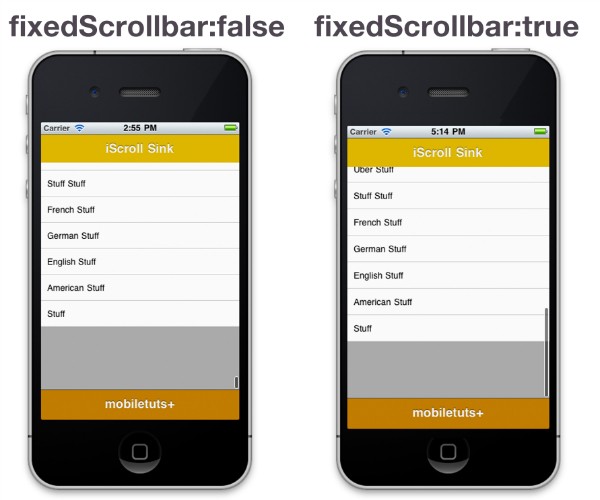
The fixedScrollbar option is the control for how the scrollbar acts when it reaches the end of your scrollable container. By default it is set to false so that when it reaches the end, it shrinks down. When set to true, it remains a fixed height.
fadeScrollbar is set to true by default, but if you would prefer to have the scrollbar just dissapear rather than fade, set this to false.
hideScrollbar is set to true by default, but if you want the scrollbar to remain on the page, set this to false. The scrollbar will now not fade out when the user stops scrolling.
bounce is to set the 'elastic banding' when the user scrolls beyond the content. By default this is set to true. Personally I have found that when using iScroll within a big application, setting this to false has saved a lot of loading time.
momentum controls the inertia of the scrolling. By default it is set to true, but if you want a more controlled scrolling area, set this to false. This is another one of those options that you might want to turn off in big applications as it seems to eat up resources.
lockDirection locks down the scrolling to one axis only. So you can either scroll up and down or left and right at any one time. This is set to true by default, but if you want to allow the user to scroll in either direction at anytime, set it to false.
Those are all the current parameters that can be used with iScroll, so let's go ahead and put the references to them in our kitchen sink app
Adding Pages to the App
Before we can go ahead and start adding pages to our reference app, we need to build on top of what we already had to allow paging. In order to do this quickly, and to explain relatively quickly, I am going to go ahead and include jQuery into the project. I'm not going to use jQuery Mobile for this app, simply because it's a little bit overkill. All we are going to need is the core library.
I've gone ahead and included it in the footer of our project and have used the minified version hosted by Google.
<footer>
    mobiletuts+
</footer>

</body>
<script src="https://ajax.googleapis.com/ajax/libs/jquery/1.6.4/jquery.min.js" type="text/javascript"></script>
<script src="assets/js/iscroll.js"></script>
<script src="assets/js/main.js"></script>

<script type="text/javascript">

</script>
</html>
To get our paging to work I have also made some modifications to the index.php. I have changed the wrapper ID to id="home-wrapper" and added a class of page and current to the home wrapper. I have then added another DIV underneath with a new ID and just the page class. We also need to change scroll-content to a class rather than an ID as there could now be multiple on the page.
Your index.php should look something like the below now:
<?php include("assets/inc/header.shtml"); ?>
<div id="home-wrapper" class="page current">
<div class="scroll-content">
<ul>
<li><a href="#parameters" class="pageLink">Parameters</a></li>
</ul>
</div>
</div>
<div id="parameters" class="page">
<div class="scroll-content">
<ul>
<li>
<a href="#hscroll" class="pageLink">hScroll & vScroll</a>
</li>
<li>
<a href="#fixedScrollbar" class="pageLink">fixedScrollbar</a>
</li>
<li>
<a href="#fadeScrollbar" class="pageLink">fadeScrollbar</a>
</li>
<li>
<a href="#hideScrollbar" class="pageLink">hideScrollbar</a>
</li>
<li>
<a href="#bounce" class="pageLink">bounce</a>
</li>
<li>
<a href="#momentum" class="pageLink">momentum</a>
</li>
<li>
<a href="#lockDirection" class="pageLink">lockDirection</a>
</li>
</ul>
</div>
</div>
<?php include("assets/inc/footer.shtml"); ?>
There are also adjustments needed for the CSS. The wrapper ID rule should now be assigned to the page class, a new rule for the current class sould be added, and the scroll-content should be a class and not an ID. Your CSS should resemble the below now.
body,ul,li {
    padding:0;
    margin:0;
    border:0;
}

body {
    font-family:helvetica;
}

header{
    background-color:#deb500;
    position:absolute;
    z-index:2;
    top:0; left:0;
    width:100%;
    height:45px;
    padding:0;
}

footer {
    background-color:#c27b00;
    position:absolute;
    z-index:2;
    bottom:0; left:0;
    width:100%;
    height:48px;
    padding:0;
    border-top:1px solid #444;
}

header, footer{
    font-size:20px;
    text-align:center;
    color:#f3f3f3;
    font-weight:bold;
    text-shadow:0 -1px 0 rgba(0,0,0,0.5);
    line-height:45px;
}

/*** CHANGES BELOW ***/

.page {
    position:absolute;
    z-index:1;
    top:45px; bottom:48px; left:0;
    width:100%;
    background:#aaa;
    overflow:auto;
    display: none;
}

.page.current{
	display: block;
}

.scroll-content {
    position:absolute;
    z-index:1;
    width:100%;
    padding:0;
}

/*** CHANGES ABOVE ***/

ul {
    list-style:none;
    padding:0;
    margin:0;
    width:100%;
    text-align:left;
}

li {
    padding:0 10px;
    height:40px;
    line-height:40px;
    border-bottom:1px solid #ccc;
    border-top:1px solid #fff;
    background-color:#fafafa;
    font-size:14px;
}
Note that the page is hidden by default and any page with the class of current is shown, this is the beginning of our paging technique.
In our main.js file I have also written a small amount of functionality that basically takes the target of our href and adds the current class to the element. It also removes the current class from the clicked anchor.
This is pretty basic paging for the app. Animating paging, general navigation through a web app, and building up a history object (without using a prebuilt mobile framework) is beyond the scope of this tutorial. If you would like to see a tutorial covering such things, please leave a comment below.
Just for a bit of consistency, I am also going to initialize iScroll inside the jQuery document.ready() function.
$(document).ready(function()
{
	var newScroll = new iScroll('home-wrapper');
	$(".pageLink").bind('click', function(e)
	{
		e.preventDefault();
		var nextPage = $(e.target.hash);
		$(".current").removeClass("current");
		nextPage.addClass("current");
	});
})
Now that we have some navigation through our app, let's go ahead and add some details to our Parameters section. Im going to make a page for each section, that way you can include any notes you may want to keep on that parameter.
<?php include("assets/inc/header.shtml"); ?>
<div id="home-wrapper" class="page current">
<div class="scroll-content">
<ul>
<li><a href="#parameters" class="pageLink">Parameters</a></li>
</ul>
</div>
</div>
<div id="parameters" class="page">
<div class="scroll-content">
<ul>
<li>
<a href="#hscroll" class="pageLink">hScroll & vScroll</a>
</li>
<li>
<a href="#fixedScrollbar" class="pageLink">fixedScrollbar</a>
</li>
<li>
<a href="#fadeScrollbar" class="pageLink">fadeScrollbar</a>
</li>
<li>
<a href="#hideScrollbar" class="pageLink">hideScrollbar</a>
</li>
<li>
<a href="#bounce" class="pageLink">bounce</a>
</li>
<li>
<a href="#momentum" class="pageLink">momentum</a>
</li>
<li>
<a href="#lockDirection" class="pageLink">lockDirection</a>
</li>
<li>
<a href="#home-wrapper" class="pageLink">HOME</a>
</li>
</ul>
</div>
</div>
<div id="hscroll" class="page">
<div class="page-content">
<h2>hscroll & vScroll</h2>
<p><code>hScroll</code> and <code>vScroll</code> control the horizontal and vertical scrolling (if you hadn't guessed) and by setting either one to <code>false</code>, you can disable them altogether. By default these are both set to <code>true</code>, so if your content exeeds the wrapper, the user will have the ability to scroll to it.</p>
<p><code>hScrollbar</code> and <code>vScrollbar</code> these are the options to show and hide the black scrollbar that fades-in and fades-out when scrolling.</p>
<a href="#parameters" class="pageLink">back</a>
</div>
</div>
<div id="fixedScrollbar" class="page">
<div class="page-content">
<h2>fixedScrollbar</h2>
<p><code>fixedScrollbar</code> is the control for how the scrollbar acts when it reaches the end of your scrollable container. By default it is set to <code>false</code> so that when it reaches the end, it shrinks down. When set to <code>true</code> it remains a fixed height.</p>
<a href="#parameters" class="pageLink">back</a>
</div>
</div>
<div id="fadeScrollbar" class="page">
<div class="page-content">
<h2>fadeScrollbar</h2>
<p><code>fadeScrollbar</code> is set to <code>true</code> by default, but if you would prefer to have the scrollbar just dissapear rather than fade, set this to <code>false</code>.</p>
<a href="#parameters" class="pageLink">back</a>
</div>
</div>
<div id="hideScrollbar" class="page">
<div class="page-content">
<h2>hideScrollbar</h2>
<p><code>hideScrollbar</code> is set to <code>true</code> by default, but if you want the scrollbar to remian on the page, set this to <code>false</code>. The scrollbar will now not fade out when the user stop scrolling. </p>
<a href="#parameters" class="pageLink">back</a>
</div>
</div>
<div id="bounce" class="page">
<div class="page-content">
<h2>bounce</h2>
<p><code>bounce</code> is to set the 'elastic banding' when the user scrolls beyond the content. By default this is set to <code>true</code>. Personally I have found that when using iScroll within a big application, setting this to false has saved s lot of loading time.</p>
<a href="#parameters" class="pageLink">back</a>
</div>
</div>
<div id="momentum" class="page">
<div class="page-content">
<h2>momentum</h2>
<p><code>momentum</code> controls the inertia of the scrolling. By default it is set to <code>true</code>, but if you want a more controlled scrolling area, set this to <code>false</code>. This is another one of those options that you might want to turn off in big applications as it seems to eat up resources.</p>
<a href="#parameters" class="pageLink">back</a>
</div>
</div>
<div id="lockDirection" class="page">
<div class="page-content">
<h2>lockDirection</h2>
<p><code>lockDirection</code> locks down the scrolling to one axis only. So you can either scroll up and down or left and right at any one time. This is set to <code>true</code> by default, but if you want to allow the user to scroll in either direction at anytime, set it to <code>false</code>.</p>
<a href="#parameters" class="pageLink">back</a>
</div>
</div>
<?php include("assets/inc/footer.shtml"); ?>
I've just added some backlinks to be able to go backwards through the app and wrapped the page content in a DIV with the page-content class. Add some CSS to accomodate the new elements.
.pageLink{
	color:#444;
	font-weight:bold;
}

.page-content{
	padding:10px;
	background-color: white;
	height:100%;
}
Now that we have taken care of paging and adding our first pages to our iScroll Sink, we can continue looking at iScroll.
Adding Pinch and Zoom
The Pinch and Zoom allows you to have scalable content within our app, but while keeping the fixed headers and footers. It is passed thorugh like any of the other parameters (as an object) and you will need to create a new instance of iScroll for the zoomable area.
Step 1: Destroy and Rebuild
To keep from constantly creating new instances of iScroll for everything, we can .destroy() the current scroll and make a new one each time we page. If you are going to be using various scrolling implementations in your application, you might find .destroy() helpful to free up memory.
To be able to customize my options I am going to first get the current page's ID.
currentPageId = $(".current").attr("ID");
Then I am going to destroy() the current iScroll and set the newScroll to null.
    newScroll.destroy();
	newScroll = null;
Step 2: Initialize Zoom
Using an if statement, I will next create a new iScroll.
	if(currentPageId === 'zoom'){
		newScroll = new iScroll(currentPageId, { zoom: true });
	}
You can control the maximum zoom by passing through an additional option of zoomMax. By Default this is set to 4. You also have the ability to double-tap in order to zoom in and out.
If you are going to be using images in your zoomable areas, you might want to go ahead and add webkit-transform:translate3d(0,0,0) in order to take advantage of hardware compositing.
Go ahead and create a new page for zoom.
Adding Custom Scrollbars
When working with iScroll, you have the option of doing a bit of customization on the scrollbar itself if you pass in the scrollbarClass option.
Step 1: Make the Page
Let's make a Custom Scroll page and see how it works.
<div id="custom-scroll" class="page">
    <div class="scroll-content">
        <ul>
            <li>Fake Content for Scroll</li>
            <li>Fake Content for Scroll</li>
            <li>Fake Content for Scroll</li>
            <li>Fake Content for Scroll</li>
            <li>Fake Content for Scroll</li>
            <li>Fake Content for Scroll</li>
            <li>Fake Content for Scroll</li>
            <li>Fake Content for Scroll</li>
            <li>Fake Content for Scroll</li>
            <li>Fake Content for Scroll</li>
            <li>Fake Content for Scroll</li>
            <li>Fake Content for Scroll</li>
            <li>Fake Content for Scroll</li>
            <li>Fake Content for Scroll</li>
            <li>Fake Content for Scroll</li>
            <li>Fake Content for Scroll</li>
            <li>Fake Content for Scroll</li>
            <li>Fake Content for Scroll</li>
            <li>Fake Content for Scroll</li>
            <li>Fake Content for Scroll</li>
            <li>
                <a href="#home-wrapper" class="pageLink">HOME</a>
            </li>
        </ul>
    </div>
</div>
Step 2: Initialize iScroll
Then we need to create a new iScroll when we navigate to this page with our options.
if (currentPageId === 'custom-scroll'){
	newScroll = new iScroll(currentPageId, { scrollbarClass: 'myScrollbar' });
}
Step 3: Scrollbar CSS
In order to customize our scrollbar we need to add some CSS. The myScrollbarV and myScrollbarH classes are added to the vertical and horizontal respectivly. We are going to style myScrollbarV.
/** SCROLLBAR **/

.myScrollbarV {
	position:absolute;
	z-index:100;
	width:8px;bottom:7px;top:2px;right:1px
}

.myScrollbarV > div {
	position:absolute;
	z-index:100;
	width:100%;

	background:-webkit-gradient(linear, 0 0, 100% 0, from(#deb700), to(#c17c00));
	border:1px solid #800;
	-webkit-background-clip:padding-box;
	-webkit-box-sizing:border-box;
	-webkit-border-radius:4px;
	-webkit-box-shadow:inset 1px 1px 0 rgba(255,255,255,0.5);
}
You should now have a custom scrollbar when navigating to the Custom Scrollbar page.

Have a play around with the styles and see what you can come up with.
Adding Pull to Refresh
Pull to refresh is probably one of the more popular features of iScroll. Any application that has some sort of live feed or stream seems to have an implementation that enables the users to 'Pull' to refresh that content.
Step 1: Refreshing HTML
To get this working in iScroll takes a little more effort than the other options, so let's dive right in and create a page for it.
<div id="refresh" class="page">
    <div class="scroll-content">
        <div id="pullDown">
            <span class="pullDownLabel">Pull down to refresh...</span>
        </div>
        <ul id="refreshList">
            <li>Fake Content for Scroll</li>
            <li>Fake Content for Scroll</li>
            <li>Fake Content for Scroll</li>
            <li>Fake Content for Scroll</li>
            <li>Fake Content for Scroll</li>
            <li>Fake Content for Scroll</li>
            <li>Fake Content for Scroll</li>
            <li>Fake Content for Scroll</li>
            <li>Fake Content for Scroll</li>
            <li>Fake Content for Scroll</li>
            <li>Fake Content for Scroll</li>
            <li>Fake Content for Scroll</li>
            <li>Fake Content for Scroll</li>
            <li>Fake Content for Scroll</li>
            <li>Fake Content for Scroll</li>
            <li>Fake Content for Scroll</li>
            <li>Fake Content for Scroll</li>
            <li>Fake Content for Scroll</li>
            <li>Fake Content for Scroll</li>
            <li>Fake Content for Scroll</li>
            <li>
                <a href="#home-wrapper" class="pageLink">HOME</a>
            </li>
        </ul>
    </div>
</div>
Note that we have added an extra DIV for our pull down label. Let's take a look at the JS.
Step 2: Refreshing JavaScript
var pullDownEl,
pullDownOffset,
generatedCount = 0;

function pullDownAction () {
	var el, li, i;
	el = document.getElementById('refreshList');
	for (i=0; i<3; i++) {
		li = document.createElement('li');
		li.innerText = 'Generated row ' + (++generatedCount);
		el.insertBefore(li, el.childNodes[0]);
	}

	newScroll.refresh();
}

pullDownEl = document.getElementById('pullDown');
pullDownOffset = pullDownEl.offsetHeight;

newScroll = new iScroll('refresh', {
	useTransition: true,
	topOffset: pullDownOffset,
	onRefresh: function ()
	{

		if (pullDownEl.className.match('loading')) {
			pullDownEl.className = '';
			pullDownEl.querySelector('.pullDownLabel').innerHTML = 'Pull down to refresh...';
			}
	},

	onScrollMove: function () {
		if (this.y > 5 && !pullDownEl.className.match('flip')) {
			pullDownEl.className = 'flip';
			pullDownEl.querySelector('.pullDownLabel').innerHTML = 'Release to refresh...';
			this.minScrollY = 0;
			}
	},

	onScrollEnd: function () {
		if (pullDownEl.className.match('flip')) {
			pullDownEl.className = 'loading';
			pullDownEl.querySelector('.pullDownLabel').innerHTML = 'Loading...';
			pullDownAction();
		}
	}
});
It might be a bit daunting to look at, but it is pretty self explanatory. I'll break it up a bit. I also had some trouble getting this to work with jQuery, so I have reverted to pure JavaScript.
The pullDownAction() is fired when we stop scrolling and our pullDown DIV has the class flip. This could be an Ajax request to get some data from the server, but for the demo we are just going to generate some li elements and generate the text inside of them.
The .refresh() method is a public method available to the iScroll object, like .destroy(). This refreshes the object to accompany any new content that is added to the scrolling area. So, when we are adding rows to our list, we refresh iScroll and it takes them into account so our scrolling area doesn't cut off.
Next, we create a new iScroll object and pass in our options. We need to set the transition, topOffset, onRefresh, onScrollMove and onScrollEnd
If useTransition is set to true, then the scrollbar does not shrink when the content is pulled down to generate new rows. Set it to false to get the shrinking scrollbar.
The topOffset option is the amount of offest needed at the top of the document to hide the refresh DIV. We calculated this above with JavaScript.
The other three options are functions we are defining within the iScroll object. You are most likely to change the labels and the wording within them.
In the onScrollMove function, there is a reference to this.y. This is the distance that the user will have to pull down before the "Release to refresh..." replaces the "Pull to refresh" message.
There are a couple of things I didn't add to my demo that are available in the official iScroll demo. The loading timer and the images. These are pretty easy for you to add if needed, but be carefull not to add the setTimeout into your production code as the Ajax call will take time to fill in.
You can also have pull-up to refresh, which is the same as pull down, except you reverse some of the properties to offset at the bottom.
You should be able to pull down your scrolling area and get some generated rows.
Adding Snap and Snap to Element
The last feature we are going to look at within iScroll is the Snap and Snap to element capabilities. This option allows us to have our scrollable area 'snap' to either the elements within the scrolling container using the default snap or other defined areas.
Step 1: Setting Up the Carousel
For the demo we are just going to build a mini-carousel that will use the swiping to snap to the next element. Here is the HTML code.
<div id="snap" class="page">
    <div class="scroll-content">
        <ul id="thelist">
            <li><p>Content for the Carousel</p></li>
            <li><p>Secondary Content</p></li>
            <li><p>Tertiary Content</p></li>
            <li><a href="#home-wrapper" class="pageLink">Click to go Home</a></li>
        </ul>
    </div>
</div>
Step 2: Snap Options for iScroll
We need to make a new iScroll object and pass in the snap options.
newScroll = new iScroll(currentPageId, {snap: true,momentum: false,hScrollbar: false,vScrollbar: false });
Setting snap to true allows the content to snap into place. This is false by default. The momentum option is the momentum carried through when swiping the content. If you swipe too hard the element are skipped as the momentum carries through. Set this to false if you want to snap to the very next element, regardless of the user swipe speed. The hScrollbar and vScrollbar are two we've seen before. Set these to true if you'd like to see the scrollbar when the content is moving.
Step 3: Carousel CSS
Let's add some CSS to our carousel to finish it off. This is standard CSS for a carousel.
#snap {
    width:300px;
    height:160px;
    float:left;
    position:relative;
    z-index:1;
    overflow:hidden;
    background:#aaa;
    background:#e3e3e3;
    margin:2%;
}

#snap .scroll-content {
    width:1200px;
    height:100%;
    float:left;
    padding:0;
}

#snap .scroll-content ul {
    list-style:none;
    display:block;
    float:left;
    width:100%;
    height:100%;
    padding:0;
    margin:0;
    text-align:left;
}

#snap .scroll-content li {
    -webkit-box-sizing:border-box;
    -moz-box-sizing:border-box;
    -o-box-sizing:border-box;
    box-sizing:border-box;
    display:block; float:left;
    width:300px; height:160px;
    text-align:center;
    font-family:georgia;
    font-size:35px;
    line-height:140%;
    border-bottom:0;
    background:#deb700;
    color:#f3f3f3;
    text-shadow: 0 -1px 0 rgba(0, 0, 0, 0.5);
}
You should now have a scrollable carousel.
Step 4: Further Reading
In the demo on the official site, the carousel has additional links that allow you to scroll by clicking. Check out the live demo and you will see the code being used. If you like, see if you can get something similar working in the sink.
Kitchen Sink Code Review
Let's take a look at what the finished code should look like. First, the index.php file:
<?php include("assets/inc/header.shtml"); ?>
<div id="home-wrapper" class="page current">
<div class="scroll-content">
<ul>
<li><a href="#parameters" class="pageLink">Parameters</a></li>
<li><a href="#zoom" class="pageLink">Pinch / Zoom</a></li>
<li><a href="#custom-scroll" class="pageLink">Custom Scrollbars</a></li>
<li><a href="#refresh" class="pageLink">Refresh</a></li>
<li><a href="#snap" class="pageLink">Snap</a></li>
</ul>
</div>
</div>
<div id="parameters" class="page">
<div class="scroll-content">
<ul>
<li>
<a href="#hscroll" class="pageLink">hScroll & vScroll</a>
</li>
<li>
<a href="#fixedScrollbar" class="pageLink">fixedScrollbar</a>
</li>
<li>
<a href="#fadeScrollbar" class="pageLink">fadeScrollbar</a>
</li>
<li>
<a href="#hideScrollbar" class="pageLink">hideScrollbar</a>
</li>
<li>
<a href="#bounce" class="pageLink">bounce</a>
</li>
<li>
<a href="#momentum" class="pageLink">momentum</a>
</li>
<li>
<a href="#lockDirection" class="pageLink">lockDirection</a>
</li>
<li>
<a href="#home-wrapper" class="pageLink">HOME</a>
</li>
</ul>
</div>
</div>
<div id="hscroll" class="page">
<div class="page-content">
<h2>hscroll & vScroll</h2>
<p><code>hScroll</code> and <code>vScroll</code> control the horizontal and vertical scrolling (if you hadn't guessed) and by setting either one to <code>false</code>, you can disable them altogether. By default these are both set to <code>true</code>, so if your content exeeds the wrapper, the user will have the ability to scroll to it.</p>
<p><code>hScrollbar</code> and <code>vScrollbar</code> these are the options to show and hide the black scrollbar that fades-in and fades-out when scrolling.</p>
<a href="#parameters" class="pageLink">back</a>
</div>
</div>
<div id="fixedScrollbar" class="page">
<div class="page-content">
<h2>fixedScrollbar</h2>
<p><code>fixedScrollbar</code> is the control for how the scrollbar acts when it reaches the end of your scrollable container. By default it is set to <code>false</code> so that when it reaches the end, it shrinks down. When set to <code>true</code> it remains a fixed height.</p>
<a href="#parameters" class="pageLink">back</a>
</div>
</div>
<div id="fadeScrollbar" class="page">
<div class="page-content">
<h2>fadeScrollbar</h2>
<p><code>fadeScrollbar</code> is set to <code>true</code> by default, but if you would prefer to have the scrollbar just dissapear rather than fade, set this to <code>false</code>.</p>
<a href="#parameters" class="pageLink">back</a>
</div>
</div>
<div id="hideScrollbar" class="page">
<div class="page-content">
<h2>hideScrollbar</h2>
<p><code>hideScrollbar</code> is set to <code>true</code> by default, but if you want the scrollbar to remian on the page, set this to <code>false</code>. The scrollbar will now not fade out when the user stop scrolling. </p>
<a href="#parameters" class="pageLink">back</a>
</div>
</div>
<div id="bounce" class="page">
<div class="page-content">
<h2>bounce</h2>
<p><code>bounce</code> is to set the 'elastic banding' when the user scrolls beyond the content. By default this is set to <code>true</code>. Personally I have found that when using iScroll within a big application, setting this to false has saved s lot of loading time.</p>
<a href="#parameters" class="pageLink">back</a>
</div>
</div>
<div id="momentum" class="page">
<div class="page-content">
<h2>momentum</h2>
<p><code>momentum</code> controls the inertia of the scrolling. By default it is set to <code>true</code>, but if you want a more controlled scrolling area, set this to <code>false</code>. This is another one of those options that you might want to turn off in big applications as it seems to eat up resources.</p>
<a href="#parameters" class="pageLink">back</a>
</div>
</div>
<div id="lockDirection" class="page">
<div class="page-content">
<h2>lockDirection</h2>
<p><code>lockDirection</code> locks down the scrolling to one axis only. So you can either scroll up and down or left and right at any one time. This is set to <code>true</code> by default, but if you want to allow the user to scroll in either direction at anytime, set it to <code>false</code>.</p>
<a href="#parameters" class="pageLink">back</a>
</div>
</div>
<div id="zoom" class="page">
<div class="page-content">
<h2>Zoom</h2>
<p>The Pinch and Zoom allows you to have scalable content within our app, but keeping the fixed headers and footers. It is passed thorugh like any of the other parameters (as an object) and you will need to create a new instance of iScroll for the zoomable area.</p>
<p>You can control the maximum zoom by passing through an additional option of <code>zoomMax</code>. By Default this is set to 4.</p>
<a href="#home-wrapper" class="pageLink">back</a>
</div>
</div>
<div id="custom-scroll" class="page">
<div class="scroll-content">
<ul>
<li>Fake Content for Scroll</li>
<li>Fake Content for Scroll</li>
<li>Fake Content for Scroll</li>
<li>Fake Content for Scroll</li>
<li>Fake Content for Scroll</li>
<li>Fake Content for Scroll</li>
<li>Fake Content for Scroll</li>
<li>Fake Content for Scroll</li>
<li>Fake Content for Scroll</li>
<li>Fake Content for Scroll</li>
<li>Fake Content for Scroll</li>
<li>Fake Content for Scroll</li>
<li>Fake Content for Scroll</li>
<li>Fake Content for Scroll</li>
<li>Fake Content for Scroll</li>
<li>Fake Content for Scroll</li>
<li>Fake Content for Scroll</li>
<li>Fake Content for Scroll</li>
<li>Fake Content for Scroll</li>
<li>Fake Content for Scroll</li>
<li>
<a href="#home-wrapper" class="pageLink">HOME</a>
</li>
</ul>
</div>
</div>
<div id="refresh" class="page">
<div class="scroll-content">
<div id="pullDown">
<span class="pullDownLabel">Pull down to refresh...</span>
</div>
<ul id="refreshList">
<li>Fake Content for Scroll</li>
<li>Fake Content for Scroll</li>
<li>Fake Content for Scroll</li>
<li>Fake Content for Scroll</li>
<li>Fake Content for Scroll</li>
<li>Fake Content for Scroll</li>
<li>Fake Content for Scroll</li>
<li>Fake Content for Scroll</li>
<li>Fake Content for Scroll</li>
<li>Fake Content for Scroll</li>
<li>Fake Content for Scroll</li>
<li>Fake Content for Scroll</li>
<li>Fake Content for Scroll</li>
<li>Fake Content for Scroll</li>
<li>Fake Content for Scroll</li>
<li>Fake Content for Scroll</li>
<li>Fake Content for Scroll</li>
<li>Fake Content for Scroll</li>
<li>Fake Content for Scroll</li>
<li>Fake Content for Scroll</li>
<li>
<a href="#home-wrapper" class="pageLink">HOME</a>
</li>
</ul>
</div>
</div>
<div id="snap" class="page">
<div class="scroll-content">
<ul id="thelist">
<li><p>Content for the Carousel</p></li>
<li><p>Secondary Content</p></li>
<li><p>Tertiary Content</p></li>
<li><a href="#home-wrapper" class="pageLink">Click to go Home</a></li>
</ul>
</div>
</div>
<?php include("assets/inc/footer.shtml"); ?>
Then the styles.css file:
body,ul,li {
    padding:0;
    margin:0;
    border:0;
}

body {
    font-family:helvetica;
}

header{
    background-color:#deb500;
    position:absolute;
    z-index:2;
    top:0; left:0;
    width:100%;
    height:45px;
    padding:0;
}

footer {
    background-color:#c27b00;
    position:absolute;
    z-index:2;
    bottom:0; left:0;
    width:100%;
    height:48px;
    padding:0;
    border-top:1px solid #444;
}

header, footer{
    font-size:20px;
    text-align:center;
    color:#f3f3f3;
    font-weight:bold;
    text-shadow:0 -1px 0 rgba(0,0,0,0.5);
    line-height:45px;
}

/*** CHANGES BELOW ***/

.page {
    position:absolute;
    z-index:1;
    top:45px; bottom:48px; left:0;
    width:100%;
    background:#fff;
    overflow:auto;
    display: none;
}

.page.current{
    display: block;
}

.scroll-content {
    position:absolute;
    z-index:1;
    width:100%;
    padding:0;
}

/*** CHANGES ABOVE ***/

ul {
    list-style:none;
    padding:0;
    margin:0;
    width:100%;
    text-align:left;
}

li, div#pullDown {
    padding:0 10px;
    height:40px;
    line-height:40px;
    border-bottom:1px solid #ccc;
    border-top:1px solid #fff;
    background-color:#fafafa;
    font-size:14px;
}

.pageLink{
    color:#444;
    font-weight:bold;
}

.page-content{
    padding:10px;
    background-color: white;
    height:100%;
}

/** SCROLLBAR **/

.myScrollbarV {
    position:absolute;
    z-index:100;
    width:8px;bottom:7px;top:2px;right:1px
}

.myScrollbarV > div {
    position:absolute;
    z-index:100;
    width:100%;

    background:-webkit-gradient(linear, 0 0, 100% 0, from(#deb700), to(#c17c00));
    border:1px solid #800;
    -webkit-background-clip:padding-box;
    -webkit-box-sizing:border-box;
    -webkit-border-radius:4px;
    -webkit-box-shadow:inset 1px 1px 0 rgba(255,255,255,0.5);
}

#snap {
    width:300px;
    height:160px;
    float:left;
    position:relative;
    z-index:1;
    overflow:hidden;
    background:#aaa;
    background:#e3e3e3;
    margin:2%;
}

#snap .scroll-content {
    width:1200px;
    height:100%;
    float:left;
    padding:0;
}

#snap .scroll-content ul {
    list-style:none;
    display:block;
    float:left;
    width:100%;
    height:100%;
    padding:0;
    margin:0;
    text-align:left;
}

#snap .scroll-content li {
    -webkit-box-sizing:border-box;
    -moz-box-sizing:border-box;
    -o-box-sizing:border-box;
    box-sizing:border-box;
    display:block; float:left;
    width:300px; height:160px;
    text-align:center;
    font-family:georgia;
    font-size:35px;
    line-height:140%;
    border-bottom:0;
    background:#deb700;
    color:#f3f3f3;
    text-shadow: 0 -1px 0 rgba(0, 0, 0, 0.5);
}
Finally, the main.js file:
$(document).ready(function()
{

    var newScroll = new iScroll('home-wrapper');

    $(".pageLink").bind('click', function(e)
    {
        e.preventDefault();
        var nextPage = $(e.target.hash);
        $(".current").removeClass("current");
        nextPage.addClass("current");
        currentPageId = $(".current").attr("ID");
        newScroll.destroy();
        newScroll = null;
        if (currentPageId === 'custom-scroll'){
            newScroll = new iScroll(currentPageId, { scrollbarClass: 'myScrollbar' });
        }else if(currentPageId === 'zoom'){
            newScroll = new iScroll(currentPageId, { zoom: true });
        } else if(currentPageId === 'refresh'){
            var pullDownEl,
                pullDownOffset,
                generatedCount = 0;

            function pullDownAction () {
                    var el, li, i;
                    el = document.getElementById('refreshList');
                    for (i=0; i<3; i++) {
                        li = document.createElement('li');
                        li.innerText = 'Generated row ' + (++generatedCount);
                        el.insertBefore(li, el.childNodes[0]);
                    }

                    newScroll.refresh();
            }

                pullDownEl = document.getElementById('pullDown');
                pullDownOffset = pullDownEl.offsetHeight;

                newScroll = new iScroll('refresh', {
                    useTransition: true,
                    topOffset: pullDownOffset,
                    onRefresh: function () {
                        if (pullDownEl.className.match('loading')) {
                            pullDownEl.className = '';
                            pullDownEl.querySelector('.pullDownLabel').innerHTML = 'Pull down to refresh...';
                        }
                    },
                    onScrollMove: function () {
                        if (this.y > 5 && !pullDownEl.className.match('flip')) {
                            pullDownEl.className = 'flip';
                            pullDownEl.querySelector('.pullDownLabel').innerHTML = 'Release to refresh...';
                            this.minScrollY = 0;
                        }
                    },
                    onScrollEnd: function () {
                        if (pullDownEl.className.match('flip')) {
                            pullDownEl.className = 'loading';
                            pullDownEl.querySelector('.pullDownLabel').innerHTML = 'Loading...';
                            pullDownAction();   // Execute custom function (ajax call?)
                        }
                    }
                });
        }else if(currentPageId === 'snap'){
            newScroll = new iScroll(currentPageId,
            {
                snap: true,
                momentum: false,
                hScrollbar: false,
                vScrollbar: false
            });
        }else {
            newScroll = new iScroll(currentPageId);
        }

    });

})
I have published this copy of iScroll Sink to GitHub. You are more than welcome to fork this code, and if you modify it feel free to submit a pull request. I will keep this GitHub repo updated if and when more things get added to iScroll.
Next Steps
What you have here is the foundation of iScroll, and now you have it in an app you can keep on your local machine or personal server and refer to any time you might need to use something. You also have a place where you can test out new things with iScroll and keep updating the sink to be your personal reference. While we have not covered every inch of iScroll, we have covered a good majority of it, and I encourge you to check out the main website and the google groups page for more information.

Comments