This tutorial is the second in a three-part series on working with the push notification features of iOS 3.0+. It focuses on how to send notifications to Apple's Push Notification Service (APNS) via Urban Airship. This installment builds on the things we set up in the last one, so you will want to go and read through that one first to get up to speed if you haven't already.
Prepare your SSL certificates
The SSL certificate file you downloaded from the iOS Provisioning Portal in part one of this series is in DER format and only contains the certificate - it does not contain your private key. Urban Airship, however, needs both the SSL certificate and private key uploaded in a single PKCS#12 file in order to properly communicate with the Apple Push Notification Service. So, we've got some work to do. Lucky for us, the Keychain Access utility actually does pretty much everything for us with just a few mouse clicks.
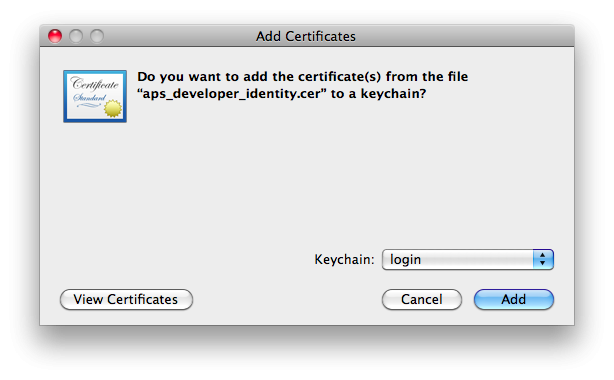
The first thing you need to do, if you haven't done it already, is to double-click the downloaded certificate (it should be named aps_developer_identity.cer) in the Finder and click "Add" to add it to your keychain. Note: You need to add the certificate to the same keychain that contains the public and private keys generated by the certificate signing request in the previous installment.
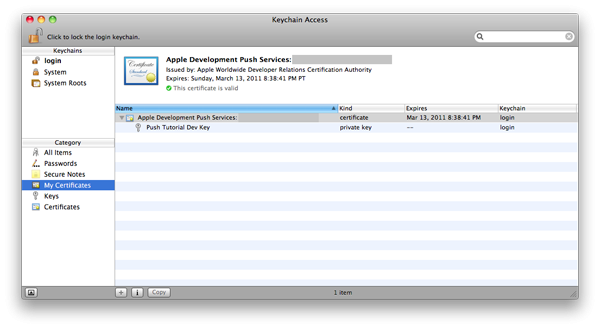
Once the certificate has been added to your keychain, select "My Certificates" from the Category list at the left and find your newly-added certificate. Verify that it has a disclosure triangle next to it. If it does not, that means that Keychain Access cannot find the private key that matches the certificate in the current keychain - make sure you added the certificate to the proper keychain.
Right-click the certificate and choose 'Export "Apple Development Push Services [identifier]"...' When the export sheet appears, verify that "Personal Information Exchange (.p12) is selected from the File Format popup button. Give your file a good name and hit "Save."
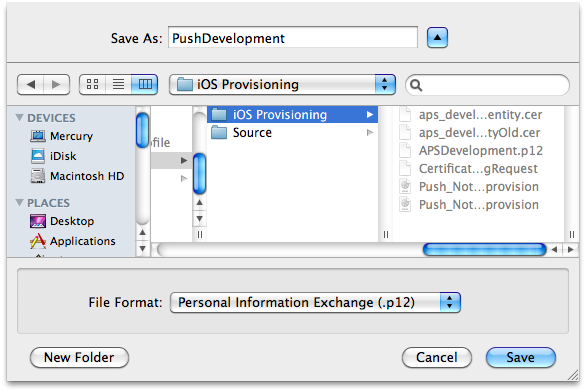
A prompt appears, asking for a password for the file. Although Urban Airship supports password-protected PKCS#12 files, it recommends leaving it blank - just hit "OK."
See, that wasn't too difficult! Now we're ready to head over to Urban Airship and set everything up.
Urban Airship
As mentioned in the previous installment, we will be using Urban Airship to communicate with the Apple Push Notification Service and send pushes to our demo app.
1. Create an account
In order to start using the Urban Airship service, you will need to create an account with them. Their indie plan gives you one million messages/month for free (as of this writing). Fill out the form and click "Sign up." Then click the URL in the confirmation email that is sent to activate your account.
2. Add a new app to your account
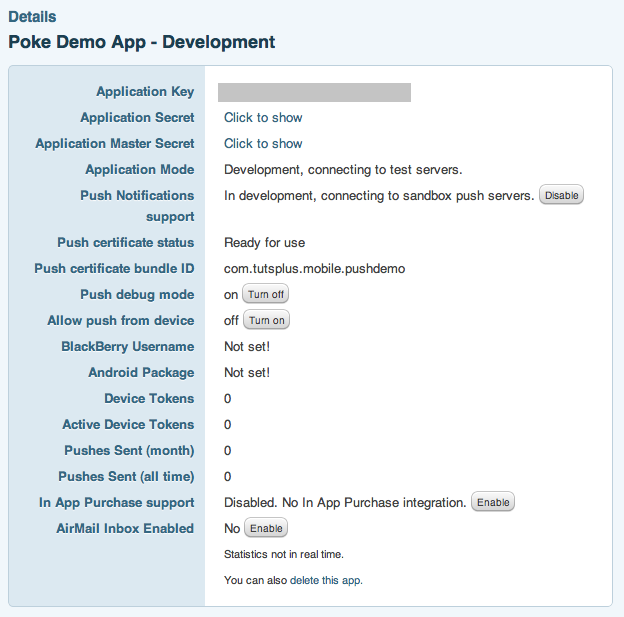
Once signed in, go to the "Add a new application" form and enter your app's name. As mentioned previously, Apple uses two separate groups of push servers for development and production - each requires you to generate a separate SSL certificate in the provisioning portal. Because of this, Urban Airship recommends that you create separate applications on their end for development and production - that way, you can continue to test out notifications in development without interrupting push services to your users who have downloaded your app from the App Store.
Because we are working with a development build of our app, we will be using our development SSL certificate. The Application Mode needs to be set to "Development - connecting to test servers." accordingly.
Check the box that says "Push Notifications Support" and a number of new fields should be added to the form. The only fields we will be worrying about are the three under the "Apple" heading. Click the "Choose File" button and locate the PKCS#12 file you previously exported from Keychain Access. If you decided to enter a password for the file after all, type it into the "Certificate password" box. We also should check the "Push debug mode" box to assist us in debugging any issues. (The curious can click the link to learn more about what it is and what it does).
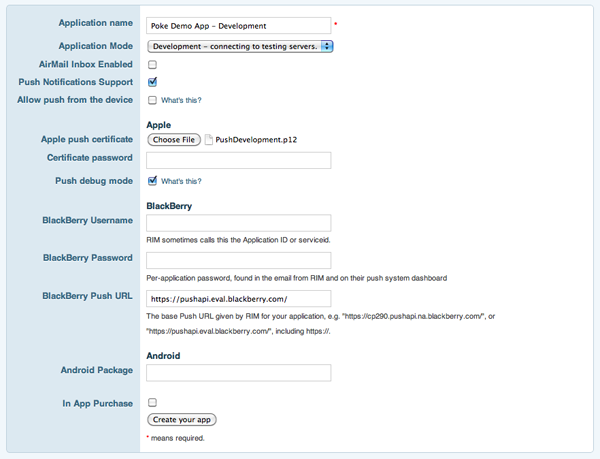
With all your information entered, click "Create your app."
3. App credentials
Once your app has been created, you should be redirected to your app's details page.
The two things I want to call out before we move on to the API are the Application Key and Application Secret. For an explanation of both, I refer you to Urban Airship's documentation:
Each application has an Application Key and both an Application Secret and an Application Master Secret (formerly known as the Application Push Secret). Credentials are supplied in HTTP Basic Auth (with the key as the username and the secret as the password), always over our HTTPS connection. The application secret is to be included on in the application to perform registration, and the master secret should only be used on a remote server and not included in the application.
Basically, we'll be using the application key and secret as the username and password, respectively, when communicating with the Urban Airship API from our App. With that in mind, let's quickly cover the device registration call of the API.
4. Device registration API
If you scroll down the API documentation page we were just looking at, the first item you encounter is the Registration section. Quickly read through the first four paragraphs, and you'll see that we need to send an HTTP PUT request to https://go.urbanairship.com/api/device_tokens/<device token> in order to register a device.
Let's go back to our Xcode project and add some code to make our app do just that!
Back to the app
If it's not open already, open the Xcode project we created in the first part of this series.
Device registration
The first thing we need to do is have our app pass the token we received from the APNS back to Urban Airship. If you recall from part one, we added a push notification callback method to our app delegate that looked like this:
- (void)application:(UIApplication *)application
   didRegisterForRemoteNotificationsWithDeviceToken:(NSData *)deviceToken
{
   // TODO: Pass the token to our server

   NSLog(@"We successfully registered for push notifications");
}
Now, we're going to implement the TODO item.
If you look at the callback method above, you'll notice that the device token comes back as an instance of NSData and not NSString. If you look up the callback method in Apple's documentation, you'll see why:
The token is an opaque data type because that is the form that the provider needs to submit to the APS servers when it sends a notification to a device. The APS servers require a binary format for performance reasons.
What does all this mean? Urban Airship needs the token as a hexadecimal string but the OS hands it to us as raw data, so we need to do some converting. Though arguably not the best way to do this, we're going to use NSData's -description method to convert the data to a hexadecimal string:
   // Convert the token to a hex string and make sure it's all caps
   NSMutableString *tokenString = [NSMutableString stringWithString:[[deviceToken description] uppercaseString]];
   [tokenString replaceOccurrencesOfString:@"<" withString:@"" options:0 range:NSMakeRange(0, tokenString.length)];
   [tokenString replaceOccurrencesOfString:@">" withString:@"" options:0 range:NSMakeRange(0, tokenString.length)];
   [tokenString replaceOccurrencesOfString:@" " withString:@"" options:0 range:NSMakeRange(0, tokenString.length)];
Next, we need to build the URL, as described in the API documentation:
   // Create the NSURL for the request
   NSString *urlFormat = @"https://go.urbanairship.com/api/device_tokens/%@";
   NSURL *registrationURL = [NSURL URLWithString:[NSString stringWithFormat:
                                                  urlFormat, tokenString]];
We then need to instantiate an NSMutableURLRequest. We use a mutable request because we need to change the HTTP method of the request to PUT.
   // Create the registration request
   NSMutableURLRequest *registrationRequest = [[NSMutableURLRequest alloc]
                                               initWithURL:registrationURL];
   [registrationRequest setHTTPMethod:@"PUT"];
Lastly, we need to create an instance of NSURLConnection to actually send the data to the server:
   // And fire it off
   NSURLConnection *connection = [NSURLConnection connectionWithRequest:registrationRequest
                                                               delegate:self];
   [connection start];
You'll notice that we're setting the connection's delegate to self. Because NSURLRequest does not have built-in support for providing HTTP Basic Authentication credentials up-front (without dipping down into base 64 encoding), we want to know when the connection receives an authentication challenge so that we can provide the username and password. NSURLConnection has a delegate method -connection:didReceiveAuthenticationChallenge: which we will now need to implement as well.
- (void)connection:(NSURLConnection *)connection
   didReceiveAuthenticationChallenge:(NSURLAuthenticationChallenge *)challenge
{
   // Check for previous failures
   if ([challenge previousFailureCount] > 0)
   {
      // We've already tried - something is wrong with our credentials
      NSLog(@"Urban Airship credentials invalid");
      return;
   }

   // Send our Urban Airship credentials
   NSURLCredential *airshipCredentials = [NSURLCredential credentialWithUser:@"<Your App Key here>"
                                                                    password:@"<Your App Secret here>"
                                                                 persistence:NSURLCredentialPersistenceNone];
   [[challenge sender] useCredential:airshipCredentials
          forAuthenticationChallenge:challenge];
}
Remember to enter your Urban Airship application key and secret where indicated. You can retrieve them from your app's detail page.
You should also implement other NSURLConnection delegate methods, such as -connection:didFailWithError: and -connection:didReceiveResponse:, the second of which you can use to verify the response code against the expected one listed in the Urban Airship documentation. But I'll leave that as an exercise to the reader.
Whew! OK, so we now have our app passing the push token it receives from the APNS on to Urban Airship's servers. We're now ready to install the app on our device and try sending some notifications!
Installing the app
If you have already gone through the entire first part of the series, everything should already be properly configured in Xcode to build the app and install it on your iPhone.
Plug your iPhone into your computer. If this is the first time you've done this with Xcode open, it should prompt if you want to use the device for development - if it does, click "Yes." Give it a few seconds after plugging it in to be properly recognized by Xcode.
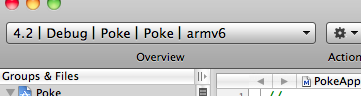
Verify that the active SDK is set to "Device" in the Overview popup and that the Active Configuration is set to "Debug." Then hit the green "Build and Run" button in the toolbar.
Within a few minutes, Xcode should build the app and install it on your iPhone. Make sure you're connected to a network of some sort and let the app run for a few minutes so that it has time to register with the APNS and send its device token to Urban Airship.
The main event
After two tutorials, we are finally ready to send a push notification to our app!
Go back to Urban Airship's website and log in (if you're not still logged in). Navigate to your app's page and select "Statistics" from the menu at the left.
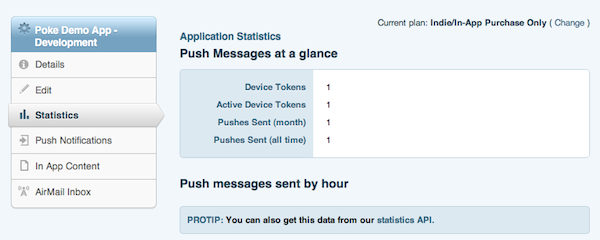
Next to "Device Tokens" on the right, there should be a number 1. If there isn't, go back and check that you entered your credentials properly. You also might want to implement more of the NSURLConnection delegate methods to verify that the request is being properly received by Urban Airship's servers.
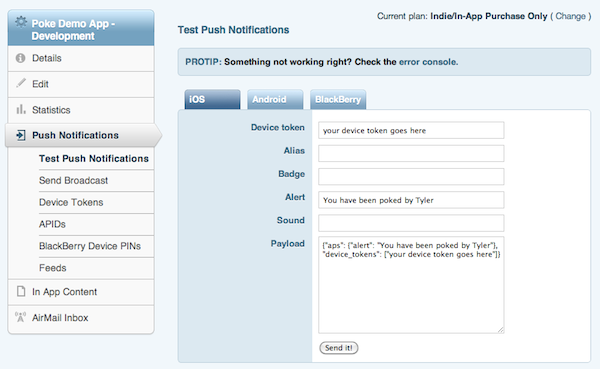
After verifying that our device has properly registered, we will now send a push. Select "Push Notifications" from the menu at the left, and then choose "Device Tokens" from its submenu. On the right, a long hexadecimal string should appear under "Device Token." Copy this string to the clipboard and then select "Test Push Notifications" on the left.
Make sure you're on the iOS tab, and paste your device token into the "Device token" field. In the "Alert" field, enter some text. After verifying that your app is not running on your phone, hit "Send it!"
Within a few minutes, the alert should appear on your phone. Congratulations! You just sent your first push notification! Let me know in the comments if you have any trouble getting it working.
In the last part of this series, we will explore some of the other push features shown here, such as badges and sounds, as well as some of the more advanced Urban Airship API features.

Comments