ASP.NET MVC has come a long way since "The Gu" jotted down some ideas during an airplane ride to a conference in 2007. In just under four years, ASP.NET MVC has seen its fourth release, and it provides developers an environment that eases development, streamlines processes, and promotes modern patterns.
Dive In
Jumping right in is one of the best ways to get a handle of new technology. Let's go ahead and dive right into teh codez!
Setup
I will be using Visual Studio 2012 Release Candidate, which is available here. I also recommend downloading SQL Server 2012 because the new Management Studio is a much needed improvement over earlier versions.
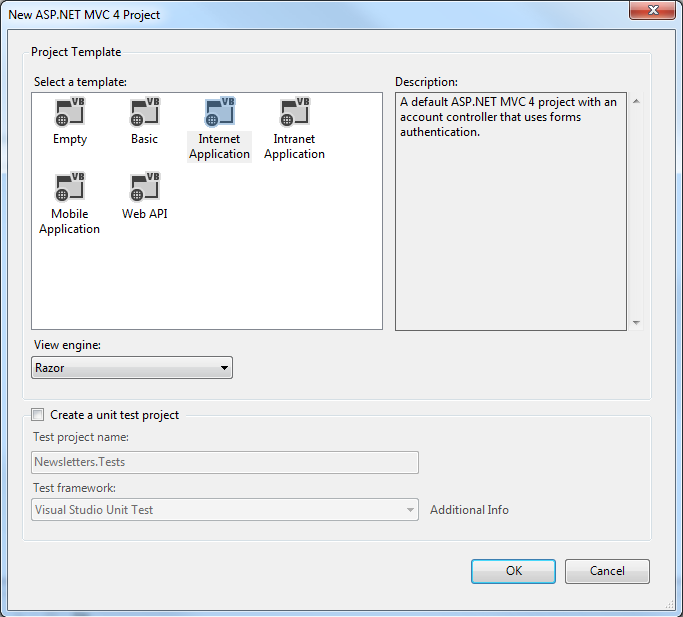
Once VS 2012 is up and running, go ahead and create a new project. Go to File -> New Project and choose an Internet Application. It's not a perfect template, but it'll get the job done.
Note: the code for this demo application is located in a Github repo. I won't go through every single piece of code in this app, but you'll have a good understanding of an MVC4 application at the end of this tutorial.
Entity Framework
I am going to use Entity Framework (EF) Code First for the data model. EF Code First lets us generate database tables with nothing more than a few Plain Old CLR Objects (POCO). Plus, EF lets us use LINQ to Entities and Lambda expressions, making it easy to query and issue commands. A win win!
Our application will be a review site for reviewing... stuff. Therefore, the data model needs to incorporate all the necessary bits and pieces for a single review. We'll start with a class called Review. Write the following class in its own file in the Models directory:
// Review.cs
// https://github.com/jcreamer898/NetTutsMvcEf/blob/master/Reviewed/Models/Review.cs
public class Review
{
    public int Id { get; set; }

    [Required]
    public string Content { get; set; }

    [Required]
    [StringLength(128)]
    public string Topic { get; set; }

    [Required]
    public string Email { get; set; }

    [Required]
    public bool IsAnonymous { get; set; }

    public int CategoryId { get; set; }
    public virtual Category Category { get; set; }

    public virtual IEnumerable<Comment> Comments { get; set; }
}
The Review class has it's Id (the primary key), the Content property to store the review, a Topic such as a restaurant name (or any name of an organization), an Email property, and an IsAnonymous flag to signify if the reviewer is anonymous. The CategoryId and the Category properties create a foreign key relationship to tie a review to a Category (eg: Doctors, Dentists, etc). And last is a collection of Comment objects.
Now write the Comment class. Once again, add the new class to the Models directory:
// Comment.cs
// https://github.com/jcreamer898/NetTutsMvcEf/blob/master/Reviewed/Models/Comment.cs
public class Comment
{
    public int Id { get; set; }

    [Required]
    public string Content { get; set; }

    [Required]
    public string Email { get; set; }

    [Required]
    public bool IsAnonymous { get; set; }

    public int ReviewId { get; set; }
    public Review Review { get; set; }
}
The comment class has an Id property for the primary key, Content of the comment, an Email property, and an IsAnonymous flag for users. Then there are ReviewId and Review properties to create a foreign key relationship between comments and reviews.
Last is the Category class. Here is its code:
// Category.cs
// https://github.com/jcreamer898/NetTutsMvcEf/blob/master/Reviewed/Models/Category.cs
public class Category
{
    public int Id { get; set; }

    [Required]
    [StringLength(32)]
    public string Name { get; set; }
}
This class is self-explanatory.
You probably noticed extensive use of the [Required] data annotation in the above classes. These designate a non-nullable field in the database and provide validation later down the road. You can also create your own custom validation attributes if you so desire. In addition to [Required], we also used the virtual keyword for some properties; those properties signify foreign key relationships with other tables.
To create the corresponding tables for these classes, you'll need to create a DbContext class. The following code creates a context class called ReviewedContext:
    // https://github.com/jcreamer898/NetTutsMvcEf/blob/master/Reviewed/Models/ReviewedContext.cs
    public class ReviewedContext : DbContext
    {
        public DbSet<Review> Reviews { get; set; }
        public DbSet<Category> Categories { get; set; }
        public DbSet<Comment> Comments { get; set; }

        public ReviewedContext()
        {
            Configuration.ProxyCreationEnabled = false;
        }
    }
EF Code First lets us generate database tables with nothing more than a few Plain Old CLR Objects (POCO).
Every property in this class corresponds to a table when generating the database. The Configuration.ProxyCreationEnabled = false; makes sure that the entities are retrieved as objects of their respective classes instead of proxies--making debugging much easier.
Next, we set up a database initializer. An initializer ensures that the database is created correctly when the data model undergoes any change. Without an initializer, you'll have to manually delete the database if you make a change to one of your POCOs. There are a few different types of initializers to choose from: DropCreateDatabaseAlways and DropCreateDatabaseIfModelChanges. The names are self explanatory. The one we are going to use is DropCreateDatabaseIfModelChanges.
The DropCreateDatabaseAlways and DropCreateDatabaseIfModelChanges initializers have a side effect: they drop the tables (and thus data) in the database when the model structure changes. But EF Code First provides a third way to generate databases: Migrations. This new feature tracks changes to the database and does not lose data as the POCO classes change.
Here's the code for our initializer:
// https://github.com/jcreamer898/NetTutsMvcEf/blob/master/Reviewed/Models/ReviewedContextInitializer.cs
// http://slipsum.com/
public class ReviewedContextInitializer : DropCreateDatabaseIfModelChanges<ReviewedContext>
{
    protected override void Seed(ReviewedContext context)
    {
        // Use the context to seed the db.
    }
}
The ReviewedContextInitializer class overrides the Seed() method. This gives us the ability to fill our database with some test data. Now, we need to visit the Global.asax file and add the following line to the Application_Start() method:
// https://github.com/jcreamer898/NetTutsMvcEf/blob/master/Reviewed/Global.asax.cs
Database.SetInitializer(new ReviewedContextInitializer());
Let's create some repositories for retrieving data from the database, and we'll go ahead and setup dependency injection (DI) with Ninject. If you don't exactly know what DI or Inversion of Control (IoC) are, then take a moment to read this article.
Basically, the idea of dependency injection is to inject a concrete dependency into a class, as opposed to hard coding the class to be dependent upon the concrete dependency. In other words, it's a decoupling of one concrete class from another. If that's still clear as mud, let's look at a brief example:
    public class Foo
    {
        private Bar _bar;

        public Foo()
        {
            _bar = new Bar();
        }
    }
This code creates a class called Foo. It is dependent upon the functionality of an object of type Bar, and the Bar object is created within the Foo class. This can be difficult to maintain and unit test because:
-
FooandBarare tightly coupled. As a result, maintenance is less than ideal. -
Foois dependent upon a specific implementation ofBar, making unit testing difficult.
This code can be improved upon with just a few modifications. Take a look at the revised Foo class:
    public class Foo
    {
        private IBar _bar;

        public Foo(IBar bar)
        {
            _bar = bar;
        }
    }
In just under four years, ASP.NET MVC has seen its fourth release...
Now, the Foo class is not dependent upon a specific implementation of Bar. Instead, an object of a class implementing the IBar interface is supplied to Foo via the latter's constructor. This approach greatly improves maintainability, while also allowing us to inject any IBar object--making it easier to unit test our code.
With that brief description out of the way, let's get Ninject up and running. Fire up the Package Manager Console and run Install-Package Ninject.MVC3. This will add Ninject to our project.
The first repository we'll create is the ReviewsRepository, and it will implement the IReviewRepository interface. Here's the interface:
// https://github.com/jcreamer898/NetTutsMvcEf/blob/master/Reviewed/Models/Abstract/IReviewRepository.cs
public interface IReviewRepository
{
    Review Get(int id);
    IQueryable<Review> GetAll();
    Review Add(Review review);
    Review Update(Review review);
    void Delete(int reviewId);
    IEnumerable<Review> GetByCategory(Category category);
    IEnumerable<Comment> GetReviewComments(int id);
}
This interface ensures that our review repositories provide the basic CRUD operations. We also get the utility of retrieving reviews by a specific category, as well as retrieving the comments for a given review. Now let's write a concrete class implementing this interface:
// https://github.com/jcreamer898/NetTutsMvcEf/blob/master/Reviewed/Models/Repos/ReviewRepository.cs
public class ReviewRepository : IReviewRepository
{
    private ReviewedContext _db { get; set; }

    public ReviewRepository()
        :this (new ReviewedContext())
    {

    }

    public ReviewRepository(ReviewedContext db)
    {
        _db = db;
    }

    public Review Get(int id)
    {
        return _db.Reviews.SingleOrDefault(r => r.Id == id);
    }

    public IQueryable<Review> GetAll()
    {
        return _db.Reviews;
    }

    public Review Add(Review review)
    {
        _db.Reviews.Add(review);
        _db.SaveChanges();
        return review;
    }

    public Review Update(Review review)
    {
        _db.Entry(review).State = EntityState.Modified;
        _db.SaveChanges();
        return review;
    }

    public void Delete(int reviewId)
    {
        var review = Get(reviewId);
        _db.Reviews.Remove(review);
    }

    public IEnumerable<Review> GetByCategory(Category category)
    {
        return _db.Reviews.Where(r => r.CategoryId == category.Id);
    }

    public IEnumerable<Comment> GetReviewComments(int id)
    {
        return _db.Comments.Where(c => c.ReviewId == id);
    }
}
WebAPI is a MVC-like framework that we can use to easily create a RESTful API...
This repository relies on a ReviewedContext object that is stored as a class variable. This enables us to use LINQ in any of the repository's methods, making database interaction easy.
WebAPI has a nice feature that lets us add our own DI framework. This feature is beyond the scope of this tutorial, so be sure to read this article to help get that setup.
One of the most important locations for our code is the App_Start folder, which contains a file called NinjectCommonWeb.cs (installing Ninject automatically adds this file to App_Start). This file contains a static class called NinjectWebCommon, and it has a method called RegisterServices(). In this method, add the following code:
// https://github.com/jcreamer898/NetTutsMvcEf/blob/master/Reviewed/App_Start/NinjectWebCommon.cs
kernel.Bind<IReviewRepository>().To<ReviewRepository>();
kernel.Bind<ICategoriesRepository>().To<CategoriesRepository>();
kernel.Bind<ICommentsRepository>().To<CommentsRepository>();

GlobalConfiguration.Configuration.DependencyResolver = new NinjectResolver(kernel);
The first three statements bind an interface to a concrete implementation of the interface, and the fourth line sets up the DI for WebAPI (the feature covered in the aforementioned article).
WebAPI
Let's now create the controllers for the API. WebAPI is a MVC-like framework that we can use to easily create a RESTful service, and it can run inside of a MVC4 application, in its own project, or it can be self hosted outside of IIS. But that's not all; it has many other features, such as: content negotiation (to automatically serialize it data into whatever format is requested), model binding, validation, and many more.
We first need to create an endpoint with WebAPI, and we do that by creating a class that inherits ApiController. Getting started with this is rather easy. Visual Studio 2012 has a new feature that creates a new, partially scaffolded controller.
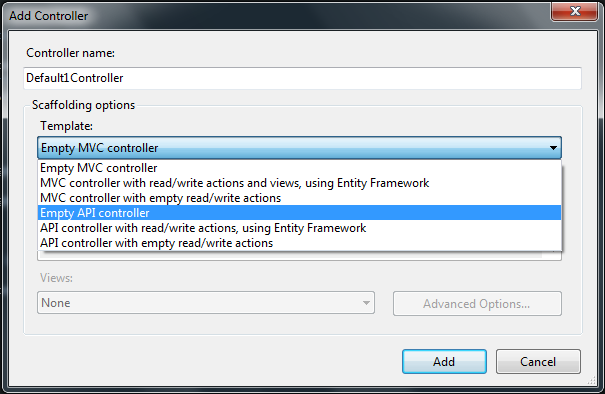
This will create a controller class with a few methods already defined for you. Here is an example:
// GET api/default1
public IEnumerable<string> Get()
{
    return new string[] { "value1", "value2" };
}

// GET api/default1/5
public string Get(int id)
{
    return "value";
}

// POST api/default1
public void Post(string value)
{
}

// PUT api/default1/5
public void Put(int id, string value)
{
}

// DELETE api/default1/5
public void Delete(int id)
{
}
The method names correspond to the HTTP verb they represent. We'll now create the ReviewsController class. The code a bit long, but pretty straightforward.
// https://github.com/jcreamer898/NetTutsMvcEf/blob/master/Reviewed/Controllers/ReviewsController.cs
public class ReviewsController : ApiController
{
    private ICategoriesRepository _categoriesRepository { get; set; }
    private IReviewRepository _reviewRepository { get; set; }

    public ReviewsController(IReviewRepository reviewRepository, ICategoriesRepository categoriesRepository)
    {
        _reviewRepository = reviewRepository;
        _categoriesRepository = categoriesRepository;
    }

    // GET api/review
    public IEnumerable<Review> Get()
    {
        var reviews = _reviewRepository.GetAll();
        return reviews;
    }

    // GET api/review/5
    public HttpResponseMessage Get(int id)
    {
        var category = _reviewRepository.Get(id);
        if (category == null)
        {
            return Request.CreateResponse(HttpStatusCode.NotFound);
        }
        return Request.CreateResponse(HttpStatusCode.OK, category);
    }

    // POST api/review
    public HttpResponseMessage Post(Review review)
    {
        var response = Request.CreateResponse(HttpStatusCode.Created, review);
        // Get the url to retrieve the newly created review.
        response.Headers.Location = new Uri(Request.RequestUri, string.Format("reviews/{0}", review.Id));
        _reviewRepository.Add(review);
        return response;
    }

    // PUT api/review/5
    public void Put(Review review)
    {
        _reviewRepository.Update(review);
    }

    // DELETE api/review/5
    public HttpResponseMessage Delete(int id)
    {
        _reviewRepository.Delete(id);
        return Request.CreateResponse(HttpStatusCode.NoContent);
    }

    // GET api/reviews/categories/{category}
    public HttpResponseMessage GetByCategory(string category)
    {

        var findCategory = _categoriesRepository.GetByName(category);
        if (findCategory == null)
        {
            return Request.CreateResponse(HttpStatusCode.NotFound);
        }
        return Request.CreateResponse(HttpStatusCode.OK,_reviewRepository.GetByCategory(findCategory));
    }

    // GET api/reviews/comments/{id}
    public HttpResponseMessage GetReviewComments(int id)
    {

        var reviewComments = _reviewRepository.GetReviewComments(id);
        if (reviewComments == null)
        {
            return Request.CreateResponse(HttpStatusCode.NotFound);
        }
        return Request.CreateResponse(HttpStatusCode.OK, reviewComments);
    }
}
This code uses IReviewRepository and ICategoriesRepository objects to perform the appropriate action (eg: retrieving data for GET requests, adding data with POST requests, etc). These respositories are injected with Ninject via Constructor Injection.
If you don't have Fiddler yet, get it now--even if you're not a .NET developer.
Notice that some of the methods return different data types. WebAPI gives us the ability to return a non-string data type (such as IEnumerable<Review>), and it will serialize the object to send in the server's response. You can also use the new HttpResonseMessage class to returning a specific HTTP status code along with the returned data. One way to create an HttpResponseMessage object is by calling Request.CreateResponse(responseCode, data).
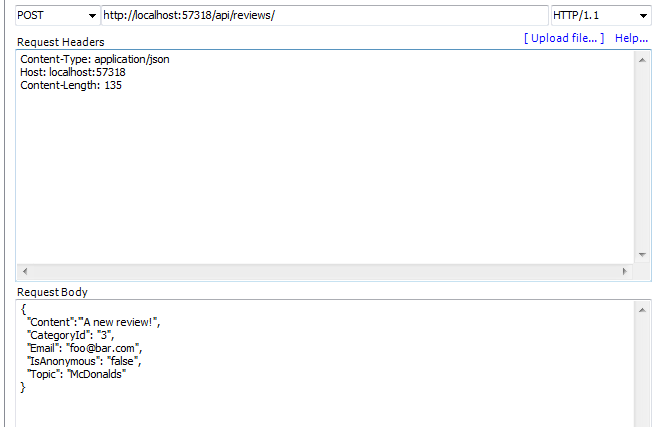
We can properly test our WebAPI project with a tool such as Fiddler2. If you don't have Fiddler yet, get it now--even if you're not a .NET developer. Fiddler is a fantastic HTTP debugging tool. Once you're running Fiddler, click on RequestBuilder and enter the API URL you want to test. Then choose the appropriate request type. If making a POST request, be sure and specify a Content-Type: application/json header, and then place a valid JSON structure into the request body. The following image demonstrates a raw JSON POST request to the api/reviews URL:
When you send the request, you'll see something like the following image:

Notice the POST request's status code is a 201. WebAPI does a great job of returning the correct status code for a RESTfull web service. Have fun with Fiddler2, it's a fantastic tool!
With WebAPI, you can specify the routing for the controllers (just like MVC). In MVC4, a RouteConfig.cs file is added to the App_Start folder. Routes for a WebAPI project are just like MVC routes.
// https://github.com/jcreamer898/NetTutsMvcEf/blob/master/Reviewed/App_Start/RouteConfig.cs
routes.MapHttpRoute(
    name: "GetReviewComments",
    routeTemplate: "api/reviews/comments/{id}",
    defaults: new { id = RouteParameter.Optional, controller = "Reviews", action = "GetReviewComments" }
);

routes.MapHttpRoute(
    name: "GetByCategories",
    routeTemplate: "api/reviews/categories/{category}",
    defaults: new { category = RouteParameter.Optional, controller = "Reviews", action = "GetByCategory" }
);

routes.MapHttpRoute(
    name: "DefaultApi",
    routeTemplate: "api/{controller}/{id}",
    defaults: new { id = RouteParameter.Optional }
);
The DefaultApi route is automatically generated by Visual Studio. The other two routes are custom and map to specific methods on the Reviews controller. There are many articles and tutorials that provide good information on routing. Be sure to check this one out.
MVC4
That covers a lot of what WebAPI has to offer. Next, we'll write a few methods to display the data. We'll consume the API in a little bit, but for now we'll use the repositories in our HomeController. A HomeController was created by Visual Studio; let's just modify its methods to display the data. First, let's get a list of the categories in the Index method.
// https://github.com/jcreamer898/NetTutsMvcEf/blob/master/Reviewed/Controllers/HomeController.cs
private ICategoriesRepository _categoriesRepository { get; set; }
private IReviewRepository _reviewRepository { get; set; }

public HomeController(ICategoriesRepository categoriesRepository, IReviewRepository reviewRepository)
{
    _categoriesRepository = categoriesRepository;
    _reviewRepository = reviewRepository;
}

public ActionResult Index()
{
    var categories = _categoriesRepository.GetAll();
    return View(categories);
}
Here, we continue to use DI by accepting the repositories as parameters for the HomeController constructor. Ninject automatically inject the appropriate concrete classes for us. Next, let's add some code to the Index view to display the categories:
// https://github.com/jcreamer898/NetTutsMvcEf/blob/master/Reviewed/Views/Home/Index.cshtml
@model IEnumerable<Reviewed.Models.Category>

<h3>Pick a Category:</h3>
<ul class="round">
    @foreach(var category in Model)
    {
        <li>
        <a href="@Url.Action("Reviews", new { id = @category.Name} )">@category.Name</a>
        </li>
    }
</ul>
This generates a list of categories that users can click on. Now add a new method to HomeController that retrieves a Review. We'll call this method Reviews, shown here:
// https://github.com/jcreamer898/NetTutsMvcEf/blob/master/Reviewed/Controllers/HomeController.cs
public ActionResult Reviews(string id)
{
    List<Review> reviews = new List<Review>();
    if (!string.IsNullOrWhiteSpace(id))
    {
        reviews = _reviewRepository.GetByCategory(_categoriesRepository.GetByName(id)).ToList();
    }
    else
    {
        reviews = _reviewRepository.GetAll().ToList();
    }

    foreach (var review in reviews)
    {
        var comments = _reviewRepository.GetReviewComments(review.Id);
        review.Comments = comments.ToList();
    }
    return View(reviews);
}
Because a route already exists for /{controller}/{action}/{id}, you can use a URL such as Home/Reviews/Doctors. The routing engine will pass "Doctors" as the id parameter to the Reviews method. We use the id as the category and retrieve all reviews associated with that category. If no category is provided, however, we simple retrieve all reviews in the database. Once we have all the reviews, we pass the review list to the view. Let's look at the view right now:
// https://github.com/jcreamer898/NetTutsMvcEf/blob/master/Reviewed/Views/Home/Reviews.cshtml
<div class="reviews">
@foreach(var review in Model)
{
    <h3>@review.Topic</h3>
    <p>
        @review.Content
    </p>

    var hasComments = review.Comments.Count > 0 ? "is-comments" : null;

    <ul class="@hasComments">
        @foreach(var comment in review.Comments)
        {
            <li>
                <strong>@(!comment.IsAnonymous ? string.Format("{0} says,", comment.Email) : "")</strong>
                <blockquote>@comment.Content</blockquote>
            </li>
        }
    </ul>
}
</div>
This code uses a new feature of MVC4. The <ul/> element's class attribute will not appear in the HTML if hasComments is null. Read more about this feature here.
JavaScript
No modern web app is complete without JavaScript, and we'll use it to consume our WebAPI service. We'll use Backbone.js for this; so, ahead on over and download Backbone and its dependency Underscore. Place the JavaScript files in the Scripts directory.
We'll take advantage of another new MVC4 feature called script bundling. In the App_Start folder, you'll find the BundleConfig.cs file. In this file, you can configure MVC4 to bundle JavaScript files together. Open it up and add a new bundle, like this:
bundles.Add(new ScriptBundle("~/bundles/backbone").Include(
        "~/Scripts/underscore*",
        "~/Scripts/backbone*"));
Then in the /Views/Shared/_Layout.cshtml file, add the following at the bottom of the page's body:
@Scripts.Render("~/bundles/backbone")
This will bundle your scripts if your application is in debug mode, or leave them alone with it turned off.
The MVC4 code we wrote for retrieving the review list is a fine way of displaying them, but all the new hawtness is using Ajax. So let's refactor the code to use Backbone.js. Through JavaScript, we'll retrieve the views asynchronously after the page has loaded. Create a new file in the Scripts folder called home.js. Add the following code to that file:
var Review = Backbone.Model.extend();
var Reviews = Backbone.Collection.extend({
    model: Review,
    url: '/api/reviews'
});
var Comment = Backbone.Model.extend({});
var Comments = Backbone.Collection.extend({
    model: Comment,
    url: '/api/reviews/comments/'
});
These are the JavaScript data models, each corresponding to a URL to retrieve data from the WebAPI service. Now let's write the view:
var ListReviews = Backbone.View.extend({
    el: '.reviews',
    initialize: function() {
        this.collection.on('reset', this.render, this);
        this.collection.fetch();
    },
    render: function() {
        this.collection.each(this.renderItem, this);
    },
    renderItem: function(model) {
        var view = new ReviewItem({
            model: model
        });
        this.$el.append(view.el);
    }
});
This view is for the entire list of reviews. When the collection's fetch() method is called, it triggers the reset event and then calls render(). The third parameter passed to the on() method is the scope, or what this will be in the render() callback. In the render() method, call the collection's each() method, passing the renderItem() method. The renderItem() method will be called on each item in the collection, generating a new ReviewItem for every review.
The code for ReviewItem follows:
var ReviewItem = Backbone.View.extend({
    events: {
        'click a': 'getComments'
    },
    tagName: 'li',
    initialize: function () {

        this.template = _.template($('#reviewsTemplate').html());
        this.collection = new Comments();
        this.collection.on('reset', this.loadComments, this);
        this.render();
    },
    render: function () {
        var html = this.template(this.model.toJSON());
        this.$el.append(html);
    },
    getComments: function () {
        this.collection.fetch({
            data: {
                Id: this.model.get('Id')
            }
        });
    },
    loadComments: function () {
        var self = this,
            item;
        this.comments = this.$el.find('ul');
        this.collection.each(function (comment) {
            item = new CommentItem({
                model: comment
            });
            self.comments.append(item.el);
        });

        this.$el.find('a').hide();
    }
});
WebAPI is a fantastic addition to the ASP.NET stack; a feature rich REST based API has never been easier.
The ReviewItem view is responsible for rendering each individual review. The initialize() method compiles the template used to display each review; this template resides in a <script/> element. Backbone pulls the template out of the <script/> element and combines it with the review.
A click event handler is also set up for loading the comments for each review. When the link is clicked, the getComments() method is called, fetching the comments by passing an Id to the WebAPI service. The fetch() method is merely an abstraction to jQuery's $.ajax method, so normal Ajax parameters, like data, can be passed in the fetch() call. Lastly, the loadComments() method will fire and create a new CommentItem view for each comment returned. The tagName on this view ensures the view is created with an <li/> as its $el property.
Next, let's look at the CommentItem view:
var CommentItem = Backbone.View.extend({
    tagName: 'li',
    initialize: function () {
        this.template = _.template($('#commentsTemplate').html());
        this.render();
    },
    render: function () {
        var html = this.template(this.model.toJSON());
        this.$el.html(html);
    }

});
This is a simple view that renders each comment. Now let's modify the Review.cshtml view as follows:
@model IEnumerable<Reviewed.Models.Review>

@section scripts {
    <script type="text/javascript" src="/Scripts/home.js"></script>
}

<div class="reviews">
    <ul></ul>
</div>

<script type="text/html" id="reviewsTemplate">

    <h3><%= Topic %></h3>
    <p>
        <%= Content %>
    </p>

    <a href="#comments">Load Comments</a>
    <ul></ul>

</script>

<script type="text/html" id="commentsTemplate">
<li>
    <strong><%= !IsAnonymous ? Email + " says," : "" %></strong>
    <blockquote><%= Content %></blockquote>
</li>
</script>
Notice the @section scripts in the above code. This is not a new feature to MVC4, but it is a great tool to render specific pieces of JavaScript. In the _layout.cshtml file, there's also a @RenderSection("scripts", required: false) which renders the section defined in the view. The <script/> elements are Underscore templates to render content. They follow a Ruby-esque syntax, and anything inside <% %> is evaluated as a statement. Anything inside of <%= %> will output to the HTML. Loops and conditional statements can be used like this:
<ul>
<script type="text/html" id="template">
<% for (var i = 0; i < list.length; i++) { %>
    <li><%= list[i] %></li>
<% } %>
</ul>

<% if (someCondition) { %>
    <%= output %>
<% } %>
</script>
That's the template. To use it, do this:
var template = _.template($('#template').html());
var html = template({
    someCondition: true,
    output: 'hello world',
    list: ['foo', 'bar', 'bam']
});
There are many JavaScript templating frameworks available on the Web: Handlebars.js, mustache.js, and Hogan.js are quite popular. Be sure and check them out and pick the one that works for you.
Conclusion
WebAPI is a fantastic addition to the ASP.NET stack; a feature rich REST based API has never been easier. There are a lot of great new features in MVC4. Be sure and check them out! As I previously mentioned, the code for this example is available on Github. Fork it!

Comments