In the first part of this series, we looked at how to to programmatically retrieve the count of a Facebook page's Likes, and Twitter and Google+ followers. By the end, we had created three PHP helper functions to simplify the social count retrieval.
These functions accept as its argument, a Facebook page username, Twitter username and Google+ username or ID respectively and in-turn return the Like or follower count.
In this final part of the series, we will develop a social profile widget that link to a Facebook page, Twitter and Google+ profile. The widget will also display the count of Facebook page likes as well as Twitter and Google+ followers count.
Below is a screenshot of the widget to be built at the end of this tutorial.

Coding the Widget
Like with all WordPress plugins, the file header containing meta information (such as Name, Version, Author, and so on) regarding the plugin should be at the beginning of the plugin file.
Below is our widget plugin header.
<?php
/*
 * Plugin Name: Tuts+ Social Profile Widget
 * Plugin URI: http://code.tutsplus.com
 * Description: Social widget that links to various social media profiles
 * Author: Agbonghama Collins
 * Author URI: http://tech4sky.com
 */
To create a WordPress widget, the standard WP_Widget class needs to be extended and the required methods included in the child class. Finally, the widget child class is registered and hooked to WordPress.
Create the child class extending the WP_Widget parent class.
class Tutsplus_Social_Profile extends WP_Widget {
// ...
Give the widget a name and description using the __construct() method.
function __construct() {

    parent::__construct(
        'Tutsplus_Social_Profile', __( 'Social Networks Profiles', 'translation_domain' ),
        array( 'description' => __('Links to Author social media profile', 'translation_domain' ) )
    );

}
At this point, it's time to take advantage of the helper functions we created in the last post so that we can display the Likes and Followers from Facebook, Twitter, and Google+.
public function twitter_count( $username ) {

    require_once 'TwitterAPIExchange.php';

    // Set access tokens here - see: https://dev.twitter.com/apps/
    $settings = array(
        'oauth_access_token'		=> 	"211978035-fedllb5xEQhnoHxAsK3259VIOhsFrLuRUyR4Atvr",
        'oauth_access_token_secret' => 	"7Nev2EyOxoHAVgb8Y5VHPRYuKbKomFqe3kf1ouOHtmHVs",
        'consumer_key' 				=> 	"MsHrMc5B9dZyP8mgqV0m2JGsq",
        'consumer_secret' 			=> 	"YhIdWozaAb9cvKcjKqamEcN2GgSBrzqfWZpIvKSeYVvCQsb8LL"
    );

    $url = 'https://api.twitter.com/1.1/users/show.json';
    $getfield = '?screen_name=' . $username;
    $request_method = 'GET';
    $twitter_instance = new TwitterAPIExchange( $settings );
    $follow_count = $twitter_instance	->setGetfield( $getfield )
            							->buildOauth( $url, $request_method )
            							->performRequest();
    $count = json_decode( $follow_count, true );

    return $count['followers_count'];

}
public function facebook_count( $username ) {
    $facebook_count = file_get_contents( 'http://graph.facebook.com/' . $username );
    return json_decode( $facebook_count )->likes;
}
public function googleplus_count( $username, $apikey = 'AIzaSyBHm7J9qLupabYWaxLg_9_UZPbxWdso2vY' ) {
        $google = file_get_contents( 'https://www.googleapis.com/plus/v1/people/' . $username . '?key=' . $apikey );
        return json_decode( $google ) -> circledByCount;
}
In the twitter_count() method above, the Twitter application OAuth access token, access token secret, consumer key and consumer secret are all hard-coded to the method.
You will have to change them to your Twitter application's OAuth credentials.
Same goes for the Google Plus API Key in googleplus_count() method.
The widget settings options will consist of
five form fields that contain the title of the widget, Facebook,
Twitter, and Google+ usernames as depicted in the image below.
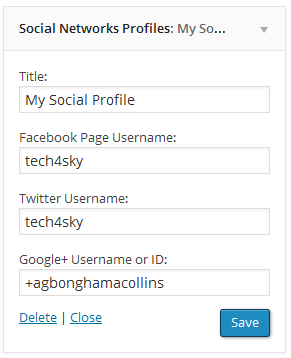
The form() method below create the Widget form.
public function form( $instance ) {
        isset ( $instance['title'] ) ? $title = $instance['title'] : null;
        empty ( $instance['title'] ) ? $title = 'My Social Profile' : null;

        isset ( $instance['facebook'] ) ?  $facebook = $instance['facebook'] : null;
        isset ( $instance['twitter'] )  ?  $twitter = $instance['twitter'] : null;
        isset ( $instance['google'] )   ?  $google = $instance['google'] : null;
        ?>
        <p>
            <label for="<?php echo $this->get_field_id('title'); ?>"><?php _e('Title:'); ?></label>
            <input class="widefat" id="<?php echo $this->get_field_id( 'title' ); ?>" name="<?php echo $this->get_field_name( 'title' ); ?>" type="text" value="<?php echo esc_attr( $title ); ?>">
        </p>

        <p>
            <label for="<?php echo $this->get_field_id('facebook'); ?>"><?php _e('Facebook Page Username:'); ?></label>
            <input class="widefat" id="<?php echo $this->get_field_id('facebook'); ?>" name="<?php echo $this->get_field_name('facebook'); ?>" type="text" value="<?php echo esc_attr( $facebook ); ?>">
        </p>

        <p>
            <label for="<?php echo $this->get_field_id('twitter'); ?>"><?php _e('Twitter Username:'); ?></label>
            <input class="widefat" id="<?php echo $this->get_field_id('twitter'); ?>" name="<?php echo $this->get_field_name('twitter'); ?>" type="text" value="<?php echo esc_attr( $twitter ); ?>">
        </p>

        <p>
            <label for="<?php echo $this->get_field_id('google'); ?>"><?php _e('Google+ Username or ID:'); ?></label>
            <input class="widefat" id="<?php echo $this->get_field_id( 'google' ); ?>" name="<?php echo $this->get_field_name( 'google' ); ?>" type="text" value="<?php echo esc_attr( $google ); ?>">
        </p>

<?php
}
When values are entered into the form field, they need to be saved to the database. The update() method sanitizes form values by stripping out malicious data and saves the sanitized values to the database.
public function update( $new_instance, $old_instance ) {

    $instance = array();
    $instance['title']     	= 	( ! empty ( $new_instance['title']) ) ? strip_tags( $new_instance['title'] ) : '';
    $instance['facebook'] 	= 	( ! empty ( $new_instance['facebook']) ) ? strip_tags( $new_instance['facebook'] ) : '';
    $instance['twitter'] 	= 	( ! empty ( $new_instance['twitter']) ) ? strip_tags( $new_instance['twitter'] ) : '';
    $instance['google'] 	= 	( ! empty ( $new_instance['google']) ) ? strip_tags( $new_instance['google'] ) : '';
    $instance['linkedin'] 	= 	( ! empty ( $new_instance['linkedin']) ) ? strip_tags( $new_instance['linkedin'] ) : '';

    return $instance;

}
Next is the widget() method that displays links to social network profiles together with the Likes and followers count at the front-end of WordPress.
        $title     	= 	apply_filters( 'widget_title', $instance['title'] );
        $facebook 	= 	$instance['facebook'];
        $twitter 	= 	$instance['twitter'];
        $google 	= 	$instance['google'];

        // social profile link
        $social_widget = '
        <ul class="diverz">
    	<li class="diverz facebookz">
		<a href="https://www.facebook.com/' . $facebook . '">
		<div class="main-diverz">
		<i class="facebookz fa fa-facebook"></i>
		<br/>
		<big class="spanz facebookz">facebook</big>
		</div>
		</a>
		<div class="sub-diverz">
		<strong>' .
        $this->facebook_count( $facebook ) . '</strong>
        <br/>fans
		</div>
		</li>

		<li class="diverz twitterz">
		<a href="https://www.twitter.com/' . $twitter . '">
		<div class="main-diverz">
		<i class="twitterz fa fa-twitter"></i><br/>
		<big class="spanz twitterz">twitter</big>
		</div></a>
		<div class="sub-diverz"><strong>' .
        $this->twitter_count('tech4sky') . '</strong><br/>fans
		</div>
		</li>

		<li class="diverz googlez">
		<a href="https://plus.google.com/u/0/' . $google . '">
		<div class="main-diverz">
		<i class="googlez fa fa-google-plus"></i><br/>
		<big class="spanz googlez">google+</big>
		</div></a>
		<div class="sub-diverz"><strong>' .
        $this->googleplus_count( $google ) . '</strong><br/>fans
		</div>
		</li>
		</ul>';

        echo $args['before_widget'];

        if ( !empty($title) ) {
            echo $args['before_title'] . $title . $args['after_title'];
        }

        echo $social_widget;

        echo $args['after_widget'];
}
We are done including the necessary methods and codes to the class so all that's left for us to do is to include the closing class brace.
// ...
}
The widget class Tutsplus_Social_Profile need to be registered using the WordPress register_widget function, and then hooked to widgets_init Action.
Without doing this, the widget won't be recognizable by WordPress.
function register_tutsplus_social_profile() {
    register_widget( 'Tutsplus_Social_Profile' );
}
add_action( 'widgets_init', 'register_tutsplus_social_profile' );
To give the widget a nice look, below is the CSS of the widget which also include the imported Font Awesome icons stylesheet file.
@import "//netdna.bootstrapcdn.com/font-awesome/4.1.0/css/font-awesome.min.css";

social-icons {
    font-size: 21px;
}

ul .diverz {
	width: 80px;
	border: 1px solid #e3e3e3;
	list-style-type: none;
	overflow: hidden;
	padding: 4px 2px;
	margin: 2px 2px !important;
	background-color: #eee;
}
.main-diverz {

	font-size: 16px;
	padding: 2px;
}

.sub-diverz {

	color: #000;
	background-color: #FFFFFF;
	margin: 2px;
	padding: 2px;
}

.diverz {
	float: left;
	text-align: center;
}

.spanz {
	font-size: 15px;
	vertical-align: middle;
}

.facebookz, .facebookz a {
	color: #3B5998;
}

.twitterz, .twitterz a {
	color: #00abe3;
}

.main-diverz i {

	font-size: 20px;
}
Save the CSS file with name tutsplus-social-profile-widget.css which must reside in the plugin root folder.
Finally, we need to enqueue the CSS file to WordPress:
// enqueue css stylesheet
function tutsplus_social_profile_widget_css() {
    wp_enqueue_style( 'social-profile-widget', plugins_url( 'tutsplus-social-profile-widget.css', __FILE__ ) );
}
add_action( 'wp_enqueue_scripts', 'tutsplus_social_profile_widget_css' );
Hurray - we've have finished coding our Social Profile Widget
Suggested Improvements
In the widget class, the Twitter OAuth credentials and the Google+ API key were hard-coded to the class. When developing a plugin of this nature, a settings page which will contain a form that will save the OAuth and API keys to WordPress database should be in-place which are then retrieved and use by the class.
The widget form lacks a client-side validation mechanism which come in handy to ensure the appropriate form values are entered. Read my article on Client-Side Form Validation with HTML5 to learn how the validation can be done.
The widget only feature Facebook, Twitter and Google+. You are at liberty to extend the widget class and include other social networks.
At the top-right corner of this page is a link to download the Widget plugin file. Go ahead and use in your WordPress site and also sturdy the code to fully comprehend how it works.
Any and all feedback and questions are welcome in the comments section!

Comments