Shopify is a fast-growing eCommerce platform, adding thousands of new merchants every month.
The great thing about the Shopify platform is that Shopify has openly said they aren't concerned with solving every problem for their merchants. Instead they have created their APIs and App Store so that independent developers can build out (and charge for) features their merchants want.
This means there are opportunities to extend and customize Shopify using Shopify apps, whether you have your own Shopify store you want to improve or you want to create a Shopify app as a business.
Shopify apps aren't required to be complex either. A Shopify app is just a piece of software that integrates with Shopify's REST APIs. Shopify makes tools and software development kits (SDKs) available to make building an app easier, but any program can become a Shopify app with a little integration.
In this article, I'm going to show you how to build a simple Shopify app, and I will do a few things the "hard way" for the sake of teaching you about the APIs and Shopify apps. Make sure to check out the resources at the end to find the best ways to reduce the amount of effort required.
Private Apps vs. Public Apps
Before we get started, there is one important Shopify concept to learn. Your choice will frame all of the app development you do.
In Shopify there are two types of apps:
- Public apps, which work with multiple stores, can be listed in the Shopify App Store, and have access to most APIs.
-
Private apps, which work with one store, are not listed in the Shopify App Store, cannot be embedded into the Shopify Admin panel, and have limited access to the APIs.
The big technical difference between the two is that public apps are authenticated using OAuth, which requires more setup and a confusing "new user setup". Private apps are authenticated using two keys for a single shop, which act like an app-specific username and password.
Since this shop authentication is one of the first things you need to do, making the right decision at the beginning is important.
To keep the complexity down, we're going to build our app as a private app. That way we don't have to worry about the OAuth configuration and the complexity it entails.
Building an App to Tag Repeat Customers
For our example Shopify app, we're going to build a command-line app that will help a shop find who its repeat customers are. It will do this by using the Customer API.
Then it will tag those repeat customers so we can easily find them in the Shopify admin panel. Command-line scripts like this are great for automation and back-office work. Typically they'll be scheduled to run automatically so there's no real UI or user input.
We're also going to use Ruby for this app. While you can use any language that supports HTTP REST calls, Shopify itself uses Ruby and Ruby on Rails, and it maintains the official libraries for Ruby.
1. Registering Your New App With Shopify
The first step to building an app is to register it in Shopify. Since this is a private app, we would log in to our Shopify store, go to the Apps section, click the Private Apps, and then click Create a New Private App.
The name of the app is only used for our reference, and it's not used in the code at all.
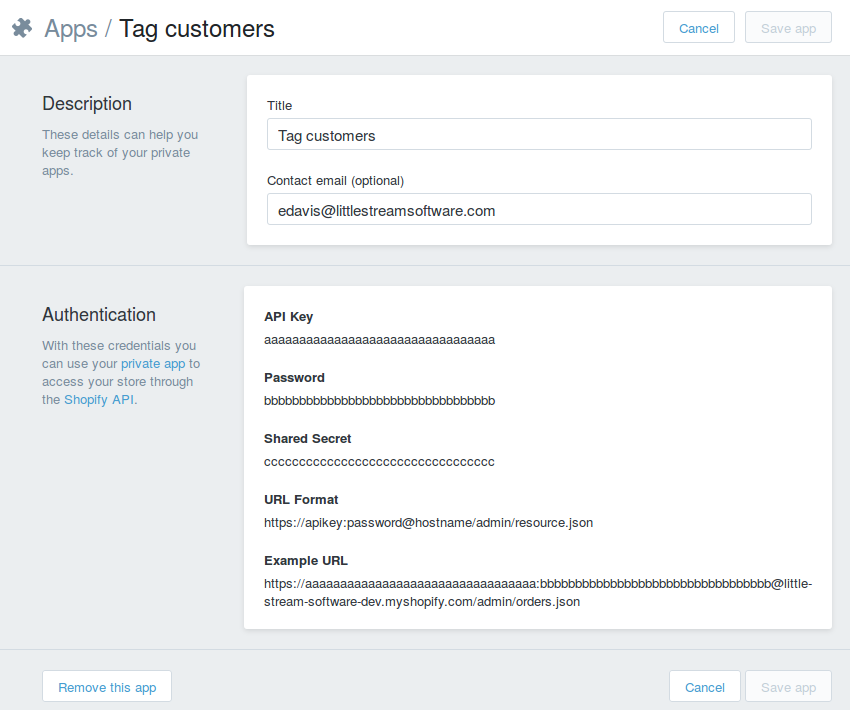
Once created, we'll get a few API keys to use.
- API key: this is the app's identifier and acts like the username to the API.
- App password: this is the secret password that authenticates our app.
- Shared secret: this is used by Shopify to sign some APIs. We're not using it in this app.
(You can sign up for the Shopify Partner program, which gives you the ability to create public apps and free development stores. I strongly recommend this to everyone, even if you're planning to integrate with only one Shopify store, because this will let you test your app outside of your live store.)
With the app registered, we can start writing some code.
2. Setting Up the Ruby Gems
This being a Ruby project, we want to start by creating a Gemfile that lists all of the RubyGems we're going to use. Two important ones are shopify_api and dotenv.
source 'https://rubygems.org'

# Script
gem 'shopify_api'
gem 'dotenv'
gem 'rake'

# Debugging
gem 'pry'

# Testing
gem 'minitest'
The shopify_api gem includes ActiveResource classes for Shopify's API. This means you don't have to worry about writing the code for the HTTP requests and responses; the library will do the API calls for you and return you Ruby objects to work with. Shopify provides non-Ruby libraries too; check the resources at the bottom of this article for your language.
The dotenv gem is an important gem because it will let us create a special file (.env) that holds our app configuration that gets loaded into the app when it runs. The purpose of this is so we can publish the app and its code without including sensitive data like our API key and password.
This .env file defines several variables that will get exported into our app as part of the runtime environment (accessible in Ruby's ENV).
# Your Shopify store's myshopify.com subdomain
export SHOP=example
# Your app's identifier, used as the username in the API
export SHOPIFY_API_KEY="aaaaaaaaaaaaaaaaaaaaaaaaaaaaaaaa"
# Your app's password
export SHOPIFY_PASSWORD="bbbbbbbbbbbbbbbbbbbbbbbbbbbbbbbb"
# Secret key that is used by Shopify to sign some APIs
export SHOPIFY_SHARED_SECRET="cccccccccccccccccccccccccccccccc"
Now that the gems are configured, they can be installed using bundler with bundle install.
3. Command-Line Interface
The way we'd want this app to work is: a user can run the script on the command line like bundle exec ruby tag_customers.rb, and it will automatically tag all repeat customers in Shopify.
Let's start by creating an empty script and loading the libraries we need.
#!/usr/bin/env ruby
require 'pry'
require 'shopify_api'
require 'dotenv'
Dotenv.load
Notice how we call Dotenv.load right away. That does the variable exporting from our .env file so from then on we can use that configuration.
We're also going to create a simple class to hold the logic and then call that class at the end to execute it using Ruby's __FILE__ == $PROGRAM_NAME feature.
class TagCustomers
end

# Called when the file is run on the command line, but not in a require
if __FILE__ == $PROGRAM_NAME
  TagCustomers.new
end
4. Shopify API Connection
Now that we have everything needed to run our app, let's add a connection to Shopify's API. Since everything is based on the shop, grabbing its data works great as a connection test. For this, we need to do a few things:
- Configure the
shopify_apito use our Shopify shop and authentication. - Make the API call to Shopify.
- Check the results.
When working with private apps in shopify_api, we can configure our shop's authentication in the base URL using HTTP Basic. The base URL is built like this:
- https
- HTTP Basic username, which is our app's API key
- HTTP Basic password, which is our app's password
- SHOP_NAME.myshopify.com subdomain, which is unique for every shop
- /admin subdirectory, where all of the APIs live
Putting this all together, here is the result:
https://aaaaaaaaaaaaaaaaaaaaaaaaaaaaaaaa:[email protected]/admin
To configure this in our script, we'll assemble this base URL and assign it to the ShopifyAPI::Base class.
class TagCustomers
  attr_accessor :shop_url

  # Configure the Shopify connection
  def initialize
    @shop_url = "https://#{ENV["SHOPIFY_API_KEY"]}:#{ENV["SHOPIFY_PASSWORD"]}@#{ENV["SHOP"]}.myshopify.com/admin"
    ShopifyAPI::Base.site = @shop_url
  end
end
Notice how the ENV is used again to keep sensitive data out of the actual code. This also lets users change the SHOP variable, which is useful if you have multiple shops you'd like to run this script on.
Finally, let's add a method to grab the details of the shop from Shopify.
#!/usr/bin/env ruby
require 'pry'
require 'shopify_api'
require 'dotenv'
Dotenv.load

class TagCustomers
  attr_accessor :shop_url

  # Configure the Shopify connection
  def initialize
    @shop_url = "https://#{ENV["SHOPIFY_API_KEY"]}:#{ENV["SHOPIFY_PASSWORD"]}@#{ENV["SHOP"]}.myshopify.com/admin"
    ShopifyAPI::Base.site = @shop_url
  end

  # Tests the Shopify connection with a simple GET request
  def test_connection
    return ShopifyAPI::Shop.current
  end
end

# Called when the file is run on the command line, but not in a require
if __FILE__ == $PROGRAM_NAME
  puts TagCustomers.new.test_connection.inspect # Prints the result
end
Using ShopifyAPI::Shop.current, we let the shopify_api:
- build up an HTTP request for the shop data at https://123456:[email protected]/admin/shop.json
- get the response
- if successful, convert the response JSON into a
ShopifyAPI::Shopobject
If the request was successful, our script would print out the final result to the command line. If there was an error, like in our authentication or in the API, then shopify_api would raise an exception and end our app with an error message.
$ bundle exec ruby tag_customers.rb
#<ShopifyAPI::Shop:0x00000002670b40 @attributes={"id"=>8431627, "name"=>"Little Stream Software Dev", "email"=>"[email protected]", "domain"=>"little-stream-software-dev.myshopify.com", "created_at"=>"2015-04-23T16:54:53-04:00", "province"=>"Oregon", "country"=>"US", "address1"=>"123 Main St", "zip"=>"97007", "city"=>"Aloha", "source"=>"littlestream", "phone"=>"5555555555", "updated_at"=>"2016-03-22T13:00:00-04:00", "customer_email"=>"[email protected]", "latitude"=>45.000000, "longitude"=>-122.000000, "primary_location_id"=>nil, "primary_locale"=>"en", "country_code"=>"US", "country_name"=>"United States", "currency"=>"USD", "timezone"=>"(GMT-05:00) Eastern Time (US & Canada)", "iana_timezone"=>"America/New_York", "shop_owner"=>"Eric Davis", "money_format"=>"$ {{amount}}", "money_with_currency_format"=>"$ {{amount}} USD", "province_code"=>"OR", "taxes_included"=>false, "tax_shipping"=>nil, "county_taxes"=>true, "plan_display_name"=>"affiliate", "plan_name"=>"affiliate", "has_discounts"=>true, "has_gift_cards"=>false, "myshopify_domain"=>"little-stream-software-dev.myshopify.com", "google_apps_domain"=>nil, "google_apps_login_enabled"=>nil, "money_in_emails_format"=>"${{amount}}", "money_with_currency_in_emails_format"=>"${{amount}} USD", "eligible_for_payments"=>true, "requires_extra_payments_agreement"=>false, "password_enabled"=>false, "has_storefront"=>true, "eligible_for_card_reader_giveaway"=>true, "setup_required"=>false, "force_ssl"=>false}, @prefix_options={}, @persisted=true>
5. Customer List
Now that the connection works, we can use another API to grab a list of a shop's customers. Once again, shopify_api makes this simple:
class TagCustomers
  # ...

  # Downloads the customers from Shopify
  def customers
    ShopifyAPI::Customer.all
  end

  # ...
end
In this case we want all of the shop's customers, so we use ShopifyAPI::Customer.all, which behind the scenes calls Shopify's Customer API and returns an array of customer objects.
6. Tagging Repeat Customers
Since we only want to tag customers who have placed more than one order, we need to add another method to tag repeat customers.
If you look at the Customer objects or in Shopify's API docs, you'll see that Shopify has a field called orders_count that already tracks how many orders a customer has placed. This is great news for our app because in eCommerce systems there are usually thousands or millions of orders. If we wanted to look for customers with repeat orders, we'd need to download and count all of those orders. Since Shopify has this field, we can focus entirely on the Customers.
Whenever you're working with any API, it always is useful to read the API documentation and look at the data you get back from it. Sometimes you'll find a better way to accomplish what you're trying to do.
Let's add a method that checks the orders_count and does the tagging.
  # Tags repeat customers with the tag "repeat"
  def tag_repeat_customers
    tagged_customers = []
    customers.each do |customer|
      if customer.orders_count > 1
        unless customer.tags.include?("repeat")
          customer.tags += "repeat"
          customer.save
        end
        tagged_customers << customer
      end
    end

    tagged_customers
  end
This is the guts of the app, so let's break it down part by part.
First off, we create an array of tagged_customers. If you jump to the end of the method, you can see that's what's being returned. We want our app to let us know which customers are tagged as repeat customers, so that we can keep track of them and spot any potential problems later on (e.g. customers are getting skipped).
Next we call our customers method from earlier, which uses Shopify's API to fetch all of the shop's customers.
We immediately start iterating over it each customer record we get back (each).
Since shopify_api converted the customer JSON into a Ruby object, we can check customer.orders_count and see how many orders they have. We are only concerned with customers that have more than one order, so using the if conditional we can ignore customers with 0 or 1 order.
For the repeat customers, we're adding the "repeat" tag and then calling the save method on the Ruby object. This method, through shopify_api, makes the API call to update the customer record.
Surrounding that tagging and save call is another conditional. Before we take the time and API call to update the customer with a new tag, we should check to see if they have the "repeat" tag already. If they do, we can skip over them and proceed to the next customer. Limiting the API calls to only records that need to be updated will make our app run faster and will also keep it from hitting Shopify's API call limits.
Finally, for repeat customers, we add them into that array of tagged_customers we set up at the beginning so the method will return it.
7. Calling the Class From the Command Line
# Called when the file is run on the command line, but not in a require
if __FILE__ == $PROGRAM_NAME
  tagged = TagCustomers.new.tag_repeat_customers
  puts "Tagged #{tagged.length} customers with 'repeat'"
end
All that's left to do is to call our new tag_repeat_customers when our script executes. We'll even add a bit of content there to print on the command line how many repeat customers have been tagged.
$ bundle exec ruby tag_customers.rb
Tagged 1 customers with 'repeat'
Final Code
#!/usr/bin/env ruby
require 'pry'
require 'shopify_api'
require 'dotenv'
Dotenv.load

class TagCustomers
  attr_accessor :shop_url

  # Configure the Shopify connection
  def initialize
    @shop_url = "https://#{ENV["SHOPIFY_API_KEY"]}:#{ENV["SHOPIFY_PASSWORD"]}@#{ENV["SHOP"]}.myshopify.com/admin"
    ShopifyAPI::Base.site = @shop_url
  end

  # Tests the Shopify connection with a simple GET request
  def test_connection
    return ShopifyAPI::Shop.current
  end

  # Downloads the customers from Shopify
  def customers
    ShopifyAPI::Customer.all
  end

  # Tags repeat customers with the tag "repeat"
  def tag_repeat_customers
    tagged_customers = []
    customers.each do |customer|
      if customer.orders_count > 1
        unless customer.tags.include?("repeat")
          customer.tags += "repeat"
          customer.save
        end
        tagged_customers << customer
      end
    end

    tagged_customers
  end
end

# Called when the file is run on the command line, but not in a require
if __FILE__ == $PROGRAM_NAME
  tagged = TagCustomers.new.tag_repeat_customers
  puts "Tagged #{tagged.length} customers with 'repeat'"
end
Completed Shopify App to Tag Customers
In roughly 50 lines of code, we've created a Shopify private app that finds customers with more than one order and tags them with "repeat". Counting our test_connection part, we're using three separate Shopify APIs here:
- GET Shop
- GET Customers
- PUT Customer
Future Improvements
This script is nice and solves a problem quite easily, but there is always room for improvement.
One dramatic improvement would be to change it to be a web app that runs on a server. The interface could have a button to run the tagging methods, or the tagging could be run automatically. The web app could also log which customers have the tag added each time, and we could browse through past runs and see the store's repeat customers.
If you do decide to go down this route, make sure to check out the shopify_app project. That project is a library that wraps the shopify_api gem and integrates it into Ruby on Rails along with OAuth. It's the basic skeleton you want to use if you're creating a Rails-based public Shopify app.
Another improvement to the app would be to tag customers based on what's in their order. For example, you might want to tag customers who bought a particular product or who have spent over a specific amount.
This improvement would require getting the orders and line items for each customer, which makes it a more complex app due to the amount of data processing.
Shopify Development Libraries and Resources
Shopify maintains several different libraries for its API, and there are several unofficial, third-party libraries you can use too. Here's a small collection of them:
Now you should have a better understanding of how you can build a Shopify app. You've seen how to connect to Shopify from Ruby using shopify_api and Private App authentication. You've also learned how to test the connection with an API call as well as one technique to limit your API usage. Finally, you learned how easy it is to update the Shopify objects and have those changes pushed back to Shopify.
While the app is simple in concept, all of these techniques apply to larger and more complex apps.

Comments