This tutorial will teach you how to build a mobile news feed reader web application using the Google Reader API. This application will be very "feature focused", but the foundation you learn here should be enough for you to expand upon in your own apps. As of the time of this writing, there isn't an official Google Reader API, so this tutorial will make use of the unofficial API commonly used when building Google Reader applications.
Step 1: Concepts and Endpoints
Concepts
Google uses slightly different lingo for some of the backend parts of the Google Reader API. Some of it is tied to their platform and some seems to be due to drift as the application matured on the front-end. One such concept is referred to as a "stream". A stream represents content that is sliced and diced or filterd in different ways. All the articles from a specific feed are part of a stream, and so are all the articles from a folder.
The following is a brief table to show differences in common client-side lingo and the corresponding Google Reader API backend terminology:
| Client-side | API |
| Folder / Tag | Tag / Label |
| Subscription | Subscription |
| People you Follow | Friend |
| Starred | Starred |
| Shared | Broadcast |
Endpoints
If you are logged into your Google Reader account, try entering the following endpoints in your browser:
User information:
https://www.google.com/reader/api/0/user-info?output=json
List of subscriptions:
https://www.google.com/reader/api/0/subscription/list?output=json
List of folders/tags:
https://www.google.com/reader/api/0/tag/list?output=json
List of people you follow:
https://www.google.com/reader/api/0/friend/list?output=json
List of Google Reader preferences:
https://www.google.com/reader/api/0/preference/stream/list?output=json
The above endpoints are read-only, and will be used throughout this tutorial.
Step 2: Building the Interface
To access Google Reader we'll build a custom PHP class. Below is a list of the functions this class will need (I'll go into each in more depth later on):
Class Functions
-
login- Gets Google auth code and reader edit token. -
get_subscriptions- Returns a list of subscribed feeds. -
get_tags- Returns a list of folders/tags. -
get_friends- Returns a list of people you follow. -
get_stream_items- Returns an article from a stream. -
set_article_read- Sets an article as read. -
set_article_starred- Stars an article. -
set_article_broadcast- Adds an article to your shared list. -
set_article_review- Applies the tag "review" to an article. -
get_url- HTTP GET request with Google authentication. -
get_anon_url- HTTP GET request without Google authentication. -
post_url- HTTP POST request with Google authentication. -
post_anon_url- HTTP POST request without Google authentication.
Properties
Our PHP class will use a number of different properties.
As you might be able to guess, the following properties will be set to your Google Reader account's email ID and password:
   public $grEmail  = '';
   public $grPasswd = '';
The following properties are used in the class Curl functions (check out the source code for those):
   public $userAgent = 'tuts+rss+bot';
   public $proxy     = 0;
   public $proxyUrl  = '';
I've included proxy support because my hosting ISP (Godaddy) requires outbound traffic to pass through a proxy. If you don't need proxy support keep $proxy set to 0 in gr-config.php.
Next, we have many of the beginning endpoints for the API's available:
   protected $_urlBase          =  'https://www.google.com';
   protected $_urlApi           =  'https://www.google.com/reader/api/0';
   protected $_urlAuth          =  'https://www.google.com/accounts/ClientLogin';
   protected $_urlToken         =  'https://www.google.com/reader/api/0/token';
   protected $_urlUserInfo      =  'https://www.google.com/reader/api/0/user-info';
   protected $_urlTag           =  'https://www.google.com/reader/api/0/tag';
   protected $_urlSubscription  =  'https://www.google.com/reader/api/0/subscription';
   protected $_urlStream        =  'https://www.google.com/reader/api/0/stream';
   protected $_urlFriend        =  'https://www.google.com/reader/api/0/friend';
The next three properties store information collected during the authentication process:
   public $userInfo  = '';
   protected $auth   = '';
   protected $token  = '';
In the application section we'll set these to PHP sessions so we don't have to login again with each request.
Step 3: Fleshing Out the Class Functions
The following functions will do the heavy-lifting for our application.
Login Function
We need to hit the Google Authentication API to start off:
    $data = '&Email='.$this->grEmail.'&Passwd='.$this->grPasswd.'&service=reader&source='.$this->userAgent.'&continue=http://www.google.com';
    $result = $this->post_anon_url($this->_urlAuth,$data);
After querying the authentication API, the first thing to collect is the $auth string. This string supplies Google's authentication layer with our credentials. Getting the $auth is useful for almost any Google service.
    preg_match('/Auth=(\S*)/', $result, $match);
    $this->auth = $match[1];
Next is the $token and we'll need to hit another endpoint for it. Token is specific to Google Reader and is required for requests that write or change state.
$this->token = $this->get_url($this->_urlToken);
The third is a user information object, we'll need the userId portion. Some of the API options require your google userId, which is a large number that represents your account and not the email ID you use for logins. The user info also contains the large number used to access your shared feed.
$this->userInfo = json_decode($this->get_url($this->_urlUserInfo));
List Functions
These are simple functions to retrieve a list of your feeds in various ways.
get_subscriptions returns a list of every feed you have subscribed to:
function get_subscriptions() {
    $result = $this->get_url($this->_urlSubscription.'/list?output=json');
    return json_decode($result);
}
get_tags returns a list of all the folders and tags:
function get_tags() {
    $result = $this->get_url($this->_urlTag.'/list?output=json');
    return json_decode($result);
}
get_friends returns a list of the people you follow:
function get_friends() {
    $result = $this->get_url($this->_urlFriend.'/list?output=json');
    return json_decode($result);
}
Items Function
This is the meat of the class and what everything else leads up to. With this function we are returning the individual articles based on the criteria specified. The $stream is pulled from the results of the list functions, and it could be a feed from a friend, an entire folder, or a specific feed. $n is the number of articles to return at one time. For the app i've limited it to just 20, but if your reusing this for anything other then real-time display you can bump it up to 1000. After 1000 you need to use the continuation option, which is out of scope for this article.
get_stream_items accepts a number of parameters and with the defaults you only really need to provide it with a stream:
function get_stream_items(
    $stream = '',
    $xt_a = array('user/-/state/com.google/read'),
    $daysago = 3,
    $n = 20,
    $magic = True) {
$ot is used to tell Google Reader you don't want to return any articles older them this time. Google Reader goes by epoch time, but I like using $daysago because it's just easier to go by days rather than seconds. From that, we can calculate $ot from the current time. $ck is important, but I've never received a good explanation about it, and without an official Google Reader API it may remain a mystery. I've been setting it to time() * 1000 and it just works, whereas time() * 100 does not.
    $ot = time() - ($daysago * 86400);
    $ck = time() * 1000;
$magic is a boolean to return the articles using the Google Reader "magic" ranking, or, if false, by the newest first. You can also sort by oldest first by setting $r = 'o' if you want.
if ($magic == True) { $r = 'a'; } else { $r = 'n'; }
$xt_a is used to exclude articles of a feed based on certain metadata related to the article's state. By default the function only returns unread posts because it's excluding articles flagged as read.
    $xt = '';
    foreach($xt_a as $key=>$value) { $xt .= '&xt='.$value; }
We pass the final URL to Google Reader and return the results after the parameters are set:
    $url = $this->_urlStream.'/contents/'.$stream.'?ot='.$ot.'&r='.$r.$xt.'&n='.$n.'&ck='.$ck.'&client='.$this->userAgent;
    $result = $this->get_url($url);
    return json_decode($result);
}
Set Function
Three of these functions are used to write back to Google Reader and mark articles with a certain state. The last is used to set a tag. You could easily condense all four down to a single function and pass the "a=" as a function parameter. This set up is just my preference, I prefer it this way so the code using the class is cleaner and easier to read. If you plan on creating your own function you can submit multiple "a=" at a time. Also, you can pass multiple "i=" and "s=" options, you just have to pass an equal amount and in the correct order. I generally pass 10 at a time when marking a lot of items as read.
Set the article to the "read" state:
function set_article_read($id,$stream) {
    $url = $this->_urlApi . '/edit-tag?pos=0&client=' . $this->userAgent;
    $data = 'a=user/-/state/com.google/read&async=true&s='.$stream.'&i='.$id.'&T='.$this->token;
    return $this->post_url($url,$data);
}
Star the article:
function set_article_starred($id,$stream) {
    $url = $this->_urlApi . '/edit-tag?pos=0&client=' . $this->userAgent;
    $data = 'a=user/-/state/com.google/starred&async=true&s='.$stream.'&i='.$id.'&T='.$this->token;
    return $this->post_url($url,$data);
}
Share the article with those who follow you:
function set_article_broadcast($id,$stream) {
    $url = $this->_urlApi . '/edit-tag?pos=0&client=' . $this->userAgent;
    $data = 'a=user/-/state/com.google/broadcast&async=true&s='.$stream.'&i='.$id.'&T='.$this->token;
    return $this->post_url($url,$data);
}
This last one applies a review tag:
function set_article_review($id,$stream) {
    $url = $this->_urlApi . '/edit-tag?pos=0&client=' . $this->userAgent;
    $data = 'a=user/'.$this->userInfo->userId.'/label/Review&async=true&s='.$stream.'&i='.$id.'&T='.$this->token;
    return $this->post_url($url,$data);
}
The above should be used in the app so you can mark something to review when next using a regular browser.
Step 4: On to the Application
The application interface is built on the base of the excellent HTML5 boilerplate at http://html5boilerplate.com/. I took the index.php from the boilerplate and split it into header and footer include files. The main page is index.php and will accept an &list querystring value denoting which list to display. It defaults to the folder list. Any item in the list will go to articles.php with the &stream and &list passed. The class is placed in a file gr.php with gr-config.php actually being the file that includes it into the others. It might be obvious, but in gr-config.php we'll also put in the config options for the class. The last php file is set_article.php. It will be called with an AJAX request from articles.php and is responsible for calling the set functions.
I've included the two tags below in the header.php include file but they are commented out:
  <link rel="apple-touch-startup-image" href="splashimage.png">
  <meta name="apple-mobile-web-app-capable" content="yes" />
They make the web app function more like a regular app when you add the site on the iOS homescreen. apple-touch-startup-image provides an image to display while the main page is being loaded. apple-mobile-web-app-capable makes the site run on its own Safari instance rather then in the general Safari instance. The only problematic thing is that with apple-mobile-web-app-capable set to yes, clicking a link to a different domain opens the link in the main Safari instance, thus forcing you to multitask back to the reader app.
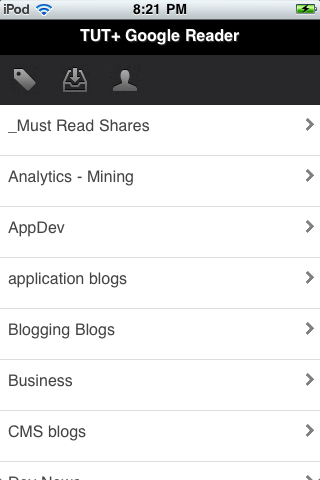
Step 5: Building the Main Page
For this application we are going to build a main page that will display a list of either  Folders (default),
  Friends or
  Subscriptions.
Screenshot
The Setup
Here's the setup at the beginning of the index.php, articles.php, and set_article.php pages:
session_set_cookie_params(300);
session_start();
include_once('gr-config.php');
include_once('header.php');
The Menu
The menu is a simple HTML list that can be used to retrieve the different subscription lists:
<div id="menu">
    <ul>
        <li class="tags" onclick="window.location='index.php?list=tags'"></li>
        <li class="subs" onclick="window.location='index.php?list=subs'"></li>
        <li class="friends" onclick="window.location='index.php?list=friends'"></li>
    </ul>
</div>
The menu uses a sprite for the buttons based off the nice icon set Glyphish.
The Code
Now on to the first real use of the class. Basically, we are going to check if &list is set and, if not, default to tags view. Then it's just a switch statement to know what list to build and gr function to use.
First, we default $list to tags if nothing is passed and then pass $list to a switch. When $list matches subs we just output a pretty straight list of all the subscriptions returned. This can be a lot for heavy users which is why tags mode is the default.
if (isset($_GET['list'])) { $list = $_GET['list']; } else { $list = 'tags'; }
switch ($list) {
   case 'subs':
      $subs = $gr->get_subscriptions();
      foreach($subs->subscriptions as $sub) {
         echo '<li onclick="window.location = \'articles.php?list=',$list,'&stream=',$sub->id,'\'">  ',$sub->title,'<div class="right-arrow"></div></li>';
      }
      break;
The data comes back with the full label string rather then just the folder name. Setting up $remove will let us get rid of the unneeded parts of the label string and just show the folder name. Unfortunately, there is no way to exclude Review from the labels returned so I had to handle it with PHP. I also check to make sure we only display labels:
case 'tags':
    $tags = $gr->get_tags();
    $remove = 'user/'.$gr->userInfo->userId.'/label/';

    foreach($tags->tags as $tag) {
        if (strpos($tag->id,'/label/') > 0 && strpos($tag->id,'/Review') == 0) {
            $title = str_replace($remove,'',$tag->id);
            echo '<li onclick="window.location = \'articles.php?list=',$list,'&stream=',$tag->id,'\'">  ',$title,'<div class="right-arrow"></div></li>';
        }
    }

    break;
The friends URL though has a lot of additional information from the user's profile. One nice thing we can use is the profile picture and include it as a 32 pixel image:
case 'friends':
    $friends = $gr->get_friends();
    foreach($friends->friends as $friend) {
        if ($friend->contactId != -1) {
            echo '<li onclick="window.location = \'articles.php?list=',$list,'&stream=',$friend->stream,'\'"><img class="friends_icon" src="http://s2.googleusercontent.com'.$friend->photoUrl.'?sz=32">',$friend->displayName,'<div class="right-arrow"></div></li>';
        }
    }
    break;
}
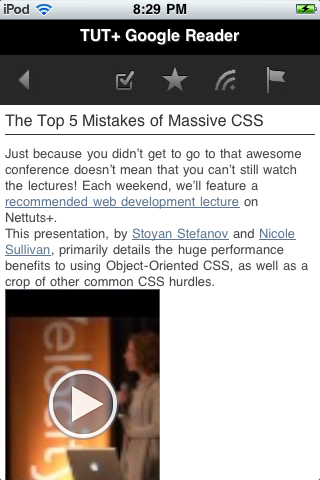
Step 6: Building the Article Page
This page is where you'll view the articles, mark them read, set them to be reviewed later, mark them as a favorite, or share them with your friends.
Screenshot
The Setup
Same as the main page.
The Menu
Another simple HTML list. I'm not a fan of using window.history for a back button, so for the back I'm sending them back to the list they were viewing.
    <div id="menu">
      <ul>
         <li class="back" onclick="window.location = '/index.php?list=<?php echo $_GET['list'] ?>'"></li>
         <li> </li>
         <li class="read" onclick="set_article('read')"></li>
         <li class="starred" onclick="set_article('starred')"></li>
         <li class="broadcast" onclick="set_article('broadcast')"></li>
         <li class="review" onclick="set_article('review')"></li>
      </ul>
   </div>
The Code
The get_stream_items function from our class is the primary driver for the page and most of the defaults are good for this. By default it excludes items marked as read but I've extended the $xt_a array to also exclude articles marked with the "review" label/tag. This way items we mark for review never show up on this list even though we haven't read them yet. We are going to load up the articles in hidden div tags and only show the :first-child, then manipulate the others via JavaScript.
   $stream = $_GET['stream'];
   $articles = $gr->get_stream_items($stream,array('user/-/state/com.google/read','user/'.$gr->userInfo->userId.'/label/Review'));
   if (count($articles->items) > 0) {
      foreach ($articles->items as $article) {
Instead of trying to hold state in a session or an array in JavaScript, I'm just using the relavant pieces of data as attributes on each article's wrapper div.
    echo '<div class="article" id="',$article->id,'" stream=',$article->origin->streamId,'>';
    echo '<div class="article-title"><a target="_blank" href="',$article->alternate[0]->href,'">',$article->title,'</a></div>';
The content can come back in summary form or not depending on the feed. Since we're mobile will try for summary but fall back to full content if it's not available. Also we'll make the links in the article pop in a new window.
    if (isset($article->summary->content)) {
        $content = str_replace('href=','target="_blank" href=',$article->summary->content);
    } else {
        $content = str_replace('href=','target="_blank" href=',$article->content->content);
    }
Finally, display what we have:
    echo '<div class="article-summary">',$content,'</div>';
    echo '</div>';
}
Step 7: JavaScript for Article Actions
The JavaScript is heavily reliant on jQuery. The article.php menu calls set_article() when you click on an action and calls set_article.php to process that action. set_article() will first grab the id and stream from the article we're viewing's div tag. It will then grab the total to fire off a reload if we hit the end of the available articles. The set_article.php script will return a 1 if the action performed should move to the next article. Otherwise, it checks the action performed and either lights up the Star or the Share icon. It's using $.eq() and the variable slice to enumerate through the returned articles.
Setting total variable dynamically rather then just using '20':
   var total = $('.article').size();
   function set_article(action){
Adding attributes to the article wrapper div tag:
    id = $('.article').eq(slice).attr('id');
    stream = $('.article').eq(slice).attr('stream');
Here we pass the id and stream to the set_article.php page and get back a 1 or 0. The 1 means the action requires the removal of the article from view and the 0 means this is just a state change.
    $.get('/set_article.php?action='+action+'&id='+id+'&stream='+stream,function(data){
    if (data=="1") {
        $('.article').eq(slice).hide();
        slice += 1;
        $('.article').eq(slice).show();

        $('.starred').css({backgroundPosition: '-62px -31px'});
        $('.broadcast').css({backgroundPosition: '-93px -31px'});
    }
    else
    {
If it returns a 0, then we need to see what action was taken so the proper icon state is also switched:
         if (action == 'starred') {
             $('.starred').css({backgroundPosition: '-62px 0px'});
         } else {
             $('.broadcast').css({backgroundPosition: '-93px 0px'});
         }
     }

     if (slice >= total) {
        window.location.reload(true);
     }

  });
}
Step 8: Applying Actions to Articles
This is the final bit of PHP that will allow us to manipulate the article.
The Setup
Same as the main page.
The Code
The hard work is done in the class, so this page is really just a switch to run the class function that matches up with the action. You might wonder why Google requires the $stream variable. From what I can tell, it all has to do with how Google stores all the reader data and cuts the transaction time when processing these edit functions.
if (isset($_GET['action'])) {
   $action = $_GET['action'];
   $id = $_GET['id'];
   $stream = $_GET['stream'];

   switch ($action) {
      case 'read':
         $r = $gr->set_article_read($id,$stream);
         echo '1';
         break;
      case 'starred':
         $r = $gr->set_article_starred($id,$stream);
         echo '0';
         break;
      case 'broadcast':
         $r = $gr->set_article_broadcast($id,$stream);
         echo '0';
         break;
      case 'review':
         $r = $gr->set_article_review($id,$stream);
         echo '1';
         break;
   }
}
Step 9: Rounding It Out With CSS
Most of the CSS isn't anything too special. I have the two key styles included below:
.article-summary  img, .article-summary  embed {
   max-height:50%;
   max-width:50%;
}

.article:first-child { display:block; }
The max-height:50% and max-width:50% declarations are very useful when repurposing HTML that may have images and embeds. It keeps the images and youtube includes from overloading the mobile screen.
Step 10: Learn More
Until there is an official API, these places are great to get some additional information on building apps with Google Reader:
- Friends of the Unofficial Google Reader API: A discussion group with lots of great info and people.
- Niall Kennedy: One of the first to mess with the API.
- Stack Overflow: Questions tagged with google-reader-api (I've started answering some of them).
- pyrfeed: The wiki for this python class has a lot of info.
- Martin Doms: Well done break down of the URLs used in the API.

Comments