AV Foundation is a framework for working with audio and visual media on iOS and OSX. Using AV Foundation, you can play, capture, and encode media. It is quite an extensive framework and for the purpose of this tutorial we will be focusing on the audio portion. Specifically, we will be using the AVAudioPlayer class to play MP3 files.
Starter Project
I have provided a starter project that has all the actions and outlets already configured, and with the appropriate methods stubbed out. The classes the project uses, are already stubbed out as well so we can dive right into the code. You can download the starter project from GitHub.
1. Linking the AV Foundation Framework
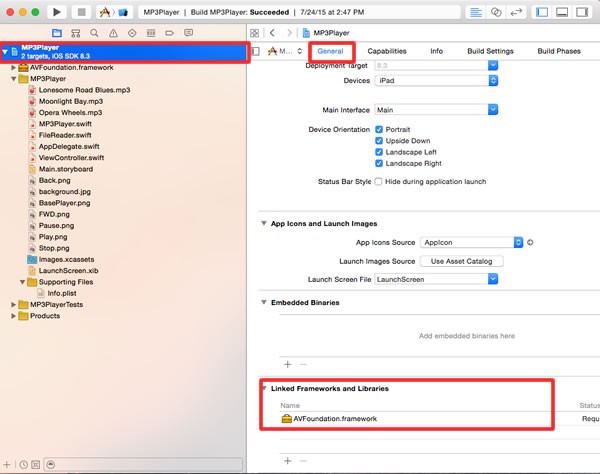
Before you can use AV Foundation, you have to link the project against the framework. In the Project Navigator, make sure your project is selected. Under the General tab, go to Linked Frameworks and Libraries and from there you choose AVFoundation.framework.
2. FileReader Class
In the starter project, you will find a file named FileReader.swift. Open this file to view its contents.
import UIKit

class FileReader: NSObject {

}
This is a simple stub of the class that we'll use to read files from disk. It inherits from NSObject. We will implement a method, readFiles, which will be a type method. Type methods allow you to call a method on the class itself, the type, as opposed to an instance of the class. Below is the implementation of the readFiles method.
class func readFiles() -> [String] {
    return  NSBundle.mainBundle().pathsForResourcesOfType("mp3", inDirectory: nil) as! [String]
}
The main bundle contains the code and resources for your project, and it is here that we will find the MP3s. We use the method pathsForResourcesOfType(_:inDirectory:) method, which returns an array containing the pathnames for the specified type of resource. In this case, we are searching for type "mp3". Because we are not interested in a specific directory, we pass in nil.
This class will be used by the MP3Player class, which we will work on next.
3. MP3Player Class
Next, open MP3Player.swift and view its contents.
import UIKit
import AVFoundation

class MP3Player: NSObject, AVAudioPlayerDelegate {

}
Notice that we are adopting the AVAudioPlayerDelegate protocol. This protocol declares a number of useful methods, one of which is audioPlayerDidFinishPlaying(_:successfully:). By implementing the audioPlayerDidFinishPlaying(_:successfully:) method, we will be notified when the audio has finished playing.
Step 1: Properties
Add the following to MP3Player.swift.
class MP3Player: NSObject, AVAudioPlayerDelegate {
    var player:AVAudioPlayer?
    var currentTrackIndex = 0
    var tracks:[String] = [String]()
}
The player property will be an instance of the AVAudioPlayer class, which we will use to play, pause, and stop the MP3s. The currentTrackIndex variable keeps track of which MP3 is currently playing. Finally, the tracks variable will be an array of the paths to the list of MP3s that are included in the application's bundle.
Step 2: init
override init(){
    tracks = FileReader.readFiles()
    super.init()
    queueTrack();
}
During initialization, we invoke the FileReader's readFiles method to fetch the paths of the MP3s and store this list in the tracks array. Because this is a designated initializer, we must call the init method of the superclass. Finally, we call queueTrack, which we will be writing next.
Step 3: queueTrack
Add the following implementation for the queueTrack method to the MP3Player class.
func queueTrack(){
    if (player != nil) {
        player = nil
    }

    var error:NSError?
    let url = NSURL.fileURLWithPath(tracks[currentTrackIndex] as String)
    player = AVAudioPlayer(contentsOfURL: url, error: &error)

    if let hasError = error {
        //SHOW ALERT OR SOMETHING
    } else {
        player?.delegate = self
        player?.prepareToPlay()
    }
}
Because we will be instantiating a new AVAudioPlayer instance each time this method is called, we do a little housekeeping by setting player to nil.
We declare an optional NSError and a constant url. We invoke fileURLWithPath(_:) to fetch the path to the current MP3 and store the value in url. We are passing the tracks array as a parameter using currentTrackIndex as the subscript. Remember the tracks array contains the paths to the MP3s, not a reference to the MP3 files themselves.
To instantiate the player, we pass the url constant and error variable into the AVAudioPlayer's initializer. If the initialization happens to fail, the error variable is populated with a description of the error.
If we don't encounter an error, we set the player's delegate to self and invoke the prepareToPlay method on the player. The prepareToPlay method preloads the buffers and acquires the audio hardware, which minimizes any lag when calling the play method.
Step 4: play
The play method first checks to see whether or not the audio is already playing by checking the aptly named playing property. If the audio is not playing, it invokes the play method of the player property.
 func play() {
    if player?.playing == false {
        player?.play()
}
Step 5: stop
The stop method first checks whether the audio player is already playing. If it is, it invokes the stop method and sets the currentTime property to 0. When you invoke the stop method, it just stops the audio. It does not reset the audio back to the beginning, which is why we need to do it manually.
func stop(){
    if player?.playing == true {
        player?.stop()
        player?.currentTime = 0
    }
}
Step 6: pause
Just like the stop method, we first check to see if the audio player is playing. If it is, we invoke the pause method.
 func pause(){
    if player?.playing == true{
        player?.pause()
    }
}
Step 7: nextSong
The nextSong(_:Bool) method queues up the next song and, if the player is playing, plays that song. We don't want the next song playing if the player is paused. However, this method is also called when a song finishes playing. In that case, we do want to play the next song, which is what the parameter songFinishedPlaying is for.
func nextSong(songFinishedPlaying:Bool){
    var playerWasPlaying = false
    if player?.playing == true {
        player?.stop()
        playerWasPlaying = true
    }

    currentTrackIndex++
     if currentTrackIndex >= tracks.count {
        currentTrackIndex = 0
    }
    queueTrack()
    if playerWasPlaying || songFinishedPlaying {
        player?.play()
    }
}
The playerWasPlaying variable is used to tell whether or not the player was playing when this method was invoked. If the song was playing, we invoke the stop method on the player and set playerWasPlaying to true.
Next, we increment the currentTrackIndex and check to see if it is greater than or equal to tracks.count. The count property of an array gives us the total number of items in the array. We need to be sure that we don't try to access an element that doesn't exist in the tracks array. To prevent this, we set currentTrackIndex back to the first element of the array if that is the case.
Finally, we invoke queueTrack to get the next song ready and play that song if either playerWasPlaying or songFinishedPlaying is true.
Step 8: previousSong
The previousSong method works very similar to nextSong. The only difference is that we decrement the currentTrackIndex and check if it is equal to 0. If it is, we set it to the index of the last element in the array.
func previousSong(){
    var playerWasPlaying = false
    if player?.playing == true {
        player?.stop()
        playerWasPlaying = true
    }
    currentTrackIndex--
    if currentTrackIndex < 0 {
        currentTrackIndex = tracks.count - 1
    }

    queueTrack()
    if playerWasPlaying {
        player?.play()
    }
}
By utilizing both the nextSong and previousSong methods, we are able to cycle through all of the MP3s and start over when we reach the beginning or the end of the list.
Step 9: getCurrentTrackName
The getCurrentTrackName method gets the name of the MP3 without the extension.
func getCurrentTrackName() -> String {
    let trackName = tracks[currentTrackIndex].lastPathComponent.stringByDeletingPathExtension
    return trackName
}
We get a reference to whatever the current MP3 is by using tracks[currentTrackIndex]. Remember, however, that these are the paths to the MP3s and not the actual files themselves. The paths are rather long, because it is the full path to the MP3 files.
On my machine, for example, the first element of the tracks array is equal to "/Users/jamestyner/Library/Developer/CoreSimulator/Devices/80C8CD34-22AE-4F00-862E-FD41E2D8D6BA/data/Containers/Bundle/Application/3BCF8543-BA1B-4997-9777-7EC56B1C4348/MP3Player.app/Lonesome Road Blues.mp3". This path would be different on an actual device of course.
We've got a large string that contains the path to the MP3, but we just want the name of the MP3 itself. The NSString class defines two properties that can help us. As the name implies, the lastPathComponent property returns the last component of a path. As you might have guessed, the stringByDeletingPathExtension property removes the extension.
Step 10: getCurrentTimeAsString
The getCurrentTimeAsString method uses the currentTime property of the player instance and returns it as a human-readable string (e.g., 1:02).
 func getCurrentTimeAsString() -> String {
    var seconds = 0
    var minutes = 0
    if let time = player?.currentTime {
        seconds = Int(time) % 60
        minutes = (Int(time) / 60) % 60
    }
    return String(format: "%0.2d:%0.2d",minutes,seconds)
   }
The currentTime property is of type NSTimeInterval, which is just a typealias for a Double. We use some math to get the seconds and minutes, making sure we convert time to an Int since we need to work with whole numbers. If you are not familiar with the remainder operator (%), it finds the remainder after division of one number by another. If the time variable was equal to 65, then seconds would be equal to 5 because we are using 60.
Step 11: getProgress
The getProgress method is used by the UIProgressView instance to give an indication of how much of the MP3 has played. This progress is represented by a value from 0.0 to 1.0 as a Float.
  func getProgress()->Float{
    var theCurrentTime = 0.0
    var theCurrentDuration = 0.0
    if let currentTime = player?.currentTime, duration = player?.duration {
        theCurrentTime = currentTime
        theCurrentDuration = duration
    }
    return Float(theCurrentTime / theCurrentDuration)
}
To get this value, we divide the player's currentTime property by the player's duration property, we store these values in the variables theCurrentTime and theCurrentDuration. Like currentTime, the duration property is of type NSTimeInterval and it represents the duration of the song in seconds.
Step 12: setVolume
The setVolume(_:Float) method invokes the setVolume method of the player instance.
func setVolume(volume:Float){
    player?.volume = volume
}
Step 13: audioPlayerDidFinishPlaying(_:successfully:)
The audioPlayerDidFinishPlaying(_:successfully:) method is a method of the AVAudioPlayerDelegate protocol. This method takes as parameters the AVAudioPlayer instance and a boolean. The boolean is set to true if the audio player has finished playing the current song.
func audioPlayerDidFinishPlaying(player: AVAudioPlayer, successfully flag: Bool){
    if flag == true {
        nextSong(true)
    }
}
If the song successfully finished playing, we call the nextSong method, passing in true since the song finished playing on its own.
This completes the MP3Player class. We will revisit it a bit later, after implementing the actions of the ViewController class.
4. ViewController Class
Open ViewController.swift and view its contents.
mport UIKit
import AVFoundation

class ViewController: UIViewController {
    var mp3Player:MP3Player?
    var timer:NSTimer?

    @IBOutlet weak var trackName: UILabel!
    @IBOutlet weak var trackTime: UILabel!
    @IBOutlet weak var progressBar: UIProgressView!

    override func viewDidLoad() {
        super.viewDidLoad()

    }
    @IBAction func playSong(sender: AnyObject) {

    }
    @IBAction func stopSong(sender: AnyObject) {

    }

    @IBAction func pauseSong(sender: AnyObject) {

    }

    @IBAction func playNextSong(sender: AnyObject) {
           }


    @IBAction func setVolume(sender: UISlider) {

    }

    @IBAction func playPreviousSong(sender: AnyObject) {

    }


    override func didReceiveMemoryWarning() {
        super.didReceiveMemoryWarning()
        // Dispose of any resources that can be recreated.
    }
}
The mp3Player variable is an instance of the MP3Player class we implemented earlier. The timer variable will be used to update the trackTime and progressBar views every second.
In the next few steps, we will implement the actions of the ViewController class. But first, we should instantiate the MP3Player instance. Update the implementation of the viewDidLoad method as shown below.
override func viewDidLoad() {
    super.viewDidLoad()
    mp3Player = MP3Player()
}
Step 1: playSong(_: AnyObject)
Enter the following in the playSong(_: AnyObject) method.
@IBAction func playSong(sender: AnyObject) {
    mp3Player?.play()
}
In this method, we invoke the play method on the mp3Player object. We are at a point where we can start testing the app now. Run the app and press the play button. The song should start playing.
Step 2: stopSong(_: AnyObject)
The stopSong(_: AnyObject) method invokes the stop method on the mp3Player object.
 @IBAction func stopSong(sender: AnyObject) {
    mp3Player?.stop()
}
Run the app again and tap the play button. You should now be able to stop the song by tapping the stop button.
Step 3: pauseSong(_: AnyObject)
As you might have guessed, the pauseSong(_: AnyObject) method invokes the pause method on the mp3Player object.
@IBAction func pauseSong(sender: AnyObject) {
    mp3Player?.pause()
}
Step 4: playNextSong(_: AnyObject)
IBAction func playNextSong(sender: AnyObject) {
    mp3Player?.nextSong(false)
}
In playNextSong(_: AnyObject), we invoke the nextSong method on the mp3player object. Note that we pass false as a parameter, because the song didn't finish playing on its own. We are manually starting the next song by pressing the next button.
Step 5: previousSong(_: AnyObject)
 @IBAction func playPreviousSong(sender: AnyObject) {
    mp3Player?.previousSong()
}
As you can see, the implementation of the previousSong(_: AnyObject) method is very similar to that of nextSong(_: AnyObject). All the buttons of the MP3 player should be functional now. If you've not tested the app yet, now would be a good time to make sure everything is working as expected.
Step 6: setVolume(_: UISlider)
The setVolume(_: UISlider) method invokes the setVolume method on the mp3Player object. The volume property is of type Float. The value ranges from 0.0 to 1.0. The UISlider object is set up with 0.0 as its minimum value and 1.0 as its maximum value.
 @IBAction func setVolume(sender: UISlider) {
    mp3Player?.setVolume(sender.value)
}
Run the app one more time and play with the volume slider to test that everything is working correctly.
Step 7: startTimer
The startTimer method instantiates a new NSTimer instance.
 func startTimer(){
    timer = NSTimer.scheduledTimerWithTimeInterval(1.0, target: self, selector: Selector("updateViewsWithTimer:"), userInfo: nil, repeats: true)
}
The scheduledTimerWithTimeInterval(_:target:selector:userInfo:repeats:) initializer takes as parameters the number of seconds between firing of the timer, the object to which to call a method on specified by selector, the method that gets called when the timer fires, an optional userInfo dictionary, and whether or not the timer repeats until it is invalidated.
We are using a method named updateViewsWithTimer(_: NSTimer) as the selector, so we will create that next.
Step 8: updateViewsWithTimer(_: NSTimer)
The updateViewsWithTimer(_: NSTimer) method calls the updateViews method, which we will implement in the next step.
func updateViewsWithTimer(theTimer: NSTimer){
    updateViews()
}
Step 9: updateViews
The updateViews method updates the trackTime and progressBar views.
func updateViews(){
    trackTime.text = mp3Player?.getCurrentTimeAsString()
    if let progress = mp3Player?.getProgress() {
        progressBar.progress = progress
    }
}
The text property of trackTime is updated with the currentTime property, formatted as a string by invoking the getCurrentTimeAsString method. We declare a constant progress using the mp3Player's getProgress method, and set progressBar.progress using that constant.
Step 10: Wiring Up the Timer
Now we need to call the startTimer method at the appropriate places. We need to start the timer in the playSong(_: AnyObject) method, the playNextSong(_ :AnyObject) method, and the playPreviousSong(_ :AnyObject) method.
@IBAction func playSong(sender: AnyObject) {
    mp3Player?.play()
    startTimer()
}
 @IBAction func playNextSong(sender: AnyObject) {
    mp3Player?.nextSong(false)
    startTimer()
}
@IBAction func playPreviousSong(sender: AnyObject) {
    mp3Player?.previousSong()
    startTimer()
}
Step 11: Stopping the Timer
We also need to stop the timer when the pause and stop buttons are pressed. You can stop the timer object by invoking the invalidate method on the NSTimer instance.
@IBAction func stopSong(sender: AnyObject) {
    mp3Player?.stop()
    updateViews()
    timer?.invalidate()
}
@IBAction func pauseSong(sender: AnyObject) {
    mp3Player?.pause()
    timer?.invalidate()
}
Step 12: setTrackName
The setTrackName method sets the text property of trackName by invoking getCurrentTrackName on the mp3Player object.
func setTrackName(){
    trackName.text = mp3Player?.getCurrentTrackName()
}
Step 13: setupNotificationCenter
When a song finishes playing, it should automatically show the next song's name and start playing that song. Also, when the user presses the play, next, or previous buttons, the setTrackName method should be invoked. The ideal place to do this is the queueTrack method of the MP3Player class.
We need a way to have the MP3Player class tell the ViewController class to invoke the setTrackName method. To do that, we will use the NSNotificationCenter class. The notification center provides a way to broadcast information throughout a program. By registering as an observer with the notification center, an object can receive these broadcasts and perform an operation. Another way to accomplish this task would be to use the delegation pattern.
Add the following method to the ViewController class.
 func setupNotificationCenter(){
    NSNotificationCenter.defaultCenter().addObserver(self,
        selector:"setTrackName",
        name:"SetTrackNameText",
        object:nil)
}
We first obtain a reference to the default notification center. We then invoke the addObserver(_:selector:name:object:) method on the notification center. This method accepts four parameters:
- the object registering as the observer,
selfin this case - the message that will be sent to the observer when the notification is posted
- the name of the notification for which to register the observer
- the object whose notifications the observer wants to receive
By passing in nil as the last argument, we listen for every notification that has a name of SetTrackNameText.
Now we need to call this method in the view controller's viewDidLoad method.
override func viewDidLoad() {
    super.viewDidLoad()
    mp3Player = MP3Player()
    setupNotificationCenter()
}
Step 14: Posting the Notification
To post the notification, we invoke the postNotificationName(_:object:) method on the default notification center. As I mentioned earlier, we will do this in the queueTrack method of the MP3Player class. Open MP3Player.swift and update the queueTrack method as shown below.
 func queueTrack(){
    if(player != nil){
        player = nil
    }

    var error:NSError?
    let url = NSURL.fileURLWithPath(tracks[currentTrackIndex] as String)
    player = AVAudioPlayer(contentsOfURL: url, error: &error)

    if let hasError = error {
        //SHOW ALERT OR SOMETHING
    } else {
        player?.delegate = self
        player?.prepareToPlay()
        NSNotificationCenter.defaultCenter().postNotificationName("SetTrackNameText", object: nil)
    }
 }
If you test the app now and let a song play all the way through, it should start playing the next song automatically. But you may be wondering why the song's name does not show up during the first song. The init method of the MP3Player class calls the queueTrack method, but since it has not finished initializing, it has no affect.
All we need to do is manually call the setTrackName method after we initialize the mp3Player object. Add the following code to the viewDidLoad method in ViewController.swift.
  override func viewDidLoad() {
    super.viewDidLoad()
    mp3Player = MP3Player()
    setupNotificationCenter()
    setTrackName()
    updateViews()
}
You'll notice that I also called the updateViews method. This way, the player shows a time of 0:00 at the start. If you test the app now, you should have a fully functional MP3 player.
Conclusion
This was a rather long tutorial, but you now have a functional MP3 player to build and expand on. One suggestion is to allow the user to choose a song to play by implementing a UITableView below the player. Thanks for reading and I hope you've learned something useful.

Comments