In the previous part of this series, we implemented the sign-in and sign-up process using the Eve API we created in the first part of the series. We used Node.js and AngularJS to create and get our app running.
In this tutorial, we'll take our app development to the next level by using the Add, Edit and Delete APIs to create items in the user home page.
Getting Started
To get started, clone the source code of the previous tutorial from GitHub.
git clone https://github.com/jay3dec/AngularEveApp_Part1.git
Once done, navigate to AngularEveApp_Part1 and install the dependencies.
npm install
bower install
Make sure that the Python Eve REST APIs are running. Start the app server.
node app.js
Point your browser to http://localhost:3000 and you should have the application running.
Creating User Home
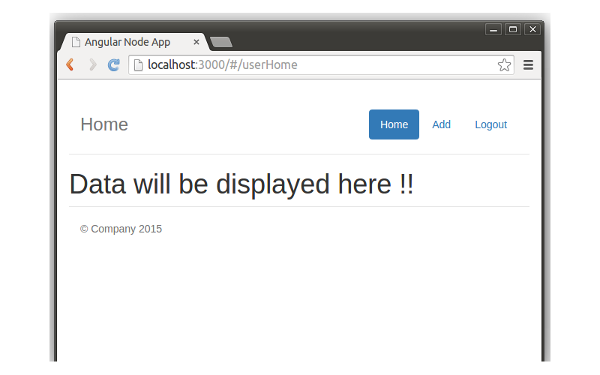
After the user signs in successfully, we'll take the user to the home page. So, let's start by creating userHome.html. Navigate to the public folder and create a new folder called userHome. Inside userHome create files called userHome.html and userHome.js. Open userHome.html and add the following HTML code:
<div class="container">
<div class="header">
<nav>
<ul class="nav nav-pills pull-right">
<li role="presentation" class="active"><a href="#userHome">Home</a></li>
<li role="presentation"><a href="#addItem">Add</a></li>
<li role="presentation"><a href="#">Logout</a></li>
</ul>
</nav>
<h3 class="text-muted">Home</h3>
</div>
<h1>Data will be displayed here !!</h1>
<footer class="footer">
<p>© Company 2015</p>
</footer>
</div>
Inside userHome.js define the module userHome and its template and controller. So, open userHome.js and add the following code:
'use strict';

angular.module('userHome', ['ngRoute'])

.config(['$routeProvider', function($routeProvider) {
    $routeProvider.when('/userHome', {
        templateUrl: '../userHome/userHome.html',
        controller: 'UserHomeCtrl'
    });
}])

.controller('UserHomeCtrl', ['$scope', function($scope) {

}]);
Add a reference to userHome.js in the index.html page.
<script src="userHome/userHome.js"></script>
Inject the module userHome into the app myApp in index.js.
angular.module('myApp', [
  'ngRoute',
  'home',
  'signin',
  'userHome'
]).
config(['$routeProvider', function($routeProvider) {
  $routeProvider.otherwise({redirectTo: '/home'});
}]);
In the signIn function in signin.js, on the success callback of the $http request redirect to the /userHome view.
$location.path('/userHome');
Save the above changes and restart the node server. Point your browser to http://localhost:3000 and sign in using a valid username and password. Once successfully signed in, you should be able to view the user home page with the default view.
Creating an Add Task Page
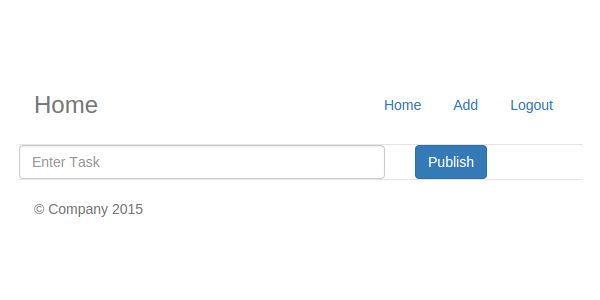
Let's add a view to enable the user to add items. Navigate to the public folder and create a folder called addItem. Inside the addItem folder, create two files called addItem.html and addItem.js. Open addItem.html and add the following HTML code:
<div class="container">
<div class="header">
<nav>
<ul class="nav nav-pills pull-right">
<li role="presentation"><a href="#userHome">Home</a></li>
<li role="presentation" class="active"><a href="#addItem">Add</a></li>
<li role="presentation"><a href="#">Logout</a></li>
</ul>
</nav>
<h3 class="text-muted">Home</h3>
</div>
<div class="row">
<div class="col-md-8 col-sm-8 col-xs-8">
<input id="txtTitle" name="txtTitle" type="text" ng-model="title" placeholder="Enter Task" class="form-control input-md">
</div>
<div class="col-md-4 col-sm-4 col-xs-4">
<input id="singlebutton" name="singlebutton" class="btn btn-primary" ng-click="addItem(title)" value="Add Task" />
</div>
</div>
<footer class="footer">
<p>© Company 2015</p>
</footer>
</div>
Next, open addItem.js and add the following code to define the route, template and controller.
'use strict';

angular.module('addItem', ['ngRoute'])

.config(['$routeProvider', function($routeProvider) {
  $routeProvider.when('/addItem', {
    templateUrl: '../addItem/addItem.html',
    controller: 'AddItemCtrl'
  });
}])

.controller('AddItemCtrl', [function() {

}]);
Open userHome.html and modify the Add link href to point to the correct route.
<li role="presentation" ><a href="#addItem">Add</a></li>
Add a reference to addItem.js in index.html.
<script src="addItem/addItem.js"></script>
Inject the module addItem in the myApp in index.js.
angular.module('myApp', [
  'ngRoute',
  'home',
  'signin',
  'userHome',
  'addItem'
]).
config(['$routeProvider', function($routeProvider) {
  $routeProvider.otherwise({redirectTo: '/home'});
}]);
Save the following changes and restart the node server. Once you have signed in, click on the Add link and you should be able to see the add item page.
Adding Items Using the Eve API
In order to add items, we'll need the base64 authdata. So, on successful sign-in we'll keep the username and auth data inside an AngularJS service. Navigate to the public folder and create a folder called service. Inside the service folder create a file called service.js. Let's create a new service module called myAppService.
angular.module('myAppService',[])
Add a new service to the myAppService module.
.service('CommonProp', function() {

});
Inside the CommonProp service, we'll define a few functions to get and set the username and authData.
.service('CommonProp', function() {
    var user = '';
    var userAuth = '';

    return {
        getUser: function() {
            return user;
        },
        setUser: function(value) {
            user = value;
        },
        getUserAuth: function() {
            return userAuth;
        },
        setUserAuth: function(value) {
            userAuth = value;
        }
    };
});
Include a reference to the service in index.html.
<script src="service/service.js"></script>
Next, inject the above created myAppService module in the signin module.
angular.module('signin', ['base64','ngRoute','myAppService'])
Inject the required CommonProp service in the SignInCtrl controller.
.controller('SignInCtrl',['$scope','$http','$base64','$window','$location','CommonProp',function($scope,$http,$base64,$window,$location,CommonProp)
On $http success callback, add the following code to keep the username and authData in the service.
CommonProp.setUser(username);
CommonProp.setUserAuth(authdata);
Next, open up addItem.js and inject the myAppService module.
angular.module('addItem', ['ngRoute','myAppService'])
Inject the CommonProp service in the AddItemCtrl.
.controller('AddItemCtrl', ['$scope','CommonProp','$http','$location',function($scope,CommonProp,$http,$location)
Open up addItem.html and add the ngModel and ngClick directive to the task text box and Add task button respectively.
<div class="col-md-8 col-sm-8 col-xs-8">
  <input id="txtTitle" name="txtTitle" type="text" ng-model="title" placeholder="Enter Task" class="form-control input-md">
</div>

<div class="col-md-4 col-sm-4 col-xs-4">
  <input id="singlebutton" name="singlebutton" class="btn btn-primary" ng-click="addItem(title)" value="Add Task" />
</div>
Inside addItem.js define a new function called addItem.
$scope.addItem = function(title){
    // Add item logic will be here !
}
Inside addItem function let's make our $http call to the Python Eve REST API. First, we'll need to get the username and the user auth data from the service.
var auth = CommonProp.getUserAuth();

var user = CommonProp.getUser();
Let's set the required headers to make the API call.
$http.defaults.headers.common = {"Access-Control-Request-Headers": "accept, origin, authorization"};
$http.defaults.headers.common = {"Access-Control-Expose-Headers": "Origin, X-Requested-With, Content-Type, Accept"};
$http.defaults.headers.common["Cache-Control"] = "no-cache";
$http.defaults.headers.common.Pragma = "no-cache";
$http.defaults.headers.common['Authorization'] = 'Basic '+auth;
Once headers have been set, let's use $http to make the API call to add the item.
$http({
    method: 'POST',
    cache: false,
    url: 'http://127.0.0.1:5000/item',
    data: {
        name: title,
        username: user
    }
}).
success(function(data, status, headers, config) {
    $location.path('/userHome');
}).
error(function(data, status, headers, config) {
    console.log(data, status);
});
Save the changes and restart the node server. Point your browser to http://localhost:3000 and sign in. Click the Add link, enter a task and click Add Task. On successful API call you should be redirected to the user home page.
Get Tasks From the Eve API
When the user home page is loaded, we'll make an API call to fetch the items added by the particular user. In order to make the API call we'll need the username and the authData. So, inject the myAppService module in the userHome module.
angular.module('userHome', ['ngRoute','myAppService'])
Inject the CommonProp service to UserHomeCtrl.
.controller('UserHomeCtrl',['$scope','CommonProp','$http','$location', function($scope,CommonProp,$http,$location)
Next, let's fetch the username and authData from CommonProp.
var auth = CommonProp.getUserAuth();

var user = CommonProp.getUser();
Set the required headers to make the API call.
$http.defaults.headers.common = {"Access-Control-Request-Headers": "accept, origin, authorization"};
$http.defaults.headers.common = {"Access-Control-Expose-Headers": "Origin, X-Requested-With, Content-Type, Accept"};
$http.defaults.headers.common["Cache-Control"] = "no-cache";
$http.defaults.headers.common.Pragma = "no-cache";
$http.defaults.headers.common['Authorization'] = 'Basic '+auth;
In order to get the tasks created by a particular user, we'll make a $http GET request to http://127.0.0.1:5000/item?where={"username":"'+user+'"}'.
$http({
    method: 'GET',
    cache: false,
    url: 'http://127.0.0.1:5000/item?where={"username":"' + user + '"}'
}).
success(function(data, status, headers, config) {
    console.log(data);
}).
error(function(data, status, headers, config) {
    console.log(data, status);
});
On successful API call, we'll parse the data returned and set the data into a $scope variable.
First, let's create a tasks variable:
$scope.tasks = [];
Now, let's parse the data returned and fill the tasks variable.
for (var i = 0; i < data._items.length; i++) {
    $scope.tasks.push({
        'title': data._items[i].name
    });
}
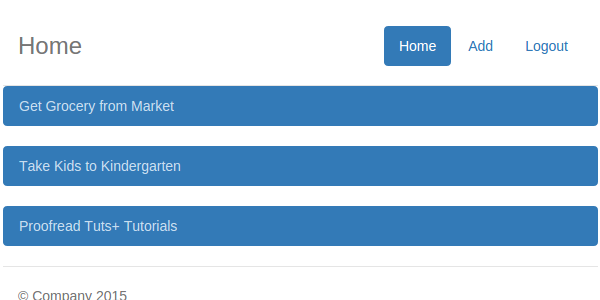
In userHome.html, we'll iterate over the tasks variable and render the tasks fetched for a particular user. We'll make use of the ngRepeat directive to iterate over the tasks variable.
<div class="list-group" ng-repeat="task in tasks">
    <a href="#" onclick="return false;" class="list-group-item active">

        <p class="list-group-item-text">{{task.title}}</p>

    </a>
</div>
Save the above changes and restart the server. Point your browser to http://localhost:3000 and sign in. On successful sign-in you should be able to see the tasks added by the signed-in user.
Editing & Deleting a Task Item
Editing Tasks
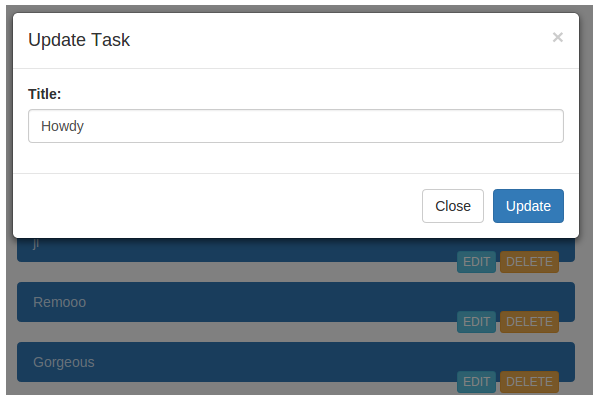
Let's add an edit and delete button to the list of tasks in the user home page, to enable editing and deleting of the tasks respectively. Open userHome.html and add the following HTML code to the .list-group div.
<span class="pull-right">
     <button class="btn btn-xs btn-info" ng-click="editTask(task.title,task.id,task.tag)" data-target="#editModal">EDIT</button>

     <button class="btn btn-xs btn-warning" ng-click="confirmDelete(task.id,task.tag)" data-target="#deleteModal" >DELETE</button>
</span>
We'll be using bootstrap modals to show the task to be edited, so include jQuery and Bootstrap in index.html.
<script src="https://code.jquery.com/jquery-2.0.1.min.js"></script>

<script src="https://maxcdn.bootstrapcdn.com/bootstrap/3.3.1/js/bootstrap.min.js"></script>
Add the following HTML code to userHome.html for modal pop-up for edit.
<div class="modal fade" id="editModal" tabindex="-1" role="dialog" aria-labelledby="editModalLabel" aria-hidden="true">
<div class="modal-dialog">
<div class="modal-content">
<div class="modal-header">
<button type="button" class="close" data-dismiss="modal"><span aria-hidden="true">×</span><span class="sr-only">Close</span>
</button>
<h4 class="modal-title" id="editModalLabel">Update Task</h4>
</div>
<div class="modal-body">
<form role="form">
<div class="form-group">
<label for="recipient-name" class="control-label">Title:</label>
<input type="text" class="form-control" ng-model="edit.task" id="recipient-name">
</div>
</form>
</div>
<div class="modal-footer">
<button type="button" class="btn btn-default" data-dismiss="modal">Close</button>
<button type="button" class="btn btn-primary" ng-click="update()">Update</button>
</div>
</div>
</div>
</div>
Next open up userHome.js and create a new function called editTask which will be invoked on edit button click.
$scope.edit = {};

$scope.editTask = function(title,id,tag){
    	$scope.edit.task = title;
		$scope.edit.id = id;
		$scope.edit.tag = tag;
		$('#editModal').modal('show');
}
As seen in the above code, we have assigned the title, id and tag of the particular record to the $scope.edit.task variable. If the user chooses to update the particular record, then we'll use the $scope.edit data for update.
Save all the above changes and restart the server. Once signed in successfully, click on the edit button to edit a task, and you should have the modal pop-up.
Earlier, we made a $http request from the UserHomeCtrl. Let's convert that into a proper function, since we'll need to call that in future. Here is the getAllTask function.
var getAllTask = function(){
    	$scope.tasks = [];
		$http.defaults.headers.common = {"Access-Control-Request-Headers": "accept, origin, authorization"};
	    $http.defaults.headers.common = {"Access-Control-Expose-Headers": "Origin, X-Requested-With, Content-Type, Accept"};
		$http.defaults.headers.common["Cache-Control"] = "no-cache";
	    $http.defaults.headers.common.Pragma = "no-cache";
	    $http.defaults.headers.common['Authorization'] = 'Basic '+auth;

		$http({method: 'GET',cache: false, url: 'http://127.0.0.1:5000/item?where={"username":"'+user+'"}'}).
		    success(function(data, status, headers, config) {

			for(var i=0;i<data._items.length;i++){
				$scope.tasks.push({'title': data._items[i].name,'id':data._items[i]._id,'tag':data._items[i]._etag});
			}

		    }).
		    error(function(data, status, headers, config) {
		        console.log(data,status);
		    });
}

getAllTask();
Next, create a function called update in userHome.js which we'll call to update the edited task. Inside the update function we'll be making a PATCH request to http://127.0.0.1:5000/item/(item-id) with the data to be updated. The Eve API expects a tag id header to be passed when making an update request, so we'll also be passing the tag id in the request header. Inside the update function, first we'll declare the required headers for the $http request.
$http.defaults.headers.common = {"Access-Control-Request-Headers": "accept, origin, authorization"};
$http.defaults.headers.common = {"Access-Control-Expose-Headers": "Origin, X-Requested-With, Content-Type, Accept"};
$http.defaults.headers.common["Cache-Control"] = "no-cache";
$http.defaults.headers.common.Pragma = "no-cache";
$http.defaults.headers.common['Authorization'] = 'Basic '+auth;
$http.defaults.headers.common['If-Match'] = $scope.edit.tag;
Once headers have been defined, we'll make the PATCH $http request.
$http({
    method: 'PATCH',
    cache: false,
    url: 'http://127.0.0.1:5000/item/' + $scope.edit.id,
    data: {
        name: $scope.edit.task
    }
}).
success(function(data, status, headers, config) {
    $('#editModal').modal('hide');
    getAllTask();
}).
error(function(data, status, headers, config) {
    console.log(data, status);
});
As seen in the above code, on successful update we have closed the edit modal and reloaded all the tasks related to the particular user.
Save all the changes and restart the server. Point your browser to http://localhost:3000 and sign in using valid credentials. Once signed in, try to edit a particular task by clicking the edit button.
Deleting Tasks
Before deleting a task we need to show a confirmation pop-up. So, in userHome.html add the following HTML code for the delete confirmation pop-up.
<div class="modal fade" id="deleteModal" tabindex="-1" role="dialog" aria-labelledby="deleteModalLabel" aria-hidden="true">
    <div class="modal-dialog">
        <div class="modal-content">
            <div class="modal-header" style="text-align:center;">
                <h4 class="modal-title" style="color:red;" id="deleteModalLabel">You are about to Delete this Task !!</h4>
            </div>

            <div class="modal-footer">
                <button type="button" class="btn btn-default" data-dismiss="modal">Cancel</button>
                <button type="button" class="btn btn-primary" ng-click="deleteTask()">Delete</button>
            </div>
        </div>
    </div>
</div>
Next, we need to define a function called confirmDelete which we have already attached to the Delete button using the ngClick directive. Inside the confirmDelete function we'll keep the task ID and TAG which will be required when we call the Delete API. Here is the confirmDelete function:
$scope.deletion = {};

$scope.confirmDelete = function(id, tag) {
    $scope.deletion.id = id;
    $scope.deletion.tag = tag;
    $('#deleteModal').modal('show');
}
Save the changes and restart the server. Sign in to the application and when on the user home page, click on the Delete button and you should be able to view the Delete confirmation pop-up.

Next, we'll define one more function to carry out the task deletion. We have already attached a function called deleteTask to the Delete button using the ngClick directive. Now, let's define the deleteTask function inside userHome.js.
Similar to the update function, calling the Delete request on the Eve API requires the TAG ID to be set in the header. So, first set the required headers as shown:
$http.defaults.headers.common = {"Access-Control-Request-Headers": "accept, origin, authorization"};
$http.defaults.headers.common = {"Access-Control-Expose-Headers": "Origin, X-Requested-With, Content-Type, Accept"};
$http.defaults.headers.common["Cache-Control"] = "no-cache";
$http.defaults.headers.common.Pragma = "no-cache";
$http.defaults.headers.common['Authorization'] = 'Basic '+auth;
$http.defaults.headers.common['If-Match'] = $scope.deletion.tag;
Next, we'll make a DELETE request to the REST API http://127.0.0.1:5000/item/(itemId).
$http({
    method: 'DELETE',
    cache: false,
    url: 'http://127.0.0.1:5000/item/' + $scope.deletion.id
}).
success(function(data, status, headers, config) {
    $('#deleteModal').modal('hide');
    getAllTask();
}).
error(function(data, status, headers, config) {
    console.log(data, status);
});
As seen in the above code, on successful DELETE request callback we'll hide the delete confirm modal pop-up and reload the task entries by calling the getAllTask method. Here is the full deleteTask function:
$scope.deleteTask = function() {
    $http.defaults.headers.common = {
        "Access-Control-Request-Headers": "accept, origin, authorization"
    };
    $http.defaults.headers.common = {
        "Access-Control-Expose-Headers": "Origin, X-Requested-With, Content-Type, Accept"
    };
    $http.defaults.headers.common["Cache-Control"] = "no-cache";
    $http.defaults.headers.common.Pragma = "no-cache";
    $http.defaults.headers.common['Authorization'] = 'Basic ' + auth;
    $http.defaults.headers.common['If-Match'] = $scope.deletion.tag;

    $http({
        method: 'DELETE',
        cache: false,
        url: 'http://127.0.0.1:5000/item/' + $scope.deletion.id
    }).
    success(function(data, status, headers, config) {
        $('#deleteModal').modal('hide');
        getAllTask();
    }).
    error(function(data, status, headers, config) {
        console.log(data, status);
    });
}
Save the above changes and restart the server. Point your browser to http://localhost:3000 and sign in. When on the user home page, click the Delete button to delete a few tasks and it should be working.
Conclusion
In this part of the series, we saw how to use the Python Eve REST APIs created in the first part of the series in an AngularJS application. We implemented some simple CRUD operations from our AngularJS application using the Eve REST APIs. I hope this tutorial will serve as the basis for creating something awesome.
Feel free to post your comments, corrections or questions below. If you found this tutorial helpful, do visit my instructor page for other tutorials.
Source code from this tutorial is available on GitHub.

Comments