In the previous part of this series, we saw how to get started with Eve, a Python REST API framework, and create some APIs. In this part of the series, we'll make use of those APIs to create an application powered by Node.js and AngularJS.
We'll be implementing the sign-up functionality using Node.js, and adding other functionalities by calling the REST APIs from AngularJS.
Getting Started
To get started, clone the source code of the previous tutorial and run the APIs.
git clone https://github.com/jay3dec/REST_API_EVE_Part-1
Once you have cloned the source code, make sure you have MongoDB running. Navigate to the REST_API_EVE_Part-1 directory and run the app:
cd REST_API_EVE_Part-1
python app.py
Now, you should have your API running on http://localhost:5000/.
Creating the NodeJS App
Step 1: Creating the Basic App
Create a project folder called AngularNodeApp. We'll be using Express, a minimalistic web application framework for creating Node.js applications. So let's install express into our project.
npm install express
Once express has been installed, create a file called app.js. Inside app.js we'll create our express application and define the routes for the application.
Let's start by importing express into app.js and creating an express app.
var express = require('express'),
    app = express();

app.get('/',function(req,res){
    res.send('welcome !!');
});

app.listen(3000)
We just created an express app and defined a route, /, which will return welcome when requested. Start the server.
node app.js
Point your browser to http://localhost:3000/ and you should have the message welcome !!.
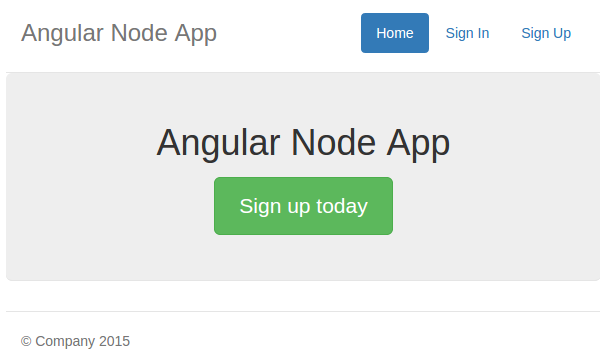
Let's create a home page for our application. Navigate to the project folder and create a new directory called public. Inside public/index create a file called index.html. Add the following HTML code to index.html.
<!DOCTYPE html>
<html lang="en">
<head>
<title>Angular Node App</title>
<link href="http://getbootstrap.com/dist/css/bootstrap.min.css" rel="stylesheet">
<link href="http://getbootstrap.com/examples/jumbotron-narrow/jumbotron-narrow.css" rel="stylesheet">
</head>
<body>
<div class="container">
<div class="header">
<nav>
<ul class="nav nav-pills pull-right">
<li role="presentation" class="active"><a href="#">Home</a>
</li>
<li role="presentation"><a href="/signIn">Sign In</a>
</li>
<li role="presentation"><a href="/signUp">Sign Up</a>
</li>
</ul>
</nav>
<h3 class="text-muted">Angular Node App</h3>
</div>
<div class="jumbotron">
<h1>Angular Node App</h1>
<p class="lead"></p>
<p><a class="btn btn-lg btn-success" href="/signUp" role="button">Sign up today</a>
</p>
</div>
<footer class="footer">
<p>© Company 2015</p>
</footer>
</div>
</body>
</html>
Next, let's modify the existing / request handler to show index.html. Define the path to the public folder in app.js.
app.use(express.static(__dirname + '/public'));
Modify the / request handler as shown:
app.get('/',function(req,res){
    res.sendFile('index.html',{'root': __dirname + '/public/index'});
});
Save the changes and restart the server. Point your browser to http://localhost:3000/ and you should be able to see the application page.
Next create a page called signin/signin.html and add the following HTML code:
<!DOCTYPE html>
<html lang="en">
<head>
<title>Python Flask Bucket List App</title>
<link href="http://getbootstrap.com/dist/css/bootstrap.min.css" rel="stylesheet">
<link href="http://getbootstrap.com/examples/jumbotron-narrow/jumbotron-narrow.css" rel="stylesheet">
<link href="signup.css" rel="stylesheet">
</head>
<body>
<div class="container">
<div class="header">
<nav>
<ul class="nav nav-pills pull-right">
<li role="presentation"><a href="/">Home</a>
</li>
<li role="presentation" class="active"><a href="#">Sign In</a>
</li>
<li role="presentation"><a href="/signUp">Sign Up</a>
</li>
</ul>
</nav>
<h3 class="text-muted">Python Flask App</h3>
</div>
<div class="jumbotron">
<h1>Bucket List App</h1>
<form class="form-signin">
<label for="inputEmail" class="sr-only">Email address</label>
<input type="email" name="inputEmail" id="inputEmail" class="form-control" placeholder="Email address" required autofocus>
<label for="inputPassword" class="sr-only">Password</label>
<input type="password" name="inputPassword" id="inputPassword" class="form-control" placeholder="Password" required>
<button id="btnSignIn" class="btn btn-lg btn-primary btn-block" type="submit">Sign in</button>
</form>
</div>
<footer class="footer">
<p>© Company 2015</p>
</footer>
</div>
</body>
</html>
In app.js add a request handler called /SignIn which will render the signin.html page.
app.get('/signIn', function(req, res) {
    res.sendFile('signin.html', {
        'root': __dirname + '/public/signin'
    });
});
Similarly, add a signup.html to the public/signup folder with the following HTML code:
<!DOCTYPE html>
<html lang="en">
<head>
<title>Python Flask Bucket List App</title>
<link href="http://getbootstrap.com/dist/css/bootstrap.min.css" rel="stylesheet">
<link href="http://getbootstrap.com/examples/jumbotron-narrow/jumbotron-narrow.css" rel="stylesheet">
<link href="signup.css" rel="stylesheet">
</head>
<body>
<div class="container">
<div class="header">
<nav>
<ul class="nav nav-pills pull-right">
<li role="presentation"><a href="/">Home</a>
</li>
<li role="presentation"><a href="/signIn">Sign In</a>
</li>
<li role="presentation" class="active"><a href="#">Sign Up</a>
</li>
</ul>
</nav>
<h3 class="text-muted">Python Flask App</h3>
</div>
<div class="jumbotron">
<h1>Bucket List App</h1>
<form class="form-signin" action="/register" method="post">
<label for="inputFirstName" class="sr-only">First Name</label>
<input type="name" name="inputFirstName" id="inputFirstName" class="form-control" placeholder="First Name" required autofocus>
<label for="inputLastName" class="sr-only">Last Name</label>
<input type="name" name="inputLastName" id="inputLastName" class="form-control" placeholder="Last Name" required autofocus>
<label for="inputUsername" class="sr-only">Username</label>
<input type="name" name="inputUsername" id="inputUsername" class="form-control" placeholder="Username" required autofocus>
<label for="inputPassword" class="sr-only">Password</label>
<input type="password" name="inputPassword" id="inputPassword" class="form-control" placeholder="Password" required>
<label for="inputPhone" class="sr-only">Password</label>
<input type="number" name="inputPhone" id="inputPhone" class="form-control" placeholder="Phone" required>
<button id="btnSignUp" class="btn btn-lg btn-primary btn-block" type="submit">Sign up</button>
</form>
</div>
<footer class="footer">
<p>© Company 2015</p>
</footer>
</div>
</body>
</html>
Add a request handler called signUp in app.js.
app.get('/signUp', function(req, res) {
    res.sendFile('signup.html', {
        'root': __dirname + '/public/signup'
    });
});
Save the changes and restart the server. Point your browser to http://localhost:3000 and you should have the application running. Click on the sign-in and sign-up links on the page, and the respective pages should be displayed.
Step 2: Implementing the Sign-Up Functionality
To implement the sign-up functionality, we'll be calling the Python Eve REST API. We'll be calling this API from the Node.js back end since it requires passing the service authentication username and password. So, to prevent exposing the authentication username and password from the scripts, we'll make this call from Node.js.
Let's first create a register request handler to handle the sign-up functionality.
app.post('/register', function(req, resp) {
   // Code will be here
});
We'll require body-parser to parse the data posted from the form. Install body-parser using NPM package manager.
npm install body-parser
Once body-parser has been installed, require that inside app.js.
bodyParser = require('body-parser')
To use body-parser to parse the posted form data, we need to use it in our app.
app.use(bodyParser.urlencoded({
    extended: true
}));
Inside the /register handler we can parse the form data as shown:
var _firstName = req.body.inputFirstName;
var _lastName = req.body.inputLastName;
var _username = req.body.inputUsername;
var _password = req.body.inputPassword;
var _phone = req.body.inputPhone;
We'll be using request to make the call to the Eve APIs. So, install request into the application.
npm install request
Require request in app.py.
request = require('request')
Create the options for calling the API as shown:
var options = {
    url: 'http://127.0.0.1:5000/user/',
    method: 'POST',
    auth: {
        user: 'admin',
        password: 'admin'
    },
    formData: {
        firstname: _firstName,
        lastname: _lastName,
        username: _username,
        password: _password,
        phone: _phone
    }
}
We have specified the details for the POST request in the options. admin_username and admin_password are the authentication username and password required to access the Eve user creation API.
Next, let's use request to make the call.
request(options, function(err, res, body) {
    if (err) {
        console.log(err);
        return;
    }
    console.log('Response: ', res)
    console.log('Returned data: ', body)
})
Save the changes and restart the server. Point your browser to http://localhost:3000 and navigate to the sign-up screen. Enter the details and click on the sign-up button. Check the terminal window for the response and user creation details returned from the API call.
Step 3: Handling Sign-Up Error
When an error occurs during the sign-up process, we'll pass the error message to the sign-up page. We'll be using a template engine called EJS. First, let's install EJS.
npm install ejs
Once done with installation of EJS, add the following line of code to set the view folder and the view engine.
var path = require('path');
app.set('views', path.join(__dirname + '/public/signup'));
app.set('view engine', 'ejs');
Rename signup.html to signup.ejs and add a span to display an error after the submit button.
<span style="color:red;"><%= error %></span>
Also, modify the signUp request handler.
app.get('/signUp',function(req,res){
    res.render('signup',{error:''})
});
Next, if any error occurs in the sign-up response, we'll pass it to the sign-up page. If the sign-up process returns no error, we'll redirect the user to the sign-in page.
request(options, function(err, res, body) {
    if (err) {
        return resp.render('signup', {
            error: err
        })
    }
    var result = JSON.parse(body)
    if (result._status == 'ERR') {
        if (result._error.code == '400') {
            return resp.render('signup', {
                error: 'Username Already Exists!'
            })
        }
        return resp.render('signup', {
            error: result._issues.username
        })
    } else {
        console.log('All good');
        resp.redirect('/signIn');
    }
})
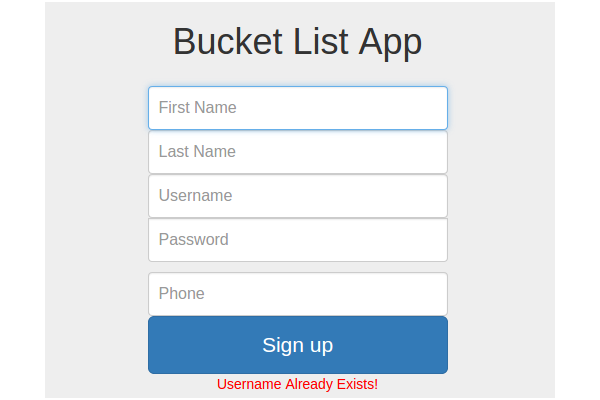
Save all the changes and restart the server. Point your browser to http://localhost:3000/signUp and try to register using an existing username. Since the username already exists, you should get an error.
Creating the AngularJS App
Implementing the Sign-In Functionality
AngularJS provides a service called $http which helps in making REST API calls. From the AngularJS docs,
The$httpservice is a core Angular service that facilitates communication with the remote HTTP servers via the browser's XMLHttpRequest object or via JSONP.
Copy the body content of index.html and create a new file called public/home/home.html.
<div class="container">
<div class="header">
<nav>
<ul class="nav nav-pills pull-right">
<li role="presentation" class="active"><a href="#">Home</a></li>
<li role="presentation"><a href="#/signin">Sign In</a></li>
<li role="presentation"><a href="/signUp">Sign Up</a></li>
</ul>
</nav>
<h3 class="text-muted">Angular Node App</h3>
</div>
<div class="jumbotron">
<h1>Angular Node App</h1>
<p class="lead"></p>
<p><a class="btn btn-lg btn-success" href="/signUp" role="button">Sign up today</a></p>
</div>
<footer class="footer">
<p>© Company 2015</p>
</footer>
</div>
In the home folder, create a file called home.js and define the home module and routes config as shown:
'use strict';

angular.module('home', ['ngRoute'])

.config(['$routeProvider', function($routeProvider) {
  $routeProvider.when('/home', {
    templateUrl: '../home/home.html',
    controller: 'HomeCtrl'
  });
}])

.controller('HomeCtrl', [function() {

}]);
Similarly, replace the HTML code of signin.html with the body content of signin.html. We'll handle sign-in page routing through the AngularJS app.
Inside the signin folder, create a file called signin.js and add the following route config details.
'use strict';

angular.module('signin', ['base64','ngRoute','myAppService'])

.config(['$routeProvider', function($routeProvider) {
  $routeProvider.when('/signin', {
    templateUrl: '../signin/signin.html',
    controller: 'SignInCtrl'
  });
}])
In index.html we'll use ngView and route the AngularJS application views. Here is how index.html will look:
<!DOCTYPE html>
<html lang="en" ng-app="myApp">
  <head>
    <title>Angular Node App</title>


    <link href="http://getbootstrap.com/dist/css/bootstrap.min.css" rel="stylesheet">

    <link href="http://getbootstrap.com/examples/jumbotron-narrow/jumbotron-narrow.css" rel="stylesheet">
    <script src="https://code.jquery.com/jquery-2.0.1.min.js"></script>
    <script src="https://maxcdn.bootstrapcdn.com/bootstrap/3.3.1/js/bootstrap.min.js"></script>
    <script src="https://ajax.googleapis.com/ajax/libs/angularjs/1.3.12/angular.js"></script>
    <script src="home/home.js"></script>
    <script src="signin/signin.js"></script>
    <script src="index/index.js"></script>

  </head>

  <body>

    <div ng-view></div>
  </body>
</html>
Inside the index folder, create a file called index.js which will serve as the root file. In index.js we'll inject the different modules created into the myApp app. Here is the index.js file:
angular.module('myApp', [
  'ngRoute',
  'home',
  'signin'
]).
config(['$routeProvider', function($routeProvider) {
  $routeProvider.otherwise({redirectTo: '/home'});
}]);
Install angular-route using bower and include the reference in index.html.
bower install angular-route
<script src="../bower_components/angular-route/angular-route.js"></script>
We'll also need to convert the username and password to base64, so install angular-base64.
bower install angular-base64
Once installed, add a reference to angular-base64 in index.html.
<script src="../bower_components/angular-base64/angular-base64.js"></script>
Set the static path to bower_components in app.js.
app.use('/bower_components', express.static(__dirname + '/bower_components'));
Inside signin.js, let's create a controller called SignInCtrl.
'use strict';

angular.module('signin', ['base64','ngRoute'])

.config(['$routeProvider', function($routeProvider) {
  $routeProvider.when('/signin', {
    templateUrl: '../signin/signin.html',
    controller: 'SignInCtrl'
  });
}])

.controller('SignInCtrl',['$scope','$http','$base64',function($scope,$http,$base64){
}]);
We just created a controller called SignInCtrl in signin.js. We have injected the base64 module to the SignInCtrl.
On sign-in button click, we'll call the above signIn function to authenticate the user. So, first let's add the ngModel directive to the username and password field in the sign-in page.
<input type="text" name="inputUsername" id="inputUsername" ng-model="username" class="form-control" placeholder="Email address"  autofocus>
<input type="password" name="inputPassword" id="inputPassword" ng-model="password" class="form-control" placeholder="Password" >
Add the ngClick directive to the Sign In button in signin.html.
<button id="btnSignIn" class="btn btn-lg btn-primary btn-block" ng-click="signIn()">Sign in</button>
Inside the signIn function read the username and password from $scope. Once we have the username and password, we'll create the base64 string using angular-base64.
$scope.signIn = function() {

    var username = $scope.username;
    var password = $scope.password;

    var authdata = $base64.encode(username + ':' + password);
}
Before making a call to the REST APIs, we need to set the necessary headers. We need to set the Access-Control-Request-Headers and Access-Control-Expose-Headers.
$http.defaults.headers.common = {"Access-Control-Request-Headers": "accept, origin, authorization"};

$http.defaults.headers.common = {"Access-Control-Expose-Headers": "Origin, X-Requested-With, Content-Type, Accept"};

$http.defaults.headers.common["Cache-Control"] = "no-cache";

$http.defaults.headers.common.Pragma = "no-cache";
We'll also need to set the Authorization header in the $http. Using the base64 authData created using username and password, set the authorization header.
$http.defaults.headers.common['Authorization'] = 'Basic '+authdata;
Next, make the $http GET call to the Python Eve REST APIs.
$http({
    method: 'GET',
    url: 'http://127.0.0.1:5000/user/' + username
}).
success(function(data, status, headers, config) {
    console.log(data);
}).
error(function(data, status, headers, config) {
    console.log(data, status);
});
Save all the changes and restart the server. Point your browser to http://localhost:3000/signin. Try to sign in using a valid username and password. Check browser console and you should have the user data. If the authentication fails, you should have an authentication failure error.
Conclusion
In this tutorial, we saw how to use the REST APIs created in the previous tutorial in our AngularJS and Node.js app. We implemented the sign-in and sign-up functionality in this tutorial.
In the next part of this series, we'll use the other APIs to complete our AngularJS app.
Source code from this tutorial is available on GitHub.

Comments