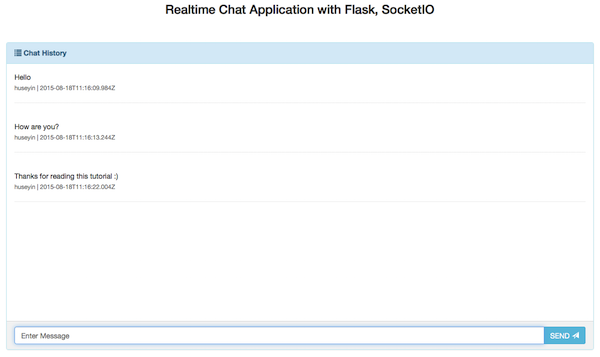
First of all, let me show you the final look of the chat application that we will completed by the end of this article.

We will implement the application with Flask, Gunicorn for standalone WSGI application, and Flask-SocketIO for real-time communication.
1. Scenario
Let's look at an example scenario that we can use throughout this article as we build the application:
- Alberto wants to use our application so he opens it in the browser.
- He selects a nickname and logs in to chat.
- He writes something in the text area and presses Enter
- The entered text will be broadcast to the users that are currently logged in to the chat app.
As you can see, this is a very simple application that will cover all the basics of a web application. Let's continue with the project design.
2. Prerequisites
Before proceeding with implementing the project, we need to review some required dependencies and libraries. I will perform the installation process in Ubuntu to make the installation much easier.
2.1. Python
You can simply install Python by simply executing the following command:
sudo apt-get install python-dev build-essential
2.2. pip
pip is a package management system used to install and manage software packages written in Python. We will use this for installing Python packages for our application. You can install pip by executing following command:
sudo apt-get install python-pip
2.3. Virtualenv
This tool enables you to create isolated Python environment. This means, you can switch your context to environment that has Python related properties and switch back to your normal environment if you do not have Python development. You can install Virtualenv by executing following command:
sudo pip install virtualenv
2.4. Gunicorn
Gunicorn stands for Green Unicorn and it is a Python WSGI (Web Server Gateway Interface) HTTP server for UNIX. Gunicorn acts like an interface between the web server and your Python application. We will use this for running our Flask application as standalone WSGI application. We need to use [email protected] because newer versions have some problems that need to be resolved.
sudo pip install gunicorn==18.0
We are done with the installation part. Let's continue with project setup.
3. Project Setup
Create a project directory as you want;
mkdir realtimepythonchat
Go to the newly created directory and create a virtual environment for Python development like this:
virtualenv realtimepythonchat_env
You can change the name of environment according to your needs. Virtual environment is created but is not activated yet. If you execute following command;
source realtimepythonchat_env/bin/activate
Your Python virtual environment will be activated, and we are ready to install requirements within this virtual environment. In order to be sure about virtual environment, you can check your command line starts with virtual environment name in parenthesis and you will see following;

3.1. Dependency Installation
We need to install some dependent libraries for our project. Create a file called requirements.txt in the root directory of your project and put following content inside file:
Flask==0.10.1
Flask-SocketIO
Jinja2==2.7.2
MarkupSafe==0.18
Werkzeug==0.9.4
gevent==1.0
gevent-socketio==0.3.6
gevent-websocket==0.9.2
greenlet==0.4.2
itsdangerous==0.23
ujson==1.33
These dependencies will help us to create a real-time web application. Now let's install dependencies with following command
pip install -r requirements.txt
3.2 Project Skeleton
Thus far, we have created a project and installed required software. Now, let's add project specific files.
Add a file called server.py and put the following content into it:
from gevent import monkey

monkey.patch_all()

from flask import Flask, render_template, session, request
from flask.ext.socketio import SocketIO, emit, join_room

app = Flask(__name__)
app.debug = True
app.config['SECRET_KEY'] = 'nuttertools'
socketio = SocketIO(app)


@app.route('/')
def chat():
    return render_template('chat.html')

@app.route('/login')
def login():
    return render_template('login.html')


@socketio.on('message', namespace='/chat')
def chat_message(message):
    emit('message', {'data': message['data']}, broadcast = True)

@socketio.on('connect', namespace='/chat')
def test_connect():
    emit('my response', {'data': 'Connected', 'count': 0})


if __name__ == '__main__':
    socketio.run(app)
This is simple Flask application that runs through the Flask-SocketIO module. The first and second route is for rendering the main page and the login page. The third route is for handling the message event on the chat channel.
When client sends a message to this endpoint, it will be broadcasted to the connected clients. This is done by emit() command. The first parameter is the message payload and second one is for setting broadcast value. If it is true, message will be broadcasted to the clients. 4th router is for simple ACK message for client side to ensure that client is connected to the socket.
3.3 Templates
We have two pages - chat.html and login.html. You can see the content of the login.html below:
<!DOCTYPE html>
<html>
<head lang="en">
    <meta charset="UTF-8">
    <title></title>
    <script src="//code.jquery.com/jquery-1.11.1.js"></script>
    <script src="//maxcdn.bootstrapcdn.com/bootstrap/3.2.0/js/bootstrap.min.js"></script>
    <script src="//cdnjs.cloudflare.com/ajax/libs/jquery-cookie/1.4.1/jquery.cookie.min.js"></script>
    <script>
        $(function(){
            if ($.cookie("realtime-chat-nickname")) {
                window.location = "/"
            } else {
                $("#frm-login").submit(function(event) {
                    event.preventDefault();
                    if ($("#nickname").val() !== '') {
                        $.cookie("realtime-chat-nickname", $("#nickname").val());
                        window.location = "/";
                    }
                })
            }
        })
    </script>
    <link href="//maxcdn.bootstrapcdn.com/bootstrap/3.2.0/css/bootstrap.min.css" rel="stylesheet">
    <link href="//maxcdn.bootstrapcdn.com/font-awesome/4.1.0/css/font-awesome.min.css" rel="stylesheet">
    <style type="text/css">

    </style>
</head>
<body>
<div class="container" style="padding-top: 50px">
    <div class="row">
        <div class="col-md-4 col-md-offset-4">
            <div class="login-panel panel panel-default">
                <div class="panel-heading">
                    <h3 class="panel-title">Choose a nickname to enter chat</h3>
                </div>
                <div class="panel-body">
                    <form role="form" id="frm-login">
                        <fieldset>
                            <div class="form-group">
                                <input class="form-control" placeholder="Enter Nickname" name="nickname" id="nickname" type="text" autofocus required="">
                            </div>
                            <button type="submit" class="btn btn-lg btn-success btn-block">Enter Chat</button>
                        </fieldset>
                    </form>
                </div>
            </div>
        </div>
    </div>
</div>
</body>
</html>
This is a simple login system that includes user information stored in the cookie. When you select a nickname and proceed, your nickname will be stored to the cookie and you will be redirected to the chat page. Let's have a look at chat.html.
<!DOCTYPE html>
<html>
<head lang="en">
    <meta charset="UTF-8">
    <title></title>
    <script src="//code.jquery.com/jquery-1.11.1.js"></script>
    <script src="//cdnjs.cloudflare.com/ajax/libs/jquery-cookie/1.4.1/jquery.cookie.min.js"></script>
    <script src="//maxcdn.bootstrapcdn.com/bootstrap/3.2.0/js/bootstrap.min.js"></script>
    <script src="//cdnjs.cloudflare.com/ajax/libs/jquery-timeago/1.4.0/jquery.timeago.min.js"></script>
    <script src="//cdnjs.cloudflare.com/ajax/libs/socket.io/0.9.16/socket.io.min.js"></script>
    <script>
        var channel = "/chat";

        var socket = io.connect('http://' + document.domain + ':' + location.port + channel);

        socket.on('connect', function() {
            socket.emit('my_connection', {data: 'I\'m connected!'});
        });

        socket.on("message", function (message) {
            refreshMessages(message);
        });

        function refreshMessages(message) {
            $(".media-list").append('<li class="media"><div class="media-body"><div class="media"><div class="media-body">'
                + message.message + '<br/><small class="text-muted">' + message.author + ' | ' + message.createDate + '</small><hr/></div></div></div></li>');
        }

        $(function(){

            if (typeof $.cookie("realtime-chat-nickname") === 'undefined') {
                window.location = "/login"
            } else {
                $("#sendMessage").on("click", function() {
                    sendMessage()
                });

                $('#messageText').keyup(function(e){
                    if(e.keyCode == 13)
                    {
                        sendMessage();
                    }
                });
            }

            function sendMessage() {
                $container = $('.media-list');
                $container[0].scrollTop = $container[0].scrollHeight;
                var message = $("#messageText").val();
                var author = $.cookie("realtime-chat-nickname");
                socket.emit('message', {data: {message: message, author: author}});
                $("#messageText").val("");
                $container.animate({ scrollTop: $container[0].scrollHeight }, "slow");
            }
        })
    </script>
    <link href="//maxcdn.bootstrapcdn.com/bootstrap/3.2.0/css/bootstrap.min.css" rel="stylesheet">
    <link href="//maxcdn.bootstrapcdn.com/font-awesome/4.1.0/css/font-awesome.min.css" rel="stylesheet">
    <style type="text/css">
        .fixed-panel {
            min-height: 500px;
            max-height: 500px;
        }
        .media-list {
            overflow: auto;
        }
    </style>
</head>
<body>
<div class="container">
    <div class="row " style="padding-top:40px;">
        <h3 class="text-center">Realtime Chat Application with Flask, SocketIO</h3>
        <br/><br/>

        <div class="col-md-12">
            <div class="panel panel-info">
                <div class="panel-heading">
                    <strong><span class="glyphicon glyphicon-list"></span> Chat History</strong>
                </div>
                <div class="panel-body fixed-panel">
                    <ul class="media-list">
                    </ul>
                </div>
                <div class="panel-footer">
                    <div class="input-group">
                        <input type="text" class="form-control" placeholder="Enter Message" id="messageText" autofocus/>
                                    <span class="input-group-btn">
                                        <button class="btn btn-info" type="button" id="sendMessage">SEND <span class="glyphicon glyphicon-send"></span></button>
                                    </span>
                    </div>
                </div>
            </div>
        </div>
    </div>
</div>
</body>
</html>
As we already said, the client-side can use the SocketIO JavaScript implementation on the front-end. The required client-side library is fetched from CDN. Actually, all the CSS and JavaSCript files are fetched from a CDN in order to make the application faster and to reduce the project size. You can clone this project and run it on your local computer easily.
When you go to chat page after successful login, the cookie will be checked to see if the user is logged in or not. If not, user will be redirected to login page again. If you successfully go to the chat page, there will be a socket connection between client and server. SocketIO is used on client side, and server side has been already implemented in above sections. When user clicks the Enter key or presses the Enter button, the text written in message area will be emit() to the server-side. The message will be handled on the server-side and will be broadcasted to the connected clients through hte chat channel.
4. Running Project
We will run this project as stand-alone WSGI application. In order to do this, you can use the following command:
gunicorn --worker-class socketio.sgunicorn.GeventSocketIOWorker server:app
We are running gunicorn command with two arguments. The first is the worker class and it comes from gevent-socketio. The second is the application name with its module. Here, the module is server.py and the application name is app (which is on the eighth line in server.py). When you execute above command, you will see output like this:

When you got to http://127.0.0.1:8000, you will see the following screen:
5. Deployment
We will use Modulus for our deployment environment. First of all, create an account on Modulus and go to the Dashboard to create a new project. Fill in the Project Name and select Python box from project types and click CREATE PROJECT.
After a successful account creation, we can proceed with the deployment. You can do deployment to Modulus in two ways:
- Zip your project and upload it from your Modulus dashboard
- Install Modulus client and deploy from command line
I will use command line deployment for this project. First of all, install Node.js on your computer.
When we start our deployment to Modulus, Modulus will perform the following command on their side:
pip install -r requirements.txt
We have already required dependency file - requirements.txt and then it will perform following to start deployed project:
./manage.py migrate
However, we need to override this command in order to make our application up. Create a file called app.json and put following command inside file:
{
  "scripts": {
    "start": "gunicorn -b unix:/mnt/home/app.sock --worker-class socketio.sgunicorn.GeventSocketIOWorker server:app"
  }
}
Now we are ready to upload the file to Modulus. Open up a command line console and execute following command.
npm install -g modulus
You are ready to use Modulus CLI, run following command to login Modulus.
modulus login
You will be prompted for your username/email and password. Enter required credentials and it is time to deploy. Go to your project directory and execute following command.
modulus deploy -p "your project name"
Above command will deploy current project to the Modulus that you have created before. Do not forget to replace project name with the one you have created before. If everything is fine, you will see a success message in the console, and test your application by following url provided within the successful message in the console.
6. Conclusion
The main purpose of this tutorial was show you how to create a real-time chat application with Flask and SocketIO. We have used Modulus for PaaS provider and it has really simple steps to deploy your application to the production environment.

Comments