In this two-part tutorial, I will show you how to build a poker game using the Corona SDK. You will learn about touch controls, tweening elements, timers, and how to create a custom sort function.
Introduction
In the first tutorial, we will focus on setting up the project and creating the user interface for the game. To get you excited about this project, below is a screenshot of how the game will look like when it's finished.

The playing cards are not included in the download files. If you would like to follow along, you can purchase the card set on Graphic River or use another set of cards. The dimensions of each card are 75px x 105px, which translates to 150px x 210px for the @2x size.
If you'd like to run the demo application of this tutorial, you need to add the card to the project's directory. The images for the cards should start with h, c, d, or s, with a number appended to the letter (d1.png to d12.png, h1.png to h13.png, etc.).
If you would like to work with the original vector files, the graphics for the poker machine were created by Andrei Marius and are available on VectorTuts+. Feel free to download them from Vectortuts+.
1. New Project
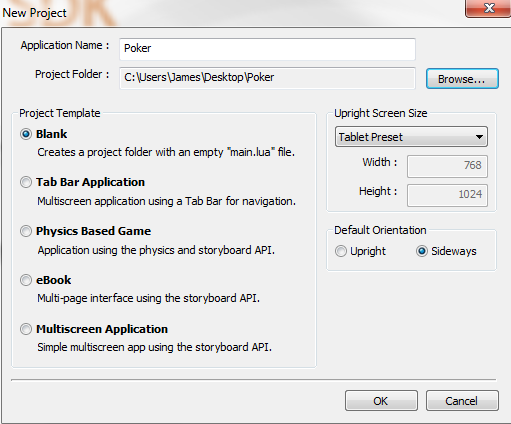
Open the Corona Simulator, click New Project, and configure the project as shown below enter the following details. Select a location to save your project and click OK. This will create a folder with a number of icons and three files that are important to us, main.lua, config.lua, and build.settings. We will take a look at each file in the next few steps.
2. Build.Settings
The build.settings file is responsible for the build time properties of the project. Open this file, remove its contents, and populate it with the following code snippet.
settings =
{
    orientation =
    {
        default ="landscapeRight",
        supported =
        {
          "landscapeLeft","landscapeRight"
        },
    },
}
In build.settings, we are setting the default orientation and restricting the application to only support a landscape orientation. You can learn which other settings you can include in build.settings by exploring the Corona Documentation.
3. Config.lua
The config.lua files handles the application's configuration. As we did with build.settings, open this file, remove its contents, and add the following code.
application =
{
    content =
    {
      width = 768,
      height = 1024,
      scale = "letterbox",
      fps = 30,
      imageSuffix =
      {
        ["@2x"] = 2, -- images with "@2x" appended will be used for iPad 3
      }
    }
}
This sets the default width and height of the screen, uses letterbox to scale the images, sets the frames per second to 30, and uses the imageSuffix setting for dynamic image selection. The download files for this tutorial include two files for each image, imageName.png and [email protected]. iPads with a retina display will use the @2x images, while the iPad 1 and 2 will use the regular images.
You can learn what other properties you can set in config.lua by checking out the Corona Documentation.
4. Main.lua
The main.lua file is the file that the application loads first and uses to bootstrap the application. We will be placing all of our code into this file. In the next few steps, we will be stubbing out a number of functions. You should add all of them to main.lua.
5. Hide Status Bar
We don't want the status bar showing in our application. Add the following to line to main.lua to accomplish this.
display.setStatusBar(display.HiddenStatusBar)
6. Variables
The next code snippet declares the variables that we will need throughout the project. Read the comments to better understand what each variable is used for. Most of them are self-explanatory.
local pokerMachine = display.newImage("cardsBG.png",true)
pokerMachine.anchorX, pokerMachine.anchorY = 0,0 -- Sets the images anchors it uses the new Graphics 2.0
local suits = {"h","d","c","s"}; -- hearts = h,diamonds =d,clubs =c,spades=s
local deck; -- The deck of Cards
local playerHand = {} --Holds the Players Cards
local cashOutButton
local betMaxButton
local betButton
local dealButton
local holdButtons = {} --Holds the "Hold" buttons
local isNewGame = true
local MAXBETAMOUNT  = 15 -- Max amount player can bet
local instructionsText
local betAmount = 0 -- How much the player has bet so far
local creditText
local betText
local winText
local gamesText
local gameData = {} -- This will hold game data -- The credits and number of games played
7. setup
The setup function is used to setup the game assets and start the game.
function setup()

end
8. setupButtons
This function sets up the buttons in the game.
function setupButtons()

end
9. setupTextFields
This function sets up the text field used in the application.
function setupTextFields()

end
10. enableDealButton
As the name indicates, this function enables the deal button.
function enableDealButton()

end
11. disableDealButton
This function disables the deal button.
function disableDealButton()

end
12. enableBetButtons
This function enables the bet buttons.
function enableBetButtons()

end
13. disableBetButtons
This function disables the bet buttons.
function disableBetButtons()

end
14. enableHoldButtons
This function enables the hold buttons.
function enableHoldButtons()

end
15. disableHoldButtons
This function enables the hold buttons.
function disableHoldButtons()

end
16. createDeck
This function creates a deck of cards.
function createDeck()

end
17. holdCard
This function goes through the player's hand and determines which cards are being held.
function holdCard(event)

end
18. betMax
This function is called when the player bets the maximum amount.
function betMax()

end
19. bet
This function is called when the player places an actual bet.
function bet()

end
20. doDeal
This function handles the dealing of the cards.
function doDeal()

end
21. dealInitialHand
This function deals the initial hand.
function dealInitialHand()

end
22. dealNewCards
This function deals the second part of the hand.
function dealNewCards()

end
23. getHand
This function figures out the player's hand.
function getHand()

end
24. newGame
This function resets all the variables and starts a new game.
function newGame()

end
25. awardWinnings
This function awards the player the money won.
function awardWinnings(theHand, theAward)

end
26. resetCardsYPosition
This function resets the cards' y position after a player holds a card.
function resetCardsYPosition()

end
27. generateCard
This function generates a random card.
function generateCard()

end
28. getCard
This function calls getGenerateCard and puts it on the screen.
function getCard(index)

end
29. Implementing setupButtons
Now that we have all our functions stubbed out we are going to start implementing them. Implement setupButtons as shown below.
function setupButtons()
  cashOutButton = display.newImage("buttonCashOut.png",89,572)
  cashOutButton.anchorX, cashOutButton.anchorY = 0,0
  local holdButtonPosition = 186
      for i=1,5 do
    local tempHoldButton = display.newImage("buttonHold1.png",holdButtonPosition + (93*(i-1)),572)
    tempHoldButton.buttonNumber = i
    tempHoldButton.anchorX, tempHoldButton.anchorY = 0,0
    table.insert(holdButtons,tempHoldButton)
      end
  betMaxButton = display.newImage("buttonBetMax.png",679,572)
  betMaxButton.anchorX, betMaxButton.anchorY = 0,0
  betButton = display.newImage("buttonBet.png",775,572)
  betButton.anchorX, betButton.anchorY = 0,0
  dealButton  = display.newImage("buttonDeal.png",869,572)
  dealButton.anchorX, dealButton.anchorY = 0,0
  instructionsText = display.newText( "", 400,400, native.systemFont, 30)
  instructionsText:setFillColor(0,0,0)
  enableBetButtons()
end
In setupButtons, we initialize our buttons as new images. We store the tempHoldButtons in a table so we can reference them without having to create five separate variables. We also setup instructionsText and enable the bet buttons. The display object has a method named newImage, which accepts the path to the image as well as an x and y position. As mentioned in the documentation, the newImage method has several optional parameters. In this tutorial, we are using the new Graphics 2.0 class so we must set the images anchorX and anchorY positions. You can learn more about migrating old projects to use the new Graphics 2.0 class in the Corona Documentation.
Add a call to setup at the very end of main.lua and then call setupButtons inside setup.
setup() -- Add to end of "main.lua"
function setup()
    setupButtons()
end
If you were to test your application now, you should see the interface along with the buttons.
30. Implementing setupTextFields
In setupTextFields, we setup the text fields in the application. Take a look at its implementation below.
function setupTextFields()
  instructionsText = display.newText( "", 400,400, native.systemFont, 30)
  instructionsText:setFillColor(0,0,0)

  creditText = display.newText("",800,185,native.SystemFont,22)
  creditText.width =150
  creditText.align = "right"
  creditText:setFillColor(255,0,0)

  betText = display.newText("",800,270,native.SystemFont,22)
  betText.width =150
  betText.align = "right"
  betText:setFillColor(255,0,0)

  winText = display.newText("",800,355,native.SystemFont,22)
  winText.width =150
  winText.align = "right"
  winText:setFillColor(255,0,0)

  gamesText = display.newText("",800,440,native.SystemFont,22) gamesText.width =150
  gamesText.align = "right"
  gamesText:setFillColor(255,0,0)
end
The display object has the method newText that takes as its parameters the text, x and y coordinates, the font, and font size. The newText method takes several optional parameters, which you can explore in the documentation. We are using the new setFillColor method from Graphics 2.0, which accepts percentages. In this example, we set the text fields to red. By setting the align property to right, the text will be aligned to the right within the text field. You must set the width property as well if you are using align. Call setupTextFields in setup.
function setup()
    setupButtons()
    setupTextFields()
end
If you run the application once more, you won't notice any change as the text fields are blank at the moment. They are ready for some text though.
31. randomSeed
Because we want to get a random card, we need to seed the random generator. If we wouldn't do this, then we would end up with the same randomness over and over. Enter the following code snippet inside our setup function.
function setup()
    math.randomseed(os.time())
    setupButtons()
    setupTextFields()
end
32. createDeck
The implementation of the createDeck function isn't too difficult either. We loop through the suits table and append a number from 1 to 13 to it. We then insert it into the deck table. The images for our cards are named d1.png, h3.png, etc. with 1 being the ace and the 13 being the king.
function createDeck()
  deck = {};
  for i=1, 4 do
      for j=1, 13 do
        local tempCard = suits[i]..j
        table.insert(deck,tempCard)
      end
  end
end
h2> Conclusion
This brings the first part of this two-part tutorial to a close. In the second part, we will finish the game. I hope to see you there.

Comments