This tutorial will teach you how to apply Instagram-like filters and special effects to images with the incredibly powerful GPUImage project. Along the way, you'll learn how to build a simple camera application capable of either taking new photos or accessing existing images from the photo album.
Project Demo
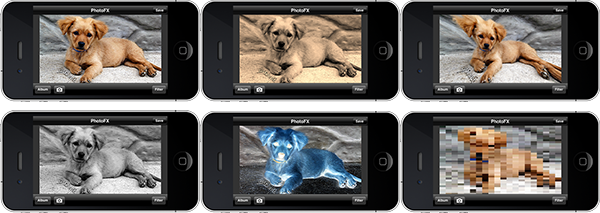
The above is a collage of image filters applied with the app this tutorial will teach you how to build. The source image is from ep.Sos.de on Flickr.
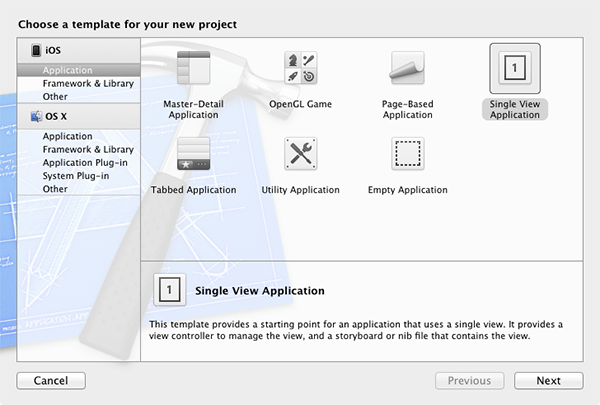
Step 1: Start a New Xcode Project
Launch Xcode and create a new application using the Single View template.
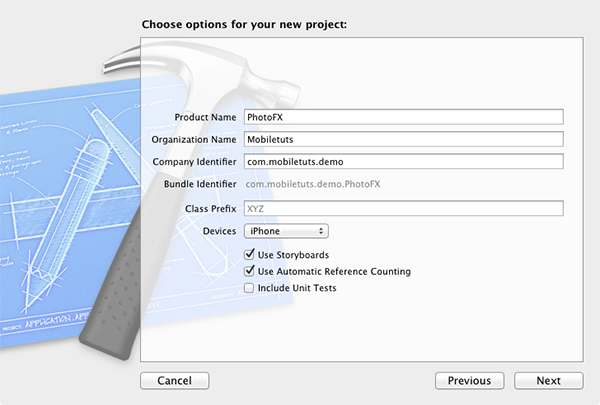
For this tutorial, we'll use both Storyboards and Automatic Reference counting, so be sure to select both boxes. Name the project "PhotoFX" and supply a unique company identifier for device testing.
Step 2: Create the Application Interface
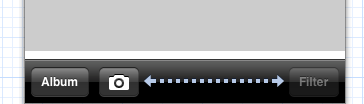
The application interface will consist of a UINavigationBar for the app title on the UIView and save button, a UIToolbar for the album, camera, and filter utility buttons, and a UIImageView set to aspect fill for viewing and modifying selected images.
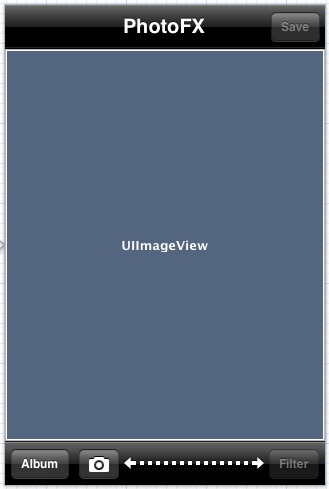
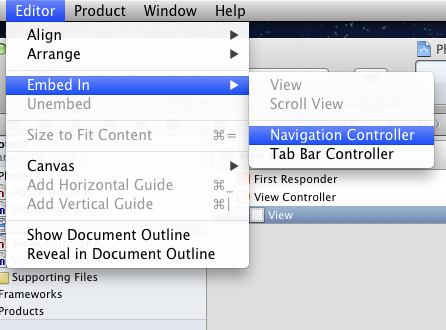
Open the MainStoryboard.storyboard file. Select the UIView on screen and then select Editor > Embed In > Navigation Controller.
Select the UINavigationController and then go to the Attributes Inspector in the Utility pane. Set the "Top Bar" drop down to "Black Navigation Bar" and the "Status Bar" to "None". To finalize the status bar removal, go to the PhotoFX-Info.plist file and add a new key with the text "Status bar is initially hidden". Set the value to "YES".
Because we've just transitioned our app into a UINavigationController template, you should now go to ViewController.h and add the following delegate declaration:
#import <UIKit/UIKit.h>

@interface ViewController : UIViewController <UINavigationControllerDelegate>

@end
We'll need that later.
Now go back to the Storyboard file and double-click the title in the center of the UINavigationItem and replace the default text with "PhotoFX".
Drag a UIBarButtonItem from the Object Library onto the UINavigationItem. With the new button item selected, go to the Attributes Inspector tab of the Utilities panel and set the button's Identifier property to "Save". Next, with the "Save" button still selected, uncheck the "Enabled" checkbox for this button. This will prevent the user from trying to save an image before either loading one from the photo album or taking a picture with the camera (we'll enable it with code again later).

Return to the object library and drag a UIToolbar onto the main UIView. Next add a total of three UIBarButtonItem objects on the toolbar. Change the title text for the first button to "Album", set the Identifier property for the second to "Camera", and set the third button's title text to "Filter". The "Filter" button should be disabled by default, just like the "Save" button from above.
To polish the toolbar layout, we need to right-align the filter button on the toolbar. You can achieve this effect by using a Flexible Space Bar Button Item, which you can simply drag onto the toolbar from the Object library.
Notice how glaring the white UIView is in contrast to the black, shiny navigation bar and tool bar? Let's do something about that. Select the UIView and set the background color to "tungsten".
The only subview left to add is the main UIImageView used to show the user's image. Drag a UIImageView from the Object Library and center it between the UINavigationItem and the UIToolbar. Pull up the Attributes Inspector and select "Aspect Fit" as the UIImageView mode under the "View" Inspector subsection.
All the major components of the interface are now in place! The next step is to wire these elements from the Storyboard to the ViewController class.
Open the ViewController.m file. Add the following IBOutlet properties and IBAction methods into the ViewController class extension:
@interface ViewController ()

@property(nonatomic, weak) IBOutlet UIImageView *selectedImageView;
@property(nonatomic, weak) IBOutlet UIBarButtonItem *filterButton;
@property(nonatomic, weak) IBOutlet UIBarButtonItem *saveButton;

- (IBAction)photoFromAlbum;
- (IBAction)photoFromCamera;
- (IBAction)applyImageFilter:(id)sender;
- (IBAction)saveImageToAlbum;

@end
So, why create IBOutlet properties for the image view, filter button, and save button, but not the other Interface Builder components? The answer is that these are the only objects that we'll need to access programmatically. The image view will be accessed to set images selected by the user while the filter and save buttons will be accessed to switch the state from disabled to enabled after the user selects an image or takes a photo.
The IBAction methods should be mostly self-explanatory and will connect directly to the UIBarButtonItem selector implied by each name.
After creating the IBOutlet properties, you should synthesize them by adding the following line of code to the class @implementation:
@implementation ViewController

@synthesize selectedImageView, filterButton, saveButton;
To complete the Interface Builder setup, map each of the above IBOutlet objects and IBAction methods declared to the proper Interface Builder components (Need help doing this? Leave a question in the comments section below). Be sure to save your changes before moving on.
With the application's interface created, we're ready to begin coding the functionality!
Step 3: Selecting Photos From the Album
This tutorial will use the UIImagePickerController class for directly accessing the images within the user's photo album. Using this class will overlay a modal view gallery browser on top of our existing interface. When a user selects the image they want, the picker will use delegation to notify our ViewController class that a selection has been made. If you're new to iOS development, don't worry, this is a lot easier than it might sound.
In the ViewController.m file, add the following implementation for the photoFromAlbum method:
@synthesize selectedImageView, filterButton, saveButton;

- (IBAction)photoFromAlbum
{
    UIImagePickerController *photoPicker = [[UIImagePickerController alloc] init];
    photoPicker.delegate = self;
    photoPicker.sourceType = UIImagePickerControllerSourceTypePhotoLibrary;

    [self presentViewController:photoPicker animated:YES completion:NULL];

}
Simple, right? Now we just need to implement the UIImagePickerController delegate protocol in order to respond to image selections. You will do this in Step 5 of this tutorial.
Step 4: Taking Photos with the Camera
There are two primary approaches to taking photos with the device camera. You can either use the UIImagePickerController to access Apple's default camera implementation, or you can create a completely customized experience with the AVFoundation framework. GPUImage actually builds upon the functionality provided by AVFoundation to provide a class specifically with this purpose in mind. However, for this tutorial, we'll be using UIImagePickerController for photo selection exclusively. In a future tutorial on GPUImage (likely to be published in the next 1-3 weeks), I'll show you how to use the more advanced GPUImage classes to achieve this.
The code for taking photos in this tutorial is as follows:
- (IBAction)photoFromCamera
{
    UIImagePickerController *photoPicker = [[UIImagePickerController alloc] init];

    photoPicker.delegate = self;
    photoPicker.sourceType = UIImagePickerControllerSourceTypeCamera;

    [self presentViewController:photoPicker animated:YES completion:NULL];

}
If you compare the method above with the photoFromAlbum method from step 3, you'll see that the only difference is whether sourceType is set to UIImagePickerControllerSourceTypePhotoLibrary or UIImagePickerControllerSourceTypeCamera. Because of this, you could easily combine these two methods into one. However, I've decided to leave photoFromCamera as a separate method as I'll be refactoring it to use AVFoundation in a future tutorial and the logic will need to be separated.
Step 5: Code the Photo Picker Delegate
The user can now browser the device library or use the device camera to select an image with UIImagePickerController. Regardless of how the user selects an image, the next step is to implement the delegate method that will be responsible for placing that image on the screen.
First, go to ViewController.h and declare that this class will conform to UIImagePickerControllerDelegate:
#import <UIKit/UIKit.h>

@interface ViewController : UIViewController <UINavigationControllerDelegate, UIImagePickerControllerDelegate>

@end
Now flip to ViewController.m and implement the imagePickerController:didFinishPickingMediaWithInfo: delegate method called by the photo picker upon selection:
- (void)imagePickerController:(UIImagePickerController *)photoPicker didFinishPickingMediaWithInfo:(NSDictionary *)info
{
    self.saveButton.enabled = YES;
    self.filterButton.enabled = YES;

    UIImage *selectedImage = [info valueForKey:UIImagePickerControllerOriginalImage];

    [self.selectedImageView setImage:selectedImage];

    [photoPicker dismissModalViewControllerAnimated:YES];
}
On lines 3-4 above, the save and filter buttons are enabled because we now have an image upon which those actions can be taken.
Line 6 creates a UIImage object with the photo selected by the user, and line 8 sets the image property of the UIImageViewController to the chosen image which will display it on the screen.
Finally, line 10 dismisses the modal view used to select the photo.
The above code should work well, but there's one enhancement needed. Rather than simply storing the image selected in the selectedImageView, we should also retain a copy in an internal UIImage data member. This will allow the application to apply each filter selected directly to the original image rather than iteratively layering the effects. It will also allow the user to easily revert to the original image from a filtered perspective. To do this, first add a UIImage object to the class extension at the top of ViewController.m:
#import "ViewController.h"
#import "GPUImage.h"

@interface ViewController ()
{
    UIImage *originalImage;
}

@property(nonatomic, weak) IBOutlet UIImageView *selectedImageView;
@property(nonatomic, weak) IBOutlet UIBarButtonItem *filterButton;
Next modify the imagePickerController:didFinishPickingMediaWithInfo: method as follows:
- (void)imagePickerController:(UIImagePickerController *)photoPicker didFinishPickingMediaWithInfo:(NSDictionary *)info
{
    self.saveButton.enabled = YES;
    self.filterButton.enabled = YES;

    originalImage = [info valueForKey:UIImagePickerControllerOriginalImage];

    [self.selectedImageView setImage:originalImage];

    [photoPicker dismissModalViewControllerAnimated:YES];
}
If you build and run the project now, you should be able to select photos directly from the device album!
Step 6: Saving the Chosen Image
The last thing we need to do before tackling GPUImage is allow users to save the photos they take with the device camera. You can do this with a single line of code within the saveImageToAlbum method:
- (IBAction)saveImageToAlbum
{
    UIImageWriteToSavedPhotosAlbum(self.selectedImageView.image, self, @selector(image:didFinishSavingWithError:contextInfo:), nil);
}
The line of code above will attempt to save the image to the photo album, but you'll need to implement the selector specified in order to respond upon success or failure:
- (void)image:(UIImage *)image didFinishSavingWithError:(NSError *)error contextInfo:(void *)contextInfo
{
    NSString *alertTitle;
    NSString *alertMessage;

    if(!error)
    {
        alertTitle   = @"Image Saved";
        alertMessage = @"Image saved to photo album successfully.";
    }
    else
    {
        alertTitle   = @"Error";
        alertMessage = @"Unable to save to photo album.";
    }

    UIAlertView *alert = [[UIAlertView alloc] initWithTitle:alertTitle
                                                    message:alertMessage
                                                   delegate:self
                                          cancelButtonTitle:@"Okay"
                                          otherButtonTitles:nil];
    [alert show];
}
The above lines of code are rather straightforward and simply display a UIAlertView message notifying the user of whether or not the image was saved successfully.
Step 7: Add GPUImage to Your Project
Adding GPUImage to your project is a bit trickier than you might expect, but by following this step it should only take a few minutes for you to be up and running.
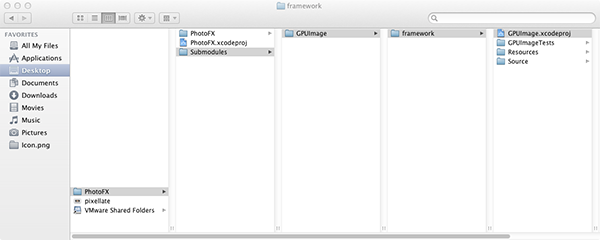
First, you need to download a copy of GPUImage from the official project GitHub. Unarchive the downloaded file and open the "framework" folder. These are the essential files needed to import GPUImage in your project. Rather than copying all of these into your project directly, use Finder to go to the location you saved your Xcode project in Step 1 (for me that's ~/Desktop/PhotoFX).Create a new folder called "Submodules" with a child folder called "GPUImage". Now copy the "framework" folder downloaded from GitHub and paste it into the "GPUImage" folder. Next, open the "framework" folder and select the GPUImage.xcodeproj file. Your screen should look something like this:
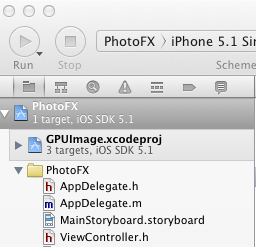
Now drag the GPUImage.xcodeproj file into the Xcode Project Navigator. If you did this successfully, you should see something like the following:
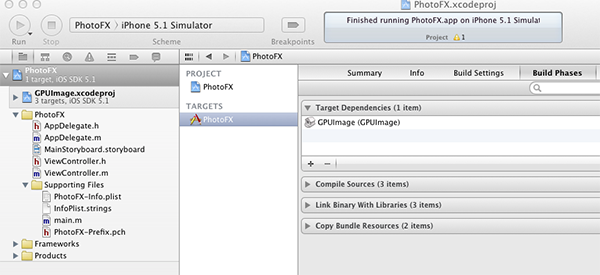
With the project added successfully, you'll need to add GPUImage as a dependency in your app's build settings. Select "PhotoFX" from the project navigator, select the "PhotoFX" target, and then go to the "Build Phases" tab. Expand the "Target Dependencies" drop down and then click the "+" icon. Select "GPUImage" from the list that appears. Take a look at the following image to get a feel for how this is done:
Now you need to drag the libGPUImage.a file (found within Xcode's Project Navigator at GPUImage.xcodeproj > Products) to the "Link Binary with Libraries" drop down. With this completed, you should see something like the following:
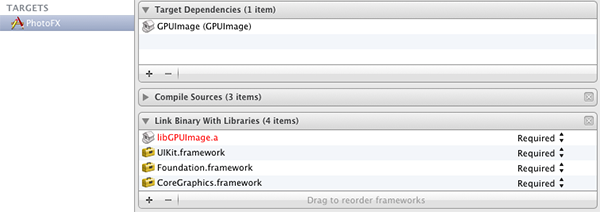
While you're focused on the "Link Binary With Libraries" dropdown, go ahead and add the following required frameworks by clicking the "+" button in the bottom left corner:
- CoreMedia
- CoreVideo
- OpenGLES
- AVFoundation
- QuartzCore
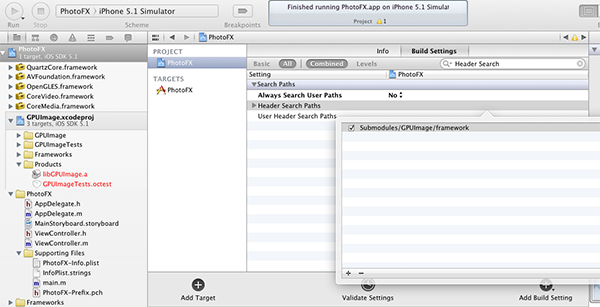
Almost done! The next step is to select the PhotoFX project and go to "Build Settings". Search for "Header Search Paths" (you may need to select the "All" button instead of "Basic" in order for this option to appear), and then double-click to add Submodules/GPUImage/framework in the popup dialog that will appear. Click the checkbox next to the entry in order to indicate that this path should be searched recursively. If you did this correctly, you should be looking at something like the following:
The final step is to return to ViewController.m and add the following line at the top:
#import "ViewController.h"
#import "GPUImage.h"
You should now be able to compile and run the project without issue. Having trouble? Leave a comment below.
Step 8: Display a List of Filters
GPUImage comes with an impressive number of filters for use within your applications. For this tutorial, I've selected the following sample to get our feet wet:
- GPUImageGrayscaleFilter
- GPUImageSepiaFilter
- GPUImageSketchFilter
- GPUImagePixellateFilter
- GPUImageColorInvertFilter
- GPUImageToonFilter
- GPUImagePinchDistortionFilter
To create your own list or simply see all the filters GPUImage has to offer, check out the official documentation on GitHub.
In order to present the above list of filters to the user, we'll be using a simple UIActionSheet. Implement the applyImageFilter: method as follows:
- (IBAction)applyImageFilter:(id)sender
{
    UIActionSheet *filterActionSheet = [[UIActionSheet alloc] initWithTitle:@"Select Filter"
                                                                   delegate:self
                                                          cancelButtonTitle:@"Cancel"
                                                     destructiveButtonTitle:nil
                                                          otherButtonTitles:@"Grayscale", @"Sepia", @"Sketch", @"Pixellate", @"Color Invert", @"Toon", @"Pinch Distort", @"None", nil];

    [filterActionSheet showFromBarButtonItem:sender animated:YES];
}
Step 9: Implement Filter Selection
In order to respond to the filter selection, we'll have to implement the UIActionSheetDelegate. Go to ViewController.h and declare that the class will conform to this delegate as follows:
#import <UIKit/UIKit.h>

@interface ViewController : UIViewController <UINavigationControllerDelegate, UIImagePickerControllerDelegate, UIActionSheetDelegate>

@end
Now jump back to ViewController.m and add the following method:
- (void)actionSheet:(UIActionSheet *)actionSheet clickedButtonAtIndex:(NSInteger)buttonIndex
{
    GPUImageFilter *selectedFilter;

    switch (buttonIndex) {
        case 0:
            selectedFilter = [[GPUImageGrayscaleFilter alloc] init];
            break;
        case 1:
            selectedFilter = [[GPUImageSepiaFilter alloc] init];
            break;
        case 2:
            selectedFilter = [[GPUImageSketchFilter alloc] init];
            break;
        case 3:
            selectedFilter = [[GPUImagePixellateFilter alloc] init];
            break;
        case 4:
            selectedFilter = [[GPUImageColorInvertFilter alloc] init];
            break;
        case 5:
            selectedFilter = [[GPUImageToonFilter alloc] init];
            break;
        case 6:
            selectedFilter = [[GPUImagePinchDistortionFilter alloc] init];
            break;
        case 7:
            selectedFilter = [[GPUImageFilter alloc] init];
            break;
        default:
            break;
    }

    UIImage *filteredImage = [selectedFilter imageByFilteringImage:originalImage];
    [self.selectedImageView setImage:filteredImage];
}
Bam! Your app should now work as desired. As you can see from the above, applying filters to an existing image with GPUImage couldn't be simpler. You simply need to instantiate a GPUImageFilter and then call the imageByFilteringImage:originalImage method.
Step 10: Add an App Icon
This app just needs one last thing: a good dock icon. Thanks to our sister-site Psdtuts+, I was able to find just what I was looking for:
![]()

The above is simply a 57x57 (non-retina) and 114x114 (retina) pixel crop from the final effect taught in How to Draw a Leica Camera in Photoshop by Mohammad Jeprie.
In order to get these into your app, you just have to drag them into the Xcode Project Navigator.
Wrap Up
This tutorial has just barely scratched the surface of what is possible with GPUImage. If you've enjoyed this tutorial or think you'll benefit from the power of GPUImage in the future, find @bradlarson and thank him for creating such an awesome open source project.
More GPUImage Content?
Do you want to see more content on GPUImage and image processing? If so, let me know! You can either leave your feedback in the comments section below (preferred) or just send me a message on Twitter (@markhammonds).
UPDATE: I've now posted a second tutorial that details how to use the GPUImage camera and display photos in a gallery.
Enhancing a Photo App with GPUImage and iCarousel.

Comments