In part four of this series, we saw how easy it is to add and remove models from our collection, and keep the page updated in sync with the changes. In this part, we're going to look at editing existing model data.
Getting Started
We'll start out by adding another simple button to the template, which will enable editing of its data:
<button class="edit">Edit</button>
As we are adding this button to our existing template, we can also add an entirely new template that can be used to render an editable form in which the model data can be changed. It's very similar to the exiting template, and can be added to the page after the existing template:
<script id="contactEditTemplate" type="text/template">
<form action="#">
    <input type="file" value="<%= photo %>" />
    <input class="name" value="<%= name %>" />
    <input id="type" type="hidden" value="<%= type %>" />
    <input class="address" value="<%= address %>" />
    <input class="tel" value="<%= tel %>" />
    <input class="email" value="<%= email %>" />
    <button class="save">Save</button>
    <button class="cancel">Cancel</button>
</form>
</script>
The new template consists mostly of <input> elements that expose the editable data. We don't need to worry about labels for the elements, but instead use the data from the model as the default values of each input. Note that we're using a hidden form field to store the type attribute of the model, we'll use this to set the value of a <select> that we need to add using our script instead of having the template render it.
Next we can bind some event handlers for the new buttons we've added; update the events object in the ContactView class so that it contains the following new bindings:
"click button.edit": "editContact",
"change select.type": "addType",
"click button.save": "saveEdits",
"click button.cancel": "cancelEdit"
Don't forget to add the trailing comma to the end of the existing binding! These are very similar to the bindings we've used before; each key:value pair simply specifies an event to listen for and a selector to match the element that triggers the event as the key, and the event handler to execute on detection of the event as the value.
Switching a Contact Into Edit Mode
In the same way that we stored a reference to the template function under the template property of our ContactView class, we should also store a reference to the template function that we'll use to switch the contact into edit mode. Add editTemplate directly after the template property:
editTemplate: _.template($("#contactEditTemplate").html()),
Now we can add the event handlers themselves, which should also go into the ContactView class after the existing deleteContact() method. First, we'll add the editContact() method:
editContact: function () {
    this.$el.html(this.editTemplate(this.model.toJSON()));

    var newOpt = $("<option/>", {
        html: "<em>Add new...</em>",
        value: "addType"
    }),

    this.select = directory.createSelect().addClass("type")
        .val(this.$el.find("#type").val()).append(newOpt)
        .insertAfter(this.$el.find(".name"));

    this.$el.find("input[type='hidden']").remove();
},
We start out by rendering our new editTemplate that we added to the page using Underscore's template() method in the same way that we added each contact using the standard display template.
In order to make editing the type of contact easier we can render a select box that lets the user switch easily between existing types, but we also want to cater for the possibility that the user may want to add a new type. To allow for this, we'll create a special option for the select box with the text Add new... and a value of addType.
We then create the new <select> element using the createSelect() method of our master view, which if you recall from the last part in this tutorial will return a <select> element containing an <option> for each unique type in the collection. We give it a class name, and to get the <select> element to show the existing type of the contact being edited we set its value to the value of the hidden <input> we added in our template. We then insert the new <select> after the <input> for the contact's name. The new select element is added as a property of the view instance so that we can interact with it easily.
Once we've added the <select> element for the contact's type, we can then remove the hidden field so that it doesn’t interfere with saving the edit, which we'll look at shortly.
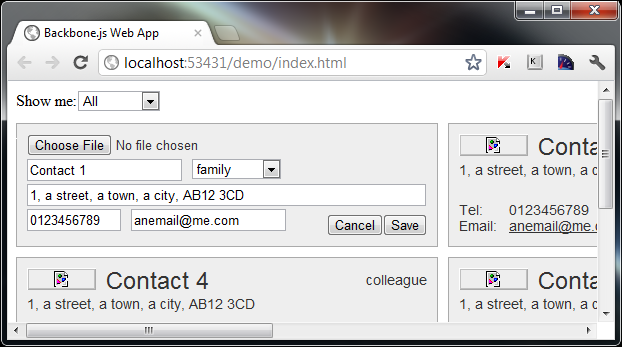
At this point, we should now be able to click the edit button in any of our contacts and have the contents of that contact converted into a form:
Adding a New Type
One of the event bindings we added was for the change event of the type select box, so we can add a handler which replaces the <select> box with a standard <input> element:
if (this.select.val() === "addType") {
    this.select.remove();

    $("<input />", {
        "class": "type"
    }).insertAfter(this.$el.find(".name")).focus();
}
When the <select> element's value changes we first check whether its value is addType and if so, we remove the element from the page and create a new <input> element to replace it. We then insert the new element using jQuery's insertAfter() method and focus it ready for text entry.
Updating the Model
Next we can add the handler that will take the changes made in the edit form and update the data in the model. Add the saveEdits() method directly after the editContact() method that we just added:
saveEdits: function (e) {
	e.preventDefault();

    var formData = {},
        prev = this.model.previousAttributes();

    $(e.target).closest("form").find(":input").add(".photo").each(function () {

        var el = $(this);
        formData[el.attr("class")] = el.val();
    });

    if (formData.photo === "") {
        delete formData.photo;
    }

    this.model.set(formData);

    this.render();

    if (prev.photo === "/img/placeholder.png") {
        delete prev.photo;
    }

    _.each(contacts, function (contact) {
        if (_.isEqual(contact, prev)) {
            contacts.splice(_.indexOf(contacts, contact), 1, formData);
        }
    });
},
First of all, we create an empty element to store the data that has been entered into the form, and also store a copy of the previousAttributes of the model that belongs to the view we're working with. The previousAttributes property of models is a data store that Backbone maintains for us so that we can easily see what an attribute's previous attribute data was.
We then get each input element from the form using a combination of jQuery's find() method and the :input filter, which gives us all of the form fields. We don't want the cancel or save <button> elements though, so we remove them from the selection using jQuery's not() method.
Once we have our collection of fields, we iterate over them using jQuery's each() method and for each item in the collection, we add a new key to our formData object using the current item's class, and a new value using the current item's value.
When we convert the editable contact back into a normal contact, we don’t want to lose the default photo if a new photo has not been chosen. To make sure we don’t lose the default photo, we can delete the photo property from our formData object if its value is blank.
Backbone models have a setter method that can be used to set any attribute.
Backbone models have a setter method that can be used to set any attribute. In order to update the model's data we just call its set() method passing in the formData object that we have prepared. Once this is done we call the view's render() method and our newly updated model will be rendered back to the page, with any updated information from the form.
As we have done previously, we need to update the data stored in our original contacts array so that filtering the view doesn’t lost any changes we have made. We do this in a very similar way as before, first checking whether the photo property has the default value and removing it if so, and then using a combination of Underscore's each() and isEqaul() methods to find the item in the contacts array that has changed. This is where we use the previousAttributes that we saved earlier; we can't use the current model anymore because its attributes have just been updated.
We use the native JavaScript's splice() function to update the contacts array. As before, we obtain the index of the item to update using Underscore's indexOf() method as the first argument to splice() and set the function to update a single item using the second argument. This time we supply our formData object as the third argument. When splice() receives three (or more) arguments, the third argument is the data to replace the data that has just been removed.
Cancelling the Edit
We have one button left that we need to add a handler for – the cancel button. This method will be very simple and will just switch the contact back into non-edit mode, using the original data from the model. Add this method after the saveEdits() method:
cancelEdit: function () {
    this.render();
},
That's all we need to do! We already have a method that takes a model and renders it as a view on the page, so we simply call this method and the original model data will be used to recreate the original contact. This is useful because even if someone changes the data in the form fields while the contact is in edit mode, when the cancel button is clicked, these changes will be lost.
Summary
In this part of the tutorial we've looked at how we can update the data of an existing model rather than creating a whole new model. To do this we essentially just need to call a model's set() method and pass in the new attributes that we wish to set.
As with Backbone however, we've only covered a small fraction of what these libraries provide, there is so more that we can use when building complex applications on the front-end.
As we saw however, we also need to think about how we can change the view to allow the visitor to enter the data that will be set as the new attributes. In this example, we achieved this by creating another template to handle rendering a form pre-filled with the existing attribute data which the user can overtype to change.
Over the course of this series, we've looked at all of the major components of Backbone including Models, Collections, Views and Routers and Events. We've also looked at some of the methods and properties provided by Backbone that we can use to interact with the different constructs to produce an integrated, functioning application, albeit a basic one.
As well as learning some Backbone basics, one of the most important aspects of the tutorial was in how the application is structured, with all of our code organised in a logical and consistent way. Applications written in this style can be much easier to return to and maintain on the long-term. Much of our functionality was event driven, either in response to the actions of the visitor in the form of UI event handlers, but some were also driven by changes to the collection and triggered manually at the appropriate point in our code.
We've also looked at some of the utilities provided by Underscore which has given us easy ways to work with the objects and array that form the foundation of our application. As with Backbone however, we've only covered a small fraction of what these libraries provide, there is so more that we can use when building complex applications on the front-end.

Comments