In Part 3, we continued this series by explaining how to add a brand new contact. We also discussed how to use the Android Java API for accessing and manipulating contacts in an Android device. This tutorial is the final installment in the series, and in it we will explain how to delete and save a contact using the Android Java API. We will also describe the development environment for the application, discuss the configuration files for the project, and give individual steps for importing the project into the Eclipse IDE.
Write Operations For Contacts
We will now look at write operations regarding a contact. Those are delete operation and save operation.
Deleting A Contact
The following method in ContactUtility class is responsible for deleting a contact.
public static void deleteContact(String id, ContentResolver contentResolver, String accountType){
  HashMap<String,String> contacts = getUsersFromAccount(accountType, contentResolver);
  String existingContactId = contacts.get(id);
  if(existingContactId == null){
    // The contact does not belong to account
    return;
  }
  deleteContactInternal(id, contentResolver);
}
As mentioned before, we do not allow deleting or modifying a contact in this tutorial application unless it has been created by the application itself. (This is simply to avoid accidental damage to a contact in a real device, given the fact that this is merely a tutorial application.) To detect if a contact has been created by this application, it is sufficient to check if contact belongs to the account with the specific account type for this application. The deleteContact() method above first executes a method named getUsersFromAccount() which returns a list of all contact id's for a given account type. If the contact id requested for deletion is in that list then deleteContactInternal() method is called to actually delete the contact. Otherwise, deleteContact() method returns without deleting the contact.
The ContactUtility.getUsersFromAccount() method is listed below. It uses the table, where clause and column names in 'Contacts Associated With An Account' query above.
import java.util.HashMap;
...
private static HashMap<String,String> getUsersFromAccount(String accountType, ContentResolver contentResolver){
  Cursor cursor = contentResolver.query(ContactsContract.RawContacts.CONTENT_URI, null,
      ContactsContract.RawContacts.ACCOUNT_TYPE + " = ? ", new String[] { accountType }, null);
  HashMap<String,String> map = new HashMap<String,String>();
  if (cursor.getCount() > 0) {
    while (cursor.moveToNext()) {
      String contactId = cursor.getString(cursor.getColumnIndex(ContactsContract.RawContacts.CONTACT_ID));
      map.put(contactId, contactId);
    }
  }
  return map;
}
The ContactUtility.deleteContactInternal() method is listed below.
import android.net.Uri;
...
private static void deleteContactInternal(String id, ContentResolver contentResolver){
  Cursor cursor = contentResolver.query(ContactsContract.Contacts.CONTENT_URI, null,
      ContactsContract.Contacts._ID + " = ? ", new String[]{id}, null);
  String lookup = null;
  if (cursor.getCount() > 0) {
    while (cursor.moveToNext()) {
      <B>lookup = cursor.getString(cursor.getColumnIndex(ContactsContract.Contacts.LOOKUP_KEY)); </B>
    }
  }
  cursor.close();
  Uri uri = Uri.withAppendedPath(ContactsContract.Contacts.CONTENT_LOOKUP_URI, lookup);
  contentResolver.delete(uri, null, null);
}
Deleting a contact from database consists of those steps.
- First, query the database for getting the contact record using
ContactsContract.Contacts.CONTENT_URIas the URI based representation of the table. - Using
ContactsContract.Contacts.LOOKUP_KEYas the column descriptor, obtain the 'lookup key' for the contact. This is a unique identifier to be used for deleting the contact. - Construct a
android.net.Uriobject which constructs a URI based representation of the contact's unique identifier. - Call
ContentResolver.delete()method with theUrirepresentation of the contact to delete it.
Saving A Contact
Saving a contact occurs in two scenarios. The contact may be an existing one in the database or it may be a brand new contact for which associated records need to be inserted from scratch.
For saving an existing contact, one could use different strategies. For example, existing records can be updated based on row id of those records. In this tutorial application, for simplicity, we decided to save an existing contact by first deleting it and then inserting back as a brand new contact. This is a simple approach because it utilizes the methods already written for deleting an existing contact and saving a brand new contact. Additional code with 'update' operations not needed.
The ContactUtility.saveOrUpdateContact() method is listed below. It is used for both new and existing contacts.
public static void saveOrUpdateContact(Contact contact,ContentResolver contentResolver, String accountName, String accountType){
  if(contact == null || accountName == null || accountType == null){
    return;
  }

  String id = contact.getContactId();
  if(!"".equals(replaceNull(id))){
    // This is existing contact to update
    HashMap<String,String> contacts = getUsersFromAccount(accountType, contentResolver);
    String existingContactId = contacts.get(id);
    if(existingContactId == null){
    // This is associated with another account - cannot process
      return;
    }
    deleteContactInternal(id, contentResolver);
  }
  saveContact(contact,contentResolver, accountName, accountType);
}
- There are various sanity checks, to avoid null or trivial objects. The
replaceNull()method, listed below, converts a null string to an empty string and is part of those sanity checks. - If the id is not an empty string, it must correspond to an existing contact in database. In that case, we check if it belongs to the account associated with this application. (The
getUsersFromAccount()method has been reviewed above.) If it does not, the contact should not be modified and the method returns without any change on the account. - If the contact belongs to the account associated with this application, it is deleted.
- Finally,
saveContact()method is called to save the contact.
public static String replaceNull(String in){
  if(in == null){
    return "";
  }
  else{
    return in;
  }
}
The ContactUtility.saveContact() method is listed below. It defines a list of android.content.ContentProviderOperation instances for inserting individual records and then calls ContentResolver.applyBatch() to perform all those operations at once.
- The first operation associates the newly created contact record with the account name and account type for this application. Recall that account name was specified by the user when the account was first created and account type is the constant
com.jquerymobile.demo.contact. - The method
ContentProviderOperation.newInsert()returns an instance ofandroid.content.ContentProviderOperation.Builderclass, which is typically used to define parameter values forContentProviderOperationobject. (See the following references forContentProviderOperationandBuilder.) TheBuilder.withValue()operation returns the same instance of theBuilderallowing us to recursively pass column values for the inserted record. - The
withValueBackReference(ContactsContract.Data.RAW_CONTACT_ID, 0)clause allows linking of each insert record with the first insert record where the 'root' contact record is inserted. - Following the first insert record, additional insert records are defined for first and last names, note, addresses, organizations, emails, IMs, and phones of the contact.
- Finally,
ContentResolver.applyBatch()is called to perform the batch insert operations against the database.
import android.content.ContentProviderOperation;
...
private static void saveContact(Contact contact,ContentResolver contentResolver, String accountName, String accountType){
  ArrayList<ContentProviderOperation>operations = new ArrayList<ContentProviderOperation>();

  <B>// New contact record with account information</B>
  operations.add(ContentProviderOperation.newInsert(ContactsContract.RawContacts.CONTENT_URI)
    .withValue(ContactsContract.RawContacts.ACCOUNT_TYPE, accountType)
    .withValue(ContactsContract.RawContacts.ACCOUNT_NAME, accountName)
    .build());

  <B>// First and last names</B>
  operations.add(ContentProviderOperation.newInsert(ContactsContract.Data.CONTENT_URI)
    .withValueBackReference(ContactsContract.Data.RAW_CONTACT_ID, 0)
    .withValue(ContactsContract.Data.MIMETYPE,
      ContactsContract.CommonDataKinds.StructuredName.CONTENT_ITEM_TYPE)
    .withValue(ContactsContract.CommonDataKinds.StructuredName.GIVEN_NAME, contact.getFirstName())
    .withValue(ContactsContract.CommonDataKinds.StructuredName.FAMILY_NAME, contact.getLastName())
    .build());

  <B>// Note</B>
  if(contact.getNote() != null){
    operations.add(ContentProviderOperation.newInsert(ContactsContract.Data.CONTENT_URI)
      .withValueBackReference(ContactsContract.Data.RAW_CONTACT_ID, 0)
      .withValue(ContactsContract.Data.MIMETYPE,
        ContactsContract.CommonDataKinds.Note.CONTENT_ITEM_TYPE)
      .withValue(ContactsContract.CommonDataKinds.Note.NOTE, contact.getNote().getText())
      .build());
  }

  <B>// Addresses</B>
  Collection<Address> addresses = contact.getAddresses();
  if(addresses != null){
    for(Address address:addresses){
      operations.add(ContentProviderOperation.newInsert(ContactsContract.Data.CONTENT_URI)
        .withValueBackReference(ContactsContract.Data.RAW_CONTACT_ID, 0)
        .withValue(ContactsContract.Data.MIMETYPE,ContactsContract.CommonDataKinds.StructuredPostal.CONTENT_ITEM_TYPE)
        .withValue(ContactsContract.CommonDataKinds.StructuredPostal.TYPE,address.getType())
        .withValue(ContactsContract.CommonDataKinds.StructuredPostal.STREET,address.getStreet())
        .withValue(ContactsContract.CommonDataKinds.StructuredPostal.CITY,address.getCity())
        .withValue(ContactsContract.CommonDataKinds.StructuredPostal.REGION,address.getState())
        .withValue(ContactsContract.CommonDataKinds.StructuredPostal.POBOX,address.getPoBox())
        .withValue(ContactsContract.CommonDataKinds.StructuredPostal.POSTCODE,address.getZip())
        .withValue(ContactsContract.CommonDataKinds.StructuredPostal.COUNTRY,address.getCountry())
        .build());
    }
  }

  <B>// Organizations</B>
  Collection<Organization> organizations = contact.getOrganizations();
  if(organizations != null){
    for(Organization organization:organizations){
      operations.add(ContentProviderOperation.newInsert(ContactsContract.Data.CONTENT_URI)
        .withValueBackReference(ContactsContract.Data.RAW_CONTACT_ID, 0)
        .withValue(ContactsContract.Data.MIMETYPE,ContactsContract.CommonDataKinds.Organization.CONTENT_ITEM_TYPE)
        .withValue(ContactsContract.CommonDataKinds.Organization.TYPE, organization.getType())
        .withValue(ContactsContract.CommonDataKinds.Organization.DATA, organization.getName())
        .withValue(ContactsContract.CommonDataKinds.Organization.TITLE, organization.getTitle())
        .build());
    }
  }

  <B>// Emails</B>
  Collection<Email> emails = contact.getEmails();
  if(emails != null){
    for(Email email:emails){
      operations.add(ContentProviderOperation.newInsert(ContactsContract.Data.CONTENT_URI)
      .withValueBackReference(ContactsContract.Data.RAW_CONTACT_ID, 0)
      .withValue(ContactsContract.Data.MIMETYPE,ContactsContract.CommonDataKinds.Email.CONTENT_ITEM_TYPE)
      .withValue(ContactsContract.CommonDataKinds.Email.TYPE,email.getType())
      .withValue(ContactsContract.CommonDataKinds.Email.DATA,email.getValue())
      .build());
    }
  }

  <B>// IMs</B>
  Collection<Im> ims = contact.getIms();
  if(ims != null){
    for(Im im:ims){
      operations.add(ContentProviderOperation.newInsert(ContactsContract.Data.CONTENT_URI)
      .withValueBackReference(ContactsContract.Data.RAW_CONTACT_ID, 0)
      .withValue(ContactsContract.Data.MIMETYPE,ContactsContract.CommonDataKinds.Im.CONTENT_ITEM_TYPE)
      .withValue(ContactsContract.CommonDataKinds.Im.PROTOCOL,im.getProtocol())
      .withValue(ContactsContract.CommonDataKinds.Im.DATA,im.getValue())
      .build());
    }
  }

  <B>// Phones</B>
  Collection<Phone> phones = contact.getPhones();
  if(phones != null){
    for(Phone phone:phones){
      operations.add(ContentProviderOperation.newInsert(ContactsContract.Data.CONTENT_URI)
      .withValueBackReference(ContactsContract.Data.RAW_CONTACT_ID, 0)
      .withValue(ContactsContract.Data.MIMETYPE,ContactsContract.CommonDataKinds.Phone.CONTENT_ITEM_TYPE)
      .withValue(ContactsContract.CommonDataKinds.Phone.TYPE,phone.getType())
      .withValue(ContactsContract.CommonDataKinds.Phone.NUMBER,phone.getNo())
      .build());
    }
  }
  try {
    <B>contentResolver.applyBatch(ContactsContract.AUTHORITY,operations);</B>
  } catch (Exception e) {
  }
}
Project Configuration And Supporting Files
Having reviewed the code let us now look at configuration and other supporting files for the project.
AndroidManifest.xml
<?xml version="1.0" encoding="utf-8"?>
<manifest xmlns:android="http://schemas.android.com/apk/res/android"
  <B>package="com.jquerymobile.demo.contact"</B>
  android:versionCode="1"
  android:versionName="1.0">
    <B><uses-permission android:name="android.permission.READ_CONTACTS"</B>/>
    <B><uses-permission android:name="android.permission.WRITE_CONTACTS"</B>/>
    <B><uses-permission android:name="android.permission.GET_ACCOUNTS"</B> />
    <B><uses-permission android:name="android.permission.AUTHENTICATE_ACCOUNTS"</B> />
    <application android:debuggable="true" android:icon="@drawable/icon"
      android:label="@string/app_name">
        <<B>service</B>
          android:name=<B>".authentication.AuthenticationService"</B>
          android:exported="true">
          <intent-filter>
            <action android:name="android.accounts.AccountAuthenticator" />
            </intent-filter>
            <meta-data android:name="android.accounts.AccountAuthenticator"
              android:resource="@xml/authenticator" />
        </<B>service</B>>
        <activity android:name=<B>".ContactsActivity"</B>
          android:configChanges="orientation|keyboardHidden"
          android:label="@string/app_name">
            <intent-filter>
              <action android:name="android.intent.action.MAIN" />
              <category android:name="android.intent.category.LAUNCHER" />
            </intent-filter>
        </activity>
    </application>
</manifest>
- The package name for our application is
com.jquerymobile.demo.contact, which is specified in top levelmanifestelement. The declarations.authentication.AuthenticationServiceand.ContactsActivityare relative to the package name. - We list the types of permissions required by the application via
uses-permissionelements. - We had discussed the
serviceelement in 'Create Account', Part 2 of this tutorial.
strings.xml
<?xml version="1.0" encoding="utf-8"?>
<resources>
  <string name="app_name">Contacts</string>
</resources>
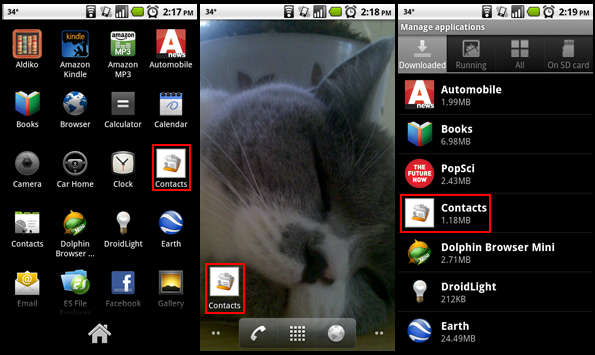
The strings.xml stores constant strings used in the application. The only constant we use is the app_name element which is name of the application. Value of that constant, 'Contacts', is displayed in various places in the Android device, as shown in the Figure below: applications launcher screen (left), home screen (middle) and manage applications screen (right).
Application Launch Icon
The launch icons for the application are based on the Android GUI elements in http://www.matcheck.cz/androidguipsd/. Per Android Icon Design Guidelines, three icon files have been created as described below.
| Folder name | File name | Pixel size |
res\drawable-ldpi |
icon.png |
36 x 36 |
res\drawable-mdpi |
icon.png |
48 x 48 |
res\drawable-hdpi |
icon.png |
72 x 72 |
Those icons are shown in the figure below. The icon on the left is 36x36 pixels, the one in the middle is 48x48 pixels and the one on the right is 72x72 pixels.

Native Android Application Development Environment
We will now discuss how to import the native application into Eclipse development environment. The project files were tested against:
- Android SDK revision 8.
- Eclipse IDE version 3.5
- Android Development Tools (ADT), which is an Eclipse plugin, version 8.0.1.
The project has been successfully tested against Android platform 2.2 API level 8.
Importing The Project
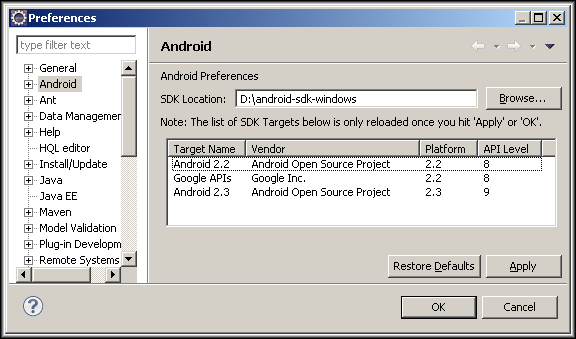
Before importing the project into your Eclipse environment, make sure that Eclipse ADT plugin points to the correct location of Android SDK in your local system. To check this, in Eclipse menu go to Window -> Preferences -> Android. The SDK Location window must be set to the location of Android SDK. Once set up correctly, you should see something similar to below
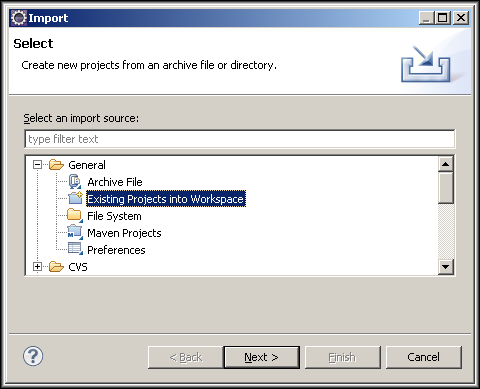
The project files are provided in an archive file named contacts.zip. To import the project, in Eclipse menu go to File -> Import and then in the file import wizard select General -> Existing Projects into Workspace (see below).
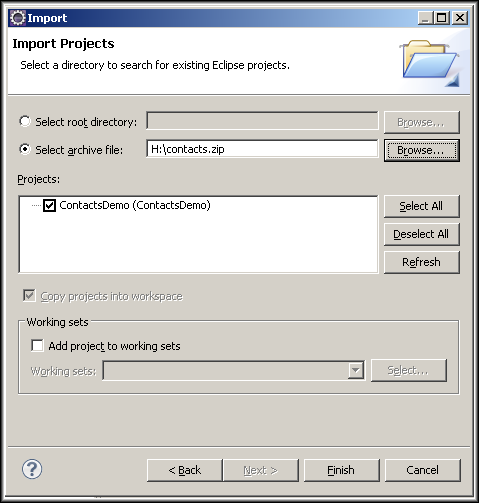
On the next page of the wizard, choose Select archive file: and browse to where contacts.zip is located in your file system. The Projects window will be automatically populated where the ContactsDemo project is already selected. This is shown below. Press the Finish button to complete the import.
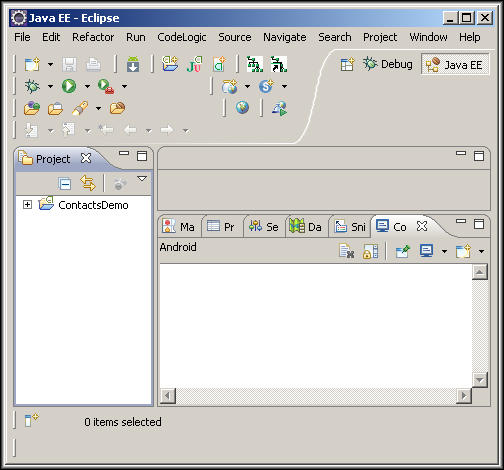
Eclipse will build the application automatically after import. Now, you should see the ContactsDemo project in project explorer, as shown below.
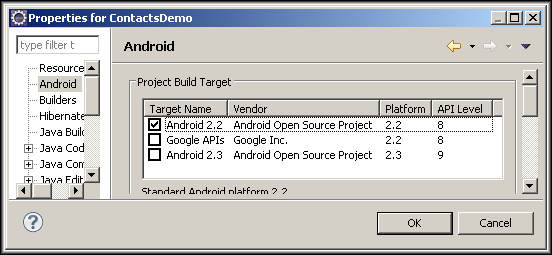
This project has been built and tested for Android OS 2.2 platform. To verify this, select the ContactsDemo project in project explorer and from right-click menu choose Properties. On left hand side listing of properties, select Android as the property. The available build targets are displayed on the right, as shown below. You should see that Android 2.2 has been selected.
File Listing
A list of files in the project is given below.

- The
srcfolder stores the Java code. There are two packages:- The
com.jquerymobile.demo.contactpackage containsAddress,Contact,ContactDisplay,ContactGroup,ContactsActivity,ContactUtility,Email,Im,Note,OrganizationandPhoneclasses. - The
com.jquerymobile.demo.contact.authenticationpackage contains theAuthenticationServiceclass.
- The
- The
genfolder contains various files automatically generated by Eclipse ADT. - The
assetsfolder stores HTML files, image files used in those HTML files and jQuery Mobile/jQuery libraries. We use jQuery Mobile version 1.0 Alpha 3, which was the latest release when the tutorial was written. (An Alpha 4 release was recently made with various bug fixes. See the announcement.) - The
libfolder stores the Jackson JSON libraries. - The
resfolder stores various resources needed by the application. Those are the icon images and configuration filesstrings.xmlandauthenticator.xml. -
default.propertiesis a system generated file that defines the API version for the Android application. - The
proguard.cfgfile is automatically created by the development environment and is used by the ProGuard tool. Details can be found in ProGuard Documentation.
Conclusions
In this tutorial, we implemented an Android application where UI is constructed via HTML/JavaScript and the core native functionality is developed via Java. An advantage of that approach is the fact that web developers, already possessing familiarity with HTML and JavaScript, can utilize their knowledge to construct the UI without having to learn Android specific APIs, UI event handling model, and the Java programming language. On the other hand, developers with Java expertise can focus on building the native functionality using Android Java API. This way, work effort can be divided between two or more developers based on existing skill sets.
A typical design consideration for an Android application is that the visual aspects and event handling model of the UI must be consistent across different devices where the application will be installed. Those devices may have different screen dimensions and run diverse set of web browsers with different levels of HTML support. In that regard, jQuery Mobile is beneficial because it provides readily available user interface components with a supporting event handling model. It has already been tested for consistency across different devices and browsers, making cross-platform development easier.
Finally, please note that some applications will not fit into the above model. For example:
- Certain applications require sophisticated UI components, e.g. complex animations, which may not be feasible to construct using HTML pages.
- One may use a web-based application framework, such as PhoneGap, to access native features via a simplified JavaScript API, if the API is sufficient to meet the business requirements. In this case, UI can still be built with jQuery Mobile, however, there may be no need to develop Java back-end code.

Comments