This tutorial picks up where we left off in part 1 by demonstrating how to create an account for the newly created contacts. We will also describe how to edit and delete an existing contact.
In Part 1 of this tutorial, we introduced the sample application that will be implemented. We also gave an overview of page elements in jQuery Mobile framework and explained how the screens in the sample application are constructed using those elements. We also reviewed basic concepts in integrating UI, composed of HTML and JavaScript, with the back-end Java classes that implement the business functionality.
Create Account
We will now look at how to create an account to associate with the tutorial application. The 'Create Account' screen is shown in Figure 1. User enters name of the account in the input field and presses the Save button. The HTML and JavaScript code for the 'Create Account' screen is part of ListPage.html. The related sections are shown below.
<html>
  ...
<body>
<B><!-- Container Page --></B>
<div data-role="page" data-theme="c" id="containerPage">
  ...
  <B><!--  Create Account --></B>
  <div data-role="header" id="hdrAccount" data-nobackbtn="true"  data-theme="c">
    <h1>Create Account</h1>
  </div>
  <div data-role="content" id="contentAccount"  data-theme="c">
    <div align="CENTER"><img src="img/<B>contacts-master-bgd.png</B>"></div>
    <div align="CENTER"><h4>Please enter name of the new account for this application</h4></div>
    <div align="CENTER">Contacts created with this application will be associated with the new account specified below.
    Other contacts can be viewed, however, cannot be deleted or modified with this application.</div>
    <div align="CENTER" id="accountDiv" data-role="fieldcontain">
      <input id="<B>accountName</B>" type="text" />
    </div>
    <div align="CENTER">
      <a href="<B>javascript:createAccount();</B>return false;" data-role="button"
        data-inline="true"><B>Save</B></a>
    </div>
    ...
  </div>
  <div data-role="footer" id="ftrAccount"  data-theme="c"></div>

</div> <!-- Container Page Ends Here -->
...
<script>
...
  function <B>createAccount()</B>{
    showProgress();
    contactSupport.createAccount($('#accountName').val(),'ListPage.html');
  }
  ...
</script>
- Observe that 'Create Account' is represented by a content page with its own header, content and footer sections, placed inside a container page.
- When user presses the Save button, the
createAccount()function is called. - The
createAccount()gets value of the account name, as entered by user into the input fieldaccountName, and passes it to theContactsActivity.createAccount()method as the first parameter. The second parameter passed to the method is the callback HTML file to load,ListPage.html.
ContactsActivity Responds
The ContactsActivity.createAccount() method is listed below.
import android.accounts.AccountManager;
import android.accounts.Account;
...
public class ContactsActivity extends Activity {
  ...
  private String accountType = null;
  ...
  public void onCreate(Bundle savedInstanceState) {
    ...
    <B>accountType = "com.jquerymobile.demo.contact";</B>
	...
  }

  public void createAccount(String accountN, String displayPage){
    if(accountN != null && !"".equals(accountN)){
	  accountName = accountN;
      <B>AccountManager</B>.get(this).addAccountExplicitly(new Account(accountName,<B>accountType</B>), "dummyPassword", null);
    }
    loadPage(displayPage);
  }
  ...
}
- Actual account creation is done by
android.accounts.AccountManagerwhich is one of the entry points in Android Java API to manage user accounts in the device. We first acquire an instance of theAccountManagerby callingAccountManager.get()and then invokeaddAccountExplicitly()to create a user account of the desired name and type. - After account is created, the callback HTML file,
ListPage.html, is loaded vialoadPage(displayPage). - Recall from Part 1, 'Initial Load Of ListPage.html', loading of
ListPage.htmlwill trigger a call toContactACtivity.getAllContacts()method. Since an account has been found, that method will generate a JSON formatted string of the contacts list and pass that string to the JavaScript functionsetContactsList()inListPage.html.We had reviewed that function in Part 1, 'Contact List Screen'.
To be able to create an account, we have to implement an Android service that has the following intent in AndroidManifest.xmlfile.
<intent-filter>
  <action android:name="android.accounts.AccountAuthenticator"/>
</intent-filter>
In addition, that service should have the following meta-data description in AndroidManifest.xml.
<meta-data
  android:name="android.accounts.AccountAuthenticator"
  android:resource="<B>@xml/authenticator</B>" />
Finally, the res/xml/authenticator.xml configuration file (which is value of the android:resource attribute above) should have an element named account-authenticator where value of android:accountType attribute is set to com.jquerymobile.demo.contact. Note that this is value of the accountType in ContactsActivity. Summarizing the discussion, first look at the highlighted section in AndroidManifest.xml.
<?xml version="1.0" encoding="utf-8"?>
<manifest xmlns:android="http://schemas.android.com/apk/res/android"
  <B>package="com.jquerymobile.demo.contact"</B>
  android:versionCode="1"
  android:versionName="1.0">
    <uses-permission android:name="android.permission.READ_CONTACTS"/>
    <uses-permission android:name="android.permission.WRITE_CONTACTS"/>
    <uses-permission android:name="android.permission.GET_ACCOUNTS" />
    <uses-permission android:name="android.permission.AUTHENTICATE_ACCOUNTS" />
    <application android:debuggable="true" android:icon="@drawable/icon"
      android:label="@string/app_name">
        <B><service
          android:name=".authentication.AuthenticationService"
          android:exported="true">
          <intent-filter>
            <action android:name="android.accounts.AccountAuthenticator" />
            </intent-filter>
            <meta-data android:name="android.accounts.AccountAuthenticator"
              android:resource="@xml/authenticator" />
        </service></B>
        <activity android:name=".ContactsActivity"
          android:configChanges="orientation|keyboardHidden"
          android:label="@string/app_name">
            <intent-filter>
              <action android:name="android.intent.action.MAIN" />
              <category android:name="android.intent.category.LAUNCHER" />
            </intent-filter>
        </activity>
    </application>
</manifest>
Relative to value of the package attribute, we define the service class as .authentication.AuthenticationService. Hence, the fully qualified class name is com.jquerymobile.demo.contact.authentication.AuthenticationService. We then provide the required intent-filter element and android:resource attribute in meta-data element. The res/xml/authenticator.xml configuration file is listed below. What is important in that file is the fact that the value of android:accountType attribute is same as the account type ContactsActivity uses to create the account.
<?xml version="1.0" encoding="utf-8"?>
<account-authenticator xmlns:android="http://schemas.android.com/apk/res/android"
  <B>android:accountType="com.jquerymobile.demo.contact"</B>
  android:icon="@drawable/icon"
  android:smallIcon="@drawable/icon"
  android:label="@string/app_name"
/>
Finally, the service implementation is given below. It is a trivial, bare bones implementation with no valuable functionality. The only implemented method is the abstract onBind() method from Service. If you need more functionality, for example, ability to link this account with an online service, you need to provide the required business logic by extending various other methods of the android.app.Service class. You may also need to implement an authenticator class extending android.accounts.AbstractAccountAuthenticator. For the purposes of the tutorial application, this service implementation is sufficient.
package com.jquerymobile.demo.contact.authentication;

import android.app.Service;
import android.content.Intent;
import android.os.IBinder;

public class AuthenticationService extends Service {
  public IBinder onBind(Intent intent) {
    return null;
  }
}
After account is created, the account name can be viewed in 'Accounts and sync settings' screen for contacts in the Android device. This is shown in the figure below.

Existing Contact
To display details of an existing contact, user presses on the list item for that contact on 'Contact List' screen (Part 1, Figure 2). Recall from the section named 'Contact List Screen', the following code constructs the list items for contacts. What is of interest is the JavaScript showContact() function in the <a> tag definition for each particular contact. When user presses a list item, id of the contact in that list item is passed to showContact(). (The id of a contact is unique identifier for that contact in contacts database of the Android device.)
  function setContactsList(jsonText){
    var tmpJson = $.parseJSON(jsonText);
    if(tmpJson != null && tmpJson.contacts != null){
      var tmpContacts = tmpJson.contacts;
      for(i = 0; i < tmpContacts.length; i++){
        var tmpKey = (tmpContacts[i]).key;
        var tmpKeyFragment = '<li data-role="list-divider">'+tmpKey+'</li>';
        contactSelectionsVar.append(tmpKeyFragment);
        var tmpValues = (tmpContacts[i]).values;
        if(tmpValues != null){
          var j;
          for(j = 0; j < tmpValues.length; j++){
            var tmpDisplayName = tmpValues[j].displayName;
            var tmpContactId = tmpValues[j].contactId;
            var tmpLiFragment = '<li><a href="<B>javascript:showContact(' +
              tmpContactId + ');</B>return false;">'+tmpDisplayName+'</a></li>';
            contactSelectionsVar.append(tmpLiFragment);
          }
        }
      }
    }
    contactSelectionsVar.listview('refresh');
    showList();
  }
Listing of JavaScript showContact() function is given below. It shows the Progress screen and calls ContactsActivity.showContact() method by passing to it the id of the contact to show and the callback display page, 'DetailPage.html'.
function showContact(tmpId){
  showProgress();
  contactSupport.showContact(tmpId,'DetailPage.html');
}
Related code in ContactsActivity class is shown below.
public void showContact(String contactId, String displayPage){
  loadPage(displayPage + "?" + contactId);
}
The showContact() method displays the callback page, value of displayPage parameter, appending contactId parameter as an HTTP query string. For example, if value of contactId is 23 and the value of displayPage is DetailPage.html then the URL to load is DetailPage.html?23.
DetailPage.html
The DetailPage.html has three content pages in it. One of them represents contact details for 'Existing Contact' and 'Empty Contact' screens in Figure 3, another one is for 'Confirm Delete' screen (Figure 4) and the last one is for Progress screen (Figure 5). Those figures are in Part 1 of the tutorial.
Contact Details
Let us look at fragments of HTML code to review the content page for contact details. The first fragment is shown below.
<div data-role="page" data-theme="c" id="containerPage">
  <!-- Header for contact details -->
  <div data-role="header" id="hdrDetail" data-nobackbtn="true" data-theme="c">
    <h1><img align="top"  src="<B>img/contacts.png</B>"> Details</h1>
  </div>

  <!-- Content for contact details -->
  <div data-role="content" id="contentDetail" data-theme="c">
    <form id="contactForm" onsubmit="return false;">
      <input id="<B>contactId</B>" type="hidden">

      <div id="namesDiv" data-role="fieldcontain">
        <table>
          <tbody>
            <tr>
              <td>First name</td>
              <td><input id="<B>firstName</B>" type="text"></td>
            </tr>

            <tr>
              <td>Last<br>
                name</td>
              <td><input id="<B>lastName</B>" type="text"></td>
            </tr>

            <tr>
              <td>Notes</td>
              <td><input id="<B>note</B>" type="text"></td>
            </tr>
          </tbody>
        </table>
      </div>

      <div <B>data-role="collapsible" data-collapsed="true"</B>>
        <h3>Phone Numbers</h3>
        <table id="<B>phonesTable</B>"></table>
      </div>
      ...
- The header bar has an image in it. (This is an icon image generated from the Android GUI elements in http://www.matcheck.cz/androidguipsd/.)
- The content page contains a form to store all the contact fields. There are input fields for first and last names and notes for the contact.
- The
contactIdis a hidden form input. It corresponds to the unique identifier for the contact in contacts database of the Android device. - The phone numbers are stored in a table structure within a jQuery Mobile collapsible block. A collapsible block serves as a container for logically related UI elements. User can expand or collapse the block to display/hide the elements it wraps. Initially the block is collapsed.
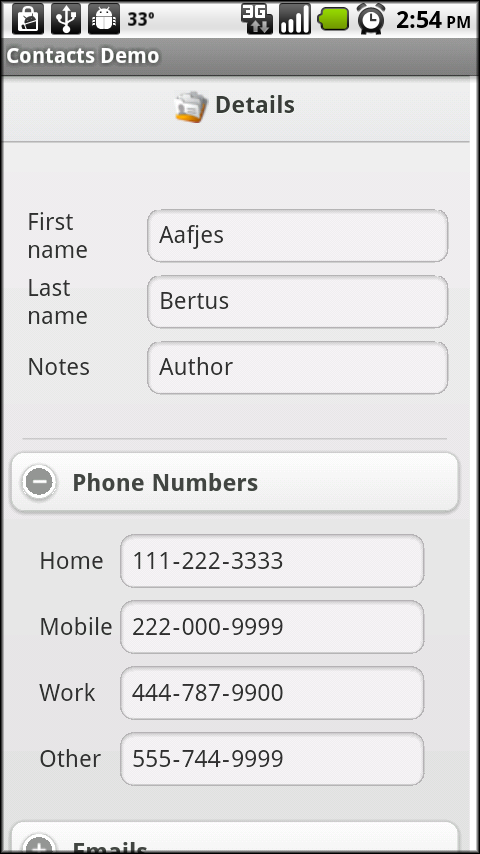
The following figure shows the 'Existing Contact' screen, with the UI elements corresponding to the code fragment above. The collapsible block for phones is expanded, showing four different types of phone numbers for the contact. Please note that those phone numbers have been dynamically added to the phonesTable as part of loading contact details. We will review the related JavaScript code later on.
We continue review of the content page for contact details with the following listing.
      ...
      <div data-role="collapsible" data-collapsed="true">
        <h3>Emails</h3>
        <table id="<B>emailsTable</B>"></table>
      </div>

      <B><div data-role="collapsible" data-collapsed="true"></B>
      <h3><B>More</B></h3>
        <div data-role="collapsible" data-collapsed="true" id="addressDiv">
         <h3>Addresses</h3>
         <table id="<B>addressTable</B>"></table>
        </div>

        <div data-role="collapsible" data-collapsed="true">
          <h3>Organizations</h3>
          <table id="<B>orgsTable</B>"></table>
        </div>

        <div data-role="collapsible" data-collapsed="true">
          <h3>IMs</h3>
         <table id="<B>imsTable</B>"></table>
        </div>
      </div>
    </form>
- Another collapsible block is defined, for the emails, which is very similar to the one for phone numbers. It contains a table with id
emailsTablewhich will be dynamically populated later on with emails of the contact. - We see an example of nested collapsible blocks. A top level collapsible block with title 'More' contains three nested collapsible blocks for addresses, organizations and IMs (instant messaging addresses) of the contact.
- Each of the collapsible blocks for addresses, organizations and IMs contains a table for the related content. Those tables are populated dynamically when the content is loaded.
Figures 13 - 16 show the 'Existing Contact' screen, with the UI elements corresponding to the code fragment above. In Figure 13, the collapsible block for the email is expanded, showing three different types of emails for the contact.

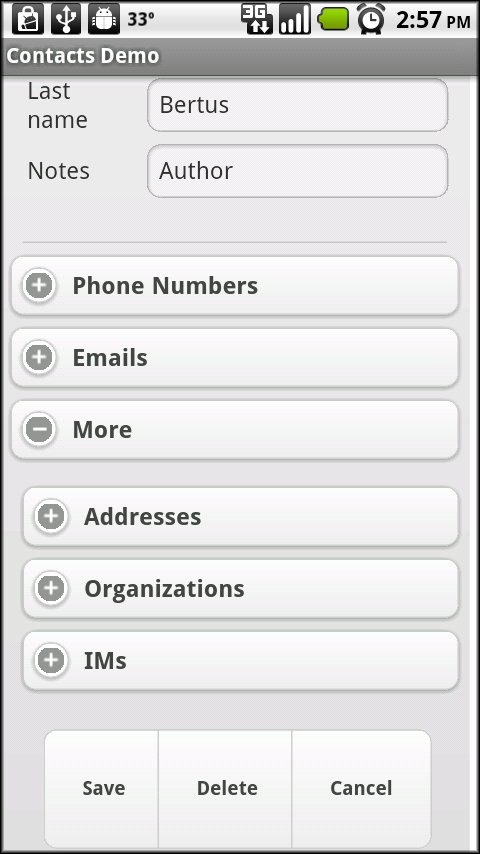
The following figure shows the email collapsible block is collapsed whereas the 'More' collapsible block is expanded. The collapsible blocks under 'More' are all in collapsed form.
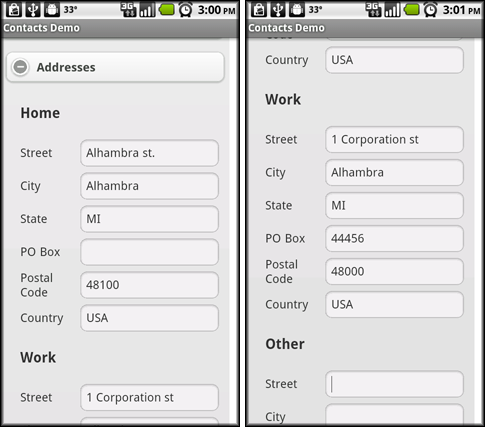
In the following figure, the block for addresses under 'More' has been expanded. There are three types of addresses listed: Home, Work, Other.
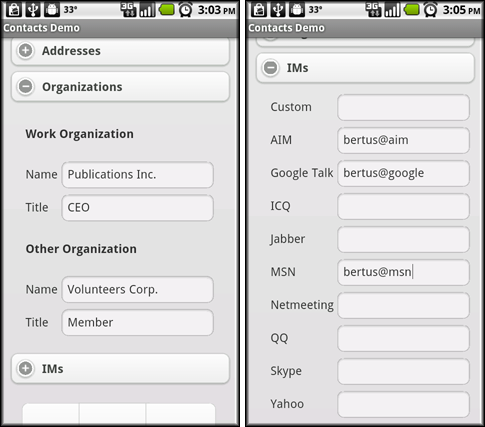
In the following figure, the blocks for organizations (left) and IMs (right) under 'More' have been expanded. There are two types of organizations (Work, Other) and ten types of IMs for the contact.
The last code fragment for the contact details content page is listed below. Those are the three buttons shown in Figure 14 for Save, Delete and Cancel operations.
    ...
    <div align="CENTER" <B>data-role="controlgroup" data-type="horizontal"</B>>
      <a href="<B>javascript:generateJson();</B>return false;" data-role="button" ><h5>Save</h5></a>
      <a id="deleteButton"  href="<B>javascript:showDialog();</B>return false;" data-role="button"  ><h5>Delete</h5></a>
      <a href="<B>javascript:showListPage();</B>return false;" data-role="button" ><h5>Cancel</h5></a>
    </div>
  </div>

  <!-- Footer for contact details -->
  <div data-role="footer" id="ftrDetail" data-theme="c"></div>
...
</div> <!-- Container page -->
- Notice the
data-role="controlgroup"attribute in<div>tag. This allows us to group three buttons together. The attribute definitiondata-type="horizontal"states that the buttons should be laid out horizontally. (Grouped Buttons details in jQuery Mobile documentation.) - Each button activates a corresponding JavaScript method.
Progress Screen
The HTML code defining the Progress screen in DetailPage.html is given below.
<div data-role="header" id="hdrProgress" data-nobackbtn="true" data-theme="c">
  <h1>Processing...</h1>
</div>

<div data-role="content" id="contentProgress" data-theme="c">
  <div align="CENTER"><h4>Please wait.</h4></div>
  <div align="CENTER">
    <img alt="" id="spin" src="img/wait.gif">
  </div>
</div>

<div data-role="footer" id="ftrProgress" data-theme="c"></div>
As seen above, the Progress screen has a simple implementation with a descriptive text and a spinning wheel image, wait.gif.
Confirm Delete
The HTML code for the third content page in DetailPage.html, corresponding to 'Confirm Delete' screen, is shown below. This screen is displayed when user presses the Delete button on Figure 14 to delete the currently displayed contact.
<div data-role="header" id="hdrDialog" data-nobackbtn="true" data-theme="c">
  <h1>Confirm delete</h1>
</div>

<div data-role="content" id="contentDialog"  data-theme="c">
  <div align="CENTER">
    <h4>Are you sure you want to delete this contact?</h4>
  </div>
  <div align="CENTER" <B>data-role="controlgroup" data-type="horizontal"</B>>
    <a href="<B>javascript:deleteContact();</B>return false;" data-role="button"><h5>Delete</h5></a>
    <a href="<B>javascript:showDetail();</B>return false;" data-role="button"><h5>Cancel</h5></a>
  </div>
</div>

<div data-role="footer" id="ftrDialog" data-theme="c"></div>
- Similar to the Save, Delete, Cancel buttons discussed above, we are using grouped buttons for Delete and Cancel.
- If user presses on Cancel, delete operation is canceled and user is displayed the 'Existing Contact' screen.
- If user presses on Delete, delete operation is carried out and user is taken to 'Contact List' screen with updated list of contacts.
Showing/Hiding Content Pages
At any given time, only one of the content pages for contact details, 'Confirm Delete' and Progress screens must be shown. The following code listing in DetailPage.html describes how showing/hiding of those content pages is done.
- We define JavaScript variables for header, content and footer sections and initialize them in jQuery
$(document).ready()function using id selectors. - Then, we define the respective
hidePage(),showPage()functions. Invoking theshowPage()function for one content page, shows the header, content and footer sections of the page and hides the header, content and footer sections of the other pages. - The 'Confirm Delete' screen does not need to be shown for an 'Empty Contact' screen, which is displayed when a new contact to be added. When 'Empty Contact' screen is shown, the contact id is an empty string. The
showDialog()function returns immediately without displaying the 'Confirm Delete' screen if the currently processed contact id is an empty string.
<script>
  ...
  // Commonly used variables
  var contactIdVar;

  <!-- contact details -->
  var hdrDetailVar;
  var contentDetailVar;
  var ftrDetailVar;

  <!-- progress page -->
  var hdrProgressVar;
  var contentProgressVar;
  var ftrProgressVar;

  <!-- confirm delete -->
  var hdrDialogVar;
  var contentDialogVar;
  var ftrDialogVar;
  ...

  $(document).ready(function () {
    // Initialize commonly used variables
    contactIdVar = $('#contactId');

    <!-- contact details -->
    hdrDetailVar = $('#hdrDetail');
    contentDetailVar = $('#contentDetail');
    ftrDetailVar = $('#ftrDetail');

    <!-- progress page -->
    hdrProgressVar = $('#hdrProgress');
    contentProgressVar = $('#contentProgress');
    ftrProgressVar = $('#ftrProgress');

    <!-- confirm delete -->
    hdrDialogVar = $('#hdrDialog');
    contentDialogVar = $('#contentDialog');
    ftrDialogVar = $('#ftrDialog');
    ...
  }

  function hideDialog(){
    hdrDialogVar.hide();
    contentDialogVar.hide();
    ftrDialogVar.hide();
  }

  function showDialog(){
    <B>if('' === contactIdVar.val()){
      return;
    }</B>
    hideProgress();
    hideDetail();
    hdrDialogVar.show();
    contentDialogVar.show();
    ftrDialogVar.show();
  }

  function hideDetail(){
    hdrDetailVar.hide();
    contentDetailVar.hide();
    ftrDetailVar.hide();
  }

  function showDetail(){
    hideDialog();
    hideProgress();
    hdrDetailVar.show();
    contentDetailVar.show();
    ftrDetailVar.show();
  }

  function hideProgress(){
    hdrProgressVar.hide();
    contentProgressVar.hide();
    ftrProgressVar.hide();
  }

  function showProgress(){
    hideDialog();
    hideDetail();
    hdrProgressVar.show();
    contentProgressVar.show();
    ftrProgressVar.show();
  }
  ...

</script>
Populating Contact Details
Having reviewed the structure of content pages in DetailPage.html, let us look into how to populate the contact details for an existing contact. Recall that the ContactsActivity.showContact() method displays DetailPage.html appending id of the contact as an HTTP query string, e.g. DetailPage.html?23. Let us see below how JavaScript code in DetailPage.html will process that information. The related section in jQuery $(document).ready() function is given below.
$(document).ready(function () {
  ...
  showProgress();
  contactIdVar.val(<B>window.location.search.substring(1)</B>);
  contactSupport.getContact(contactIdVar.val(),'setCurrentContact');
});
- When the page loads, the Progress screen is shown immediately.
- Then, the value of the
contactIdVarvariable is set to id of the contact from the query string. For example, if the page is loaded asDetailPage.html?23, the value ofcontactIdVarvariable is set to23. Parsing the query string is done viawindow.location.search.substring(1). - Finally,
ContactsActivity.getContact()is called by passing two parameters: (1) the contact id and (2) the callback functionsetCurrentContact. As a result,ContactsActivitywill get details of the contact for the specified id and pass the results back to the JavaScript functionsetCurrentContact()inDetailPage.html.
The ContactsActivity.getContact() method is shown below. It gets a JSON formatted string of contact details and passes it back to the requested JavaScript function.
public void getContact(String contactId, String contactCallback){
  String json = ContactUtility.getContactJSON(contactId, ...);
  final String callbackFunction = "javascript:" + contactCallback + "('" + json + "')";
  loadURL(callbackFunction);
}
JSON Format For Contact Details
The JSON format for details of a contact is shown below.
{
  "contactId":"265",
  "firstName":"Aafjes",
  "lastName":"Bertus",
  "note":{"rowId":"2265","text":"Author"},
  "ims":[
    {"rowId":"2274","protocol":"-1","value":""},
    {"rowId":"2275","protocol":"0","value":"bertus@aim"},
    {"rowId":"2276","protocol":"5","value":"bertus@google"},
    {"rowId":"2277","protocol":"6","value":""},
    {"rowId":"2278","protocol":"7","value":""},
    {"rowId":"2279","protocol":"1","value":"bertus@msn"},
    {"rowId":"2280","protocol":"8","value":""},
    {"rowId":"2281","protocol":"4","value":""},
    {"rowId":"2282","protocol":"3","value":""},
    {"rowId":"2283","protocol":"2","value":""}
  ],
  "phones":[
    {"rowId":"2284","type":"1","no":"111-222-3333"},
    {"rowId":"2285","type":"2","no":"222-000-9999"},
    {"rowId":"2286","type":"3","no":"444-787-9900"},
    {"rowId":"2287","type":"7","no":"555-744-9999"}
  ],
  "emails":[
    {"rowId":"2271","type":"1","value":"[email protected]"},
    {"rowId":"2272","type":"2","value":"[email protected]"},
    {"rowId":"2273","type":"3","value":"[email protected]"}
  ],
  "organizations":[
    {"rowId":"2269","type":"1","name":"Publications Inc.","title":"CEO"},
    {"rowId":"2270","type":"2","name":"Volunteers Corp.","title":"Member"}
  ],
  "addresses":[
    {"rowId":"2266","type":"1","street":"Alhambra st.","city":"Alhambra","state":"MI",
      "country":"USA","zip":"48100","poBox":""},
    {"rowId":"2267","type":"2","street":"1 Corporation st","city":"Alhambra","state":"MI",
      "country":"USA","zip":"48000","poBox":"44456"},
    {"rowId":"2268","type":"3","street":"","city":"","state":"",
      "country":"","zip":"","poBox":""}
  ]
}
- The fields
contactId,firstName,lastNameare simple strings,noteis an object, and each ofims(instant messenger addresses),phones,emails,organizationsandaddressesare arrays of objects. - For any object, the
rowIdfield is an integer. TherowIdis unique across all objects within a particular array. For example, no two objects inimsarray have the samerowId. The uniqueness ofrowIdhelps us define unique UI elements in JavaScript code. - Objects in
imsarray have aprotocolattribute, which signifies the kind of IM each object represents. Theprotocolis integer valued. Android contacts API defines the following constants for IM protocols (see documentation).- protocol=-1, Custom
- protocol=0, AIM
- protocol=1, MSN
- protocol=2, Yahoo
- protocol=3, Skype
- protocol=4, QQ
- protocol=5, Google
- protocol=6, ICQ
- protocol=7, Jabber
- Objects in
phonesarray have atypeattribute, which signifies the type of phone each object represents. Thetypeis integer valued. Android contacts API defines the following constants for phone types (see documentation).- type=1, Home
- type=2, Mobile
- type=3, Work
- type=7, Other
- Objects in
emailsarray have atypeattribute, which signifies the type of email each object represents. Thetypeis integer valued. Android contacts API defines the following constants for email types (see documentation).- type=1, Home
- type=2, Work
- type=3, Other
- Objects in
organizationsarray have atypeattribute, which signifies the type of organization each object represents. Thetypeis integer valued. Android contacts API defines the following constants for organization types (see documentation).- type=1, Work
- type=2, Other
- Objects in
addressesarray have atypeattribute, which signifies the type of address each object represents. Thetypeis integer valued. Android contacts API defines the following constants for address types (see documentation).- type=1, Home
- type=2, Work
- type=3, Other
Parsing JSON Via JavaScript
The implementation of the JavaScript setCurrentContact() function in DetailPage.html is given below. That function is responsible for parsing the JSON text above and dynamically populating various UI elements we had discussed before. For the sake of brevity, we will review the portion of the code that sets values of the first name, last name, notes and phone numbers. Other UI elements are parsed and populated in a similar manner.
Definition Of Constants
Due to the fact that the UI elements are created based on various HTML fragments used as templates, we start with defining constants for those fragments as shown below.
<script>
  // Constants
  <B>var STYLED_IN = '<input type="text" class="ui-input-text ui-body-null ui-corner-all ui-shadow-inset ui-body-c" id="';</B>
  var TR_O = '<tr><td>';
  var TD_C = '</td></tr>';
  var TD_M = '</td><td>';
  var VALUE = ' value="';

  var WORK_ORG_FRAGMENT_SFX = '">'+TD_C;

  var HOME_FRAGMENT_PRX = TR_O+'Home'+TD_M+STYLED_IN;
  var MOBILE_FRAGMENT_PRX = TR_O+'Mobile'+TD_M+STYLED_IN;
  var WORK_FRAGMENT_PRX = TR_O+'Work'+TD_M+STYLED_IN;
  var OTHER_FRAGMENT_PRX = TR_O+'Other'+TD_M+STYLED_IN;

  var HOME_PHONE_FRAGMENT_MID = '_1_No"' + VALUE;
  var MOBILE_PHONE_FRAGMENT_MID = '_2_No"' + VALUE;
  var WORK_PHONE_FRAGMENT_MID = '_3_No"' + VALUE;
  var OTHER_PHONE_FRAGMENT_MID = '_7_No"' + VALUE;
  ...
What is notable above is the variable named STYLED_IN where we add jQuery Mobile specific styles explicitly. The jQuery Mobile framework allows us to dynamically add rows into a table. However, we found that it does not automatically apply the style information from a parent level <div> tag into the <input> elements in table rows dynamically added to a table. As a result, when we dynamically add rows into a table definition, we apply the style explicitly to <input> elements in those rows.
Definition Of Variables
Following the definition of constants, we define several variables below that are initialized when the page loads.
<script>
  ...
  // Commonly used variables
  var currentContact;
  var firstNameVar;
  var lastNameVar;
  var noteVar;
  var contactIdVar;
  var phonesTableVar;
  ...
  $(document).ready(function () {
    // Initialize commonly used variables
    firstNameVar = $('#firstName');
    lastNameVar = $('#lastName');
    noteVar = $('#note');
    contactIdVar = $('#contactId');
    phonesTableVar = $('#phonesTable');
    ...
  }
-
firstNameVarrepresents the input element for first name. -
lastNameVarrepresents the input element for last name. -
noteVarrepresents the input element for notes. -
contactIdVarrepresents the contact id. -
phonesTableVarrepresents the table inside the collapsible block element for phone numbers.
Parsing Simple Object Types
We use jQuery parseJSON() function to parse the JSON formatted string of the contact details. The currentContact variable is set to the JavaScript object that contains the parsed JSON formatted string. The contactId, firstName, lastName and note fields are extracted and respective UI variables are set to those values, as shown below.
  function setCurrentContact(jsonText){
    currentContact = $.parseJSON(jsonText);
    contactIdVar.val(currentContact.contactId);
    firstNameVar.val(currentContact.firstName);
    lastNameVar.val(currentContact.lastName);
    noteVar.val(currentContact.note.text);
	...
Parsing Object Of Arrays
Android contacts database defines various phone types. Of those, this tutorial is focuses on the following ones: Home, Mobile, Work and Other. Each phone is identified by three variables, type (type of the phone, as reviewed previously), rowId (id of the phone in contacts database in the device), and no (the phone number). In our application, the phone numbers are stored in an array named phonesArr. Please consider the code listing below. We iterate through the array and for each phone extract the type, rowId, and no for the phone. Then, we set temporary variables tmpType, tmpRowId, tmpNo to those values.
    var i;
    ...
    // Phones
    var phonesArr = currentContact.phones;
    ...

    if(phonesArr !== null){
      for(i = 0; i < phonesArr.length; i++){
        var tmpType = (phonesArr[i]).type;
        var tmpRowId = (phonesArr[i]).rowId;
        var tmpNo = (phonesArr[i]).no;
        ...
Depending on type of each phone, we construct an HTML fragment to define a table row with information about that phone. For example, for home phone number, if value of tmpRowId is 15 and value of tmpNo is 2223334444 then the fragment
HOME_FRAGMENT_PRX + tmpRowId + HOME_PHONE_FRAGMENT_MID + tmpNo + FRAGMENT_SFX
<tr><td>Home</td><td><input type="text"
  class="ui-input-text ui-body-null ui-corner-all ui-shadow-inset ui-body-c"
  id="<B>15_1_No</B>" value="2223334444"></td></tr>
Above, observe that id of the input element is composed as 15_1_No where 15 corresponds to the id of the phone number in contact database, 1 signifies type of the phone and No implies that this id is for a phone number. The uniqueness of the rowId variable for the phones assures that the id attribute is unique within the document. The fragment is added to phonesTableVar via jQuery append(). Details are shown below.
...
var mobilePhoneSet = false;
var homePhoneSet = false;
var workPhoneSet = false;
var otherPhoneSet = false;

if(phonesArr !== null){
  for(i = 0; i < phonesArr.length; i++){
        var tmpType = (phonesArr[i]).type;
        var tmpRowId = (phonesArr[i]).rowId;
        var tmpNo = (phonesArr[i]).no;

    if(tmpType == 1){//home
      phonesTableVar.append(HOME_FRAGMENT_PRX + tmpRowId + HOME_PHONE_FRAGMENT_MID + tmpNo + FRAGMENT_SFX);
      homePhoneSet = true;
    }else if(tmpType == 2){//mobile
      phonesTableVar.append(MOBILE_FRAGMENT_PRX + tmpRowId + MOBILE_PHONE_FRAGMENT_MID + tmpNo + FRAGMENT_SFX);
      mobilePhoneSet = true;
    }else if(tmpType == 3){//work
      phonesTableVar.append(WORK_FRAGMENT_PRX + tmpRowId + WORK_PHONE_FRAGMENT_MID + tmpNo + FRAGMENT_SFX);
      workPhoneSet = true;
    }else if(tmpType == 7){//other
      phonesTableVar.append(OTHER_FRAGMENT_PRX + tmpRowId + OTHER_PHONE_FRAGMENT_MID + tmpNo + FRAGMENT_SFX);
      otherPhoneSet = true;
    }
  }
}
...
It is important that we create input fields for all four types of phone numbers. If the contact has at least one number of a particular type, the code above will create the input field for that phone type. If contact does not have a phone number of a particular type, we record that information, and create the input field for that phone type after executing the code above. This is done in the code listing below.
  var HOME_PHONE_FRAGMENT_LOCAL = TR_O+'Home'+TD_M+STYLED_IN+'-1_1_No">'+TD_C;
  var MOBILE_PHONE_FRAGMENT_LOCAL = TR_O+'Mobile'+TD_M+STYLED_IN+'-1_2_No">'+TD_C;
  var WORK_PHONE_FRAGMENT_LOCAL = TR_O+'Work'+TD_M+STYLED_IN+'-1_3_No">'+TD_C;
  var OTHER_PHONE_FRAGMENT_LOCAL = TR_O+'Other'+TD_M+STYLED_IN+'-1_7_No">'+TD_C;
  ...
  if(phonesArr !== null){
	...
  }
  if(!homePhoneSet){
    phonesTableVar.append(HOME_PHONE_FRAGMENT_LOCAL);
  }
  if(!mobilePhoneSet){
    phonesTableVar.append(MOBILE_PHONE_FRAGMENT_LOCAL);
  }
  if(!workPhoneSet){
    phonesTableVar.append(WORK_PHONE_FRAGMENT_LOCAL);
  }
  if(!otherPhoneSet){
    phonesTableVar.append(OTHER_PHONE_FRAGMENT_LOCAL);
  }
To interpret the above code, let us consider the work phone number.
If contact does not have a work phone number, the value of workPhoneSet is false. The above code
appends WORK_PHONE_FRAGMENT_LOCAL to phonesTableVar. Via variable substitution observe that the value of WORK_PHONE_FRAGMENT_LOCAL is as follows.
<tr><td>Home</td><td><input type="text"
	class="ui-input-text ui-body-null ui-corner-all ui-shadow-inset ui-body-c" <B>id="-1_1_No"</B>></td></tr>
This will simply create an empty input field where id attribute has -1 instead of an actual database id defined via rowId field.
Display Contact Detail
Finally, having all UI elements populated with details of the contact, we display the content page for contact details. This is end of JavaScript function setCurrentContact().
  function setCurrentContact(jsonText){
    ...
    showDetail();
  }
To summarize the discussion above, the following sequence of method calls takes place to display an existing contact.
ContactsActivity.loadPage('DetailPage.html?<em>id</em>')
  -> DetailPage.html:$(document).ready()
    -> ContactsActivity.getContact(<em>id</em>, 'setCurrentContact')
      ->  DetailPage.html:setCurrentContact(json)
Deleting A Contact
In order to delete a contact, user presses on the Delete button shown in Figure 14. This invokes the JavaScript showDialog() function which, as discussed previously, shows the 'Confirm Delete' screen in Figure 4. If user presses Cancel, no action is taken and the JavaScript showDetail() function is invoked. This displays the 'Existing Contact' screen.
On 'Confirm Delete' screen, if user presses the Delete button then the JavaScript deleteContact() function is called, a listing for which is given below. It is seen that user is displayed the Progress screen and the ContactsActivity.deleteContact() method is called with two parameters. The first one is id of the contact to delete and the second one is the callback display page, ListPage.html, to be shown after contact is deleted. That is, after the contact is deleted we would like the 'Contact List' screen to be shown to user.
function deleteContact(){
  showProgress();
  contactSupport.deleteContact(contactIdVar.val(),'ListPage.html');
}
The corresponding code for ContactsActivity.deleteContact() method is simple. It calls the ContactUtility.deleteContact() method by passing id of the contact to be deleted and then loads the desired callback page in WebView. (The ContactUtility.deleteContact() method will be reviewed later.)
public void deleteContact(String contactId, String displayPage){
  ContactUtility.deleteContact(contactId, ...);
  loadPage(displayPage);
}
Saving A Contact
In order to save a contact, user presses the Save button shown in Figure 14. This invokes the JavaScript generateJson() function, for which a partial listing is shown below. The main purpose of the function is to produce a JSON formatted string for the currently edited contact, in the same format as the one shown in 'Populating Contact Details' above, and pass it to Java back-end for saving in contacts database. For brevity, we will look at generating contactId, firstName, lastName, note and phones fields as rest of the code is very similar.
function generateJson(){
  showProgress();
  var jsonText = '{';
  jsonText += '"contactId":"' + contactIdVar.val() + '"';
  jsonText += ',"firstName":"' + firstNameVar.val() + '"';
  jsonText += ',"lastName":"' + lastNameVar.val() + '"';
  jsonText += ',"note":{"rowId":"","text":"' + noteVar.val() + '"}';
  ...
- The
contactId,firstName, andlastNamefields are generated as simple string types by reading values of the respective UI elements. - The
notefield is generated as an object type where therowIdis passed as empty, because that field is not important on Java back-end when saving a contact. Thetextfield is set to value of the respective UI element.
The phones field is created as an array of object types (shown below).
  // Phones
  jsonText += ',"phones":[';
  $('input[id$="_No"]').each(function(index) {
    jsonText += '{"rowId":"","type":"';
    jsonText += (($(this).attr('id')).split('_'))[1] + '","no":"';
    jsonText += $(this).attr('value') + '"';
    jsonText += '},';
  });
  jsonText = <B>addClosingBracket(jsonText);</B>
  ...
  jsonText += '}';
  contactSupport.saveContact(jsonText,'ListPage.html');
}

function addClosingBracket(txt){
  if((txt.length - 1) == txt.lastIndexOf(',')){
    txt = txt.substring(0,txt.length - 1) + ']';
  }else{
    txt += ']';
  }
  return txt;
}
- For each object in the array the
rowIdfield is passed as empty, because that field is not important on Java back-end when saving a contact. - The value of the
typefield is determined by parsing theidattribute of the<input>element corresponding to the phone. For example, ifid="15_1_No"then value oftypeis 1 (Home). The value ofnoattribute is simply value of the<input>element. - The
addClosingBracket()function simply strips off the latest comma from thephonesobject array and adds a closing brace '}'. - When the JSON formatted string for the contact is generated,
ContactsActivity.saveContact()method is called by passing that string and the callback page to display,ListPage.html, to be shown after contact is saved. That is, after the contact is saved we would like the 'Contact List' screen to be shown to user.
The ContactsActivity.saveContact() method is shown below.
import org.codehaus.jackson.map.ObjectMapper;

public class ContactsActivity extends Activity {
  ...
  public void saveContact(String json, String displayPage){
    ObjectMapper mapper = new ObjectMapper();
    try{
      Contact c = mapper.readValue(json,Contact.class);
      ContactUtility.saveOrUpdateContact(c, ...);
    }catch(Exception e){
      ...
    }
    loadPage(displayPage);
  }
  ...
}
The ObjectMapper class is the entry point in Jackson JSON Processor to convert a JSON formatted string to an object representation. As we will show later, the Contact class is a complex data structure compatible with the JSON format representing a contact. In other words, its fields and objects match the field names and data types in the JSON format representing a contact. With that compatibility in place, ObjectMapper.readValue() method converts the JSON text to an instance of the Contact class and returns that instance. Then, ContactsActivity.saveContact() method passes that Contact instance to ContactUtility.saveOrUpdateContact() method for saving the contact in database. Finally, the desired callback page is loaded in WebView, which is the 'Contact List' screen.
Closing Remarks For Part 2 Of This Tutorial
In Part 2 of the tutorial series, we demonstrated how to create an account for the newly created contacts. We also described how to edit and delete an existing contact. In Part 3, we will continue the tutorial by explaining how to add a brand new contact. We will also discuss how to use Android Java API for accessing and manipulating contacts in an Android device.

Comments