This is the third installment of our Cocos2D tutorial series on cloning Centipede for iOS. In today's tutorial we will begin coding the Caterpillar object and motion. Make sure you have completed the previous parts before beginning.
Where We Left Off
In the last tutorial, I showed you how to build the Sprout field for the game area. You also learned how to create some basic user interface elements using Cocos2D.
Today, we will be getting our hands dirty and creating the core object in the game: the Caterpillar. The Caterpillar is the most complex object in our series and we will need two parts to cover it completely. This will be the first part where we initialize the caterpillar with all of its segments and get it to move across the screen. The next part will be more in depth and will discuss the artificial intelligence that drives the caterpillar.
Step 1: The Caterpillar Object
The Caterpillar object will be the most complex of the objects we will create during this tutorial series. It will add numerous properties to our base GameObject class as well as some new init methods.
Start by creating a new file which is a subclass of GameObject called Caterpillar. Paste in the following code into Caterpillar.h:
#import "cocos2d.h"
#import "GameObject.h"

@class Segment;
// 1
typedef enum {
    CSRight,
    CSLeft,
    CSUpLeft,
    CSUpRight,
    CSDownLeft,
    CSDownRight
} CaterpillarState;

@interface Caterpillar : GameObject
// 2
@property (nonatomic, retain) NSMutableArray *segments;
// 3
@property (nonatomic, assign) CaterpillarState currentState;
@property (nonatomic, assign) CaterpillarState previousState;
// 4
@property (nonatomic, assign) ccTime totalTime;
@property (nonatomic, assign) NSInteger moveCount;
@property (nonatomic, assign) NSInteger level;

// 5
- (id)initWithGameLayer:(GameLayer *)layer level:(NSInteger)level position:(CGPoint) position;
// 6
- (void)update:(ccTime)dt;

@end
Before we discuss this code, I want to talk to you about the overall architecture of the caterpillar. I have chosen to implement it as a finite state machine. This means that the Caterpillar's behavior is dependant entirely on its state. Events in the game (such as collisions) will change the Caterpillar's state, thus changing its behavior. For our purposes, we will need to know about its current state as well as its previous state.
- These are all of the possible states the caterpillar can have. They should be fairly obvious based on their names. If you don't know what an enum is, I suggest you read about it.
- Our caterpillar is really just an array of Segment objects where each segement follows the one in front of it.
- The states of the caterpillar used to determine its behavior.
- Some helper properties that we will use in the class. I'll go into more detail about each when we use them.
- A new init method that also takes position and level into account during initialization.
- Since our caterpillar will be animated, we need to hook into the game's main loop. The update method is what we will be calling from the GameLayer's update method, which we will implement momentarily.
Now open up Caterpillar.m and add the following code:
#import "Caterpillar.h"
#import "GameLayer.h"
#import "GameConfig.h"

@implementation Caterpillar

@synthesize segments = _segments;
@synthesize currentState = _currentState;
@synthesize previousState = _previousState;
@synthesize totalTime = _totalTime;
@synthesize moveCount = _moveCount;
@synthesize level = _level;

- (void)dealloc {
    [_segments release];
    [super dealloc];
}

- (id)initWithGameLayer:(GameLayer *)layer level:(NSInteger)level position:(CGPoint) position {
    if(self = [super initWithGameLayer:layer]) {
        self.segments = [NSMutableArray array];
        self.level = level;
        self.currentState = CSRight;
        self.previousState = CSDownLeft;

        // 1
        [super setPosition:position];

        // 2
        int length = kCaterpillarLength + self.level / 2;
    }
    return self;
}

@end
So far, this isn't looking too complex.
- We will be overwriting the
setPostion:method in this class in a little while, so we need to call the super method explicitly in order not to call our local setter method. (by doing self.position). - The length of the caterpillar will be based on the current level of the game. The further the player is, the longer the caterpillar will be.
We have added anther configuration variable called kCaterpillarLength. Open up GameConfig.h and add this line:
#define kCaterpillarLength 11
This is just saying that the starting length for the caterpillar is 11 segments long.
Step 2: The Segment Object
As I said before, the caterpillar is just a series of segments. So, let's implement this object and we'll revisit the init method of the Caterpillar to set them up momentarily.
Create a new GameObject subclass called Segment. Paste the following code into Segment.h:
#import "cocos2d.h"
#import "GameObject.h"

@interface Segment : GameObject

@property (nonatomic, assign) CGPoint previousPosition;
@property (nonatomic, assign) Segment *parent;

@end
The main thing to note about Segment objects is they need to know their parent AND their previous position. The "head" of the caterpillar will be denoted by a Segment with a nil parent. You could almost think of the Segments as a linked list.
Now open Segment.m and add the following code:
#import "Segment.h"
#import "GameLayer.h"

@implementation Segment

@synthesize previousPosition = _previousPosition;
@synthesize parent = _parent;

- (id)initWithGameLayer:(GameLayer *)layer {
    if(self = [super initWithGameLayer:layer]) {
        self.sprite = [CCSprite spriteWithSpriteFrameName:@"segment.png"];
        [self.gameLayer.spritesBatchNode addChild:self.sprite];
    }
    return self;
}

- (void) setPosition:(CGPoint)position {
    _previousPosition = self.position;
    [super setPosition:position];
}

@end
The initWithGameLayer method here should be nothing new. The only addition to this class is we must override setPostion in order to track the previous position. Since we are overriding the setPostion method, we need to make sure to call the super class' version in order to get our sprite moved around.
That's it for the segment, let's now jump back to the Caterpillar's init method and add some code to create its segments.
Step 3: Building The Segments
Open up Caterpillar.m, import Segment.h, and add the following code in your initWithGameLayer method inside of the main if statement:
for(int i = 0; i < length; i++) {

// 1
    Segment *segment = [[[Segment alloc] initWithGameLayer:self.gameLayer] autorelease];
    segment.position = position;
    [self.segments addObject:segment];
}

__block Segment *parentSegment = [self.segments objectAtIndex:0];

// 2
[self.segments enumerateObjectsUsingBlock:^(id obj, NSUInteger idx, BOOL *stop) {
    Segment *segment = (Segment *)obj;

    if(![segment isEqual:parentSegment]) {
        segment.parent = parentSegment;
    }

    segment.position = self.position;
    segment.previousPosition = self.position;
    parentSegment = segment;

}];
- We start by creating new segments and adding them to the segments array. This is done
lengthtimes. Also, their position is set to the caterpillar's starting position. - Each segment gets enumerated and its parent gets set to the previous segment. There is a check in there to ensure that the head segment's parent stays nil.
Step 4: Initializing The Caterpillar
Although the game starts off with a single Caterpillar, it becomes multiple caterpillars once hit by the player. That being said, your GameLayer must be able to support an unlimited number of Caterpillar objects.
Open up GameLayer.h and add the following property:
@property (nonatomic, retain) NSMutableArray *caterpillars;
Now open GameLayer.m, import Caterpillar.h, and add the following code to your init method:
_caterpillars = [[NSMutableArray alloc] init];
CGPoint startingPosition = ccp(kGameAreaStartX, kGameAreaHeight + kGameAreaStartY - kGridCellSize / 2);
Caterpillar *caterpillar = [[[Caterpillar alloc] initWithGameLayer:self level:self.level position:startingPosition] autorelease];
[self.caterpillars addObject:caterpillar];
This will create a single Caterpillar object at the starting location and add it to the caterpillars array.
Step 5: Moving The Caterpillar
In Cocos2D, you can hook into the main game loop by scheduling one of your methods to be called on each tick.
Open GameLayer.m and add the following code to your init method:
[self schedule:@selector(update:)];
This tells Cocos2D to call the method called update: on every tick of the game loop. Now, let's implement this update method by adding the following code:
- (void)update:(ccTime)dt {
    [self.caterpillars enumerateObjectsUsingBlock:^(id obj, NSUInteger idx, BOOL *stop) {
        Caterpillar *caterpillar = (Caterpillar *)obj;
        [caterpillar update:dt];
    }];
}
In this code, we simply enumerate all of the Caterpillar objects and call their update methods. The Caterpillar will then take it from here.
Let's jump back to Caterpillar.m and add the following update: method:
- (void)update:(ccTime)dt {

    // 1
    self.totalTime += dt;
    if(self.totalTime < 4.0 / (self.level * 2.0)) {
        self.totalTime += dt;
        return;
    } else {
        self.totalTime = 0;
    }

    // 2
    __block int x = self.position.x;
    __block int y = self.position.y;

    // 3
    x += kGridCellSize;
    // 4
    self.position = ccp(x,y);

}
- Since we move the caterpillar the same amount of pixels on every tick (16), we need some other way of controlling its speed. The solution is to limit how often this method is allowed to run based on the current level. As the level increases, this method is allowed to run more frequently.
- We need to localize the current caterpillar position in order to modify these variables. I have marked them as
__blocktype as they will be modified within a block in a future tutorial. - This increment is temporary and meant to just show basic movement for the purpose of this tutorial. We will eventually replace it with something more complex. The x increase here will just move the caterpillar to the right until it moves off the screen.
- Finally, the position of the caterpillar gets updated after we have tweaked its location variables.
The last step to get this caterpillar moving is to override the setPosition method. Add the following code to Caterpillar.m:
- (void) setPosition:(CGPoint)position {
    // 1
    [super setPosition:position];

    // 2
    Segment *head = [self.segments objectAtIndex:0];
    head.position = position;

    // 3
    [self.segments enumerateObjectsUsingBlock:^(id obj, NSUInteger idx, BOOL *stop) {
        Segment *segment = (Segment *)obj;
        if(segment.parent) {
            segment.position = segment.parent.previousPosition;
        }
    }];
}
- The first step here is to call the super method so that everything gets updated properly in the parent.
- Moving the caterpillar basically means moving its head. Everything else should just follow.
- We enumerate the segments and set their current positions to the previous positions of their parents. This will achieve the "follow" behavior.
Now run your code and you should see the caterpillar moving along the top of the game area.
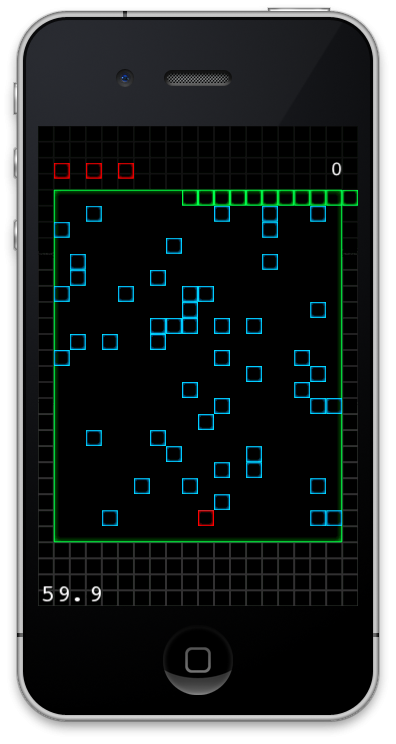
Conclusion
You now have a moving caterpillar in Cocos2D. Currently, you will notice that the caterpillar just moves right off the screen when it approaches the edge. This will be addressed next time.
Next Time
In the next tutorial in the series, we will look at how the caterpillar interacts with each of the walls as well as the sprouts. I will show you how a collision will modify the caterpillar's state and cause it to react.

Comments