Ask any developer to name the biggest challenge of developing for Android, and chances are they’re going to say fragmentation. Creating an app that’s flexible enough to run across the huge range of devices that fall under the ‘Android’ banner is a huge headache that most Android developers have experienced at some point.
But developing for a fragmented platform has its upsides! Since there are so many different Android devices out there, your app has the potential to connect with a huge audience—and that audience has just got a lot bigger, as Android apps can now run on Chrome OS.
In this article, I’ll show you how to get your latest Android app project up and running on Chrome OS. And since you’ll want to provide the best possible user experience on this new platform, I’ll also be looking at how to optimise your Android app, so you can really wow your new Chromebook audience.
Is My App Suitable for Chromebooks?
As an Android developer, getting your app in front of as many people as possible should always be your top priority, right?
Not necessarily.
Just because Android apps are now compatible with Chrome OS, doesn’t mean all Android apps are automatically going to be a good fit for this new platform.
Imagine you spot an app you like the look of, and Google Play shows that this app is compatible with your smartphone and your Chromebook. You decide to download the app to your laptop and immediately realise that most of the app’s features rely on mobile-specific hardware, such as the ability to make phone calls and send SMS messages.
The end result? This app is pretty much unusable on Chrome OS. You immediately uninstall it, feeling like the developer has completely wasted your time, and leave them a negative review on Google Play in retribution.
An app that doesn’t support Chrome OS is, at worst, mildly annoying for Chromebook users, but an app that provides a terrible user experience on the Chrome OS is far worse.
Before you dive in and start preparing your app for its Chrome OS debut, take a few moments to think about whether your app actually has something to offer Chromebook users.
Your typical Chromebook has very different hardware from your typical Android smartphone or tablet. Hardware will be a recurring theme throughout this article, but for now just cast your eye over your application’s feature list—do any of these features strike you as incompatible with your typical laptop?
For example, it’s unlikely that the pedometer app you’ve been working on is ever going to thrive on Chrome OS, as laptops typically don’t have the hardware necessary to measure footsteps (and when was the last time you saw someone taking their Chromebook on their morning jog, anyway?).
If your app does include some incompatible features, then is there any way you can modify these features to make them more Chromebook-friendly? If the answer is “no,” then you’ll need to disable these feature(s) when your app is running on Chrome OS, which leads to another question: can your app still provide a good user experience, even without these features? If it seems unlikely, then your app might not be right for Chromebooks after all.
Hopefully, even if you do need to disable or modify some features, your app will still have something to offer Chromebook users—and at this point you’re ready and raring to start updating your app to run on Chrome OS!
Getting Your App Running on Chrome OS
If your app requires hardware that isn’t supported by Chrome OS, then Chromebook users won’t be able to install your app. And there’s one piece of hardware in particular that’s present on most (if not all) smartphones and tablets, but isn’t available on all Chromebooks: a touchscreen.
To make matters worse, unless you specify otherwise, Google Play will assume that your Android app requires a touchscreen, and as a result will prevent your app from being installed on all devices that don’t include touchscreen functionality. If you’re going to make your app available to as many Chromebook users as possible, then you need to ask yourself: does my Android app really require a touchscreen?
For the majority of Android apps, the answer is no. Most Android apps can function perfectly fine without a touchscreen, especially on Chromebooks where the user has a full-sized keyboard, trackpad, and potentially also an external mouse at their disposal. Some Chromebooks even support “fake touchscreen,” which is an additional input system that allows you to use the mouse and keyboard to emulate basic touch events.
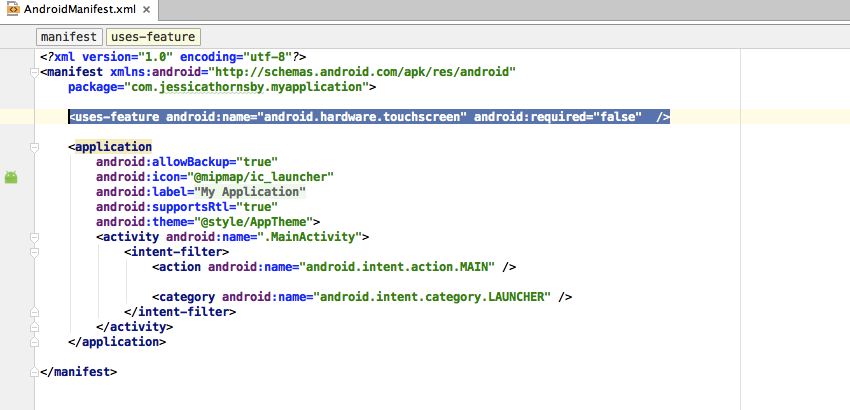
So unless you have a very good reason not to, you should specify that your app doesn’t require a touchscreen in order to function. This involves opening your project’s Manifest, declaring touchscreen as a feature that your application uses (uses-feature android:name="android.hardware.touchscreen") and then using the android:attribute to specify whether your application:
Requires this feature in order to function (
"true").Prefers this feature to be available, but can function without it (
"false").
In this instance, we want to declare that a touchscreen is preferred but not required:
<uses-feature android:name="android.hardware.touchscreen" android:required="false" />
Google Play will then use your project’s <uses-feature> and android:required declarations to determine whether your app is compatible with a user’s device, and will only allow users to download your app if their device meets all of its requirements.
Once you declare that your app doesn’t require a touchscreen, your app will immediately become available to a greater percentage of Chromebook users.
Other Hardware Considerations
Now, rinse and repeat for every feature that your application uses. This is a best practice for developing any Android app, but it’s also an important step in optimising your app for Chromebook users.
To help you get your app ready for Chrome OS, the Android team have created a handy list of all the hardware declarations that typically aren’t compatible with Chromebooks. If there are any features on this list that your app uses but doesn’t require, then it’s particularly important that you declare this feature in your Manifest and mark it as android:required="false".
However, don’t automatically set every feature to "false" because you want your app to be available to as many Chromebooks as possible! Consider what user experience your app will deliver without access to each piece of hardware. Although it’s tempting to try and get your app in front of as many people as possible, it’s always better to provide a good user experience to a smaller audience than an average or poor user experience to a huge audience.
At this point, you should also review any permissions that your app requests, as some permissions make implicit hardware requests. For example, if your app requests the camera permission then Google Play will assume that your app requires camera hardware, and will prevent your app from being installed on devices that don’t fulfil this requirement. If your app doesn’t actually require a camera, then this is a good way to miss out on potential users! To prevent this from happening, you’ll need to declare this feature in your app’s Manifest and mark it as "false".
If you adhere to the best practice of declaring every feature your app uses, then in theory you shouldn’t have to worry about implicit feature requests, but it’s always worth double-checking your project, just in case.
Specifically, the following permissions make implied feature requests that can prevent your app from being installed on Chrome OS:
CALL_PHONECALL_PRIVILEDGEDCAMERAMODIFY_PHONE_STATEPROCESS_OUTGOING_CALLSREAD_SMSREAD_SMSRECEIVE_MMSRECEIVE_SMSRECEIVE_WAP_PUSHSEND_SMSWRITE_APN_SETTINGSWRITE_SMS
If your app requests any of these permissions, then double-check that you’ve declared the related hardware in your project’s manifest, and mark each declaration as "false" if your app doesn’t actually require this hardware.
While you’re working on your feature requests, it may help to get a preview of how Google Play will filter your application based on its current hardware declarations and permission requests. The Android SDK includes an ‘aapt’ tool that lets you do just that—you can run this tool, check how its output compares with the features your app actually does require, and make adjustments as required.
For more information about using aapt, check out the official Android docs.
Sensors
Most Android smartphones and tablets have various built-in sensors that can provide your application with a range of data, including the device’s current orientation, position, and sometimes even information about environmental conditions.
Many of the sensors you’d typically expect to find on a smartphone or tablet aren’t available on Chrome OS, so if your app uses data from any sensor then you should plan how your app will react if this sensor isn’t available.
If your entire app depends on having access to a particular sensor, then you should prevent your app from being installed on any device that doesn’t include this sensor. For example, if your app can’t function without data from an accelerometer sensor, then you should add the following to your project’s Manifest:
<uses-feature android:name="android.hardware.sensor.accelerometer" android:required="true" />
The other scenario is that your app doesn’t require a particular sensor, but has features that will use data from a sensor if it’s available. If this sounds like your app, then you should declare this sensor in your Manifest but mark it as android:required="false". Your app can then check whether this sensor is available at runtime, and disable any functionality that relies on a sensor that isn’t present on the user’s device.
To determine what sensors are available, you’ll need to create an instance of the SensorManager class, then call the getSystemService method and pass in the SENSOR_SERVICE argument:
private SensorManager mSensorManager;
...
mSensorManager = (SensorManager) getSystemService(Context.SENSOR_SERVICE);
Next, you’ll need to get a list of all the sensors that are currently available, by calling the getSensorListmethod and using the Sensor.TYPE_ALL constant:
List<Sensor> deviceSensors = mSensorManager.getSensorList(Sensor.TYPE_ALL);
Armed with this information, you can then disable any application features that depend on data from sensors that aren’t present on the current device.
Resizing and Supporting Chrome OS Multi-Window Mode
On Chrome OS, Android apps are displayed in separate windows that the user can move around, and cycle between the following three supported sizes:
Portrait. A similar size to the screen of a Nexus 5.
Landscape. A similar screen to the Nexus 7.
Maximised. The app uses all the available screen space.
When it’s time to test your app on Chrome OS, you’ll want to make sure your app looks good and functions correctly across all three supported sizes, for example by checking that all your app’s text is easy to read and all UI elements remain reachable regardless of whether the user places your app in portrait, landscape, or maximised mode.
Although Chrome OS users can view multiple Android apps at a time, only one app can have focus, so in the interests of conserving the user’s battery, your app should pause rendering whenever it loses focus. The only exception is when your app has content that needs to update constantly. For example, if you’re developing an app that plays music or video then you probably won’t want this Activity to stop every time your app loses focus.
If your Activity needs to update the entire time it’s onscreen, then you should pause it in onStop and resume playback in onStart, rather than using onPause handlers.
Consider Using Auto Backup
Chromebooks are designed so that users can switch between devices with ease—they just need to sign into their Google account and all their apps and content are just there, regardless of whether they’ve ever used this particular Chromebook before.
Since this is the behaviour Chromebook users have come to expect, this is also how your app should behave when it’s running on Chrome OS. This means you’ll need to back up your app’s data online rather than just storing it locally. The easiest way is to use Android’s Auto Backup feature, which allows you to back up your app’s data to the user’s Google Drive account.
If your app targets Android 6.0 or higher, then Auto Backup is enabled by default. However, it’s always a good idea to be explicit about the features your app uses (there’s no guarantee that Auto Backup will be enabled by default on future versions of Android, after all) so open your project’s Manifest and add the following:
android:allowBackup="true"
For more detailed information about implementing backup and restore, check out the official Android docs.
Time to Test!
Even after following all these best practices, you can’t be certain that your app will provide a good user experience on Chrome OS—unless you test your app on a real-life Chromebook.
At the time of writing, Google recommends that you test your Chromebook-ready apps across the following:
An ARM-based Chromebook.
An Intel x86-based Chromebook.
A convertible Chromebook (one that can shape-shift between a laptop and a tablet).
A Chromebook with touchscreen support.
A Chromebook with “fake touch” support.
But let’s be realistic: it’s unlikely that you’ll just happen to have access to multiple Chromebooks. When deciding what Chromebook(s) you should aim to test your app across, it may help to take a look at Google’s list of all the Android-compatible Chromebooks currently on the market.
Before you can install your Android app on Chrome OS, you’ll need to put your Chromebook into Developer mode and enable installations from unknown sources.
The exact process for placing your Chromebook into Developer Mode does vary between devices, so if these instructions don’t work for your particular model then you should search the Chromium docs for device-specific instructions.
To enter Developer Mode:
Make sure your Chromebook is turned off.
Hold down the Esc and Refresh keys while pressing your device’s Power button. Your Chromebook should then boot into the Recovery screen.
Press the Control-D keys on your Chromebook’s keyboard.
When prompted, press the Enter key.
Press the Control-D keys again.
Your Chromebook will now boot into Developer Mode.
The next step is enabling Unknown Sources, by navigating to Chrome Settings > App Settings > Security and selecting Unknown sources.
Once you’ve completed these steps, you’re ready to install the APK (Android Application Package) you want to test. To quickly transfer your APK to your Chromebook, you can either:
Add your APK to Google Drive.
Copy the APK file to your Chromebook’s Downloads folder using an external drive or SD Card.
Send the APK to yourself via email.
Then, you’ll need to download the APK to your Chromebook and open it using the Android File Manager app (which you’ll find by navigating to Chrome Settings > App Settings > Device & USB > Explore).
Alternatively, you can push the APK from your development machine to your Chromebook using Android Debug Bridge (ADB) commands.
Getting ADB to play nicely with Chrome OS does require some setup, but once you’ve made the connection you can use ADB to issue a range of commands that can come in pretty useful for testing your Android app. (For more information about ADB commands, check out the official Android docs).
Working With the Android Debug Bridge
Setting up ADB is a multi-step process, so let’s tackle it one step at a time:
1. Configure the Chrome OS firewall to allow incoming ADB connections.
Launch the Chrome OS Terminal by pressing Control-Alt-T on your keyboard, and then type shell to get the bash command shell:
crosh> shell
chronos@localhost / $
Enter your password, and then issue the following commands via the Terminal window:
chronos@localhost / $ sudo /usr/libexec/debugd/helpers/dev_features_rootfs_verification
Read the disclaimer. If you’re happy to continue, enter the next command:
chronos@localhost / $ sudo reboot
At this point, your Chromebook will restart. Once your Chromebook has finished booting, relaunch the Terminal and type:
chronos@localhost / $ sudo /usr/libexec/debugd/helpers/dev_features_ssh
2. Find your Chromebook's IP address:
Enabling ADB debugging requires your Chromebook’s IP address, so:
Click the Network icon in the bottom-right of your Chromebook’s homescreen.
Select the network your Chromebook is currently connected to.
Click the i icon in the bottom-right of the menu.
At this point a box will appear, containing your Chromebook’s IP address—make a note of it, as you’ll need this later.
3. Enable adb debugging.
On your Chromebook, complete the following steps:
Click the clock icon in the bottom-right of the screen.
Select Settings.
In the Android Apps section, click the Manage your Android apps in Settings link.
Click About device.
Enter Developer mode by clicking the Build number seven times.
Click the arrow in the upper-left of the window. This will take you back to the main Settings screen.
Click Developer options.
Enable ADB debugging and then click OK.
Next, complete the following steps on your development machine:
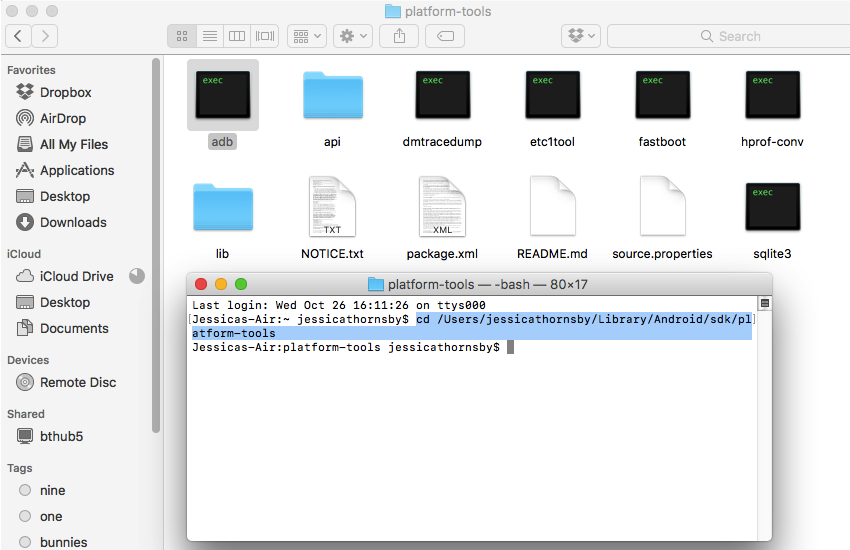
Open a Terminal window and change directory (cd) so it’s pointing at the location of your Android SDK’s ‘adb’ program.
cd /Users/jessicathornsby/Library/Android/sdk/platform-tools
Tell your development machine to listen for a TCP/IP connection on port 22, by issuing the following adb command:
./adb tcpip 22
Issue the adb connect command followed by the IP address of your Chromebook, for example:
./adb connect 100.100.0.10
On your Chromebook, click Allow when prompted.
The only thing left to do is push the APK from your development machine to your Chromebook.
On your development machine, issue the adb install command, followed by the path and filename of the APK you want to install, for example:
./adb install Users/jessicathornsby/Documents/app-name.apk
And that’s it! Your Android application is now installed on your Chromebook, ready for you to test!
Summary
In this article, we looked at how to update your app to run on Chromebooks and then, once it’s capable of running on this new platform, how to optimise it to provide a better user experience.
Being able to access their favourite apps across their smartphones, tablets and now their laptops is great news for Chromebook users, and for you as a developer it means a larger potential audience for your Android apps—and who wouldn’t want that?

Comments