So, you've got your CSS chops up to speed, and your site should now at least be a fair way down the track to being customised with a colour scheme and maybe even some custom fonts to make it really start to feel like it's much more 'you' than it was. But, you're thinking you'd also like to make some other changes and those changes aren't exactly style related. So it's likely you're going to have to to start getting into editing some of the hard-coded, inbuilt structure, and that means starting to dig into the PHP files of your site.
Oh, but before we do, if you're looking for the stylesheet I promised last week that completes the conversion of Twenty Thirteen from orange to blue: that's here - there may be some elements of the theme I may have missed as you navigate through, I didn't customise every last post-format and there are probably other things you'll find absent. So, if you're really planning on using this for a live site you'll have a fair bit more work to do. But it will, at the very least, get you a fair way into the process and set you up to be able to manage any other customisations you may want further down the track.
Anyway, back to this week's tutorial!
Before We Start, You need...
- FTP access to your site
- Your text editing software
What We'll Be Doing
- Editing the default WordPress footer with custom link / content
- Moving the main navigation to before the header
- Creating a page description using custom fields
As an introduction I need to explain a little bit more about templates in a WordPress theme and how they work in the context of a child theme. Because, you may remember that, at this stage our theme doesn't actually include any PHP templates.
Maybe I'm getting ahead of myself. You might not even be aware of the templating system, right? So for really full explanations you could start here:
Reference
- Codex: Stepping into Templates
- Codex: Templates
- Codex: Child Themes and Templates
However, for the short to the point version, let me quote the Codex as I couldn't say it any better myself:
Templates are the files which control how your WordPress site will be displayed on the Web. These files draw information from your WordPress MySQL database and generate the HTML code which is sent to the web browser. Through its powerful Theme system, WordPress allows you to define as few or as many Templates as you like all under one Theme
Now, if you look at your theme, you'll notice there actually aren't any templates in your theme directory at the moment. Do you need me to remind you as to why?
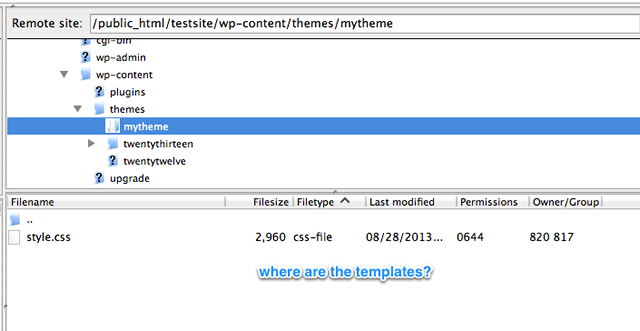
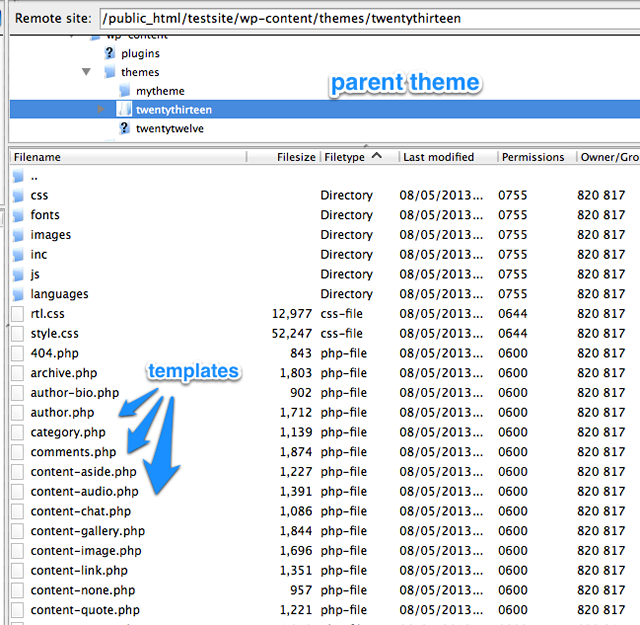
I didn't think so. You remember that our theme is a "child theme" and therefore, all the templates for our theme are tucked back up there in the parent theme directory.
So, the question then remains, how do we access and edit these files without risking the parent theme, should the theme developer update the theme?
I'm glad you asked! It's easy, we simply copy the template we want to edit from the parent directory down into our child theme directory. WordPress is clever enough to look for templates first in our child theme's directory and if it doesn't find a required file there it will automatically look back to the parent. So, anything we copy into the child theme directory will take priority.
Ok, that's the background. Now we move onto the stuff that's going to allow us to make the structural changes we want.
Creating / Copying Files in Your Child Theme
For a start, there is more than one way to get a copy of the templates we want to edit from the parent theme into the child theme.
Method 1
You can drag and drop from Remote to Local and back to Remote in your FTP client.
In FileZilla drag copies of the templates you're editing from the parent theme, to your desktop (or anywhere else local on your computer) and then drag it back up to your server into the child theme directory:
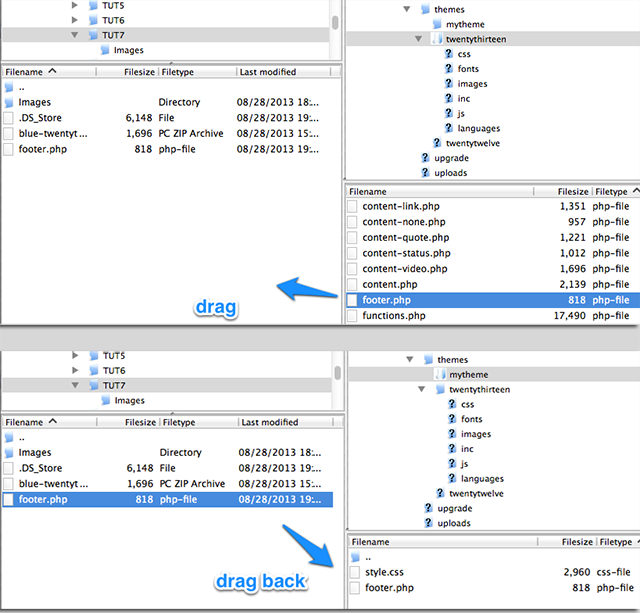
This doesn't delete anything from remote, simply creates a copy on your local machine which you're then copying back up to the remote machine in a different location.
Method 2
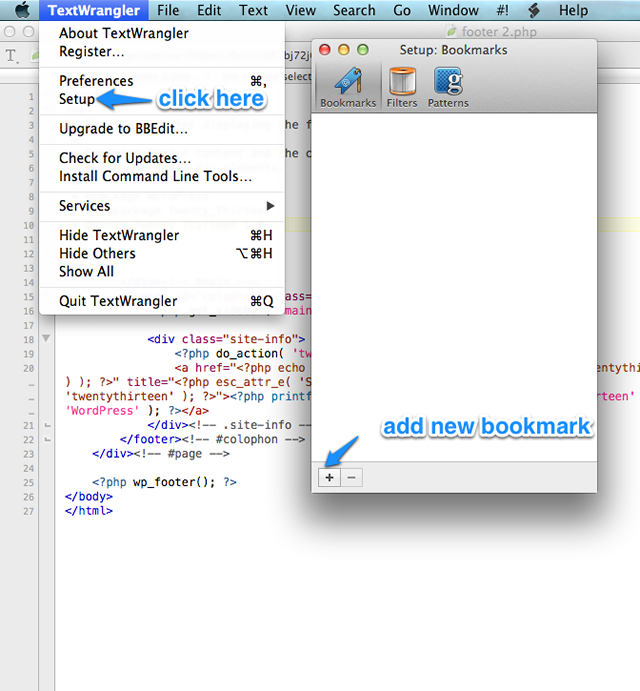
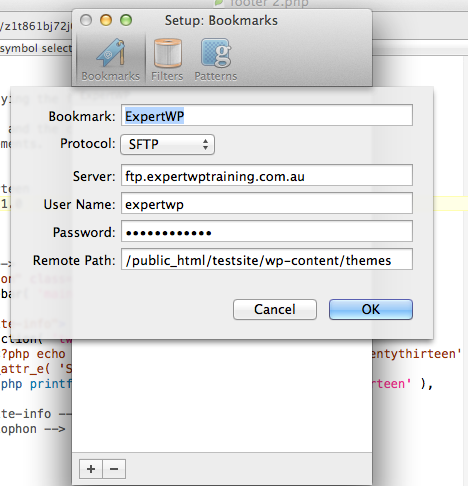
We can also set up a bookmark for our FTP server in Text Wrangler so we can save up to alternate locations (like the child theme) like this:
- In Text Wrangler go to Text Wrangler » Setup
- In the Bookmarks Tab hit the + sign in the bottom left to create a new bookmark
Populate the fields with your FTP data, the same credentials that you used when we set up FileZilla.
With that set up, when you're in FileZilla and want to copy a file you can then right-click on the file on your server (in our case, footer.php) and choose edit so it opens in Text Wrangler.
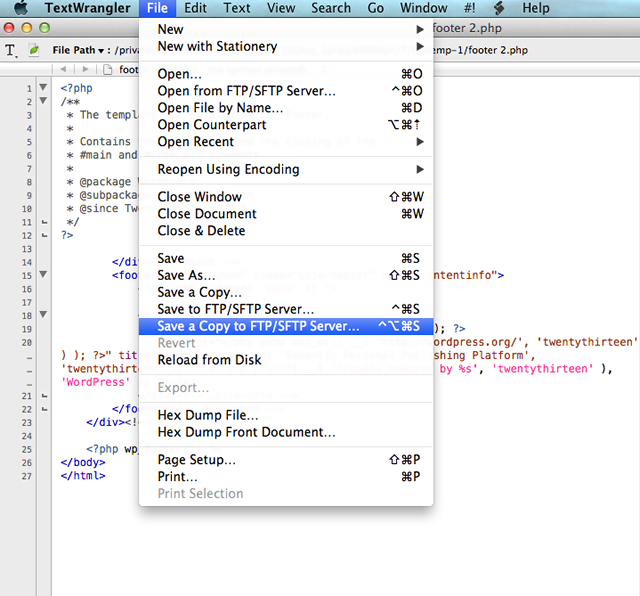
Then, in the Text Wrangler File menu, choose Save a Copy to FTP/SFTP server. (If you choose FTP and the program tells you you need to allow a security exception because you're using choose allow every time and proceed to saving the file - you'll only have to do this once).
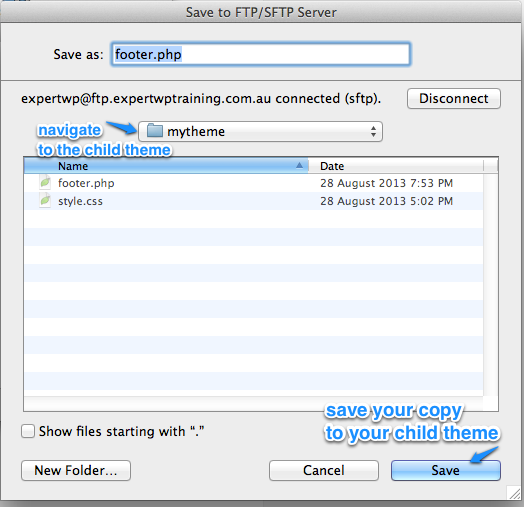
In the window that opens next, you can then navigate to your child theme's directory and save the new footer.php to your child theme.
This also moves the file down from the sever, and back up again to the new location on that server, it's slightly more complicated but I think it makes for a cleaner process in that you don't end up with orphan files on your desktop. In any case, regardless of how you choose to do it we need to have a copy of footer.php (or whichever file we're editing) in our child theme so that we can make changes to it!
Editing the Footer to Change the Site Info Details
The first change I'm usually asked to make whenever my trainees get to this part of the course is how to change the default Twenty Thirteen Footer
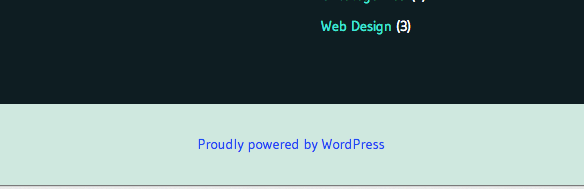
Mostly they want to add a copyright notice, or they may want to change it altogether, either way it probably won't surprise you to know that fiddling about with this part of your website can be done in the footer template (footer.php) - so, based on the information in the section above, open up your child theme's copy of the footer.php in your Text Editor.
So, before we go editing anything, let's break down what we're looking at.
At the very top of the page we'll see a code tag that looks like this. This indicates that the text to follow is PHP, a language that is interpreted and executed by the server before the page is served back to the client (browser) - that's the clever stuff of web technology, we no longer have to use dumb files that sit statically on the server simply served in response to a browser request. Server-side scripting, which is what PHP is, allows for so much more of a clever, dynamic technology that drives a lot of web based products today (there are other languages too, but WordPress is written in PHP and thus is our focus here).
PHP isn't HTML, but it works in and around HTML because that's what browsers read. Browsers can't read or interpret PHP, that all happens on the server (and is why when you ordered your hosting back in episode 2 you had to make sure your host offered a server with PHP which, of course, the vast majority of them do).
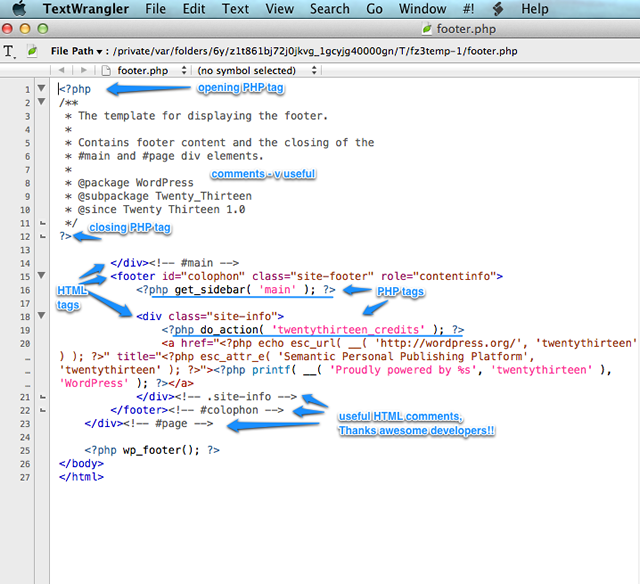
In any case, reading down the page you'll see the following:
- The opening PHP tag
- Comments about this template indicating its place in the site structure as a whole (contains the footer content, also closes the main content div)
- Closing PHP tag
- Some HTML tags - with helpful comments...
- some HTML tags - with helpful comments... The closing Main </div>, the <footer> section opening
- Some PHP tags e.g.<?php get_sidebar('main'); ?>
- More closing HTML tags
The published code actually looks like this:
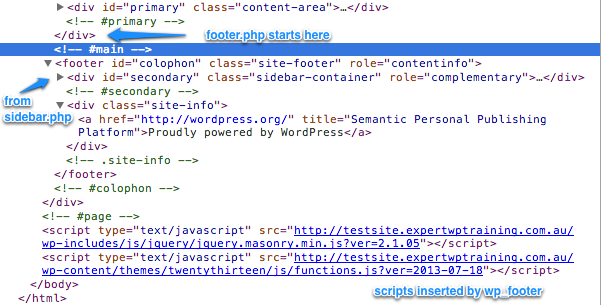
You'll notice there's only HTML on the page. All the various template parts have been pulled in from either the theme (sidebar.php and footer.php etc.) or from WordPress itself wp_footer(); and are compiled into one HTML page. Each page or post on your site that you visit will have been compiled in the same way from whichever bits of the theme are called for according to where you are in your site.
If you're on the home page it may be pulling in a home.php or a front-page.php template, if you're on the blog it will likely be an archive.php template. All of the templates in your theme are pulled together (by the server), as needed when a client (browser) makes a request to the server to view your site.
So, to get back to what we're wanting to achieve for this exercise, go back to your text editor and start to get an idea of which bits of this footer template code you might be wanting to edit.
If you look closely you'll see one long PHP tag that seems to contain all the elements that you might be wanting to change. First we can see that this whole snippet is a link back to WordPress.org:
	<?php do_action( 'twentythirteen_credits' ); ?>
		<a href="<?php echo esc_url( __( 'http://wordpress.org/', 'twentythirteen' ) ); ?>" title="<?php esc_attr_e( 'Semantic Personal Publishing Platform', 'twentythirteen' ); ?>"><?php printf( __( 'Proudly powered by %s', 'twentythirteen' ), 'WordPress' ); ?></a>
Now, as you get comfortable with this sort of code you can tweak it however you want, you may want to delete that section all together, in which case you could remove everything from:
<div class="site-info">to</div>
<!-- .site-info -->
and have that whole section disappear and your site finish with the bottom of the widgetised footer (sidebar.php).
But in this case what we're wanting to do is to change the URL to my website and put in a credit for me, as the developer, and a copyright notice to discourage people from reusing my content.
Something like this "Lovingly crafted by The Web Princess for The Site Client © 2013"
First, we change the references in this code snippet from twentythirteen to mytheme (the name of our theme) and:
<?php do_action( 'mytheme_credits' ); ?>
	<a href="<?php echo esc_url( __( 'http://wordpress.org/', 'mytheme' ) ); ?>" title="<?php esc_attr_e( 'Semantic Personal Publishing Platform', 'mytheme' ); ?>"><?php printf( __( 'Proudly powered by %s', 'mytheme' ), 'WordPress' ); ?></a>
Then we change the URL from wordpress.org to thewebprincess.com - so it will link back to my page:
<?php do_action( 'mytheme_credits' ); ?>
	<a href="<?php echo esc_url( __( 'http://thewebprincess.com/', 'mytheme' ) ); ?>" title="<?php esc_attr_e( 'Semantic Personal Publishing Platform', 'mytheme' ); ?>"><?php printf( __( 'Proudly powered by %s', 'mytheme' ), 'WordPress' ); ?></a>
Then we'll change the link title from 'Semantic Personal Publishing Platform' to 'Web Development and WordPress Training' (this is a link back to me, let's tell Google what I can do):
<?php do_action( 'mytheme_credits' ); ?>
	<a href="<?php echo esc_url( __( 'http://thewebprincess.com/', 'mytheme' ) ); ?>" title="<?php esc_attr_e( 'Web Development and WordPress Training', 'mytheme' ); ?>"><?php printf( __( 'Proudly powered by %s', 'mytheme' ), 'WordPress' ); ?></a>
Then we change the text 'Proudly Powered by' to 'Lovingly Crafted by'
<?php do_action( 'mytheme_credits' ); ?>
	<a href="<?php echo esc_url( __( 'http://thewebprincess.com/', 'mytheme' ) ); ?>" title="<?php esc_attr_e( 'Web Development and WordPress Training', 'mytheme' ); ?>"><?php printf( __( 'Lovingly Crafted by %s', 'mytheme' ), 'WordPress' ); ?></a>
Then we change the word 'WordPress' to the phrase 'The Web Princess':
<?php do_action( 'mytheme_credits' ); ?>
	<a href="<?php echo esc_url( __( 'http://thewebprincess.com/', 'mytheme' ) ); ?>" title="<?php esc_attr_e( 'Web Development and WordPress Training', 'mytheme' ); ?>"><?php printf( __( 'Lovingly Crafted by %s', 'mytheme' ), 'The Web Princess' ); ?></a>
Finally we want to customise it with our copyright notice, adding in the client's name after our link and a PHP tag to display the date, and we've used PHP because this will automatically show whatever the current year is!
<?php do_action( 'mytheme_credits' ); ?>
<p><a href="<?php echo esc_url( __( 'http://thewebprincess.com/', 'mytheme' ) ); ?>" title="<?php esc_attr_e( 'Web Development and WordPress Training', 'mytheme' ); ?>"><?php printf( __( 'Lovingly Crafted by %s', 'mytheme' ), 'The Web Princess' ); ?></a> for The Site Owner © <?php echo date('Y'); ?>
There you go! A new customised footer for our site.
By the way, that was rather a long winded way of going about it. In doing it that way we've retained all the elements that make it possible to internationalise this theme, which, in a real world scenario of just tweaking it for yourself (rather than preparing your theme for wider distribution) you could simply have skipped it all and replaced all of the code above with the following:
<a title="Web Development and WordPress Training" href="http://thewebprincess.com/">Lovingly Crafted by The Web Princess</a> for The Site Owner © 2013
Moving the Primary Navigation to Before the Header Image
So, the next thing we're going to do is to move the primary navigation from its current home below the banner to above it. Then we'll create a new navigation area below the banner. You know, just because we can.
So this time you need to copy the header.php from the parent theme into your child theme and open the child version in your editor.
Select the code from the beginning of:
<div id="navbar">to the closing tag of the same</div>
<!-- #navbar -->
This is one of the cool things about Twenty Thirteen, all these great comments to help you find where you are. Take note and do the same in your own themes, so people coming up behind you can find their way in your themes.
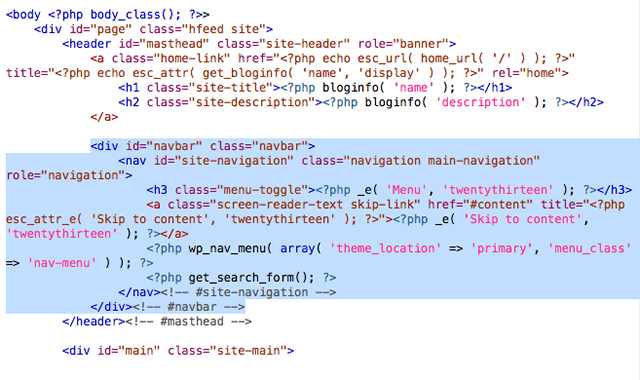
Cut that code out and paste it above the <header class="homelink"> line. Make sure you keep it within the <div>.
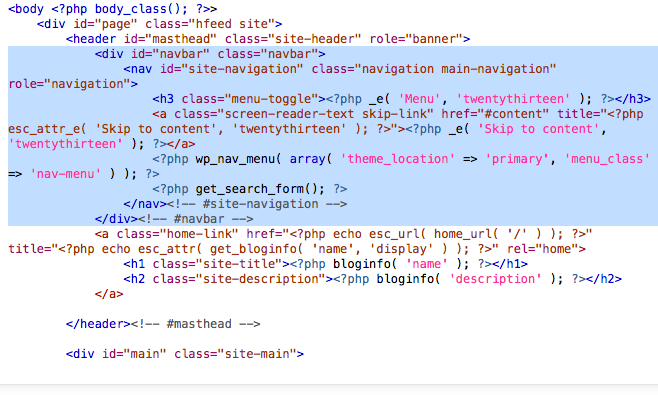
Save the file and refresh the published view of your site so you can see your changes:
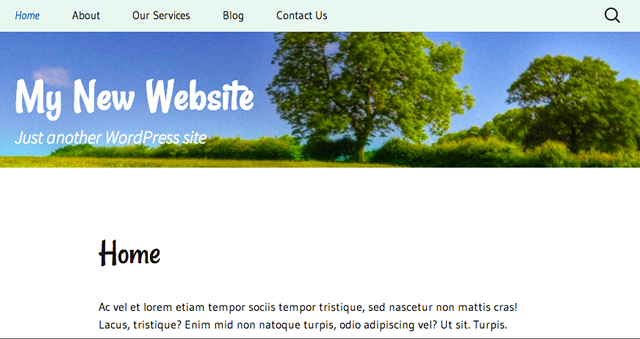
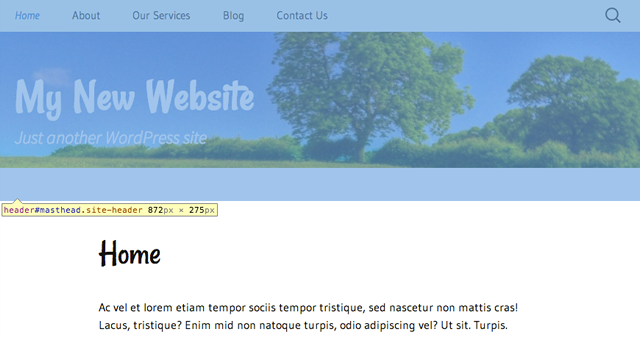
Notice how the banner photo is a bit shorter than it was, and the gap between the banner and the page title a bit wide. If we check it out in the inspector we can see that the header section is still the same height. What's happening is that the header image is being obscured by the nav, so we're going to move the image down accordingly.
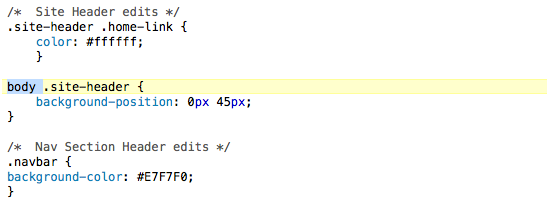
So, to do this we'll tweak a bit of CSS. In the same way as we did in our previous tutorial, inspect the code until you find this:

body .site-header {
	background-position: 0px 45px;
}
The reason we've put the body selector in with the .site-header is to increase the specificity of the CSS. Without it we could put the code in our stylesheet and would not see the results we want because the CSS for the .site-header is set elsewhere in the theme and it's taking priority (comes after our stylesheet in the cascade). Our adding the body tag makes the CSS more specific and means it takes priority and as such the site will reflect our changes.
Save up to the site and refresh the published site!

Looking Good!
Adding a Page Description to Our Page Templates Using Custom Fields
Finally, the last thing we're going to do is to edit our page.php template to allow us to add in a page description field under the page title. We'll do this using custom fields (see the Codex for more details on those).
We'll start by setting our custom field on our Services page.
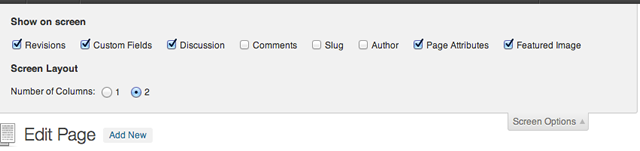
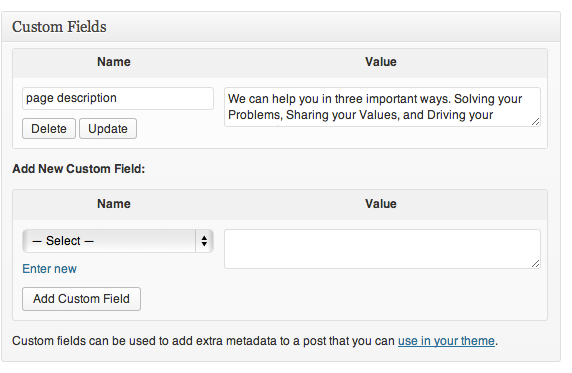
First you'll likely have to edit the Screen Options to make sure you have access to the Custom Fields panel, make sure the Custom Fields checkbox is selected:
This opens a new panel below the page editor. Click Enter New to create a new custom field and put 'page description' in the Name field and enter your page's description in the Value box.
Now we've done that we need to add some code to our page template, so copy page.php from the parent theme into our child theme directory and open the child theme's page.php in our editor. We're putting this code in the template after the level 1 heading (<h1>) and before the end of the article header.
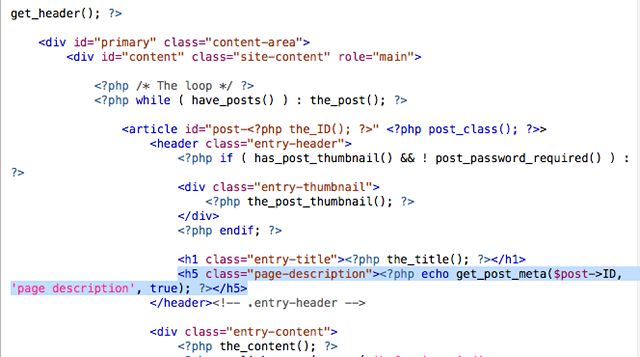
<h5 class="page-description"><?php echo get_post_meta($post->ID, 'page description', true); ?></h5>
We got the code we used for this page from the Codex's page on custom fields - look for the Template Functions section - we simply swapped out their 'key' with ours, which is 'page description'. Save and upload your file and refresh the published page:
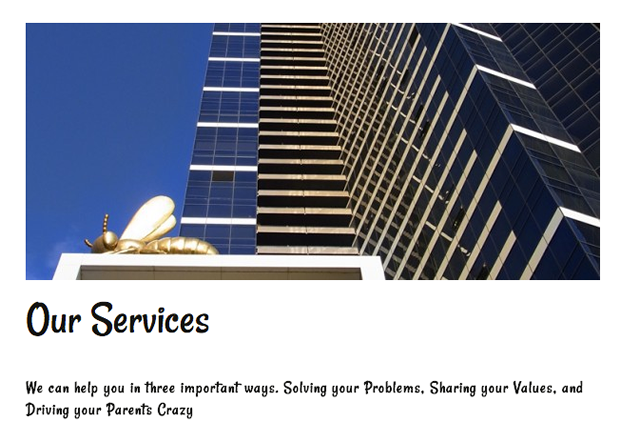
There you go, the beginnings of editing theme templates.
Conclusion
Finding your way around the theme templates can be a little bit daunting, fortunately, starting with a theme like Twenty Thirteen is a really useful start because of how well commented it is throughout.

Comments