Welcome back to the third installment in the Beginning iOS Development video series. In this lesson we will be looking at Interface Builder and how we can use it in iOS projects.
The notes below are complementary to the video. If you have any questions regarding anything mentioned in the video please don't hesitate to ask in the comment section.
Getting Started
First, we will look at the Interface Builder interface. Upon opening a XIB you will see 4 different windows. The Library window, View/Window, Document window and the Attributes, Size, Connections and Identity window. If you don't see one or any of these windows make sure Interface Builder is running by reopening the windows from the Tools menu.
The Library
The library is where all of the UIKit objects are available for use in your project. Simply dragging the object onto the window will add it to the view. The library is divided into 3 sections.
- Controllers: These are the objects that control a set of associated views in a particular context of content. An example would be a Messages Controller showing messages that the user has available.
- Data Views: When data needs to be displayed to the user these views will accommodate most media types. Tables, images, web pages, maps and scrolling content are all handled by objects in this category.
- Inputs & Values: When the user is required to input information or provide a choice these objects allow a myriad of different options.
Using Controllers Not UI Objects
If you wish to use a UITabBar in your application you do not drag a UITabBar onto the view. How you use the UITabBar, UINavigationBar and the Search bar is by using a controller. A controller extends from these objects and automatically handles the basic functionality for these objects. Using a UITabBar controller will automatically handle the transition and management of different UIViewControllers.
Extensions of UIView
All of the main UIKit objects descend from the UIView class. In Cocoa everything is developed in an inherited, tree like manner. No functionality is duplicated when it can be inherited. What I mean by this is the UIButton object, as an example, is a descendant of the UIView class. Because of this the UIButton inherits the alpha, content mode, size and other characteristics that the UIView class has but it also then extends on those with extra functionality, like acting as a button.
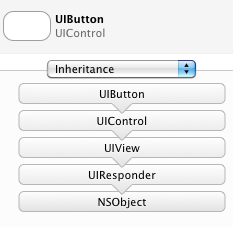
The above screenshot from Interface Builder shows that the UIButton class inherits from the UIControl class which in turn inherits from the UIView class and so on. All of that is based on the NSObject class which you will find as the base of any Cocoa class. Each of these classes, inherited from one another, bring functionality from each other and then extend.
Attributes, Connections, Size and Identity
This window allows you to change the properties and settings on a selected UIView object. Depending on the UI object it can allow you to change font settings, the object's style, background colors, or opacity.
The connections section will show all of the available actions that the object can respond to as well as any linked outlets or actions.
The size section does as you would expect. You can modify the X & Y coordinates of the object as well as its physical dimensions. This are also includes the autosizing options which control how the element will resize in the event of a screen rotation or dimension alteration.
The identity section is not commonly used but it does have some interesting fields. If you have extended a UIKit object and want to use your own class instead of the default this is where you can reassign the objects base class. There are some options around accessibility and Interface Builder internal fields like notes and allowing to name objects.
Autosizing
When the screen rotates on an iOS device you can manage how the UI objects will alter their position or if they stretch to fill the new window. This can all be managed with this simple little tool in Interface Builder.
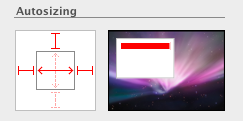
The box on the left is where you decide how the object will scale and the box on the right is an animated visualisation on how the object will perform when the layout frame is modified.
The outer box on the left is where you set the "anchors" or what sides the object will lock on. Any side selected will make the object stick to that side when the screen dimensions change. The inner square has controls for stretching. When the object is locked on 2 sides and the screen changes its width then the object can be told to stretch with the screen. Its worth having a play with these settings and see the results from different configurations.
IBActions and IBOutlets
When you need to connect your code with an object in Interface Builder you use IBAction and IBOutlet. These keywords are a flag for Interface Builder to know that there is a property available to be connected with the controller. You then connect up the corresponding object with the action or outlet. An IBAction is how an object can communicate back to your code when an event happens, when a button is pressed you use an IBAction to call a method back in your controller. An IBOutlet is the inverse, how your controller can communicate with an object in Interface Builder and your view at any time.
Creating an IBOutlet is as easy as adding the flag when you define the object property in your controller.
@interface HelloInterfaceBuilderViewController : UIViewController {

	IBOutlet UILabel *myText;

}

@property (nonatomic, retain) IBOutlet UILabel *myText;
An IBAction is similar. When defining a method in the header file you add the IBAction flag as the return type.
@interface HelloInterfaceBuilderViewController : UIViewController {

	// ... IBOutlets and properties ...

}

- (IBAction)buttonPressed:(id)sender;
Connecting these is an easy task in Interface Builder.
When creating an IBAction: Click on the object in the window, hold control, drag to the "Files Owner" in the Document window, release the mouse and then control. Select the action to link to from the drop down provided.
When creating an IBOutlet: Click on the "Files Owner" in the Document window, hold control, drag from the "Files Owner" to the object in the window, release the mouse then control. Select the outlet from the drop down provided.
Pros and Cons of Interface Builder and XIBs
There is no solid yay or nay on this subject. The common consensus is that using Interface Builder and XIB's are no more intensive than building the objects in your controller. There are some side affects from going either way.
When using XIB's its easy to over indulge views with objects and not consider the memory consequences. In most cases its nothing much to worry about but in sensitive parts of an application, a UITableView is one of these sensitive areas, overloading the interface can cause the application to slow down. Remembering that every object in a view has its own memory allocation and is created when the view is loaded into the application is key.
XIB-less programming allows object allocation at the exact moment when the object is required and deallocation as soon as its not needed. This keeps the application light and responsive, as long as nothing leaks (forget to deallocate an object). But since this is all done within code there is no visual representation of whats created until the application is in the simulator. Interface Builder allows the view to be created interactively, a WYSIWYG editor. So as a result some of the XIB-less views can look robotic or bland because the developer hasn't finessed the design.
There is no definite decision. If one way feels better to you then that's completely fine. There are no noticeable performance differences between either in most cases.
Clarification: In the screencast it is mentioned that XIB's are converted from XML to an interface on the device at runtime. This is not the case. XIB's are compiled to a NIB when you build the application and used in the application as a NIB. The XIB file type was created to allow Source Code Management services, such as SVN and Git, to perform better with an XML based file (so diff's can be performed) rather than a compiled binary file.

Comments