Ever find yourself doing boring, repetitive tasks as a web developer? Today, I'm going to show you how you can cut those meta-tasks out of your development cycle with a little bit of automation. In this tutorial, you'll learn how to easily perform those repetitive tasks with Apache Ant.
Every few weeks, we revisit some of our reader's favorite posts from throughout the history of the site. This tutorial was first published in March of 2011.
Intro: What is Ant?
Ant makes it incredibly easy to define a set of tasks that you can then execute with a few commands.
Ant is a piece of software that was originally built for automating software builds. It’s made by Apache (yes, as in Apache server), and its primarily purpose is to build Java applications. When you’re building software (or, in our case, websites/apps), you do several tasks that are identical each time you build or publish or deploy your project. It’s a waste of your valuable time to do this manually. Ant makes it incredibly easy to define a set of tasks that you can then execute with a few short-and-sweet commands through the terminal.
Ready? Let’s Get started!
Step 0: Creating our Dummy Project
Before we get to Ant, we need to have a project to work with here. Here’s the index.html file I’m using:
<!DOCTYPE html>
<html lang="en">
<head>
<meta charset="UTF-8" />
<title>Dummy Project</title>
<link rel="stylesheet" href="css/reset.css" />
<link rel="stylesheet" href="css/grid.css" />
<link rel="stylesheet" href="css/custom.css" />
</head>
<body>
<div>
<h1> Demo Page </h1>
<p> There are three CSS files and three JavaScript files in this project.
<ul>
<li><a href="http://meyerweb.com/eric/tools/css/reset/">Eric Meyer's Reset</a></li>
<li><a href="http://www.blueprintcss.org/">Grid.css from the Blueprint CSS</a></li>
<li>A custom stylesheet</li>
</ul>
<ul>
<li> <a href="http://jquery.com">jQuery</a></li>
<li> <a href="http://javascript.crockford.com/tdop/index.html">Douglas Crockford's Top Down Operator Precedence files tokens.js and parse.js.</a></li>
</ul>
<p> All these files are uncompressed; that's the point of this tutorial, after all. </p>
</div>
<script src="js/jquery-latest.js"></script>
<script src="js/tokens.js"></script>
<script src="js/parse.js"></script>
</body>
</html>
As you can see, this explains the rest of the project. If you download the project (link at the top), you’ll get the CSS and JavaScript files.
So, what are we going to do with this project? As you can see, we’ve got multiple CSS and JavaScript files linked up in this project. What we’ll do is compile and compress each into its respective file and FTP it all up to a server. Before all of that, we’ll start by installing Ant.
Step 1: Installing Ant
Installing Ant can be a rather daunting task. Thankfully, both the Windows and Mac installation process is pretty similar. If you’re on Linux, I’m going to assume you either have Ant installed already, know how, or can figure it out without my hand-holding.
If you’re on a Mac, you probably already have Ant installed; however, some of the more advanced tasks (in our case, FTP) won’t work. So, we'll install the latest version.
Before we begin, I’ll point you to the full instructions that Apache offers: you can get them here. (Unfortunately, that’s the whole manual for Ant; I can’t do any better, as it’s done with frames. You’ll see the “Installing Apache Ant” link in the left frame.) What I tell you below can all be found in there (and more besides), but my version is a little more web-developer friendly.
First off, let’s make sure we have the right Java dependencies. Whether you’re on Windows or Mac, you’ll need the Java Development Kit (JDK) - at least version 1.4. You can download it here. If you’re not sure which version of the JDK you have, run the command java -version in the terminal / command line. As I understand it, the JDK version number is the same as the Java version number.
Now, let’s download the latest version of Ant. You can get it from the download page for the binary distribution (of course, you can get the source and compile it yourself, if that’s how you roll). You’ll find the links half-way down the page:

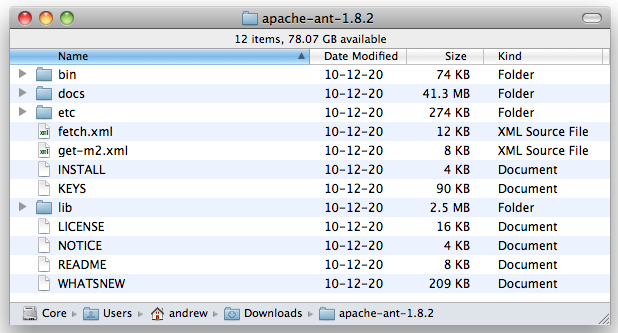
Once you’ve downloaded and unzipped it, we have to install it. This is what you’ll get:
The first part of the installation differs with your platform. Let’s start with the Windows steps:
Windows-Specific Install Bits
First, you’ll have to choose the folder in which you’d like to install Ant. I went with C:\ant, but it’s up to you. Create that folder, and move the bin, lib, and etc folders from your download folder to that folder. You’ll also want to move fetch.xml and get-m2.xml.
Once you’ve done that, you’ll have to setup some environmental variables. If you aren’t sure how to do this, you can find instructions here (Make these system variables—although, truthfully, it shouldn’t matter). This is what you’ll need to set up:
- You’ll need a variable called
ANT_HOME; this should point to the folder to which you moved the Ant components. Example:C:\ant. - You’ll need a variable called
JAVA_HOME; this might already be there, but if it’s not, it should point to the folder holding your Java install. Mine isC:\Program Files\Java\jdk1.6.0_18. - You’ll need to modify you’re
Pathvariable. This is a list of folders the command line searches through to find the commands you want to execute. DON’T overwrite this competely; just add;%ANT_HOME%\binto the end of it. Don’t miss that semicolon; that’s what separates the paths in the list. You might be able to guess that the%ANT_HOME%bit references the variable we made earlier.
Now, you’ve got Ant installed on Windows! There’s one more important step, though; so skip pver the Mac piece and keep following along.
Mac-Specific Install Bits
You’ve already got ant installed on your Mac; you can see this by running the command which ant on the terminal. This will output something along the lines of /usr/bin/ant, as the path to the Ant executable you use. However, if you actually go to that folder, you’ll find that it’s just a symlink to the real stuff.
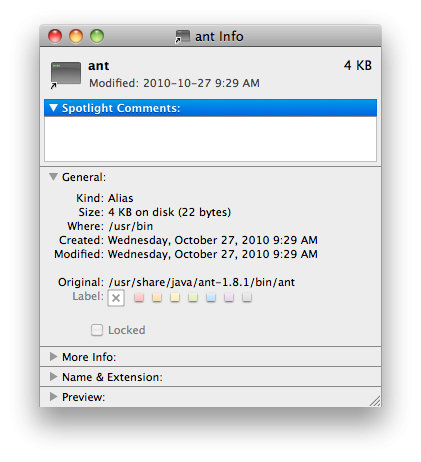
As you can see, for me it’s linked to /usr/share/java/ant-1.8.1/bin/ant. Now, you could use this, but when I tried to, I wasn’t able to use the FTP component. Rather than install Ant somewhere else and mess with the symlink, I chose to do this: move what was in the usr/share/java/ant-1.8.1 folder into a subfolder called _old and move the new stuff in. You’ll have to move the bin, lib, and etc folders, plus the fetch.xml and get-m2.xml files. Now, that symlink will point to the updated version of ant. If you run ant -version in the terminal, you should see that you’ve got version 1.8.2 (or whatever version is latest at the time you're reading this).
Back to All OS Instructions
There’s one more step to finish the installation. There are several optional components that don’t come with Ant, but that we’ll need for our project, and that you may want to use down the road. Let’s get them now.
You’ll start by opening a command line or terminal and changing to the directory that you’ve just installed Ant in. More importantly, it’s the directory you put the fetch.xml file in. Now, run this command:
ant -f fetch.xml -Ddest=system
This will download and install quite a few optional components; this isn’t one of those blink-and-it’s-over commands: it could take a few minutes.
Now, you’ve got Ant installed and ready to run; let’s get to work.
Step 2: Creating the build.xml File
Ant uses an XML file to store the tasks for the current project.
Ant uses an XML file to store the tasks for the current project; when you’re in that project’s directory on the command line, you’ll be able to run the command ant TASK_NAME_HERE, and it will find the appropriate task within the XML file and execute it.
If you’re not familiar with XML, don’t worry. XML stands for eXtensible Markup Language, and it’s very similar to HTML. It uses tags and attributes to define data. Actually, it’s more similar to XHTML (RIP), in that the rules are strict: all tags and attributes must be lowercase, values are quoted, a doctype is required, etc. Don’t worry though, you’ll get the hang of it.
The XML file that Ant looks for by default should be named build.xml; you’ll want to put it in your project folder.
So what exactly is going in the XML file? Here’s a start:
<?xml version="1.0"?>
<project name="Compress, Concatenate, and FTP CSS and JS" default="initialize">

</project>
Looks like HTML, eh? The first line is an XML doctype. Next, we have the root node, which is a project. I’ve added two attributes to it: a name, which just explains what our list of tasks will do; and a default, which defines the default task to run.
See, here’s how the default task idea works. Let’s say we create a task called call_mom. We could run that from the terminal by doing this:
ant call_mom
If you find that most of the time you run Ant on a project, you’re calling the same task, you’ll want to make it the default. In our case, we’ve set initialize as the default task, the one that will run if we don’t tell ant to run anything.
ant initialize
ant
These are both the same.
Now that we’ve got our build.xml file, let’s create our first task.
Step 3: Writing our First Task
Tasks are called targets within the build.xml file. Check this out:
<target name="call_mom">
    <echo> Hi Mom! </echo>
</target>
Plug this into your build.xml file and run ant call_mom on the console. You should output that looks something like this:
Buildfile: /path/to/your/build.xml

call_mom:
     [echo]  Hi Mom!

BUILD SUCCESSFUL
Total time: 0 seconds
In its output, Ant will have an entry for all the tasks that are run. Then, any output from those tasks will be displayed, tabbed in under the appropriate task name. As you can see, we’ve called the echo task, which prints out whatever we put inside it.
But how did I know echo was a task? Well, you can get a list of the built-in tasks here in the documentation. This is a good time to point out that many tasks have several ways they can be called. For example, we could also have done:
Now that you’re starting to warm into the ideas of Ant, let’s talk about properties.
Step 4: Creating a Properties Files
Ant has properties, which are very like variables in a programming language.
As you use Ant more, you might find that you have a boilerplate build.xml file that you only tweak slightly. One of these tweaks might be file/folder names. Ant has properties, which are very like variables in a programming language. You can create them this way (this is done inside a task).
<property name="js_dir" value="js" />
<!-- or -->
<property name="css_dir">stylesheets</property>
You can also move all these properties out into a separate file, and import the file. That’s what we’ll do here. This brings us to creating our first (real) task:
<target name="get_properties">
    <property file="ant.properties" />
    <echo>Imported Properties</echo>
</target>
We’ve called our task get_properties. It involves two actions: first, we use the property task to import the file (we can do that with the file attribute). Then, we echo a message saying that it was successful. It’s that simple.
Of course, we’ll need to create the ant.properties file. This is super-simple; here’s the one we’ll use today:
css_dir = css
js_dir = js
assets_dir = assets
You might think this actually makes it harder, because our variables names are longer than the values themselves. Well, that’s true, but it gives us some flexibility in the use of our build.xml file, makes it more reusable and more shareable.
Step 5: Creating Some More Tasks
Okay, now let’s get serious. We’ve obviously got quite a few more tasks to create before we have a useful build.xml file.
Here’s a list of the tasks we need to create:
- One to compile the CSS files.
- One to compress the CSS file.
- One to compile the JavaScript files.
- One to compress the JavaScript file.
- One to upload everything to our server.
- One to initialize the other tasks.
- One to clean up what the others do.
We’re going to use a few different tactics to do all this, to give to a good overview of how Ant works.
Compiling the CSS and JavaScript
Let’s start with the compiling tasks; these take a set of files and concatenate them all into one file. Ant has a built-in task named concat that does this.
<target name="concat_css">
    <concat destfile="${assets_dir}/style.css">
        <filelist id="files" dir="${css_dir}">
            <file name="reset.css" />
            <file name="grid.css" />
            <file name="custom.css" />
        </filelist>
    </concat>
</target>
I’ve named this task concat_css. Inside, we’re only running the concat task. As you can see, the file they will be concatenated into (destfile, or destination file) will be in assets/style.css. You’ll notice that I’m use the assets_dir properties, which will substitute the correct value in. You must wrap usages of properties in the dollar-sign-and-braces notation.
Inside the concat task, we define a filelist This is just one of the ways that we can grab a bunch of files. I’m using it here because it allows me to define the order I’d like these files concatenated. I’m giving it an id, which gives us access to the file set in the same way we’d use a parameter (although we won’t be doing that). It also has the attribute dir, which tells the task which folder to find the files in. Then, inside, just define the appropriate file nodes, with their name attribute holding the filename.
There’s your first real task! Hopefully, it makes sense. While we’re at it, the JavaScript one isn’t too different:
<target name="concat_js">
    <concat destfile="${assets_dir}/script.js">
        <filelist id="files" dir="${js_dir}">
            <file name="jquery-latest.js" />
            <file name="tokens.js" />
            <file name="parse.js" />
        </filelist>
    </concat>
</target>
Compressing the CSS and JavaScript
Compression gets a bit trickier, because it’s not built into Ant. However, Ant supports outside tasks via java .jar files. This is incredibly handy for us, because YUI Compressor is available as a .jar file (that’s the only way it’s available). You can download it on the YUI Library download page. You’ll want to save it to a smart location, and maybe rename it. I’ve saved it to MY_USER_FOLDER/bin/yui.jar. Do what pleases you.
Now, YUI Compressor will compress both JavaScript and CSS. What we can do here is create one compress task, and then call it from two more specific tasks. We can do this because Ant has support for calling other tasks and passing in parameters. Let’s see how this works:
<target name="compress">
    <java jar="/Users/andrew/bin/yui.jar" fork="true">
        <arg value="${file}" />
        <arg value="-o" />
        <arg value="${file}" />
    </java>
    <echo>${file}</echo>
</target>
We’re using the java command here. This is very similar to running the jar file from the command line. The jar attribute points to the jar file. If the fork attribute is true, the jar will be run in a Java virtual machine separate from the one Ant is running on. Then, inside the java node, we define the arguments. On the command line, we would pass in input.file -o output.file. So, we do the same thing here.
But, where’s the file property coming from? From here:
<target name="compress_css" depends="concat_css">
    <antcall target="compress">
        <param name="file" value="${assets_dir}/style.css" />
    </antcall>
</target>
This is our CSS compression task. First, notice that the target node has a second attribute: depends. You can probably guess that this means that the compress_css tasks depends on the concat_css task, so it must be run first. This way, we can call compress_css and it will automatically call concat_css first.
Now, what’s going on inside? We’re executing an antcall task, which simply calls another task within our build.xml file—in this case, that’s our compress task. Inside that, we can create as many parameters as we need to, each having a name and a value. Yep, this is very much like calling a function. This is the file parameter that we use within our compress task.
And here’s the JavaScript version:
<target name="compress_js" depends="concat_js">
    <antcall target="compress">
        <param name="file" value="${assets_dir}/script.js" />
    </antcall>
</target>
Don’t forget, this one is dependant on concat_js.
Getting the Ball Rolling
Way back at the top—on our root project node—we set the default task as initialize. We haven’t created that task yet, so let’s do it now.
<target name="initialize" depends="get_properties,clean_up">
    <mkdir dir="${assets_dir}" />
    <antcall target="compress_css" />
    <antcall target="compress_js"  />
    <echo>Done!</echo>
</target>
This task depends on two other tasks (one of which we haven’t created yet); we just use a comma separated list to require multiple tasks.
Inside, the first task is to create our assets directory, with the mkdir task (just like on the command line). Next, we make two antcalls, one to compress the CSS, and one to compress the JavaScript. Remember, these two tasks depend on their respective concatenation functions, so they will call those. Finally, we’ll echo a message letting the user know that we’re done.
Cleaning Up
What about that clean_up task that initialize depends on? It’s pretty simple:
<target name="clean_up" depends="get_properties">
    <delete dir="${assets_dir}" />
</target>
It merely deletes the assets directory. This isn’t completely necessary, but you might find it useful.
Uploading the Project
Let’s create one more task; we want to upload our project to a server. Thanks to the ftp command, this is a cinch.
<target name="upload_files" depends="initialize">
    <ftp server="your_server.com"
         userid="your_user_name"
         password="your_password"
         port="21"
         remotedir="/public_html"
         passive="yes"
         binary="no">
        <fileset dir=".">
            <include name="assets/*"   />
            <include name="index.html" />
        </fileset>
    </ftp>
</target>
We’re calling this task upload_files, and it depends on initialize. We’re using the FTP task here. As you can see, all the important info is stored in the attributes. If you’ve worked with FTP clients before, all these options should be familiar.
- Inside the
ftpnode, we've created a collection of files that we want to upload. In this case, we’re using afilesetelement. - We have a
dirattribute on thefilsetnode that defines the root directory for what we want to collect. - Then, inside, we use the
includenode to get the specific files: we just pass as the name attribute the file(s) we want to get. In our example, we’re getting everything the assets directory and its contents, and the index.html file.
Once you fill in your server information in this task, it should upload those files for you!
Notice how we’ve arranged these tasks, though. If we run ant on the command line, we’re concatenate and compress the CSS and JavaScript, but we won’t upload it; that’s not the default. If we want to upload it, we can run ant upload_files; since that depends on initialize, we don’t have to call initialize first. Of course, we can call any individual task we’d like (for example: ant compress_js).
Conclusion: Wrapping It Up
Before we close, there are a few odds and ends I’d like to mention:
- Notice that I didn’t use the
dependstask to daisy-chain tasks together. You could do that, but I’ve chosen to keep that to actual dependant tasks, and create theinitializetask to call the others. This just seems more correct semantically. - What I’ve shown you is just a small sliver of what Ant is capable of. If you want to learn more, start by checking out the tasks overview. This will show you all the built-in tasks. You’ll also realize that there are many ways to do the same this (as I showed you with the
echotask). The patterns I’ve used are by no means the “one right way.” Also, the Ant Wiki is a great resource. - It might be nice if we could have a task that will parse the HTML, find the stylesheets and scripts, and get them in the correct order. Unfortunately—since Ant wasn’t written for web developers—that’s not built in. We’d have to create an antlib (an extension), and that would be written in Java. For now, we’ll have to hard-code out lists of stylesheets and scripts.
And that’s a wrap! I hope you’ve learned some new techniques that will save you time in the future. If you have any questions, feel free to post them below! Thank you so much for reading!

Comments