Android applications are commonly broken down into functional areas where each is tied to an Activity class which dictates the display and behavior of a specific screen. Sometimes you want to conditionally inform the user about something or prompt them for specific input, but you don’t want to display that information on the screen itself. Here, you’ve got two basic choices: you can launch a child Activity class for a specific result, and then return to your original Activity, or you can use a handy feature available to Activity classes: dialogs.
Today we’re going to talk about dialogs, what they can be used for, and how they are created and used. We will then go through the steps of implementing a basic dialog within an Activity class from start to finish. We will follow up this tutorial with some QuickTut recipes for different types of dialogs you might want to use in your typical Android apps. But first you need to understand the lifecycle of an Activity dialog.
What is a Dialog?
The Android Dialog class (android.app.Dialog) is the base class for all types of dialog controls that you can use within your Activity classes. Dialogs live within the lifecycle of your Activity (android.app.Activity). They pop up in the foreground, blocking your Activity screen, to catch the user’s attention for a variety of reasons.
Note about future-proofing your apps and building Fragment-aware applications: This tutorial will use the traditional method for managing basic Dialogs within a simple Activity. A few of these methods were recently deprecated. The Android SDK documentation is now recommending that if you want to use Dialogs, you should install the compatibility library and use the DialogFragment class instead. Once you have mastered the basics of the Dialog lifecycle you’ll also want to check out DialogFragment class (android.app.DialogFragment) as well. However, that approach is beyond the scope of this basic dialog discussion as it requires you to install and use the compatibility library in order to support Dialogs in older versions of the Android SDK (we will cover this in a future tutorial). While the methods we discuss here are listed as deprecated, the new way of doing dialogs wasn't introduced until Honeycomb, so this solution will continue to work just fine on all devices.
What are Dialogs Used For?
Dialogs are useful when you want to:
- Inform the user of some event or progress (e.g. “You have mail!” Or “Downloading Message 1 of 200,000”)
- Force the user to confirm an action (e.g. “Are you sure you want to delete all your contacts? Really sure?”)
- Prompt the user for further information and collect it (e.g. “Please enter your username and password.”)
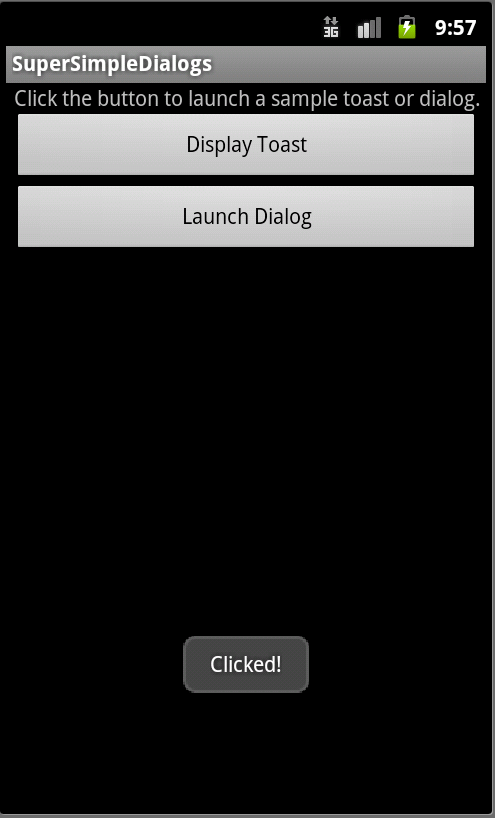
A Note on Toast Messages: Some developers also use Toast messages (android.widget.Toast) for sending simple notifications or messages to the user. A Toast message displays over your Activity screen for a few seconds and then disappears automatically. The user has no chance to interact with a Toast message. We like to think that the dividing line between when to use a Toast over a Dialog is as follows: if the user is being informed of non-essential information, use a Toast, but when the information being presented is vital, use a Dialog. We use Toasts as very lightweight, informational notifications. Any information you want to ensure the user acknowledges should be displayed using a Dialog that requires their active participation to dismiss.
A Toast message example is shown below:
How are Dialogs Structured?
Dialogs have a number of different components, most of which are optional. A basic Dialog has:
- A title
- A message
- Buttons to collect user responses (e.g. Yes, No, Cancel, etc.)
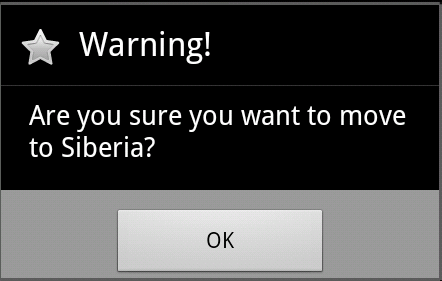
A common Dialog configuration is shown below:
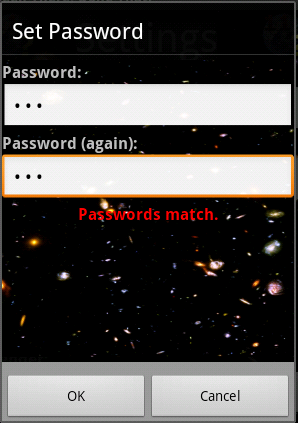
You can also create custom Dialog controls, where you control the layout within the Dialog area. You can build sophisticated Dialogs this way, including those that take input from the user using other Android controls like EditText, Spinner, and more.
A custom Dialog configuration:
What is the Dialog’s LifeCycle?
Now let’s talk about how Dialogs are managed by your Activity class. We’ll start with the basic facts:
- A Dialog belongs to an Activity and is managed by that Activity.
- An Activity can have one or more Dialogs. Each Dialog has its own unique identifier.
- An Activity keeps a pool of Dialogs.
- By default, a Dialog will be reused if asked to display again.
- An Activity can display a specific Dialog by its identifier using the showDialog() method.
- An Activity can stop displaying a specific Dialog by its identifier using the dismissDialog() method. This Dialog will remain in the Activity’s pool to be used again, if necessary.
- An Activity can remove a specific Dialog from its pool by its Dialog identifier using the removeDialog() method. If this Dialog is displayed again, it must be created from scratch.
So how do you create a basic Dialog for your Activity class? You simply define, create, and initialize it as part of your Activity. Let’s look at a simple example.
Step 0: Getting Started with Basic Dialogs
Begin by creating a simple Android application with a working Button control. We will be modifying this sample application to cause a Button click to trigger a very straightforward Dialog to display on the screen. You can either create this application from scratch, or follow along in the sample source code we provide for review.
Step 1: Defining New Dialogs within Your Activity Class
Now let’s add three new Dialogs to your basic Activity class.
Edit your Activity Java class and add the following member variables:
private static final int MY_SUPER_SIMPLE_DIALOG_ID = 0;
private static final int MY_SIMPLE_DIALOG_ID = 1;
private static final int MY_DIALOG_ID = 2;
This defines three unique Dialog identifiers for our Activity class. The values are arbitrary, but need to be unique within the Activity.
Step 2: Creating Dialogs
To create Dialog instances, you must implement the onCreateDialog() method of your Activity class. When the showDialog() method is called, it triggers a call to this method, which must return the appropriate Dialog instance. Since we are going to have three different Dialogs in our class, we will need to check the incoming Dialog identifier, and use a switch to return the Dialog of the appropriate kind.
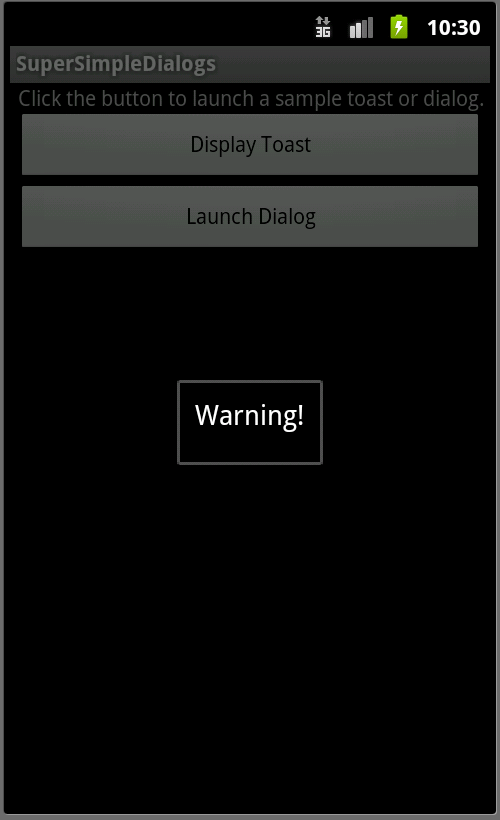
A simplest of Dialog controls (MY_SUPER_SIMPLE_DIALOG_ID), as shown in Figure 4, simply shows a text title. It has no buttons. The only way to dismiss it is to hit the Back button. You don’t see this kind of Dialog very often, since most have at least an OK button to dismiss it. This Dialog can be created by instantiating the Dialog class, and setting the title of the Dialog using the setTitle() method.
A most common of Dialog controls (MY_ SIMPLE_DIALOG_ID), shown below, shows a text title with an icon and a message. It has a single button - OK. This is an AlertDialog, which can be easily created using the AlertDialog.Builder class. In this case, you use the setTitle(), setMessage(), setIcon(), and setPositiveButton() methods to configure the button as desired.
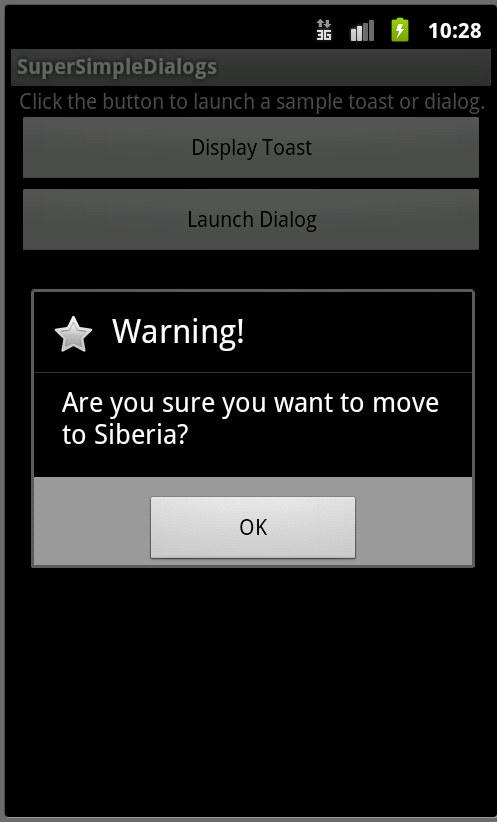
Another common Dialog controls (MY_DIALOG_ID), shown in the next figure, shows a text title with an icon and a configurable message. It has two buttons – OK and Cancel. This is another AlertDialog, which can be created using the AlertDialog.Builder class. In this case, you use the setTitle(), setMessage(), setIcon, setPositiveButton(), and setNegativeButton() methods to configure the button as desired.

The complete implementation of the onCreateDialog() method, which shows the creation of all three of the Dialog types discussed above, is shown here:
@Override
protected Dialog onCreateDialog(int id) {
	switch (id) {
	case MY_SUPER_SIMPLE_DIALOG_ID:
		Dialog superSimpleDlg = new Dialog(this);
		superSimpleDlg.setTitle(R.string.dialog_title);
		return superSimpleDlg;

	case MY_SIMPLE_DIALOG_ID:
		AlertDialog.Builder builder = new AlertDialog.Builder(this);
		builder.setTitle(R.string.dialog_title);
		builder.setMessage(R.string.dialog_message);
		builder.setIcon(android.R.drawable.btn_star);
builder.setPositiveButton(android.R.string.ok, new
DialogInterface.OnClickListener() {
			      public void onClick(DialogInterface dialog, int which) {
			    		Toast.makeText(getApplicationContext(),
"Clicked OK!", Toast.LENGTH_SHORT).show();
			    	  return;
			    } });
		return builder.create();

	case MY_DIALOG_ID:
		AlertDialog.Builder builder2 = new AlertDialog.Builder(this);
		builder2.setTitle(R.string.dialog_title);
		builder2.setIcon(android.R.drawable.btn_star);
		builder2.setMessage("");
		builder2.setPositiveButton(android.R.string.ok, new
DialogInterface.OnClickListener() {
			      public void onClick(DialogInterface dialog, int which) {
			    		Toast.makeText(getApplicationContext(),
"Clicked OK!", Toast.LENGTH_SHORT).show();
			    	  return;
			    } });

		builder2.setNegativeButton(android.R.string.cancel, new
DialogInterface.OnClickListener() {
			      public void onClick(DialogInterface dialog, int which) {
			    		Toast.makeText(getApplicationContext(),
"Clicked Cancel!", Toast.LENGTH_SHORT).show();
			    	  return;
			    } });

		return builder2.create();
	}
	return null;
}
Step 3: Initializing Dialogs
Recall that an Activity keeps Dialogs around and reuses them whenever they are shown. Some dialogs, like our first two examples (MY_SUPER_SIMPLE_DIALOG_ID and MY _SIMPLE_DIALOG_ID), have static contents, so showing them over and over again is not an issue. You can do all your Dialog configuration in the onCreateDialog() method in this case.
However, our third Dialog example (MY_DIALOG_ID) has a configurable message that must be updated each time the Dialog is shown to display the current date and time that the Dialog was requested. If you configured the message for this Dialog in the onCreateDialog() method, it would always show that time.
Each time a Dialog is requested, you get a chance to update its contents using the onPrepareDialog() method. We can use this opportunity to update the message of our Dialog with new contents.
@Override
protected void onPrepareDialog(int id, Dialog dialog) {
	super.onPrepareDialog(id, dialog);
	switch (id) {
	case MY_SUPER_SIMPLE_DIALOG_ID:
		// Static dialog contents. No initialization needed
		break;
	case MY_SIMPLE_DIALOG_ID:
		// Static dialog contents. No initialization needed
		break;
	case MY_DIALOG_ID:
		// Some initialization needed.
       	  	AlertDialog myDialog = (AlertDialog) dialog;
        		SimpleDateFormat dFormat = new SimpleDateFormat(
"yyyy-MM-dd HH:mm:ss",
			Locale.getDefault());
        		myDialog.setMessage("This dialog was launched at " +
			dFormat.format(mCurrentTime));
		break;
	}
	return;
}
Note that mCurrentTime is a member variable we set each and every time the Dialog is triggered. See the complete source code for the full example of how this works.
Step 4: Triggering Dialogs to Display
Finally, you are ready to trigger your Dialog controls to display as required. For our very simple test application, we use a single button tap to trigger the launch of one of the three Dialogs we have created, depending on the current time. The click handler for our Button control, as defined in the Activity class, looks like this:
public void onDialogButtonClick(View v) {

	Date dt = new Date(); // Gets the current date/time
	if (dt.getSeconds() % 3 == 0) {
		showDialog(MY_SUPER_SIMPLE_DIALOG_ID);
	} else if (dt.getSeconds() % 3 == 1) {
		showDialog(MY_SIMPLE_DIALOG_ID);
	} else {
		mCurrentTime = dt;
		showDialog(MY_DIALOG_ID);
	}
}
That’s all you need to trigger dialogs in your Activity class. Click on the Button a couple of times to see the different types of Dialog controls you’ve defined.
Conclusion
Dialogs are a powerful user interface tool that can help you keep your application user interface flexible and uncluttered. You can customize Dialog controls in numerous ways to inform users, prompt users, and collect more input. Understanding the Dialog lifecycle is important, as they are pooled and reused by their parent Activity.
About the Authors
Mobile developers Lauren Darcey and Shane Conder have coauthored several books on Android development: an in-depth programming book entitled Android Wireless Application Development, Second Edition and Sams Teach Yourself Android Application Development in 24 Hours, Second Edition. When not writing, they spend their time developing mobile software at their company and providing consulting services. They can be reached at via email to [email protected], via their blog at androidbook.blogspot.com, and on Twitter @androidwireless.
Need More Help Writing Android Apps? Check out our Latest Books and Resources!


Comments