In this quick tutorial you'll learn how to create basic Android radio selection controls using RadioGroup and RadioButton. You'll also learn how to react when the user selects a specific radio option, as well as how to populate radio controls in different ways.
This quick tip shows you the steps to create simple radio button selection controls in your Android applications. First, you learn how to configure RadioGroup and RadioButton controls in your layout files. Next, you learn how to handle RadioButton selections from the user. Finally, we discuss how to perform the same tasks programmatically instead of in layout files.
Step 1: Create an Android Application
Begin by creating an Android project. Implement your Android application as normal. Once you have a project set up and the application running, decide under what screen you want to add RadioButton controls to. Perhaps you’ve simply created a new Android project with its default Activity and layout (main.xml). This will work for this tutorial. Once you have gotten your Android project set up, you are ready to proceed with this quick tip.
You can follow along with our project: SimpleRadioButton, which is available as an open source project.
Step 2: Working with RadioGroup Controls
The Android SDK includes two radio controls for use together to make a group of radio button controls where only one control can be chosen at a given time. The RadioGroup control (android.widget.RadioGroup) is used to encapsulate a set of RadioButton controls for this purpose.
A RadioGroup control is simply a container for RadioButton controls, but it does have some useful properties. For example, you can have horizontal and vertical radio button groups. This is set using the the android:orientation attribute, much as you would a LinearLayout.
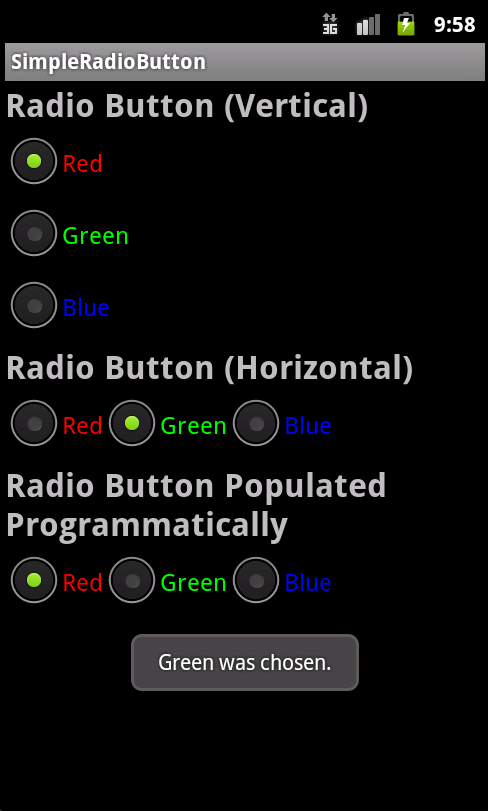
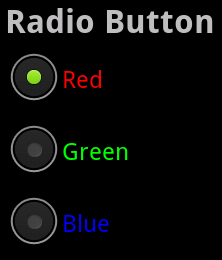
Here is an example of a vertical RadioGroup control with three RadioButton controls.
Another interesting attribute you might use is the androidCheckedButton attribute. You can use this attribute to set the View identifier of the RadioButton child control you want checked by default using this attribute.
Step 3: Working with RadioButton Controls
Once you have configured your RadioGroup Control, you need to add some child controls to it. Specifically, you need to add RadioGroup controls (android.widget.RadioButton). A RadioButton control has many attributes you will find familiar to TextView and Button controls, which we have talked about in previous tutorials.
The typical attributes of a RadioButton are:
- The android:id attribute should be used to uniquely identify the RadioButton control within the RadioGroup
- The android:text attribute should be used to specify the text associated with that selection. Typical text attributes like color, size and style can be set as well.
- The android:onClick attribute should be used to specify the click handler when this RadioButton within the RadioGroup is selected.
Here is an example XML layout of a vertical RadioGroup control with three RadioButton controls. Each RadioButton control is using a different string resource, but they all share the same click handler.
    <RadioGroup
        android:layout_width="fill_parent"
        android:layout_height="wrap_content"
        android:orientation="vertical"
        android:id="@+id/radio_group1">
        <RadioButton
            android:id="@+id/radio_right1"
            android:layout_width="wrap_content"
            android:layout_height="wrap_content"
            android:text="@string/rad_option1"
            android:checked="true"
            android:textColor="#f00"/>
        <RadioButton
            android:id="@+id/radio_left1"
            android:layout_width="wrap_content"
            android:layout_height="wrap_content"
            android:text="@string/rad_option2"
            android:textColor="#0f0" />
        <RadioButton
            android:id="@+id/radio_ambi1"
            android:layout_width="wrap_content"
            android:layout_height="wrap_content"
            android:text="@string/rad_option3"
            android:textColor="#00f" />
    </RadioGroup>
Step 4: Handling Clicks – The Layout Attribute Method
For now, if you launch this application, the radio button controls are displayed, but nothing happens if you click on them. Now it’s time to handle clicks on the controls. There are several ways to do this.
Let’s start with the easy way. RadioButton controls have a property called onClick (shown as "On Click" in the properties pane). You set the name of the method that will handle the click with this property, and then implement that method within your Activity. For example, you could set the property of your RadioButton control to onRadioButtonClick. In XML, this property would appear as:
android:onClick="onRadioButtonClick"
Then, in your Activity class, you need to implement this method. It should be a public void method with a single parameter, a View object. For example, the following button click handler generates a Toast message on the screen when the RadioButton control is clicked:
public void onRadioButtonClick(View v) {
    RadioButton button = (RadioButton) v;
    Toast.makeText(SimpleRadioButtonActivity.this,
        button.getText() + " was chosen.",
        Toast.LENGTH_SHORT).show();
}
When you click on the RadioButton control, the onRadioButtonClick() method is called, displaying the Toast message on the screen.
Step 5: Implementing RadioButtons Programmatically
Let’s say you want to populate a RadioGroup with selections from a database, or some other reason that necessitates doing so programmatically instead of using a layout file. We recommend you still include an empty RadioGroup control in your layout file, for design purposes. Make sure it has a unique identifier associated with it so it can be accessed programmatically.
Let’s create a very similar radio control to that shown in Figure 2, only let’s do so programmatically and use the default RadioGroup orientation, horizontal. In your Activity class (for example, in your onCreate() method), create and add RadioButton controls, like this:
RadioGroup rGroup3 = (RadioGroup) findViewById(R.id.radio_group3);

OnClickListener radio_listener = new OnClickListener() {
    public void onClick(View v) {
        onRadioButtonClick(v);
    }
};

RadioButton button1 = new RadioButton(this);
button1.setText(R.string.rad_option1);
button1.setTextColor(Color.RED);
button1.setOnClickListener(radio_listener);
rGroup3.addView(button1);

RadioButton button2 = new RadioButton(this);
button2.setText(R.string.rad_option2);
button2.setTextColor(Color.GREEN);
button2.setOnClickListener(radio_listener);
rGroup3.addView(button2);

RadioButton button3 = new RadioButton(this);
button3.setText(R.string.rad_option3);
button3.setTextColor(Color.BLUE);
button3.setOnClickListener(radio_listener);
rGroup3.addView(button3);

rGroup3.check(button1.getId());
First, we find the empty RadioGroup which was defined in our layout file (see the source code for details if you need more information). Then we create three RadioButton controls, set their text, text color, and onClickListener attributes programmatically. Finally, we add each to the RadioGroup parent control and set the red RadioButton to be checked by default using the check() method of the RadioGroup class.
Conclusion
RadioGroup and RadioButton controls are commonly used in Android application user interfaces to give the user a short set of options, only one of which can be selected at a given time. In this quick tip you learned how to create radio controls in layout files as well as programmatically. You also learned that radio controls need not be boring, but can be styled in many ways.
About the Authors
Mobile developers Lauren Darcey and Shane Conder have coauthored several books on Android development: an in-depth programming book entitled Android Wireless Application Development, Second Edition and Sams Teach Yourself Android Application Development in 24 Hours, Second Edition. When not writing, they spend their time developing mobile software at their company and providing consulting services. They can be reached at via email to [email protected], via their blog at androidbook.blogspot.com, and on Twitter @androidwireless.
Need More Help Writing Android Apps? Check out our Latest Books and Resources!


Comments