The ListView is one of the most useful view controls available on the Android platform for the display of variable amounts of data. In this Mobiletuts+ tutorial, we'll show you how to use a ListView to browse a list of articles!
Over the last several months, you've seen many tutorials covering various layout controls. You'll use several of these in conjunction with a ListView in today’s tutorial. The application itself will be very simple: it will display a list of article titles which, when clicked, display the article's content. The pacing of this tutorial is going to be faster than some of our beginning tutorials; you may have to review some of our other tutorials on this site or even in the Android API reference if you are unfamiliar with basic Android controls or concepts. The final open-source code is available for download on Google code hosting.
Step 0: Creating a Project
Create a new Android project in Eclipse. We've named ours MT-List, with a starting activity named TutListActivity. This Activity must extend the ListActivity class, which is a special Activity class that helps manage a ListView control. We're using a target API Level of 10 (Android 2.3.3).
Step 1: Designing the List Screen
Actually, there is very little design work here. A ListView control consists of repeating items, each with the same layout (a template for an item). We want to display a list of article titles. Each title will be a single item in the ListView. Therefore, the template for each list item need only have a TextView control. Add a new layout resource file to your project named list_item.xml which represents the template layout for each item in the list. In this case, it should look like this:
<?xml version="1.0" encoding="utf-8"?>
<TextView
    xmlns:android="http://schemas.android.com/apk/res/android"
    android:layout_width="fill_parent"
    android:layout_height="wrap_content"
    android:textSize="24dp"
    android:padding="6dp" />
The text size plus the padding attributes ensure that each list item is a big enough touch target for the average human finger on an average sized screen..
Step 2: Populating the ListView with Data
ListView controls are design to load data from a data source. An adapter can be used to read from a database, array, or other data source. We’ll use an array implementation for this application. Later on, you could always replace the array with some sort of live data source. Create two string-array resources in your project (you can add them to strings.xml or a separate arrays.xml file, your choice). Name one array "tut_titles" and the other "tut_links". Fill in the arrays with valid titles and valid URLs from the Mobiletuts+ website. Here are our arrays:
<string-array name="tut_titles">
<item>Design & Build a 1980s iOS Phone App: Design Comp Slicing</item>
<item>Best of Tuts+ in February 2011</item>
<item>Create a Brick Breaker Game with the Corona SDK: Game Controls</item>
<item>Exporting Graphics for Mobile Apps: PNG or JPEG?</item>
<item>Android Tablet Design</item>
<item>Build a Titanium Mobile Pizza Ordering App: Order Form Setup</item>
<item>Create a Brick Breaker Game with the Corona SDK: Application Setup</item>
<item>Android Tablet Virtual Device Configurations</item>
<item>Build a Titanium Mobile Pizza Ordering App: Topping Selection</item>
<item>Design & Build a 1980s iOS Phone App: Interface Builder Setup</item>
</string-array>
<string-array name="tut_links">
<item>http://mobile.tutsplus.com/tutorials/mobile-design-tutorials/80s-phone-app-slicing/</item>
<item>http://mobile.tutsplus.com/articles/news/best-of-tuts-in-february-2011/</item>
<item>http://mobile.tutsplus.com/tutorials/corona/create-a-brick-breaker-game-with-the-corona-sdk-game-controls/</item>
<item>http://mobile.tutsplus.com/tutorials/mobile-design-tutorials/mobile-design_png-or-jpg/</item>
<item>http://mobile.tutsplus.com/tutorials/android/android-tablet-design/</item>
<item>http://mobile.tutsplus.com/tutorials/appcelerator/build-a-titanium-mobile-pizza-ordering-app-order-form-setup/</item>
<item>http://mobile.tutsplus.com/tutorials/corona/corona-sdk_brick-breaker/</item>
<item>http://mobile.tutsplus.com/tutorials/android/android-sdk_tablet_virtual-device-configuration/</item>
<item>http://mobile.tutsplus.com/tutorials/appcelerator/pizza-ordering-app-part-2/</item>
<item>http://mobile.tutsplus.com/tutorials/iphone/1980s-phone-app_interface-builder-setup/</item>
</string-array>
This data is, of course, static. In some cases, using static data can make sense for a ListView. Using a string array resource for these cases turns out to be very easy and convenient. Just make sure the ordering of the titles and their links is identical, such that the array indices match.
Step 3: Adapting the Data to the ListView
Now that the application has data, it's time to display it. Back in TutListActivity.java, modify the onCreate() method to use the setListAdapter() method to load up the data. Unlike regular activities, a ListActivity does not need the use of setContentView() for cases where the entire activity is just a ListView. When done, your entire ListActivity will now look like this:
public class TutListActivity extends ListActivity {
    @Override
    public void onCreate(Bundle savedInstanceState) {
        super.onCreate(savedInstanceState);

        setListAdapter(ArrayAdapter.createFromResource(getApplicationContext(),
                R.array.tut_titles, R.layout.list_item));
    }
}
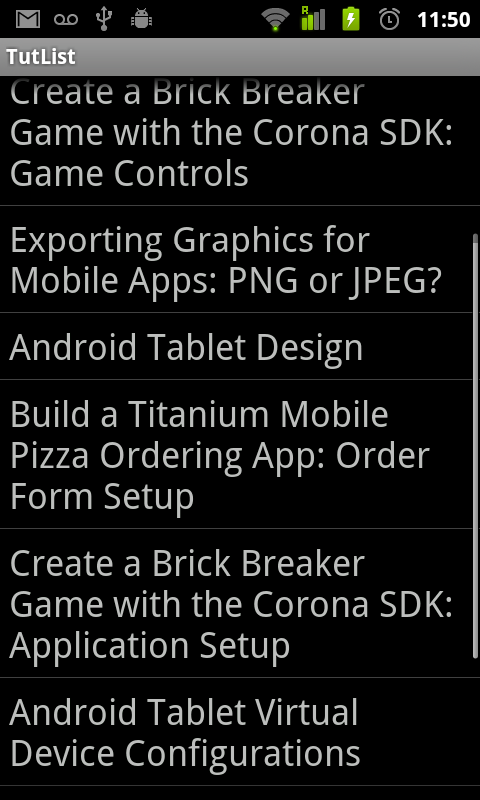
At this point, you can run the application. You'll now see a ListView with all of the titles of the tutorials. Scrolling up and down works as expected. However, clicking a title does not do anything yet.
Step 4: Handling ListView Item Clicks
Handling clicks on items within a ListView is done in a similar way to other View objects: by using a listener. In this case, we’re interested in the OnTimeClickListener. You might have noticed that we haven't once dealt with the ListView object directly. Now is the time. In a ListActivity, simply make a call to the getListView() method to retrieve the ListView and then call the setOnItemClickListener() method and implement it all in one go:
getListView().setOnItemClickListener(new OnItemClickListener() {

    @Override
    public void onItemClick(AdapterView<?> parent, View view,
            int position, long id) {
        // TBD
    }
});
The onItemClick() method will be called each time the user clicks on a particular item within the ListView. Conveniently, it passes in several useful parameters, one of which we'll need for launching the viewer activity. Wait, what viewer activity?
Step 5: Creating the Viewer Activity
Good question. Let's create a viewer activity now! This activity will be used to display the tutorial contents to the user. Create a new class by extending Activity and name it TutViewerActivity.java. Create a layout resource file for it that has exactly one item: a WebView control. The layout file should look like this:
<?xml version="1.0" encoding="utf-8"?>
<WebView
    xmlns:android="http://schemas.android.com/apk/res/android"
    android:layout_width="match_parent"
    android:layout_height="match_parent"
    android:id="@+id/tutView">
</WebView>
Within the onCreate() method of the TutViewerActivity class, call the setContentView() method and pass in this layout. Finally, don't forget to add the activity to your AndroidManifest.xml file.
Step 6: Launching the Details Activity
Switch your attention back to TutListActivity for a moment. Let's look at what we need to do to launch the viewer Activity with the appropriate article link. Inside the onItemClick() method, the position of the item that was clicked is passed in as an int type value. This is exactly what we need for accessing the array of article links.
The string values within the links array are URLs. A convenient way to pass a URL to another activity is by adding a Uri to the Intent via the setData() method. Here is the final onItemClick() implementation which starts the viewer activity, passing in the appropriate URL:
@Override
public void onItemClick(AdapterView<?> parent, View view,
        int position, long id) {
    String content = links[position];
    Intent showContent = new Intent(getApplicationContext(),
            TutViewerActivity.class);
    showContent.setData(Uri.parse(content));
    startActivity(showContent);
}
If you just paste that at the end of the onCreate() method, you'll notice that the links variable isn't defined yet. Since it'll be used within the OnItemClickListener class, the variable must be a final value, like so:
final String[] links = getResources().getStringArray(R.array.tut_links);
This line must be placed before the OnItemClickListener definition. Yes, you could have made it a member variable without being final. For a more complex case, that might even be necessary. But, in this case, we can actually keep all code within the method.
At this point, if you run the application, you'll get a blank white viewer screen. The activity is launched correctly, but we need to go wire up the viewer activity to load the URL in the WebView control.
Step 7: Loading the URL
Turn your attention back to TutViewerActivity.java. After the setContentView() call, add code to retrieve the Uri from the passed in Intent and convert it to a String variable. Then add a call to the loadUrl() method of the WebView class. The entire TutViewerActivity class will now look like this:
public class TutViewerActivity extends Activity {
    @Override
    public void onCreate(Bundle savedInstanceState) {
        super.onCreate(savedInstanceState);
        setContentView(R.layout.tut_view);

        Intent launchingIntent = getIntent();
        String content = launchingIntent.getData().toString();

        WebView viewer = (WebView) findViewById(R.id.tutView);
        viewer.loadUrl(content);
    }
}
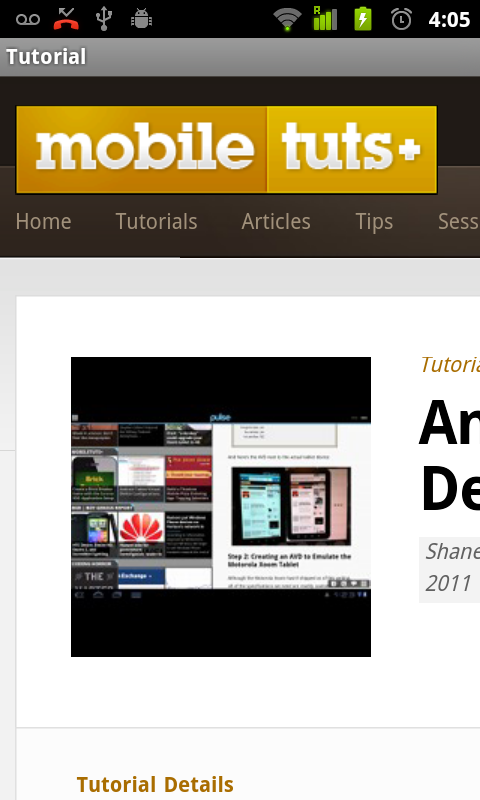
Run the application now. Does it work? Not quite yet! One final detail: you need to add the Internet permission to the AndroidManifest.xml file. Now run the application. You'll now see that the implementation works:
Step 8: Refining the Experience (Optional)
The experience, as-is, works. A ListView shows all of the article titles, a user can click on a specific list item and be redirected to an activity with a WebView to show the appropriate URL. Some refinements that you might consider making to this basic implementation include:
- Setting the initial zoom of the browser view to be zoomed out further
- Configuring the WebView to have more control over the browsing experience
- Loading the list of tutorials dynamically, instead of via a static array
- Adding fancy visual attributes to the ListView
- Making better use of larger screens (i.e. fragments)
- Adding supplementary information to the ListView items: subtitles, difficulty levels, icons, "read" indicators, favorites, etc.
Other Android tutorials on this site will teach you how to perform many of these optional features. Others you may have to discover yourself -- or ask about in the comments!
Conclusion
The ListView widget is a fast way to organize data in a list format on the screen. We have only scratched the surface of the ListView control in this tutorial. However, you have learned the basics of: creating list items, working with data adapters, and handling list item clicks.
About the Authors
Mobile developers Lauren Darcey and Shane Conder have coauthored several books on Android development: an in-depth programming book entitled Android Wireless Application Development and Sams Teach Yourself Android Application Development in 24 Hours. When not writing, they spend their time developing mobile software at their company and providing consulting services. They can be reached at via email to [email protected], via their blog at androidbook.blogspot.com, and on Twitter @androidwireless.

Comments