You’ve read about how relative layouts work in Android. Test your new skills with these progressive challenges involving relative layout controls and solidify your knowledge of the Java programming language and Android user interface design and development.
Setup
To prepare for this challenge, you’ll want to start with a basic Android application. Simply create an Android application within Eclipse and edit its default Activity, specifically the onCreate() method, to test the code you create for this challenge.
If what we've just asked of you is already too challenging, we would recommend taking a step back. Start with some of the Android tutorials, such as Introduction to Android Development or Beginning Android: Getting Started with Fortune Crunch. Once you’ve mastered setting up an Android project, return and try these progressive exercises.
A Progressive Challenge
This is a progressive challenge. It involves numerous skills that beginning Android developers must master in order to design and develop applications. By following each of the steps below, which grow in difficulty, you will solidify your knowledge of relative layouts and Android user interface design in general.
Step 0: Prepare Your Resources
Now that you have created a proper Android project, you’re going to need to create some resources for use within your user interface.
Create:
- Create seven string resources, one for each color in the spectrum (“Red”, “Orange”, “Yellow”, “Green”, “Blue”, “Indigo”, “Violet”)
- Create seven color resources, one for each color in the spectrum (Red=>#f00, Orange=>#ffa500, Yellow=>#ffff00, Green=>#0f0, Blue=>#00f, Indigo=>#4b0082, Violet=>#ee82ee)
- Create two more color resources for the text colors (Black=>#000, White=>#fff)
Stumped by creating string or color resources? Check out this tutorial on string formatting.
Challenge 1: Define Your Layout Resource
Begin by creating a new layout resource file called relativerainbow.xml. Within this XML file, add a relative layout control that fills the entire screen; set its gravity to center controls. Next, add seven TextView controls as child controls within the relative layout: one for each color in the spectrum. Set the text of each TextView control to the appropriate color string in the spectrum and the background color to the appropriate color value. Also, set each control’s layout_width attribute to wrap_content, its layout_height attribute to wrap_content, and its padding to something reasonable like 8dp.
If you’ve completed this step correctly, your layout should look like this:
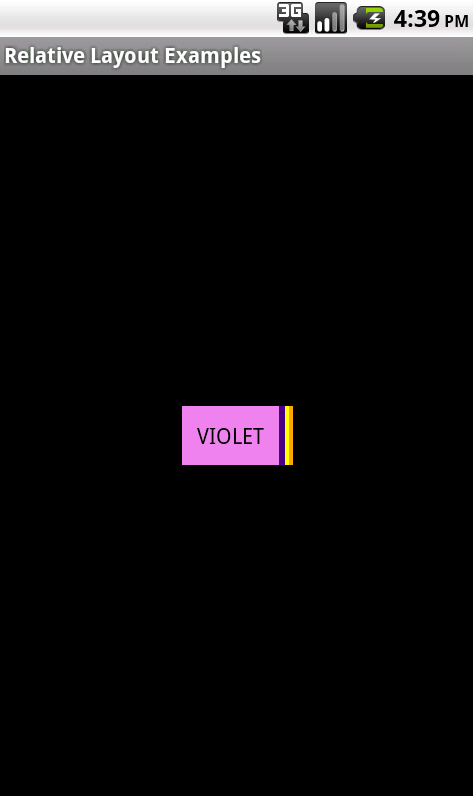
Note that all the controls are piled on top of one another, with the last control added on “top”.
Challenge 2: Stacking Child Controls
We want each TextView control to be visible and each color to be displayed in the right order. We could have used a linear layout to organize our controls, but we want more flexibility here.
Begin by adding a relative layout rule to each appropriate TextView control such that the controls display one after another vertically in a stack in order (Red, Orange, Yellow, Green, Blue, Indigo, Violet).
Now your layout should look something like this:
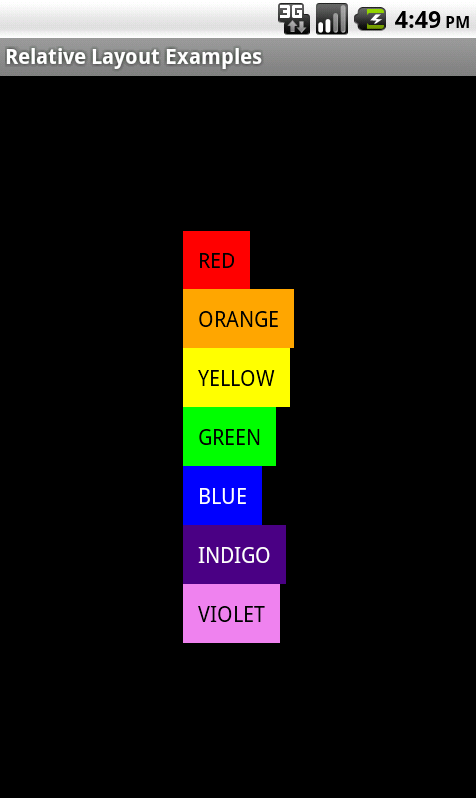
HINT: Check out the android:layout_below attribute.
Challenge 3: Staggering Child Controls
Thus far, we could have simply used a vertically-oriented linear layout to display the controls. In this step, we move beyond stacking the child TextView controls and begin to adjust them to the left or right of other controls in order to achieve the resulting design:
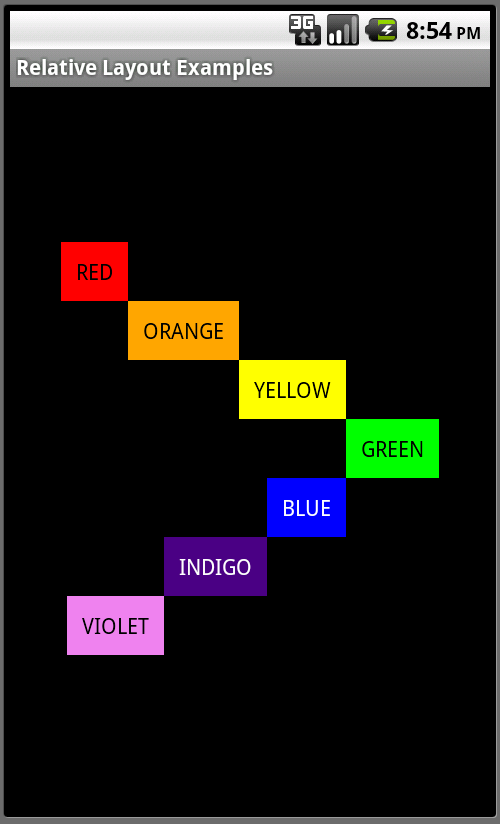
HINT: In order to achieve this effect, you need to use two different relative layout rules, associated with the attributes: android:layout_toLeftOf and android:layout_toRightOf.
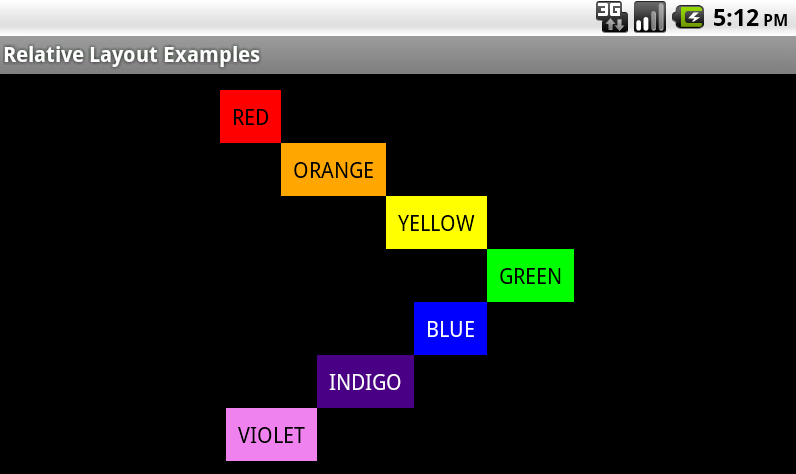
Just for kicks, switch to landscape mode and check out what the same layout looks like:
Feel free to post your XML solutions in the comments!
Bonus Challenge: Recreate the Layout Programmatically in Java
If you’ve found the previous challenges reasonably straightforward, consider the following bonus challenge: recreate your final layout resource programmatically in Java, as opposed to in a layout XML resource.
You will need to comment out the setContentView() call in your Activity’s onCreate() method and build up your RelativeLayout, as discussed in Android User Interface Design: Relative Layouts.
Here are some hints for implementing the relative rainbow layout programmatically:
- Begin by constructing each of the TextView controls. Give each control a unique identifier using the setId() method.
- To configure the layout parameters for each TextView control, construct a set of RelativeLayout.LayoutParams, to set the layout_width and layout_height of each control.
- Use the addRule() method of the RelativeLayout.LayoutParams object to configure appropriate display rules for each TextView control.
- Use the setText() method of the TextView class to load and display the appropriate string resource.
- Use the setTextSize() method of the TextView class to configure the font size of the text. You can use the getResources().getDimension() method to load the dimension resource.
- Use the setTextColor() method of the TextView class to configure the font color of the text. You can use the getResources().getColor() method to load the color resource.
- Use the setBackgroundColor() method of the TextView class to configure the background color of the control. You can use the getResources().getColor() method to load the color resource.
- Use the setGravity() method of the TextView class configure the text alignment. The Gravity class contains definitions for different gravity types.
- Next, construct a RelativeLayout control.
- Use the setGravity() method to configure the alignment of all child controls of the layout. The Gravity class contains definitions for different gravity types.
- Don’t forget to construct a LayoutParams object to set the height and width attributes of the relative layout itself.
- Add each TextView control to your RelativeLayout object using the addView() method.
- Finally, use the setContentView() method to display the RelativeLayout you just configured.
You’ll find the Java solution in the download provided with this tutorial.
Conclusion
Android user interface designers use relative layouts all the time to display controls in relation to one another. Child controls can be displayed near one another (above, below, to the left or right) or relative to the parent layout. Layout rules are used to describe where each child control should be placed on the screen.
Best of luck!
About the Authors
Mobile developers Lauren Darcey and Shane Conder have coauthored several books on Android development: an in-depth programming book entitled Android Wireless Application Development and Sams TeachYourself Android Application Development in 24 Hours. When not writing, they spend their time developing mobile software at their company and providing consulting services. They can be reached at via email to [email protected], via their blog at androidbook.blogspot.com, and on Twitter @androidwireless.

Comments