The notion of fragments was introduced in Android 3.0, API Level 11. Since then, the Android community has seen six major platform releases. Still, more than half of the active Android devices don't have this feature available to them natively. Developers must instead use the Android Support library if they are to use fragments with these devices. Learn how to create a basic fragment-based app using the Android Support library in this tutorial.
Step 0: Getting Started
This tutorial is for the Android developer who needs to target the vast majority of Android devices currently in users’ hands and wants to leverage the Fragment API, which simplifies support for a variety of screen sizes. You should be comfortable with Java, Eclipse, and be familiar with Android basics.
This tutorial is also for those who need more detailed instructions than what our other fragment tutorial gave or those who need a fresh take on fragments.
In order to fully see the effects and differences of a responsive, well-designed fragment screen design, you'll need two devices (or configured emulators): one with a regular phone-size screen and another with a tablet-sized screen.
Note that this code is based off the best-practices code created by the New Android Application wizard within Eclipse. The project can be downloaded and browsed at Google code hosting, as can the installable binary.
Step 1: Classic Two-Pane View
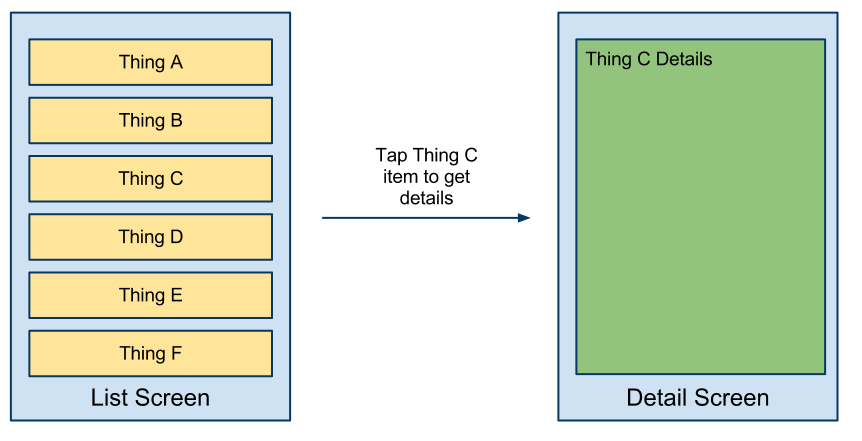
The example here will be the classic fragment example, also known as a “master-detail” flow. We start with a list of “things” (items, they could be songs, movies, pets, whatever) and, when a “thing” is clicked on, we display the details for that specific “thing”. If the device’s screen size can accommodate showing both the list and the details, two fragments will be used. Otherwise, just one is used and the user must click to drill down to the details.
Here is a figure showing the typical screen organization before fragments, or when the screen isn't large enough to handle so much information side-by-side:
And here is the screen design when done with fragments as it would display on a large or wide screened device like a tablet:

Fragments don't remove the need for activities. And, in fact, you'll still need two activities: one activity will handle the case where both fragments are displayed (two pane mode) and another to handle the detail view when only the list was displayed on the first screen because the device screen size was small. Through the use of appropriately organized resources, the first activity will adjust dynamically in response to the screen width. Internally, this activity must know if it's in two pane mode or not so it can correctly place the detail fragment or spawn the detail activity as necessary, which will contain just the detail fragment.
To simplify: You will need to implement two Activity classes and two Fragment classes to handle these cases. The Activity classes are fairly simple, since they just display the correct fragment or fragments and control the app flow. For our example here we use the following Activity classes: the main class, CircleListActivity, the sometimes used detail class, CircleDetailActivity. We also have the two Fragment classes that actually perform layout and drawing: CircleListFragment and CircleDetailFragment. Yes, we're talking about circles. Circles are just things. No need to be concerned with the “thing” we've chosen.
Step 2: Creating the Primary Activity
The primary activity, CircleListActivity, is the starting point for loading either one or both fragments for the screen.
import android.content.Intent;
import android.os.Bundle;
import android.support.v4.app.FragmentActivity;

public class CircleListActivity extends FragmentActivity {
	private boolean mTwoPane;

	@Override
	protected void onCreate(Bundle savedInstanceState) {
		super.onCreate(savedInstanceState);
		setContentView(R.layout.activity_circle_list);

		if (findViewById(R.id.circle_detail_container) != null) {

			mTwoPane = true;

			((CircleListFragment) getSupportFragmentManager().findFragmentById(
					R.id.circle_list)).setActivateOnItemClick(true);
		}

	}

}
Note that we use the Android Support FragmentManager, not the one introduced in Android 3.0.
Yet, the Activity class does very little. All the main logic happens automatically because the Android operating system will load the correct layout resource version for the device when the setContentView() method call is made. This means you just need to focus your attention on the resources in question. How does the resource correctly choose to use one fragment or two?
Step 3: Defining the Layouts for the Screens
Pop Quiz: How many layouts do we need to display both fragments?
Answer: 3, but that doesn't include the layout of each fragment.
We need one layout that will display both the list fragment and the detail fragment. We need another layout that will just show the list fragment. Finally, we need a third layout that will show just the detail fragment.
Layouts can use a fragment tag to indicate a specific fragment to load. However, this only works for fixed fragments. For dynamic fragments, such as the detail fragment that will display different information based on what was chosen, we use a container view to indicate where the fragment should go in the layout. The most common container to use is a FrameLayout, as it only contains one child element and can then be positioned as a block anywhere in the containing layout.
To start, we'll create the two single fragment layouts.
First, the layout that will display just the list fragment:
<fragment xmlns:android="http://schemas.android.com/apk/res/android"
    android:id="@+id/circle_list"
    android:name="com.mamlambo.circlesfragmentexample.CircleListFragment"
    android:layout_width="match_parent"
    android:layout_height="match_parent"
    android:layout_marginLeft="16dp"
    android:layout_marginRight="16dp"
/>
Now the layout that displays just the details fragment:
<FrameLayout xmlns:android="http://schemas.android.com/apk/res/android"
    android:id="@+id/circle_detail_container"
    android:layout_width="match_parent"
    android:layout_height="match_parent"
 />
If these look pretty simple, it's because they are. To reiterate, these are the layouts that dictate where the fragments will be, not that the fragments look like.
Finally, let's combine them into a layout that will display both fragments:
<LinearLayout xmlns:android="http://schemas.android.com/apk/res/android"

    android:layout_width="match_parent"
    android:layout_height="match_parent"
    android:layout_marginLeft="16dp"
    android:layout_marginRight="16dp"
    android:orientation="horizontal"
    android:showDividers="middle"
    >

    <fragment
        android:id="@+id/circle_list"
        android:name="com.mamlambo.circlesfragmentexample.CircleListFragment"
        android:layout_width="0dp"
        android:layout_height="match_parent"
        android:layout_weight="1"/>

    <FrameLayout
        android:id="@+id/circle_detail_container"
        android:layout_width="0dp"
        android:layout_height="match_parent"
        android:layout_weight="3" />

</LinearLayout>
Now that you know what the layouts look like, you still might be wondering how the correct one gets chosen programmatically.
Step 4: Organizing the Layouts for Different Scenarios
You know that the Android operating system will choose appropriate resources based on current device characteristics. So, at first glance, you may start placing layouts in folders like layout-land, layout-large, layout-small, and so on. You'd name the single list fragment layout the same as the dual fragment layout and put them both in a variety of different folders. This might even work, but this method will be hard to maintain, with several different files for several identical layouts.
Instead, you can use references to refer to a particular item in Android from a particular resource folder. It's best to see an example of this. We'll name our three Activity-based layouts (as opposed to the individual fragments contained within): activity_circle_detail, activity_circle_list, and activity_circle_twopane. Then we'll put all three in the standard layout folder. You've already seen in the code, from Step 2 that we only ever load the activity_circle_list layout. Or do we?
Now let's add some references. A good way to determine if the screen is suitable for two side-by-side panes is by the width, in dp units. Let's say our dual-pane layout requires at least 850dp units of screen width. Let's create a folder called values-w850dp. That should cover high density 7" tablets and medium density 10" tablets in landscape mode, but it won't include xhdpi phones and will generally exclude portrait mode on most devices, except for some with very high resolution screens. In this folder, create a file called refs.xml and place the following inside it:
<resources>
    <item name="activity_circle_list" type="layout">@layout/activity_circle_twopane</item>
</resources>
How does this work? When the width is 850dp or greater, this reference will be used to load the layout. That means the dual-pane layout will be used instead of the individual panes being displayed separately. As this resource qualifier (folder naming convention) wasn't introduced until API Level 13, we'd also want to include this same reference in another suitable folder qualifier that has been around a lot longer, such as values-xlarge-land. Extra large is defined as at least 960dp by 720dp, so we also need to make sure it would only be shown in landscape mode by including the land qualifier.
With the layouts organized, it's time to turn our focus back to the Java code. While the right layout will draw on the screen when the list activity is first launched, what happens when one of the list items is tapped?
Step 5: Defining the List Fragment
The list fragment handles displaying our array of things (circles, in this case). It's not unlike a ListActivity in that it provides some handling of routine list tasks to simplify your own coding. The list needs to contain all of the circles from the data source (a mock data source, in this case), and it also needs to handle taps on specific items to show the details. However, since a fragment isn't an activity, it should pass up events that might potentially change the screen to the controlling Activity class. A tap that occurs in dual pane mode will load a fragment in the other pane on the same screen whereas a tap in single pane mode should load a new activity with the detail fragment. However, the fragment doesn't, and shouldn't, know about these configuration details.
You must, however, create a consistent way to pass this information to the containing or controlling activity, which does, and should, know about these details. Most commonly, this communication is managed through an interface class defined in the fragment that must be implemented by any activity that uses it -- a typical method of doing callbacks.
Here is the entire code for the CircleListFragment class, including a safe callback mechanism and the tap handling that calls the callback method to pass the workflow handling up to the controlling Activity.
import android.app.Activity;
import android.os.Bundle;
import android.support.v4.app.ListFragment;
import android.view.View;
import android.widget.ArrayAdapter;
import android.widget.ListView;
import com.mamlambo.circlesfragmentexample.dummy.DummyContent;
public class CircleListFragment extends ListFragment {
private static final String STATE_ACTIVATED_POSITION = "activated_position";
private Callbacks mCallbacks = sDummyCallbacks;
private int mActivatedPosition = ListView.INVALID_POSITION;
public interface Callbacks {
public void onItemSelected(String id);
}
private static Callbacks sDummyCallbacks = new Callbacks() {
@Override
public void onItemSelected(String id) {
}
};
public CircleListFragment() {
}
@Override
public void onCreate(Bundle savedInstanceState) {
super.onCreate(savedInstanceState);
setListAdapter(new ArrayAdapter<DummyContent.DummyItem>(getActivity(),
android.R.layout.simple_list_item_activated_1,
android.R.id.text1, DummyContent.ITEMS));
}
@Override
public void onViewCreated(View view, Bundle savedInstanceState) {
super.onViewCreated(view, savedInstanceState);
if (savedInstanceState != null
&& savedInstanceState.containsKey(STATE_ACTIVATED_POSITION)) {
setActivatedPosition(savedInstanceState
.getInt(STATE_ACTIVATED_POSITION));
}
}
@Override
public void onAttach(Activity activity) {
super.onAttach(activity);
if (!(activity instanceof Callbacks)) {
throw new IllegalStateException(
"Activity must implement fragment's callbacks.");
}
mCallbacks = (Callbacks) activity;
}
@Override
public void onDetach() {
super.onDetach();
mCallbacks = sDummyCallbacks;
}
@Override
public void onListItemClick(ListView listView, View view, int position,
long id) {
super.onListItemClick(listView, view, position, id);
mCallbacks.onItemSelected(DummyContent.ITEMS.get(position).id);
}
@Override
public void onSaveInstanceState(Bundle outState) {
super.onSaveInstanceState(outState);
if (mActivatedPosition != ListView.INVALID_POSITION) {
outState.putInt(STATE_ACTIVATED_POSITION, mActivatedPosition);
}
}
public void setActivateOnItemClick(boolean activateOnItemClick) {
getListView().setChoiceMode(
activateOnItemClick ? ListView.CHOICE_MODE_SINGLE
: ListView.CHOICE_MODE_NONE);
}
private void setActivatedPosition(int position) {
if (position == ListView.INVALID_POSITION) {
getListView().setItemChecked(mActivatedPosition, false);
} else {
getListView().setItemChecked(position, true);
}
mActivatedPosition = position;
}
}
Other than the previously described functionality, there is some ListView management so that the tapped on list item shows as selected when in dual-pane mode and some basic fragment lifecycle management. As before, we are using the Support Fragment version so that we are backwards compatible with older devices. Make sure to import the correct package in the support library (import android.support.v4.app.ListFragment).
Now we need to return to the controlling Activity class so that it candle handle the callback.
Step 6: Updating the Primary Activity
Add the callback support to the primary Activity class, CircleListActivity, by having it implement the CircleListFragment.Callbacks interface created earlier. Then implement the onItemSelected() method to branch app behavior based on whether the device can handle two pane mode or not. Here is the fully updated class:
import android.content.Intent;
import android.os.Bundle;
import android.support.v4.app.FragmentActivity;

public class CircleListActivity extends FragmentActivity implements
		CircleListFragment.Callbacks {

	private boolean mTwoPane;

	@Override
	protected void onCreate(Bundle savedInstanceState) {
		super.onCreate(savedInstanceState);
		setContentView(R.layout.activity_circle_list);

		if (findViewById(R.id.circle_detail_container) != null) {
			mTwoPane = true;

			((CircleListFragment) getSupportFragmentManager().findFragmentById(
					R.id.circle_list)).setActivateOnItemClick(true);
		}

		// TODO: If exposing deep links into your app, handle intents here.
	}

	@Override
	public void onItemSelected(String id) {
		if (mTwoPane) {
			Bundle arguments = new Bundle();
			arguments.putString(CircleDetailFragment.ARG_ITEM_ID, id);
			CircleDetailFragment fragment = new CircleDetailFragment();
			fragment.setArguments(arguments);
			getSupportFragmentManager().beginTransaction()
					.replace(R.id.circle_detail_container, fragment).commit();

		} else {
			Intent detailIntent = new Intent(this, CircleDetailActivity.class);
			detailIntent.putExtra(CircleDetailFragment.ARG_ITEM_ID, id);
			startActivity(detailIntent);
		}
	}
}
Using the flag to determine if the dual-pane view is showing, the onItemSelected() method either starts a new Activity or replaces any current Fragment found in R.id.circle_detail_container with a new instance of the CircleDetailFragment class. For this sort of design, little more is needed. The identifier of which circle the user tapped on is either passed to the new Fragment instance via arguments or to the new Activity where it will turn the identifier into arguments, as well.
At this point, we need to implement both the CircleDetailActivity class for the single-pane case and implement the CircleDetailFragment class.
Step 7: Defining the Single Pane Detail Activity
Recall the simplicity of the layout for this Activity class. The layout is simply a placeholder for the detail Fragment class. All this Activity needs to do is get the identifier passed to it, turn that into a Fragment argument, then add the Fragment to the container.
package com.mamlambo.circlesfragmentexample;

import android.os.Bundle;
import android.support.v4.app.FragmentActivity;
public class CircleDetailActivity extends FragmentActivity {

	@Override
	protected void onCreate(Bundle savedInstanceState) {
		super.onCreate(savedInstanceState);
		setContentView(R.layout.activity_circle_detail);

				if (savedInstanceState == null) {
			Bundle arguments = new Bundle();
			arguments.putString(CircleDetailFragment.ARG_ITEM_ID, getIntent()
					.getStringExtra(CircleDetailFragment.ARG_ITEM_ID));
			CircleDetailFragment fragment = new CircleDetailFragment();
			fragment.setArguments(arguments);
			getSupportFragmentManager().beginTransaction()
					.add(R.id.circle_detail_container, fragment).commit();
		}
	}
}
If it sounded straightforward, you can now see that it is. The final piece we need to get to is the detail fragment itself.
Step 8: Show the Detail Fragment
The detail Fragment class needs to see what circle data should be loaded and displayed. Then, it needs to load and, well, display that data. The class will load a layout. The layout design can be generic, but should consider the fact that, as a fragment, it may or may not be full screen. In other words, as usual, don't make assumptions about the device screen size. Of course, also as usual, you can create multiple layouts based on resource qualifiers. Keep in mind these will be loaded based on overall device screen characteristics and not based on the display area characteristics (pane modes).
In this example, there's no further navigation, so no callback is needed as there was with the list fragment.
Without further ado, here's the entire code for the CircleDetailFragment class:
import android.os.Bundle;
import android.support.v4.app.Fragment;
import android.view.LayoutInflater;
import android.view.View;
import android.view.ViewGroup;
import android.widget.ImageView;
import android.widget.TextView;

import com.mamlambo.circlesfragmentexample.dummy.DummyContent;

public class CircleDetailFragment extends Fragment {
	public static final String ARG_ITEM_ID = "item_id";

	private DummyContent.DummyItem mItem;
	public CircleDetailFragment() {
	}

	@Override
	public void onCreate(Bundle savedInstanceState) {
		super.onCreate(savedInstanceState);

		if (getArguments().containsKey(ARG_ITEM_ID)) {
			mItem = DummyContent.ITEM_MAP.get(getArguments().getString(
					ARG_ITEM_ID));
		}
	}

	@Override
	public View onCreateView(LayoutInflater inflater, ViewGroup container,
			Bundle savedInstanceState) {
		View rootView = inflater.inflate(R.layout.fragment_circle_detail,
				container, false);

		if (mItem != null) {
			((TextView) rootView.findViewById(R.id.circle_detail))
					.setText(mItem.content);
			((ImageView) rootView.findViewById(R.id.circle_view))
					.setImageResource(mItem.resourceId);
		}

		return rootView;
	}
}
Although all of the code is basically the same as a non-Support fragment, note the proper import for android.support.v4.app.Fragment to be sure to use the right Android Support class.
Step 9: Updating the Android Manifest File for Fragments
Now we need to add the fragments to the manifest file, right? Actually, no. Unlike Activity classes, Fragments are not registered in the manifest file. So, simply add the activity classes to the manifest file and you're good to go.
Here's the sample manifest file for your viewing pleasure:
<?xml version="1.0" encoding="utf-8"?>
<manifest xmlns:android="http://schemas.android.com/apk/res/android"
    package="com.mamlambo.circlesfragmentexample"
    android:versionCode="1"
    android:versionName="1.0" >

    <uses-sdk
        android:minSdkVersion="8"
        android:targetSdkVersion="16" />

    <application
        android:allowBackup="true"
        android:icon="@drawable/ic_launcher"
        android:label="@string/app_name"
        android:theme="@style/AppTheme" >
        <activity
            android:name="com.mamlambo.circlesfragmentexample.CircleListActivity"
            android:label="@string/app_name" >
            <intent-filter>
                <action android:name="android.intent.action.MAIN" />

                <category android:name="android.intent.category.LAUNCHER" />
            </intent-filter>
        </activity>
        <activity
            android:name="com.mamlambo.circlesfragmentexample.CircleDetailActivity"
            android:label="@string/title_circle_detail"
            android:parentActivityName=".CircleListActivity" >
            <meta-data
                android:name="android.support.PARENT_ACTIVITY"
                android:value=".CircleListActivity" />
        </activity>
    </application>

</manifest>
Note the wide range of Android SDK versions that can be supported with this approach by using the Support library Fragment functionality.
Step 10: Running the App
While we have not presented the complete source code pasted within this tutorial and resources to the application, you can fill in those details yourself. Or you can download the code (see Step 0), compile and run it. Or you can download the pre-compiled binary and install it.
However you get to it, when running in a device configuration with 850 dp wide or the screen is extra large (at least 960x640 dp), you'll see this screen design (a 1920x1200 pixel screen at 10"):

And when the screen width is less than 850dp, the layout reverts to single pane mode, such as this 1280px wide phone display in landscape mode:

Or this 768 pixel wide portrait phone:

Or this 1200px wide portrait display on a tablet:

Due to the use of abstracted measurements, such as the use of dp units, you could see the two different layouts on a screen with identical pixel resolutions, yet different pixel densities. This helps keep the information density (more pixels doesn't always mean your users want more data) from being too high on physically small screens and is one of the great things about the Android resource system.
Conclusion
You've learned the basics of using the Android Fragment API available within the Android Support library. While there is much, much more to fragments, this tutorial gives you a starting point for a very common use-case that can dramatically improve the look and feel of many applications or portions of applications, regardless of what version of Android they are running with or screens they are being displayed upon.
About the Authors
Mobile developers Lauren Darcey and Shane Conder have coauthored several books on Android development: an in-depth programming book entitled Android Wireless Application Development (now in it's third edition as a two-volume set), Sams Teach Yourself Android Application Development in 24 Hours, and Learning Android Application Programming for the Kindle Fire: A Hands-On Guide to Building Your First Android Application. When not writing, they spend their time developing mobile software at their company and providing consulting services. They can be reached at via email to [email protected], via their blog at androidbook.blogspot.com, and on Twitter @androidwireless.
Need More Help Writing Android Apps? Check out our Latest Books and Resources!


Comments