On the Android platform, the Intent system allows users to share content between apps. You can send and receive multiple types of data on Android but in this tutorial we will implement receiving either a text String or an image, displaying the received content in the app's user interface!
Step 1: Start a New Android Project
Start by creating a new Android project in Eclipse. Choose "File", "New", "Project" - select "Android Application Project" and then click "Next". In the New Android Application window, enter your chosen Application, Project, and Package names and then choose "Next".

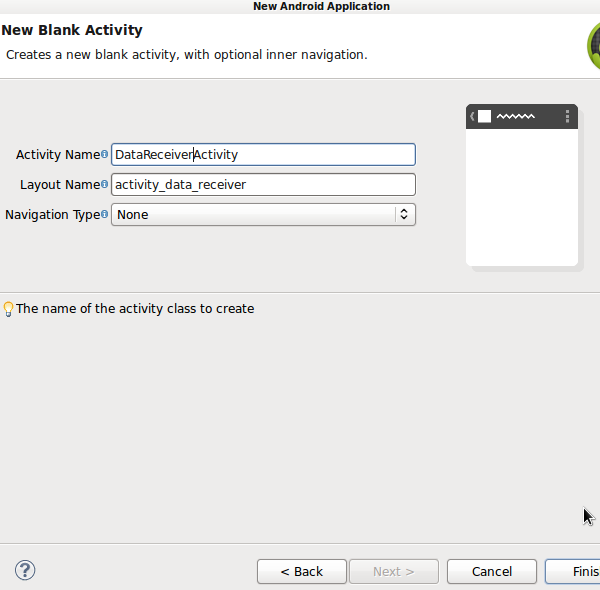
In the project configuration window, choose your options, letting Eclipse create an Activity for you. In the next screens, configure your launcher icon if appropriate, and then select "Blank Activity". In the Configure Activity screen, enter an Activity name and then choose "Finish".
Eclipse should create Activity and layout files for your app.
Step 2: Edit the Project Manifest
In order for your app to appear in the chooser list presented when the user attempts to share data from another app, you need to alter the Project Manifest file. Open it in Eclipse and switch to the XML editor tab. Find the section containing your app's main Activity - you should see an Intent Filter element there already, indicating MAIN action and LAUNCHER category.
After the existing Intent Filter element, inside the main Activity element, add another Intent Filter:
<intent-filter>

</intent-filter>
This is where we define the Actions that can launch the app - the existing Intent Filter specifying the normal options for when the user launches from the homescreen or device application menu. By adding another Intent Filter element, we are specifying additional options for launching the app. Inside the new element, add an Action element specifying the SEND Intent Action:
<action android:name="android.intent.action.SEND" />
This tells Android that when other apps launch a SEND Intent this app may receive what is being shared. Now give the Intent Filter a category:
<category android:name="android.intent.category.DEFAULT" />
Next we need to indicate the MIME types the app is going to receive:
<data android:mimeType="image/*" />
<data android:mimeType="text/*" />
This indicates that the app will receive any text or image type. You can optionally specify particular text or image types. There are lots of other types you can receive, including audio, video, message, and application. If you need your app to receive multiple data items of one of your MIME types, you can include the SEND_MULTIPLE Action as well as/instead of the SEND Action alone.
Here is the "DataReceiver" app appearing in the share list for the Gallery application, through which various image types can be shared.

Step 3: Define the App Layout
Let's design the app to display the received text String or image. Open the main layout file and switch to the XML tab to edit the code. Replace any existing code in the layout file with the following Relative Layout outline:
<RelativeLayout xmlns:android="http://schemas.android.com/apk/res/android"
	xmlns:tools="http://schemas.android.com/tools"
	android:layout_width="match_parent"
	android:layout_height="match_parent"
	android:padding="10dp"
	tools:context=".DataReceiverActivity" >

</RelativeLayout>
Alter the "tools:context" attribute if you chose a different Activity class name. Inside the layout, add the following to display a received image:
<ImageView
	android:id="@+id/picture"
	android:layout_width="fill_parent"
	android:layout_height="fill_parent"
	android:contentDescription="@string/pic"
/>
We will use the ID to refer to the Image View in our Java Activity, updating it to display any image received from the SEND Intent. Add the specified String to your app's "res/values/strings.xml" file:
<string name="pic">Received Picture</string>
Back in the layout file, add a Text View to display any text Strings received via the SEND Intent:
<TextView
	android:id="@+id/txt"
	android:layout_width="fill_parent"
	android:layout_height="fill_parent"
/>
Again, we have an ID attribute we can use in the Java code.
Step 4: Receive the Intent
Open your app's Activity class file. Your class will need the following import statements, some of which may already be present:
import android.net.Uri;
import android.os.Bundle;
import android.app.Activity;
import android.content.Intent;
import android.view.Menu;
import android.view.View;
import android.widget.ImageView;
import android.widget.TextView;
Eclipse should have created a basic onCreate method applying your layout. After this line, retrieve the Views we want to update with any received data:
//get the image view
ImageView picView = (ImageView)findViewById(R.id.picture);
//get the text view
TextView txtView = (TextView)findViewById(R.id.txt);
These use the ID attributes we included in the layout file. Now that we have a reference to the Views, we can update their appearance with data received from other applications. Within an Activity class, you can retrieve the Intent that was responsible for the Activity starting. Add the following line in your onCreate method:
//get the received intent
Intent receivedIntent = getIntent();
Now we can use this to also retrieve the Action that was used when starting the Activity:
//get the action
String receivedAction = receivedIntent.getAction();
This will let us determine whether the app has launched from the device menu or from the share list. If the app has been launched with the SEND Action, there will also be a MIME type indicated within the Intent that started it. Retrieve this as follows:
//find out what we are dealing with
String receivedType = receivedIntent.getType();
If the app was launched, for example, from the main device menu rather than from a share list, this will be null. If it was launched with the SEND Action, we will be able to use this to handle the received data, tailoring the app response to the type of data received.
Users can share text from a variety of applications, including the Web browser - if a user chooses to share a Web page, this data is contained in a text String, so our app will be able to receive it:

Here is the app listed in the browser share list:

Step 5: Handle Alternative Actions
Now we have two possibilities: the app has been launched from the device in the default fashion and is not receiving any incoming data; the app has been launched to share content, in which case there is either a text String or image incoming. Add a conditional statement to onCreate to handle these two scenarios:
//make sure it's an action and type we can handle
if(receivedAction.equals(Intent.ACTION_SEND)){
	//content is being shared
}
else if(receivedAction.equals(Intent.ACTION_MAIN)){
	//app has been launched directly, not from share list
}
If you look back at your Manifest file you will see that these are the Actions included in our two Intent Filter elements for the Activity. Let's complete the ACTION_MAIN else if statement first as it's simpler. In here you need to include whatever you want your app to do when nothing has been shared to it. For the purposes of this tutorial we will simply display a text String in the Text View:
txtView.setText("Nothing has been shared!");
Step 6: Determine MIME Type
Now to the ACTION_SEND if statement, in which we need to handle received data of the MIME types we listed in the Manifest. First add a conditional to handle the two types we listed, text and images:
if(receivedType.startsWith("text/")){
	//handle sent text
}
else if(receivedType.startsWith("image/")){
	//handle sent image
}
If you set your app up to receive other types, simply add conditional statements here for each of them.
Step 7: Receive Shared Text Data
Let's receive text first. In the if statement for text data, first hide the Image View as we only need the Text View in this case:
//hide the other ui item
picView.setVisibility(View.GONE);
Now retrieve the String as an Extra from the Intent:
//get the received text
String receivedText = receivedIntent.getStringExtra(Intent.EXTRA_TEXT);
We use the getStringExtra method for text data, passing the EXTRA_TEXT Intent constant to receive any character sequence passed using the SEND Action. Now let's make sure we have some data and display it in the app UI:
//check we have a string
if (receivedText != null) {
	//set the text
	txtView.setText(receivedText);
}
You can of course carry out further processing on the text if you need to - this is the text URL shared from the browser:

Step 8: Receive Shared Image Data
Now let's turn to the else if statement for image data. As before, first set the alternative UI item to disappear as we don't need it:
//hide the other ui item
txtView.setVisibility(View.GONE);
Now we need to get the image URI, as this is what the Intent will be sharing:
//get the uri of the received image
Uri receivedUri = (Uri)receivedIntent.getParcelableExtra(Intent.EXTRA_STREAM);
This time we use the getParcelableExtra method - there are lots of other Intent methods for the different data types you can receive in your apps, including number types, arrays and lists. We pass the EXTRA_STREAM Intent constant this time, which is used to receive data other than text. Now we can use the image URI within the app - the sample code below simply displays it in the Image View but if you plan on receiving images in your own apps you should first resample the image data to avoid memory issues:
//check we have a uri
if (receivedUri != null) {
	//set the picture
	//RESAMPLE YOUR IMAGE DATA BEFORE DISPLAYING
	picView.setImageURI(receivedUri);//just for demonstration
}
Tip: For guidance on avoiding memory problems when importing images see the Android Developers guide: Displaying Bitmaps Efficiently
Here is the image shared from the Gallery app:

Conclusion
That's our basic receiver app complete. This is of course just the bare bones of a functional app in which data is received from the SEND Action, but the principle of setting your app up to appear in the share list and handling the incoming content remains. In general, it's worth thinking of the possible ways in which users may want to launch your apps, as the main menu launcher is really just the beginning.

Comments