In this series of tutorials we are learning about Android development from scratch and getting acquainted with the basic concepts and practices you need to know in order to start working on the platform. So far we have looked at various parts of an Android project, including its resources. In this tutorial, we will explore the project manifest file.
Introduction
The manifest for a project can be simple or extremely complex depending on what the app does. We will look at the parts of the manifest you need to know about for all apps and will examine those optional parts you'll need for future projects.
The manifest file can contain many elements and attributes. See the Android Developer Guide for links to all of them. The manifest serves several purposes. It specifies the app package, provides a formal description of the app components, and declares permissions, required API levels, and linked libraries. We will only run through the most essential elements and attributes you can list in the manifest, so be aware that more elements are possible and that there may be additional attributes you can use with the elements we do cover.
1. Manifest Element
In Eclipse, open your project manifest file. You will always find the manifest in the root directory of the project. As we saw before, you can view the manifest in several ways. At the bottom of the editor area you will see tabs for Manifest, Application, Permissions, Instrumentation, and the XML code. Have a quick look through these now. We will use the XML code, so switch to the "AndroidManifest.xml" tab.
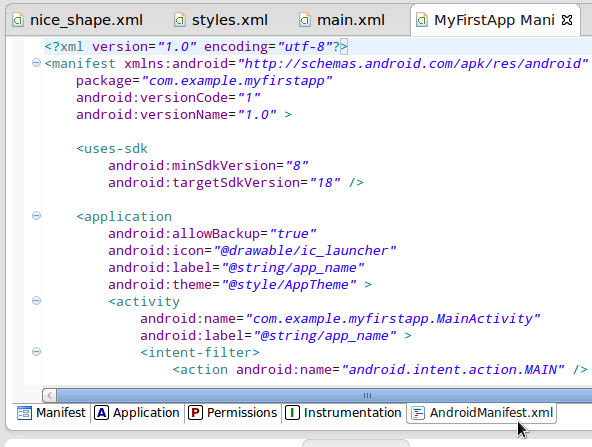
The elements that appear in the manifest file initially have been populated by Eclipse when you created the project. These are only sufficient for the needs of very simple apps, in most cases you will need to add to the manifest as you build your projects. The root element in the file is the manifest element:
<manifest xmlns:android="http://schemas.android.com/apk/res/android"
	package="com.example.myfirstapp"
	android:versionCode="1"
	android:versionName="1.0" >
</manifest>
Eclipse populates the manifest element attributes with the package name you chose when creating the project. The version code and name are set to 1 and 1.0 initially. When you release your app to the Play store, then release subsequent updates, you need to update these numbers for each new release. The version name is what users see when your app is listed in the Play store, so you can use whichever version naming convention you like. The version code is not seen by users, and must be a higher number for each release, although it does not have to increment by one each time. If you attempt to upload a new version of an app to Google Play and the version code is not higher than the current version, Play will not allow the upload.
2. Uses SDK Element
First inside the manifest element you should see the uses-sdk element:
<uses-sdk
	android:minSdkVersion="8"
	android:targetSdkVersion="18" />
The element attributes define minimum required API level as well as a target level you plan on testing the project against. Recall that we choose these values when we created the app. You can change these in the manifest after project creation if you need to. For example, you may find that you need to use some aspect of the platform that is not available at your chosen API level. If you change SDK versions, Eclipse rebuilds your project.
Users with devices running an API level lower than the specified minimum will not be able to download and install your app. Listing an API level as target is an indicator that you have tested the app on that version. For reliability you should test your apps on as many API levels as possible.
3. Application Element
Eclipse also inserted an application element in your manifest. The element contains child elements we will look at next. For the moment, let's look at the opening tag:
<application
	android:allowBackup="true"
	android:icon="@drawable/ic_launcher"
	android:label="@string/app_name"
	android:theme="@style/AppTheme" >
The main attributes to pay attention to are the icon, label, and theme items. The element can take many additional attributes. The icon attribute indicates a file in the app drawables. The default Android icon is selected, but you can add your own icon files and reference them here. The label icon references a string also in the app resources. Open the "res/values" strings XML file. You will see the referenced string listed as follows:
<string name="app_name">MyFirstApp</string>
This should be a readable string as it is displayed to the user in various places including the device menu, next to the launcher icon. You will typically want to alter the string, perhaps to include spaces: "My First App".
Back in your manifest file, notice the application element theme attribute. Again, this references a resource, you will find it in the "res/values" styles XML file, so have a look there now. Switch back to the manifest again. If you later decide to define your own application styles, you can reference them in the theme attribute.
4. Activity Elements
Inside the application element, you will see an activity element for the main Activity class you created when you started the project. This activity element also contains child elements we will look at next. Look at the opening tag first:
<activity
	android:name="com.example.myfirstapp.MainActivity"
	android:label="@string/app_name" >
The name attribute references the class using its fully qualified path in the app package. The label allows you to control what appears as the window title when the Activity is on screen. By default it is the same as the app name so you can leave it as is in most cases.
As your apps become more complex, you will add more Activities to them, one for each screen in the UI. Each time you add a new Activity class to your app, you need to add an element for it inside the application element, like in the following example:
<activity android:name=".About" >
</activity>
As you can see, you do not always need to include the full package name. The shortened form above will work as long as the Activity class (named "About") is in the package defined in the manifest element. Activity elements can take many attributes determining how the user can interact with them.
5. Intent Filters
Inside the main activity element, you will see an intent-filter element:
<intent-filter>
	<action android:name="android.intent.action.MAIN" />
	<category android:name="android.intent.category.LAUNCHER" />
</intent-filter>
The Intent Filter describes what Intents the parent activity can respond to. On Android, an Intent is a data object that is passed to an Activity when it starts. When you launch one Activity from another within your apps you will use Intents, but they can also be passed between apps.
The Intent Filter for the main activity indicates that it should start when the app is launched. It does this using the action element, which lists the "MAIN" action. The category element describes the Intent Filter by category name, in this case "LAUNCHER". Both of these in conjunction specify that your app should use the Activity as its main entry point, and that this entry point should be used when the app is launched.
Intent Filters can contain many child elements, including data specifications. For more information, see the Intent and Intent Filters section in the Android Developer Guide. The activity element can contain additional child elements alongside intent-filter such as metadata, which can define a name-value pair of data items.
6. Uses Permission
We have looked at all of the manifest elements Eclipse includes when you create your project. Let's now look at some others you may need in future projects. The uses-permission element allows you to request permission for your app to do certain things the user must grant permission for. When the user views your app in the Play store, the permissions will be displayed to them before downloading the app. If they choose to go ahead, they must accept the permissions so that your app can run.
Permissions you must request in the manifest include using Internet data, writing to external storage, and accessing devices features such as the camera. The following example demonstrates this concept:
<uses-permission android:name="android.permission.INTERNET" />
There are several potential permissions your apps can request. See the Manifest.permission page on the API reference.
7. User Devices
A range of manifest elements can be used to describe required hardware and software features for an app. These include the uses-configuration element, in which you can specify requirements for navigation, keyboard, and touchscreen options. In the uses-feature element, you can list a single feature required in either hardware or software, using the feature name and a Boolean flag. These features include Bluetooth and camera options such as flash, location detection, and sensors. The supports-screens element lets you define screen sizes supported by your app, specifying attributes related to both size and density.
8. Other Elements
The elements we've explored are most likely to be used for your initial apps. However, there are other elements used in different types of applications. The initial project we created is for a standard app launched through the user menu and presents one or more Activity screens to the user. Other types of apps include widgets and applications running ongoing background processes, handling data access, and receiving system announcements.
Apps using background processing typically do this using Service classes on Android. This requires listing the service element in the manifest, one for each Service class as with Activities. Content Providers in Android apps are responsible for managing access to a data source. These are listed using the provider element. Finally, the receiver element is listed in the manifest file if an app wants to receive Intents from other apps or from the system itself.
Conclusion
We've covered the essential features of the manifest file in Android apps. Each time you create an app, Eclipse populates the file with the main elements you need to start with. As you build functionality into the app, you will continually add content to the manifest to ensure the app as a whole can function. When you encounter problems running your apps on actual or virtual devices during development, this will sometimes be due to a missing element in the manifest. In the next part of the series, we will look at how Android apps store and access data.

Comments