This tutorial will provide an interactive, multiple-table database creation and management application for Android devices. Database navigation and search capabilities will be provided, as well as a query input popup that will take free-form queries and display the results in a scroll box.
SQLite3 is a lightweight, transactional database with small disk storage and memory requirements. It is widely used in mobile operating systems such as Android, iPhone, etc. It is now a fully relational database with the foreign key support.
A database usually contains one or more tables. The tables are designed to store data of four types: Integer, Real, String and Blob(binary or large data). There are many nice tutorials on the creation and management of single table database.
For a full discussion of the basics behind table creation, check out:
Since Android does not provide a database interface manager, these tutorials teach us efficient ways to create and manage a single-table database.
In essence, the following steps are required:
1. First a Database Helper class is defined which is extended from SQLiteOpenHelper class. This helps in creating or opening a database, upgrading the database and defining tables, columns, indexes, triggers, and views for a database.
2.Using this helper class, a database adapter class is designed where the basic CRUD (Create, Read, Update and Delete) database management tools are programmed.
3. The SQL queries are used to manage CRUD operations. The data retrieval is done with the use of Cursors.
The real databases usually have more than one table. This creates problem in creation and management of the tables.
The following is the standard procedure for a multi table database design:
1. Since the database is mounted on the Android device, once created it can not be altered on the phone device. The changes require manual intervention like pulling the database off the device, altering with Sqlite3 Manager, and remounting on the phone device.
2. All the tables must be created at the same time in the onCreate function of database helper class. This function is called when the database adapter class is instantiated. Each table must have its own creation SQL. The execSql command must be executed for each table separately.
3. How do we manage these tables? Do we need separate adapters for each table? If someone has large number of tables, the adapter overload would be enormous. Unfortunately most of the published tutorials dwell on this approach.
Would not it be nice to create the database, many tables, and manage them with a single adapter interface? Yes it will be. This tutorial will outline such a database design with two Android graphical user interfaces (GUI) using two android Activity classes. The first activity, StartIntMulti, provides a simple user input interface where the database and table designs will be input. After the input completion, the second Activity, ManageIntMulti, provides the basic CRUD management and a table navigation capability with search using only one database adapter class. A query input box is also designed where any query can be run irrespective of selected table interface.
This tutorial assumes that the reader is familiar with the single table database creation and management. We will be following a nice example of multi table database from Android Sqlit.
Let us start with the first GUI interface shown below.
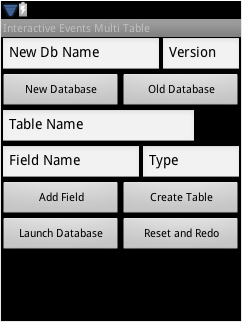
This is an interface required to have an interactive database creator. The data management is handled through a DataAttrib class. This class has various members which help in storage and retrieval of the input data.
The first two Edit Boxes require database name and version number inputs. Let us input ChessDb as the database name and 1 as the version number. Click on New Database button to save the inputs. The input is saved thru setDbName and setDbVersion functions of the class. The setDbStatus class member saves the "new" or "old" status of the database (for a previously created database, use the Old Database button and Launch Database button to move to next Activity).
The next three Edit Boxes take the table name input. For our purposes, Input "Players" as the table name. The table names are saved in an array tbl_Names[], and number of tables is recorded in setNumTables.
The next two Edit Boxes take in the field name and field type inputs. The first field of every table is "_id" which is an integer type. It is the primary key and is auto incremented. It is automatically programmed and is not required to be input. In field name, input "fname" as the field name input, and "text" as the Type input(Don't use "" in the input boxes). The "not null' is defaulted in the program itself. The field name and the field type are saved in two dimensional arrays , Col_Names[][] and Col_Types. The number of columns are recorded in Ncols[] array.
Press the "Add Field" button to save the input. This clears up the Field Name box. Now in the same Field Name input box, input the second field variable "lname". Make sure to clear up the input box before entering new inputs. The Type input is "text ". Press the Add Field button again. Since we are done with the first table definition, we will press Create Table button. Make sure not to press this button unless all the field have been defined.
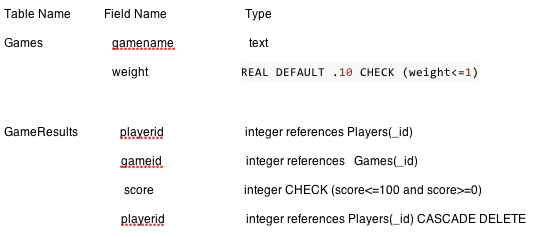
The "Cascade delete" should be "on delete cascade" in the last line. Notice that I have changed the table structure from that defined in the reference to keep tables consistent. If you would like a composite primary index, you can create this table through the query maker GUI in the next interface.
That's all for now. If you have more tables, you can input in the same way. The behind the scene programming is pretty standard Java programming for Android applications. The data is saved in the DatabaseAttrib class. Take a look into the structure of this class. It consists of basic getter and setter function for the inputs described above. Press the Launch Database button to go to the next level of database management.
The following GUI shows the database management Activity class:
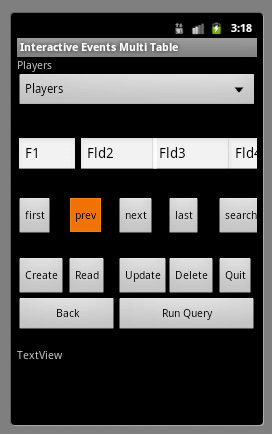
Let us examine the general process of the database management Activity. When the user launches the New or Old Database, this Activity, ManageIntMulti, receives all the informations about the tables, field names and types from the DataAttrib class. On the very top of the GUI, apart from TextBox labels, there is a table selector Spinner control interface. The Spinner control is populated with the names of these tables. It is a Radio button control where only one item can be selected at any time. The item being selected is a particular table name.
Next, the database adapter, tableAdapter, is instantiated only once. The onCreate function creates all the tables in the database. Look at the code fragment for this process;
if (DATABASE_STATUS == "new" )
			{

			String str1 ="";
			 for ( int i= 0; i<Num_Tbls; i++)
			 {
				 String SuppString = " ";
				 str1 = " ";
			    for ( int j=0; j< Num_Cols[i]-1; j++)
		        {

		   	       SuppString =  SuppString + Var_Names[i][j] + " " + Var_Types[i][j] +" not null"+", ";

		        }
		         str1 = "create table " +
		                  Tbl_Names[i] +
		       " (" +
		           ID_FIELD + " integer primary key autoincrement, " +
				   SuppString + Var_Names[i][Num_Cols[i]-1] + " " + Var_Types[i][Num_Cols[i]-1] + " not null" +
		       ");";

			     db.execSQL(str1);
			     Log.d(DATABASE_NAME, "onCreate: " + Tbl_Names[i]);

			   }

			}
This is one of the ways the multi-table creation algorithm can be implemented. Each table, field name, and field type is assembled into an SQL string. The ID field is "_id" and is programmed (not input) for every table. After the assembly of the SQL string, db.execSql(str1) executes and creates the table SQL. Theoretically, this method of interactive input should put no limitation on the number of tables or number of fields. However, the DataAttrib puts a dimension limitation of [10] for one dimensional and [10][10] for two-dimensional arrays. It can be increased to any desired value. Also, the duplicate check function requires at least two table columns in addition to the _id field.
Next, the duplicates in a table are searched with an SQL statement that uses the first two fields in the search criteria. The conditional field names are retrieved from cursor using PRAGMA query on the current table. The use of the PRAGMA query alleviates the use of multiple database adapters. The database cursor is generated with the db.rawQuery(…) process. The typical search SQL should be familiar to ACCESS database users as follows:
   String chkVar ="( " + xtbl + "." + colName[1] +"||' '||"+ xtbl + "." + colName[2]+" )";
   String sql =     "SELECT "  +
	                 chkVar + " AS Var1, "  +
	      " count" + chkVar + " " + " as NumDupes" +
	      " FROM " + xtbl +" Group by " + chkVar + " having ((count" + chkVar + ")>1);";
where xtbl is the current selected table. If duplicates are found, the user is alerted with Toast alerts and the results are printed in the Scroll view below the EditBox labelled "query". The duplicate data is not removed automatically. It can be done more efficiently using Run Query and a CRUD interface.
Next, all the components of a view are setup and the callback functions for the button listeners are defined.
There are many ways to input data in a table. Here we use four EditBox input fields (F1, Fld2, Fld3, and Fld 4) for data handling. F1 is reserved for the _id field and the user only interacts with it when deleting or updating a table. The other fields are for field names, like fname and lname, in Players table. If you have more than three inputs, you can use the Query box to do any CRUD operation. Let us input "Bobby" in Fld2 and "Fisher" in Fld3 (Never put " as they are used here for clarification only). Push the Create button. This saves the data in the database table. You can input as much data as you wish. Let us examine this data insertion scheme in little more detail. The following is the related code snippet.
private void createData()
  {
  	try
  	{

  	 	 String xtbl = input.getText().toString();
  	 	 String [] x = getInputStr();
  	 	 Cursor cursor = getPragma();

  		 int noCols = cursor.getColumnCount();

  		 int k = 0;
  	     String [] colName = new String[noCols];

  	     ContentValues values = new ContentValues();

  	 	  while (cursor.moveToNext()) {
  	      for (int i=0; i<cursor.getColumnCount(); i++)
  	      {
  	         colName[i] = cursor.getString(i);

  	      }
  	       if (k > 0 )
  	    	 values.put(colName[1], x[k]);

  	       k++;
  	 	 }

 	     db1.insert(xtbl, null, values);
 	     cursor.close();
  	}
  	catch (Exception e)
  	{
  		Log.e("sql Error", e.toString());
  		e.printStackTrace();
  	}
  }
This a typical data insertion scheme. As usual, there are many other possible ways to do the data insertion in a table. Here xtbl is the data selected in the spinner control. The field names come from x[] variable from inputs. We call PRAGMA to get the field names of this particular table as colName[]. We use a ContentValues class to assign the inputs to proper column names. The db1.insert(…) finally inserts the inputs in the database.
The other CRUD operations, namely Read, Update and Delete, follow similar logic with appropriate SQL statements.
The Read button requires the _id number input. Put the _id number in F1 box, and press this button to get the data displayed in other boxes.
The Update button also works with _id input. First, get the right data with a Read operation, then fill in changes in other input boxes. Press the Update button to save your changes.
The Delete button also works with the _id field. Input the _id number and press Delete button. The data will be deleted permanently without any warning unless some foreign key constraints are violated.
The button rows first, rev, next, last and search are used to navigate data in the table. First insert as many entries as you like in the table. With these buttons you can browse your input data. If you have many entries, finding a record would be real frustrating. The search button comes out handy for this purpose. All the searches are done on the combination of first two fields input in Fld2 and Fld3. The search takes partial inputs and is case insensitive.
The database navigation uses the field names from the PRAGMA and proper db.query to retrieve all the table data in a cursor. The navigation is accomplished with cursor.moveToFirst(), cursor.moveToLast(), cursor.setPosition(), cursor,getPosition, cursor.moveToPrevious() and cursor.moveToNext() functions.
The search operations use the LIKE option. It has been reported that this type of criteria slows the search on large tables. The Android Developer website has alternative fast search method. To make the search process case insensitive and to take partial inputs, the following where condition from function searchData() is used.
 String str2 = "lower(" + y[1] + ")" + " like "+ "lower("+ "'%"+xsearch[0].trim()+"%'"+ ")" +" and " +
  	 	               "lower(" + y[2] + ")" + " like "+ "lower("+ "'%"+xsearch[1].trim()+"%'"+ ")";
where y[] is the field name, and xsearch[] is the search string. This is a very useful scheme. Many other efficient search algorithms are also used in database searches. An index is also generated on the two search fields to expedite the binary search process.
Next, the Run Query is a quite useful tool to run queries. When you press the Run Query button, a pop up custom dialogue box shows up. This approach works well to enter long queries due to the limited display area on the emulator. Type a query which returns some data, like "Select * from any_table;" and hit the Go button. The returned data will be displayed in a Scroll Box below the Run Query button. The queries can be run on any table irrespective of the currently selected one in the Spinner control. You can do anything you want to do with the database with this option. Exit the Query Input screen by pressing the Exit button.
The Back button brings you back to the data input activity. You can only relaunch active databases from here. For new ones, you will have to quit and log into the application again.
One very useful SQL statement for efficient programming is the PRAGMA which has the following structure:
PRAGMA table_info(table_name);
This generates a five column output. The second column is the field variable name and the third is field type.
You can change the table selection and can do your database management at your ease. All these operations for all the tables are done with only one database adapter class.
When an existing database is selected, The database name and version is passed from the input GUI to the navigation GUI. The database is connected in the adapter onCreate function by providing the path to the existing database. Make sure you change the package name on the path to suite your location. The table names are retrieved using the following SQL:
"SELECT name FROM "+ " sqlite_master WHERE type='table' " +
	      " AND name NOT LIKE 'sqlite_%'  AND name NOT LIKE 'android%' UNION ALL" +
	      " SELECT name FROM sqlite_temp_master WHERE type='table' " +
	      " ORDER BY 1;";
where 'table' is a schema database internal variable. The rest of the database management is the same as in the new database case.
The Query input database has a number of character limitations from the EditBox. The critical test of Run query control comes with the the following sql in the referred article;
 sql =     "SELECT "  +
    " Players.fname||' '|| Players.lname AS PlayerName, "  +
    " SUM((Games.weight*GameResults.score)) AS TotalWeightedScore " +
    " FROM GameResults " +
   " JOIN Players " +
   "         ON (GameResults.playerid=Players._id) "  +
   " JOIN Games  "   +
    "        ON (GameResults.gameid=Games._id) "  +
   " GROUP BY GameResults.playerid " +
   " ORDER BY TotalWeightedScore DESC;";
This is a Java version of SQL. To put in the Query box you have to get rid of the " and + punctuations. Use the one from the referenced article. Even this long query can be run with the pop up query input. Be sure to type the query correctly, otherwise it may crash or nothing will happen.
The Quit button exits you from this application. If you created new tables, indices and triggers, you will have to quit from the present setup and re-enter to see the new stuff.
You may have noticed that the database adapter was only instantiated once. Use of PRAGMA and thoughtful programming alleviates the need of several cumbersome adapters. Some of you may be using similar schemes in your daily work, but for rest of us, this should be a new and efficient scheme!

Comments