In this tutorial you will learn how to manage the events of the physical keys available in every Android device. Once you know how to do this, you will be able to allow the user to control your app in new and interesting ways.
Getting Started
Every Android device is provided with physical keys, and it is up to the manufacturer to implement them all. For example, Sony usually implements only 3 of them, and those buttons are a good chance to give our user an opportunity for a new kind of interaction with the app we are developing.
Android apps are based on Activities, and one thing you should know is the implementations the Activity class already have. You can check them all in the official reference, but the one we’re going to try this time is the KeyEvent.Callback interface, which give us the methods we need for interaction with the physical keys.
Constants and Methods
The KeyEvent class has multiple key constants that represent the different keys on a standard android device. The most well-known keys are:
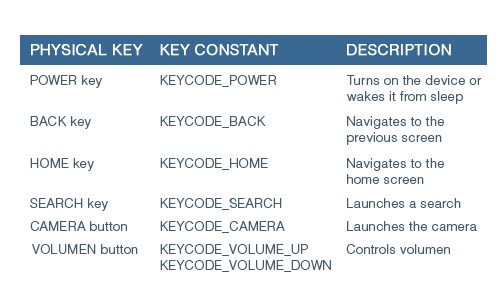
But you can find more constants in the official documentation.
For physical keys, the callback methods are:
- onKeyDown()
- onKeyUp()
- onKeyLongPress()
For trackball and touchscreen callbacks:
- onTrackballEvent()
- onTouchEvent()
You can choose which of them to implement and customize and you don't have to implement them all. For example, if you want to avoid an unintentional press of the CAMERA or SEARCH key when your app is running, you can customize them in the onKeyDown() callback and then return true to let the system know that your app is consuming the event.
Special Keys
There are some keys you will not be able to customize and it is because they are intercepted directly by the system. Specifically, these keys are the power button and the home key. The back key is also a special one. If you want to override its behavior, you can do it using its own method onBackPressed(), but there is a strong recommendation not to do so because its normal implementation allows users to navigate between previous screens and is used almost exclusively for this purpose.
Step 1: Start a New Android Project
You can create a new Android project to try this tutorial or you can implement these new methods directly into a project you already have.
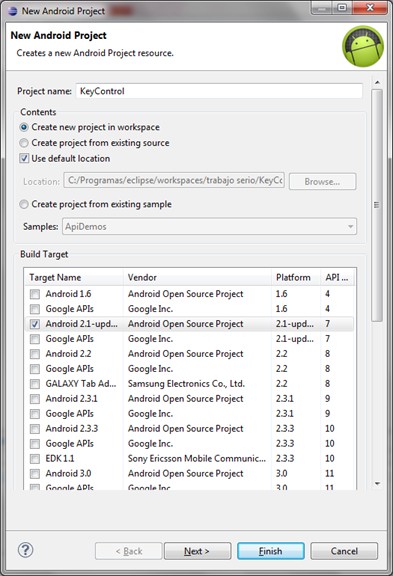
To create a new project in Eclipse, go to File -> New -> Project -> Android Project. Fill the project details with your preferences and then click "Finish". Now your new project will be in the left side of your Eclipse IDE.
Step 2: Overriding the onKeyDown() Method
The first method to override is the onKeyDown():
@Override
public boolean onKeyDown(int keyCode, KeyEvent event) {
 switch(keyCode){
 case KeyEvent.KEYCODE_MENU:
     Toast.makeText(this, "Menu key pressed", Toast.LENGTH_SHORT).show();
    return true;
   case KeyEvent.KEYCODE_SEARCH:
     Toast.makeText(this, "Search key pressed", Toast.LENGTH_SHORT).show();
     return true;
   case KeyEvent.KEYCODE_BACK:
     onBackPressed();
     return true;
   case KeyEvent.KEYCODE_VOLUME_UP:
     event.startTracking();
     return true;
   case KeyEvent.KEYCODE_VOLUME_DOWN:
     Toast.makeText(this,"Volumen Down pressed", Toast.LENGTH_SHORT).show();
     return false;
 }
 return super.onKeyDown(keyCode, event);
}
By overriding this method, we are customizing its behavior so every time we press any of these keys we are making our app to consume the event by returning true. The only exception to that logic is for the VOLUME DOWN key, as we are not consuming the event. For the down key, if the return value is false, it means it will be handled by the system, so when you press it, you are actually turning the volume down.
- The Menu and Search key is intercepted to show a message on the screen and then it is consumed.
- The Back key is intercepted by the onBackPressed() method.
- The Volume Up is intercepted, and the event.startTracking() is called to track it. If you hold it down it will call the onKeyLongPress() method.
Step 3: Overriding the onKeyUp() Method
The second method to override is onKeyUp():
@Override
public boolean onKeyUp(int keyCode, KeyEvent event) {
switch(keyCode){
case KeyEvent.KEYCODE_MENU:
Toast.makeText(this, "Menu key released", Toast.LENGTH_SHORT).show();
return true;
case KeyEvent.KEYCODE_SEARCH:
Toast.makeText(this, "Search key released", Toast.LENGTH_SHORT).show();
return true;
case KeyEvent.KEYCODE_VOLUME_UP:
if(event.isTracking() && !event.isCanceled())
Toast.makeText(this, "Volumen Up released", Toast.LENGTH_SHORT).show();
return true;
case KeyEvent.KEYCODE_VOLUME_DOWN:
Toast.makeText(this, "Volumen Down released", Toast.LENGTH_SHORT).show();
return true;
}
return super.onKeyDown(keyCode, event);
}
As in the previous method, this method will intercept when a key is released. It is up to you to implement the actions you want to take at that time. In this case, we are showing messages on the screen as follow:
- The Menu, Search, and Volume Down keys are intercepted to show a simple message.
- The Volume Up key will show a message if you hadn't pressed it in a while.
Step 4: Overriding the onKeyLongPress() Method
The third method to override is onKeyLongPress():
@Override
public boolean onKeyLongPress(int keyCode, KeyEvent event) {
 Toast.makeText(this, "Pressed for a long time =) ", Toast.LENGTH_SHORT).show();
 return true;
}
This method is called only when a key is tracked by calling the event.startTracking() method in the onKeyDown() method and pressed for a while. In this case we are doing this with the Volume Up key.
The event.startTracking() method only tracks one key at a time. So if another key down event is received, tracking is stopped on the previous event.
Step 5: Overriding the onBackPressed() Method
The fourth method to override is onBackPressed():
@Override
public void onBackPressed() {
 Toast.makeText(this, "Back key pressed =)", Toast.LENGTH_SHORT).show();
 super.onBackPressed();
}
This method is only for the back key as explained before and, once again, you should be very careful when trying to override it.
Step 6: Overriding the onTouchEvent() Method
The fifth method to override is the onTouchEvent():
@Override
public boolean onTouchEvent(MotionEvent event) {
 float x = event.getX();
 float y = event.getY();
 Toast.makeText(this, "Touch press on x: " + x + " y: "+y, Toast.LENGTH_SHORT).show();
 return true;
}
This method will intercept events done on the screen. In this case, we show in a message the coordinates where the screen was pressed.
Conclusion
By overriding these methods, you will improve the control on your app. You will also be able to craft new and unique user interfaces and navigation controls in your projects.

Comments