The Android SDK offers a wide range of interface components, including TextViews, Buttons, and EditText boxes. However, adding custom interface elements to your app is a great way to stand out in the App Market. This tutorial will dive into custom interface component creation by teaching you how to build a sleek rotary dialer.
This tutorial assumes some basic knowledge of Java and Android. Furthermore, I won’t introduce a complete API. Instead, specific classes are going to be used and explained. I will also explain, step by step, why I have chosen a particular implementation for this interface component.
Step 1: The Concept
We have a circle and want to rotate it around its center. The simplest approach is to take a two dimensional Cartesian coordinate system as a template.
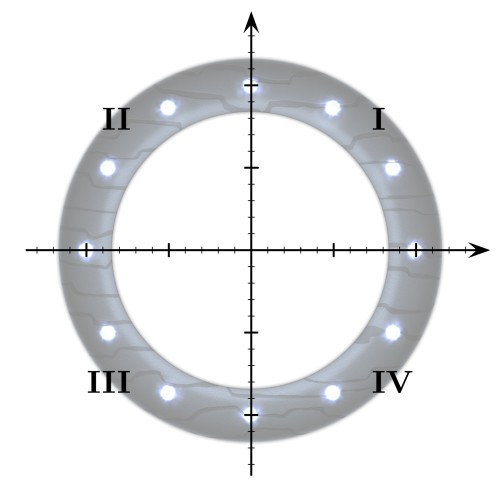
You touch the circle, rotate it, and then let it go. Moreover, the circle should register a "fling" when this occurs.
Android provides a very simple interface to transform images with the help of the Bitmap class and the Matrix class. The circle gets displayed in an ImageView. The mathematical basis of the unit circle can be implemented by using the Math class. Android also offers a good API to recognize touch events and gestures. As you can see, most of the work is already available to us with the SDK!
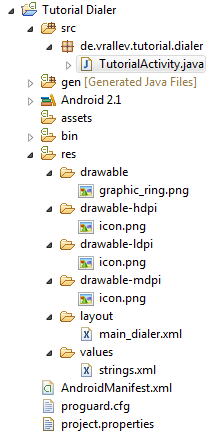
Step 2: Project Setup
Create a new Android project and add an Activity. Then add the dialer graphic to the "drawable" folder. We won’t need different versions for different display densities, because later we will scale the image programmatically. One image with a high resolution, which covers all display sizes, should be enough and will save storage space on the user's phone.
Step 3: Layout
For this tutorial, we will keep the user interface very simple. We only add one ImageView to the layout. For the ImageView’s content, we select our dialer graphic. It is no problem to add more Views later as doing so doesn’t influence our rotating dialer.
<?xml version="1.0" encoding="utf-8"?>
<LinearLayout
	xmlns:android="http://schemas.android.com/apk/res/android"
	android:orientation="vertical"
	android:layout_width="fill_parent"
	android:layout_height="fill_parent"
	android:background="#FFCCCCCC">
	<ImageView
		android:src="@drawable/graphic_ring"
		android:id="@+id/imageView_ring"
		android:layout_height="fill_parent"
		android:layout_width="fill_parent"></ImageView>
</LinearLayout>
Step 4: The Activity
As described in the steps above, we need to load the image as Bitmap while creating the activity. Furthermore, we need a matrix for the transformations, like the rotation. We do all of this in the onCreate method.
We also need a properly scaled copy of the image. Since we only know after measuring the layout how much space our ImageView fills, we add an OnGlobalLayoutListener. In the onGlobalLayout method, we can intercept the event that the layout has been drawn and query the size of our view.
	private static Bitmap imageOriginal, imageScaled;
	private static Matrix matrix;

	private ImageView dialer;
	private int dialerHeight, dialerWidth;

	@Override
    public void onCreate(Bundle savedInstanceState) {
        super.onCreate(savedInstanceState);
        setContentView(R.layout.main);

        // load the image only once
        if (imageOriginal == null) {
        	imageOriginal = BitmapFactory.decodeResource(getResources(), R.drawable.graphic_ring);
        }

        // initialize the matrix only once
        if (matrix == null) {
        	matrix = new Matrix();
        } else {
        	// not needed, you can also post the matrix immediately to restore the old state
        	matrix.reset();
        }


        dialer = (ImageView) findViewById(R.id.imageView_ring);
        dialer.setOnTouchListener(new MyOnTouchListener());
        dialer.getViewTreeObserver().addOnGlobalLayoutListener(new OnGlobalLayoutListener() {

        	@Override
			public void onGlobalLayout() {
        		// method called more than once, but the values only need to be initialized one time
        		if (dialerHeight == 0 || dialerWidth == 0) {
        			dialerHeight = dialer.getHeight();
        			dialerWidth = dialer.getWidth();

        			// resize
					Matrix resize = new Matrix();
					resize.postScale((float)Math.min(dialerWidth, dialerHeight) / (float)imageOriginal.getWidth(), (float)Math.min(dialerWidth, dialerHeight) / (float)imageOriginal.getHeight());
					imageScaled = Bitmap.createBitmap(imageOriginal, 0, 0, imageOriginal.getWidth(), imageOriginal.getHeight(), resize, false);
        		}
			}
		});

    }
The OnTouchListener is kept very simple. In the ACTION_DOWN event we initialize the angle (i.e. the unit circle). With each movement, the difference between the old and new angle gets additively incremented to the dialer.
We add the OnTouchListener as private inner class. Doing so will save us from the unnecessary passing of required parameters (e.g. the size of the view).
	/**
	 * Simple implementation of an {@link OnTouchListener} for registering the dialer's touch events.
	 */
	private class MyOnTouchListener implements OnTouchListener {

		private double startAngle;

		@Override
		public boolean onTouch(View v, MotionEvent event) {

			switch (event.getAction()) {

				case MotionEvent.ACTION_DOWN:
					startAngle = getAngle(event.getX(), event.getY());
					break;

				case MotionEvent.ACTION_MOVE:
					double currentAngle = getAngle(event.getX(), event.getY());
					rotateDialer((float) (startAngle - currentAngle));
					startAngle = currentAngle;
					break;

				case MotionEvent.ACTION_UP:

					break;
			}

			return true;
		}

	}
The calculation of the angle can be quickly solved with the help of the unit circle. However, the touch event's coordinate needs to be converted to the coordinates of the two dimensional Cartesian coordinate system first. It would probably help you to set up these formulas by yourself once again to understand them completely.
	/**
	 * @return The angle of the unit circle with the image view's center
	 */
	private double getAngle(double xTouch, double yTouch) {
		double x = xTouch - (dialerWidth / 2d);
		double y = dialerHeight - yTouch - (dialerHeight / 2d);

		switch (getQuadrant(x, y)) {
			case 1:
				return Math.asin(y / Math.hypot(x, y)) * 180 / Math.PI;
			case 2:
				return 180 - Math.asin(y / Math.hypot(x, y)) * 180 / Math.PI;
			case 3:
				return 180 + (-1 * Math.asin(y / Math.hypot(x, y)) * 180 / Math.PI);
			case 4:
				return 360 + Math.asin(y / Math.hypot(x, y)) * 180 / Math.PI;
			default:
				return 0;
		}
	}

	/**
	 * @return The selected quadrant.
	 */
	private static int getQuadrant(double x, double y) {
		if (x >= 0) {
			return y >= 0 ? 1 : 4;
		} else {
			return y >= 0 ? 2 : 3;
		}
	}
The method for rotating the dialer is very simple. We replace the old ImageView’s content every time with the new rotated Bitmap.
	/**
	 * Rotate the dialer.
	 *
	 * @param degrees The degrees, the dialer should get rotated.
	 */
	private void rotateDialer(float degrees) {
		matrix.postRotate(degrees);
		dialer.setImageBitmap(Bitmap.createBitmap(imageScaled, 0, 0, imageScaled.getWidth(), imageScaled.getHeight(), matrix, true));
	}
Notice that, apart from some small issues, rotating the dialer already works. Also note that if the rotated bitmap does not fit into the view, the bitmap gets scaled down automatically (see the scale type of the ImageView). This causes the varying size.
Step 5: Algorithm Correction
A few bugs were introduced in the step above, for example the varying scale, but they can be easily fixed. Do you see where the problem is with the method implemented above?
If you take a deeper look into the implementation of the calculation of the rotated image, you will quickly discover that a new Bitmap instance is created each time. This wastes a lot of RAM and results in often running garbage collector in the background (you notice this issue in the output of LogCat). This causes the animation to look choppy.
The problem can only be avoided by changing the approach. Instead of rotating a bitmap and applying it to the ImageView, we should directly rotate the ImageView’s content. For that purpose, we can change the scale type of the ImageView to “Matrix” and apply the matrix to the ImageView each time. This also adds another small change: now we need to add the scaled bitmap to the ImageView directly after the initialization.
<?xml version="1.0" encoding="utf-8"?>
<LinearLayout
	xmlns:android="http://schemas.android.com/apk/res/android"
	android:orientation="vertical"
	android:layout_width="fill_parent"
	android:layout_height="fill_parent"
	android:background="#FFCCCCCC">
	<ImageView
		android:src="@drawable/graphic_ring"
		android:id="@+id/imageView_ring"
		android:scaleType="matrix"
		android:layout_height="fill_parent"
		android:layout_width="fill_parent"></ImageView>
</LinearLayout>
...

			@Override
			public void onGlobalLayout() {
        		// method called more than once, but the values only need to be initialized one time
        		if (dialerHeight == 0 || dialerWidth == 0) {
        			dialerHeight = dialer.getHeight();
        			dialerWidth = dialer.getWidth();

        			// resize
					Matrix resize = new Matrix();
					resize.postScale((float)Math.min(dialerWidth, dialerHeight) / (float)imageOriginal.getWidth(), (float)Math.min(dialerWidth, dialerHeight) / (float)imageOriginal.getHeight());
					imageScaled = Bitmap.createBitmap(imageOriginal, 0, 0, imageOriginal.getWidth(), imageOriginal.getHeight(), resize, false);

					dialer.setImageBitmap(imageScaled);
					dialer.setImageMatrix(matrix);
        		}
			}

...

	/**
	 * Rotate the dialer.
	 *
	 * @param degrees The degrees, the dialer should get rotated.
	 */
	private void rotateDialer(float degrees) {
		matrix.postRotate(degrees);

		dialer.setImageMatrix(matrix);
	}
Now another bug occurs. The calculation of the angle works properly with the ImageView’s center. However, the image rotates around the coordinate [0, 0]. Therefore, we need to move the image at initialization to the correct position. The same applies to the rotation. First the bitmap has to be shifted, so that the center is located in the origin of the ImageView, then the bitmap can be rotated and moved back again.
...
			@Override
			public void onGlobalLayout() {
        		// method called more than once, but the values only need to be initialized one time
        		if (dialerHeight == 0 || dialerWidth == 0) {
        			dialerHeight = dialer.getHeight();
        			dialerWidth = dialer.getWidth();

        			// resize
					Matrix resize = new Matrix();
					resize.postScale((float)Math.min(dialerWidth, dialerHeight) / (float)imageOriginal.getWidth(), (float)Math.min(dialerWidth, dialerHeight) / (float)imageOriginal.getHeight());
					imageScaled = Bitmap.createBitmap(imageOriginal, 0, 0, imageOriginal.getWidth(), imageOriginal.getHeight(), resize, false);

					// translate to the image view's center
					float translateX = dialerWidth / 2 - imageScaled.getWidth() / 2;
					float translateY = dialerHeight / 2 - imageScaled.getHeight() / 2;
					matrix.postTranslate(translateX, translateY);

					dialer.setImageBitmap(imageScaled);
					dialer.setImageMatrix(matrix);
        		}
			}

...

	/**
	 * Rotate the dialer.
	 *
	 * @param degrees The degrees, the dialer should get rotated.
	 */
	private void rotateDialer(float degrees) {
		matrix.postRotate(degrees, dialerWidth / 2, dialerHeight / 2);

		dialer.setImageMatrix(matrix);
	}
Now our animation works much better and is very smooth.
Step 6: Fling
Android provides an easy-to-use API for recognizing gestures. For example a scroll, long press, and a fling can be detected. For our purposes, we extend the SimpleOnGestureListener class and override the method onFling. This class is recommended by the documentation.
Furthermore, we need to animate the rotation and thereby decrease its speed. Since these are just small calculations, it is not necessary to outsource the functionality in an extra thread. Instead, you can transfer the action to a Handler that can manipulate the GUI in the main thread. We can even avoid the handler instance by passing the action to the ImageView that uses its own Handler for it.
...

	private int dialerHeight, dialerWidth;

	private GestureDetector detector;

	@Override
    public void onCreate(Bundle savedInstanceState) {

...

        detector = new GestureDetector(this, new MyGestureDetector());

        dialer = (ImageView) findViewById(R.id.imageView_ring);
        dialer.setOnTouchListener(new MyOnTouchListener());

...

	/**
	 * Simple implementation of an {@link OnTouchListener} for registering the dialer's touch events.
	 */
	private class MyOnTouchListener implements OnTouchListener {

		private double startAngle;

		@Override
		public boolean onTouch(View v, MotionEvent event) {

			switch (event.getAction()) {

				case MotionEvent.ACTION_DOWN:
					startAngle = getAngle(event.getX(), event.getY());
					break;

				case MotionEvent.ACTION_MOVE:
					double currentAngle = getAngle(event.getX(), event.getY());
					rotateDialer((float) (startAngle - currentAngle));
					startAngle = currentAngle;
					break;

				case MotionEvent.ACTION_UP:

					break;
			}

			detector.onTouchEvent(event);

			return true;
		}
	}

	/**
	 * Simple implementation of a {@link SimpleOnGestureListener} for detecting a fling event.
	 */
	private class MyGestureDetector extends SimpleOnGestureListener {
		@Override
		public boolean onFling(MotionEvent e1, MotionEvent e2, float velocityX, float velocityY) {
			dialer.post(new FlingRunnable(velocityX + velocityY));
			return true;
		}
	}

	/**
	 * A {@link Runnable} for animating the the dialer's fling.
	 */
	private class FlingRunnable implements Runnable {

		private float velocity;

		public FlingRunnable(float velocity) {
			this.velocity = velocity;
		}

		@Override
		public void run() {
			if (Math.abs(velocity) > 5) {
				rotateDialer(velocity / 75);
				velocity /= 1.0666F;

				// post this instance again
				dialer.post(this);
			}
		}
	}
Step 7: Fixing The Inversed Rotations
If you extensively test the fling, it quickly becomes clear that at various positions the dialer rotates in the wrong direction. For example, this is the case when the start and end points are only in the third quadrant. However there are also more difficult error cases (e. g. when wiping from quadrant two to four over quadrant three).
The simplest solution is to remember the touched quadrants. The error cases are caught in the onFling method and the velocity gets inverted accordingly.
...

	private GestureDetector detector;

	// needed for detecting the inversed rotations
	private boolean[] quadrantTouched;

...

        detector = new GestureDetector(this, new MyGestureDetector());

		// there is no 0th quadrant, to keep it simple the first value gets ignored
        quadrantTouched = new boolean[] { false, false, false, false, false };

        dialer = (ImageView) findViewById(R.id.imageView_ring);

...

	/**
	 * Simple implementation of an {@link OnTouchListener} for registering the dialer's touch events.
	 */
	private class MyOnTouchListener implements OnTouchListener {

		private double startAngle;

		@Override
		public boolean onTouch(View v, MotionEvent event) {

			switch (event.getAction()) {

				case MotionEvent.ACTION_DOWN:

					// reset the touched quadrants
					for (int i = 0; i < quadrantTouched.length; i++) {
						quadrantTouched[i] = false;
					}

					startAngle = getAngle(event.getX(), event.getY());
					break;

				case MotionEvent.ACTION_MOVE:
					double currentAngle = getAngle(event.getX(), event.getY());
					rotateDialer((float) (startAngle - currentAngle));
					startAngle = currentAngle;
					break;

				case MotionEvent.ACTION_UP:

					break;
			}

			// set the touched quadrant to true
			quadrantTouched[getQuadrant(event.getX() - (dialerWidth / 2), dialerHeight - event.getY() - (dialerHeight / 2))] = true;

			detector.onTouchEvent(event);

			return true;
		}
	}

	/**
	 * Simple implementation of a {@link SimpleOnGestureListener} for detecting a fling event.
	 */
	private class MyGestureDetector extends SimpleOnGestureListener {
		@Override
		public boolean onFling(MotionEvent e1, MotionEvent e2, float velocityX, float velocityY) {

			// get the quadrant of the start and the end of the fling
			int q1 = getQuadrant(e1.getX() - (dialerWidth / 2), dialerHeight - e1.getY() - (dialerHeight / 2));
			int q2 = getQuadrant(e2.getX() - (dialerWidth / 2), dialerHeight - e2.getY() - (dialerHeight / 2));

			// the inversed rotations
			if ((q1 == 2 && q2 == 2 && Math.abs(velocityX) < Math.abs(velocityY))
					|| (q1 == 3 && q2 == 3)
					|| (q1 == 1 && q2 == 3)
					|| (q1 == 4 && q2 == 4 && Math.abs(velocityX) > Math.abs(velocityY))
					|| ((q1 == 2 && q2 == 3) || (q1 == 3 && q2 == 2))
					|| ((q1 == 3 && q2 == 4) || (q1 == 4 && q2 == 3))
					|| (q1 == 2 && q2 == 4 && quadrantTouched[3])
					|| (q1 == 4 && q2 == 2 && quadrantTouched[3])) {

				dialer.post(new FlingRunnable(-1 * (velocityX + velocityY)));
			} else {
				// the normal rotation
				dialer.post(new FlingRunnable(velocityX + velocityY));
			}

			return true;
		}
	}
Step 8: Stop Fling
Of course the fling animation has to stop if you touch the dialer while the animation is running. For this it is only necessary to add a boolean value for checking whether the animation is allowed to be played or not.
In the ACTION_DOWN event you want to stop it. Once you let the dialer go (ACTION_UP), the animation should be played.
...

	// needed for detecting the inversed rotations
	private boolean[] quadrantTouched;

	private boolean allowRotating;

...

		allowRotating = true;

        dialer = (ImageView) findViewById(R.id.imageView_ring);

...

			switch (event.getAction()) {

				case MotionEvent.ACTION_DOWN:

					// reset the touched quadrants
					for (int i = 0; i < quadrantTouched.length; i++) {
						quadrantTouched[i] = false;
					}

					allowRotating = false;

					startAngle = getAngle(event.getX(), event.getY());
					break;

				case MotionEvent.ACTION_MOVE:
					double currentAngle = getAngle(event.getX(), event.getY());
					rotateDialer((float) (startAngle - currentAngle));
					startAngle = currentAngle;
					break;

				case MotionEvent.ACTION_UP:
					allowRotating = true;
					break;
			}

...

		@Override
		public void run() {
			if (Math.abs(velocity) > 5 && allowRotating) {
				rotateDialer(velocity / 75);
				velocity /= 1.0666F;

				// post this instance again
				dialer.post(this);
			}
		}
Step 9: What’s Next
All the desired features are included in the dialer. However, this is only an example and can be extended indefinitively.
A few additional enhancements that come to mind include: you could track the angle and invert or decrease certain values (see my app Shutdown Remote for an example of this). Also, after releasing the dialer you could animate it back to the original position to replicate the mechanical function of real, antique rotary dials. Further, the dialer could be extracted into a custom View class, which would increase the reusability of the component. The possibilities for enhancement abound!
Conclusion
In this tutorial, I have shown you how to implement a simple rotary dialer. Of course, the functionality can be extended and improved further as discussed above. The Android SDK offers a great and very useful API with many classes. There is no need the reinvent a lot, you normally just need to implement what is already there. Do not hesitate to give comments or leave suggestions!
Sources
http://en.wikipedia.org/wiki/File:Cartesian_coordinates_2D.svg

Comments