The Android platform provides the ability to facilitate interaction, to carry out computation, and to save data. To explore some of these basic features with a practical focus, this series will create a simple arithmetic game for the Android platform. The series will involve creating user interface elements and layouts, four Activity classes, and one helper class. The gameplay logic will be relatively complex if you do not have much Java experience, but you will learn to use various Java control structures along the way!
Series Format
This series on Creating an Arithmetic Game will be released in three parts:
Game Overview
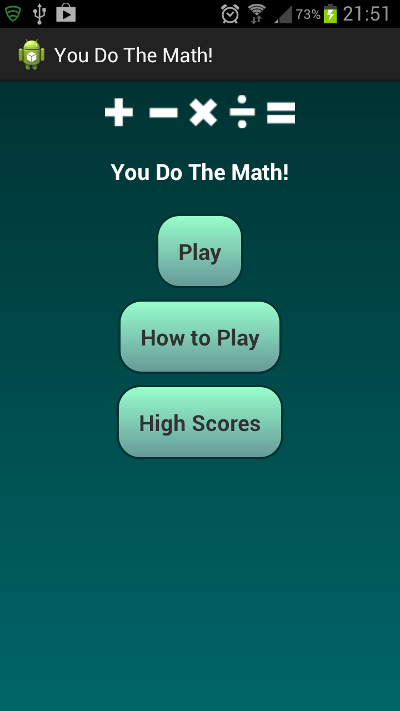
The following is a screenshot of the game I'll teach you how to build:

When the app launches, the user will be presented with a menu screen offering three options: Play, How to Play, and High Scores. On selecting the Play option, the user will be prompted to choose a level (i.e. easy, medium, or hard). The Play screen will display a calculator-style interface in which the user is presented with arithmetic questions that may include addition, subtraction, multiplication, or division. Their chosen level will determine the range of numerical operators used in the questions.
The user will be able to enter their answer and will receive feedback regarding whether or not it was correct, with a score indicator updating throughout. The user will simply be continuously presented with questions until they decide to quit. The score will be reset to zero if the user enters an incorrect answer, with high scores in the game being the number of questions answered correctly in a row.
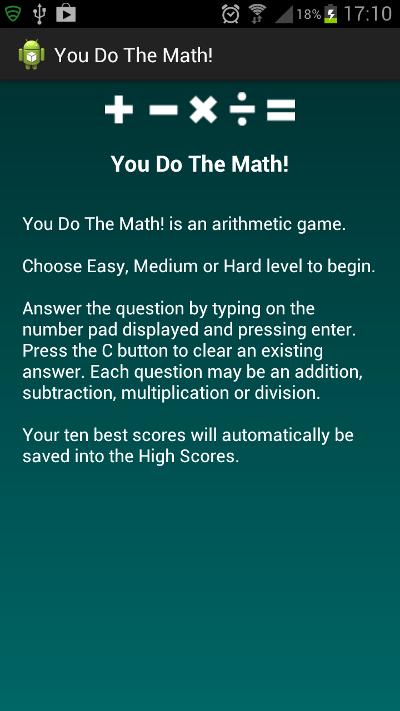
The How to Play screen will include textual information about the game, with the High Scores screen listing the ten top scores along with their dates. As well as implementing the gameplay, the application code will need to automatically store any high scores reached by the user as they play the game. This will involve the Shared Preferences for the app. We will also be saving and restoring instance state data so that gameplay continues when the app is hidden or paused.
1. Create a New Android Project
Step 1
Open Eclipse and create a new project for your arithmetic game app. Enter a package and application name of your choice - we will be using a minimum SDK of 14 with a target of 17 for the code in this tutorial.
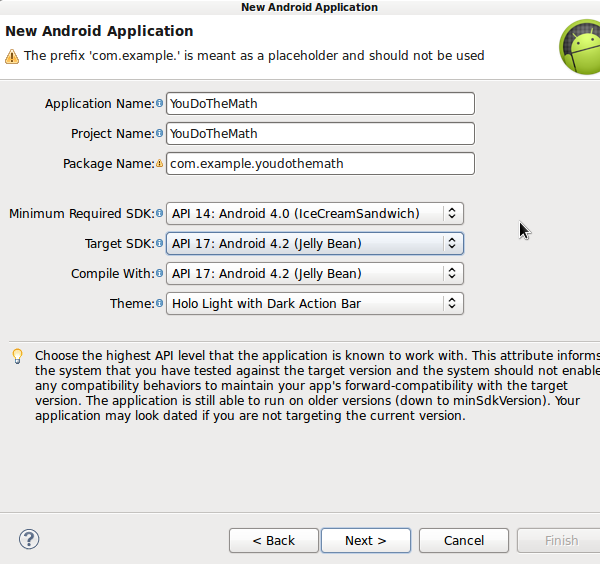
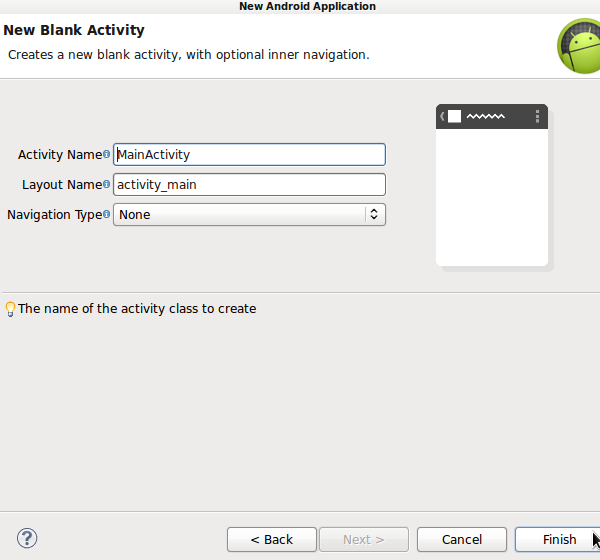
Let Eclipse create a blank Activity for you plus a main layout for it.
Step 2
Open the Manifest file for your project and switch to the XML editing tab. Your main Activity should already be listed in the application element. After it, add three more Activity elements, before the closing application tag:
<activity android:name=".PlayGame">
</activity>
<activity android:name=".HowToPlay">
</activity>
<activity android:name=".HighScores">
</activity>
Open your application's "res/values" strings XML file to set the app name. Edit the automatically generated "app_name" string to suit a name of your choice, for example:
<string name="app_name">You Do The Math!</string>
2. Create Visual Elements
Step 1
The application is going to use three images we prepare outside of Eclipse. When the user answers a question, they will be presented with a tick or a cross image indicating whether they answered correctly or incorrectly. You can use the following images or create your own if you wish. The images are white since the background is going to be dark. Add them to your app's drawable folder(s):


Step 2
A couple of the app screens are going to use a header image depicting the arithmetic operators which is purely for decoration - copy it to your drawables or use your own:

These images are also included in the download folder for this tutorial. If you are targeting more than one device screen density with multiple drawable folders, remember to add image files for each target. Otherwise, you can simply use a single folder named "drawable" to hold the images, but Eclipse does not create this folder by default.
Step 3
The game interface is going to use three backgrounds we will define in XML as part of the project. In your app's drawables folder, create a new file named "app_back.xml", entering the following code:
<shape xmlns:android="http://schemas.android.com/apk/res/android"
android:dither="true">
<gradient
	android:startColor="#ff006666"
	android:endColor="#ff003333"
	android:angle="90"
/>
</shape>
This gradient will be displayed in the screen backgrounds - we will add references to it and the other drawables when we define the application layouts. You can of course change any of the colors if you like. Next create another new drawables files named "num_back.xml" with the following content:
<shape xmlns:android="http://schemas.android.com/apk/res/android"
android:dither="true">
<gradient
	android:startColor="#ff003333"
	android:endColor="#ff009966"
	android:angle="90"
/>
<corners android:radius="20dp" />
<stroke
	android:color="#ff003333"
	android:width="2dp"
/>
</shape>
This background will be used for the numerical buttons during gameplay. This time we use rounded corners and a border together with the gradient fill to define a button shape. Finally, add another drawables file, naming it "enter_back.xml" and adding the following content:
<shape xmlns:android="http://schemas.android.com/apk/res/android"
android:dither="true">
<gradient
	android:startColor="#ff669999"
	android:endColor="#ff99ffcc"
	android:angle="90"
/>
<corners android:radius="20dp" />
<stroke
	android:color="#ff003333"
	android:width="2dp"
/>
</shape>
This will be used for the enter button, with similar content as the previous drawable but slightly different colors.
3. Create the Main Activity Layout
Step 1
Open the main layout file Eclipse created when you started the project. This will be the layout users see on first launching the app and will present the three options for playing a game, reading how to play or viewing the high scores. Replace the content of the file with the following Scroll View and Relative Layout:
<ScrollView xmlns:android="http://schemas.android.com/apk/res/android"
	xmlns:tools="http://schemas.android.com/tools"
	android:layout_width="match_parent"
	android:layout_height="match_parent"
	android:background="@drawable/app_back"
	android:padding="10dp" >

	<RelativeLayout
		android:layout_width="match_parent"
		android:layout_height="wrap_content"
		android:gravity="center" >

	</RelativeLayout>
</ScrollView>
Notice that we refer to one of the drawable background files we created and center the content of the screen.
Step 2
Now let's add the content of the main Activity to its layout. Inside the Relative Layout, first add the image containing the operator symbols:
<ImageView
	android:id="@+id/operators"
	android:layout_width="wrap_content"
	android:layout_height="wrap_content"
	android:layout_centerHorizontal="true"
	android:src="@drawable/operators"
	android:padding="5dp"
	android:contentDescription="operators"/>
We use an ID so that other items in the layout can be laid out relative to this one. We also refer to the image file we added to the drawables earlier. Eclipse will prompt you to store the content description attribute in the strings resource file, which is generally better for performance but in this case we will not be using the string anywhere else in the application so you can leave it hard-coded in the layout file.
Step 3
After the image, add a Text View in which the app name appears:
<TextView
	android:id="@+id/intro"
	android:layout_width="wrap_content"
	android:layout_height="wrap_content"
	android:layout_below="@id/operators"
	android:layout_centerHorizontal="true"
	android:padding="20dp"
 	android:text="@string/app_name"
	android:textColor="#ffffffff"
 	android:textSize="20sp"
	android:textStyle="bold" />
We position this view relative to the image we already added, using an ID attribute again for subsequent items to position themselves relative to this one. We use the "app_name" string we altered in the strings values file earlier.
Step 4
Now let's add buttons for launching the three options. First the button to play a game:
<Button
	android:id="@+id/play_btn"
	android:layout_width="wrap_content"
	android:layout_height="wrap_content"
	android:layout_below="@id/intro"
	android:layout_centerHorizontal="true"
	android:layout_margin="5dp"
	android:background="@drawable/enter_back"
	android:padding="20dp"
	android:text="Play"
	android:textColor="#ff333333"
	android:textSize="20sp"
	android:textStyle="bold" />
This time we will use the ID attribute for positioning other items and for identifying the button in Java. Notice that we use one of the backgrounds we created as a drawable file. Next add the How to Play button:
<Button
	android:id="@+id/help_btn"
	android:layout_width="wrap_content"
	android:layout_height="wrap_content"
	android:layout_below="@id/play_btn"
	android:layout_centerHorizontal="true"
	android:layout_margin="5dp"
	android:background="@drawable/enter_back"
	android:padding="20dp"
	android:text="How to Play"
	android:textColor="#ff333333"
	android:textSize="20sp"
	android:textStyle="bold" />
Finally add the High Scores button:
<Button
	android:id="@+id/high_btn"
	android:layout_width="wrap_content"
	android:layout_height="wrap_content"
	android:layout_below="@id/help_btn"
	android:layout_centerHorizontal="true"
	android:layout_margin="5dp"
	android:background="@drawable/enter_back"
	android:padding="20dp"
	android:text="High Scores"
	android:textColor="#ff333333"
	android:textSize="20sp"
	android:textStyle="bold" />
We will handle clicks on these buttons in the main Activity class later. That's the main layout file complete.
4. Create the Gameplay Activity Layout
Step 1
Let's now turn to the gameplay Activity layout, which will be the most complex one. In your app's layout folder, create a new file, naming it "activity_playgame.xml" and entering the following outline:
<LinearLayout xmlns:android="http://schemas.android.com/apk/res/android"
	android:layout_width="match_parent"
	android:layout_height="match_parent"
	android:background="@drawable/app_back"
	android:orientation="vertical" >

</LinearLayout>
We use the background drawable again. The gameplay Activity screen will use nested Linear Layouts, which suits the calculator style content we will be placing in it. As you can see from the preview image above, the screen will display an area for the tick or cross image feedback together with the score at the top, then an area for the question, answer and clear button under that. Finally, running to the bottom of the screen will be the number pad with digits 0 to 9 plus the enter key.
Step 2
Inside the Linear Layout you added, add another one:
<LinearLayout
	android:layout_width="fill_parent"
	android:layout_height="wrap_content"
	android:layout_weight="1"
	android:orientation="horizontal">
</LinearLayout>
Inside this Linear Layout, place an Image View for the tick/cross image and a Text View for the score:
<ImageView
	android:id="@+id/response"
	android:layout_width="wrap_content"
	android:layout_height="wrap_content"
	android:layout_gravity="center|left"
	android:layout_weight="1"
	android:contentDescription="result"
	android:src="@drawable/tick" />

<TextView
	android:id="@+id/score"
	android:layout_width="wrap_content"
  	android:layout_height="match_parent"
	android:layout_weight="1"
	android:gravity="center|right"
	android:paddingRight="20dp"
	android:text="Score: 0"
	android:textColor="#ffffffff"
	android:textSize="20sp"
	android:textStyle="bold" />
We start the Image View with the tick image displayed so that you can see how the layout comes together - in reality we will set either the tick or cross to display during gameplay. Similarly, we start the score Text View with a score of zero and will continually set it from Java as the gameplay progresses.
Step 3
Still inside the main Linear Layout in the file but after the nested one with the image and score text in it, add another Linear Layout:
<LinearLayout
	android:layout_width="fill_parent"
	android:layout_height="wrap_content"
	android:layout_weight="1"
	android:orientation="horizontal" >
</LinearLayout>
Inside this Linear Layout, add Text Views for the question and answer, then the clear button:
<TextView
	android:id="@+id/question"
	android:layout_width="0dp"
	android:layout_height="match_parent"
	android:layout_marginBottom="2dp"
	android:layout_marginLeft="2dp"
	android:layout_marginTop="2dp"
	android:layout_weight="1"
	android:background="#ffffffff"
	android:gravity="center|right"
	android:padding="5dp"
	android:text="0 + 0"
	android:textColor="#ff333333"
	android:textSize="30sp" />

<TextView
	android:id="@+id/answer"
	android:layout_width="0dp"
	android:layout_height="match_parent"
	android:layout_marginBottom="2dp"
 	android:layout_marginRight="2dp"
	android:layout_marginTop="2dp"
	android:layout_weight="1"
	android:background="#ffffffff"
	android:gravity="center|left"
	android:padding="5dp"
	android:text="= ?"
	android:textColor="#ff333333"
	android:textSize="30sp" />

<Button
	android:id="@+id/clear"
	android:layout_width="0dp"
	android:layout_height="match_parent"
	android:layout_margin="1dp"
	android:layout_weight="1"
	android:background="@drawable/enter_back"
	android:gravity="center"
	android:padding="5dp"
	android:text="C"
	android:textColor="#ff333333"
	android:textSize="30sp"
	android:textStyle="bold" />
We will use the ID attributes to refer to all of these in Java during gameplay. We use one of the background drawables for the "C" button. As before, we set dummy initial text to display in the question and answer views.
Step 4
Next we are going to add the number pad area, which will involve four more horizontal Linear Layouts added after the last one but still inside the outer one:
<LinearLayout
	android:layout_width="fill_parent"
	android:layout_height="wrap_content"
	android:layout_weight="1"
	android:orientation="horizontal" >

	<Button
		android:id="@+id/btn7"
		android:layout_width="0dp"
		android:layout_height="match_parent"
		android:layout_margin="1dp"
		android:layout_weight="1"
		android:background="@drawable/num_back"
		android:gravity="center"
		android:padding="5dp"
		android:tag="7"
		android:text="7"
		android:textColor="#ffcccccc"
		android:textSize="30sp"
		android:textStyle="bold" />

	<Button
		android:id="@+id/btn8"
		android:layout_width="0dp"
		android:layout_height="match_parent"
		android:layout_margin="1dp"
		android:layout_weight="1"
		android:background="@drawable/num_back"
		android:gravity="center"
		android:padding="5dp"
		android:tag="8"
		android:text="8"
		android:textColor="#ffcccccc"
		android:textSize="30sp"
		android:textStyle="bold" />

	<Button
		android:id="@+id/btn9"
		android:layout_width="0dp"
		android:layout_height="match_parent"
		android:layout_margin="1dp"
		android:layout_weight="1"
		android:background="@drawable/num_back"
		android:gravity="center"
		android:padding="5dp"
		android:tag="9"
		android:text="9"
		android:textColor="#ffcccccc"
		android:textSize="30sp"
		android:textStyle="bold" />
</LinearLayout>

<LinearLayout
	android:layout_width="fill_parent"
	android:layout_height="wrap_content"
	android:layout_weight="1"
	android:orientation="horizontal" >

	<Button
		android:id="@+id/btn4"
		android:layout_width="0dp"
		android:layout_height="match_parent"
		android:layout_margin="1dp"
		android:layout_weight="1"
		android:background="@drawable/num_back"
		android:gravity="center"
		android:padding="5dp"
		android:tag="4"
		android:text="4"
		android:textColor="#ffcccccc"
		android:textSize="30sp"
		android:textStyle="bold" />

	<Button
		android:id="@+id/btn5"
		android:layout_width="0dp"
		android:layout_height="match_parent"
		android:layout_margin="1dp"
		android:layout_weight="1"
		android:background="@drawable/num_back"
		android:gravity="center"
		android:padding="5dp"
		android:tag="5"
		android:text="5"
		android:textColor="#ffcccccc"
		android:textSize="30sp"
		android:textStyle="bold" />

	<Button
		android:id="@+id/btn6"
		android:layout_width="0dp"
		android:layout_height="match_parent"
		android:layout_margin="1dp"
		android:layout_weight="1"
		android:background="@drawable/num_back"
		android:gravity="center"
		android:padding="5dp"
		android:tag="6"
		android:text="6"
		android:textColor="#ffcccccc"
		android:textSize="30sp"
		android:textStyle="bold" />
</LinearLayout>

<LinearLayout
	android:layout_width="fill_parent"
	android:layout_height="wrap_content"
	android:layout_weight="1"
	android:orientation="horizontal" >

	<Button
		android:id="@+id/btn1"
		android:layout_width="0dp"
		android:layout_height="match_parent"
		android:layout_margin="1dp"
		android:layout_weight="1"
		android:background="@drawable/num_back"
		android:gravity="center"
		android:padding="5dp"
		android:tag="1"
		android:text="1"
		android:textColor="#ffcccccc"
		android:textSize="30sp"
		android:textStyle="bold" />

	<Button
		android:id="@+id/btn2"
		android:layout_width="0dp"
		android:layout_height="match_parent"
		android:layout_margin="1dp"
		android:layout_weight="1"
		android:background="@drawable/num_back"
		android:gravity="center"
		android:padding="5dp"
		android:tag="2"
		android:text="2"
		android:textColor="#ffcccccc"
		android:textSize="30sp"
		android:textStyle="bold" />

	<Button
		android:id="@+id/btn3"
		android:layout_width="0dp"
		android:layout_height="match_parent"
		android:layout_margin="1dp"
		android:layout_weight="1"
		android:background="@drawable/num_back"
		android:gravity="center"
		android:padding="5dp"
		android:tag="3"
		android:text="3"
		android:textColor="#ffcccccc"
		android:textSize="30sp"
		android:textStyle="bold" />
</LinearLayout>

<LinearLayout
	android:layout_width="fill_parent"
	android:layout_height="wrap_content"
	android:layout_weight="1"
	android:orientation="horizontal" >

	<Button
		android:id="@+id/btn0"
		android:layout_width="0dp"
		android:layout_height="match_parent"
		android:layout_margin="1dp"
		android:layout_weight="1"
		android:background="@drawable/num_back"
		android:gravity="center"
		android:padding="5dp"
		android:tag="0"
		android:text="0"
		android:textColor="#ffcccccc"
		android:textSize="30sp"
		android:textStyle="bold" />

	<Button
		android:id="@+id/enter"
		android:layout_width="0dp"
		android:layout_height="match_parent"
		android:layout_margin="1dp"
		android:layout_weight="2"
		android:background="@drawable/enter_back"
		android:gravity="center"
		android:padding="5dp"
		android:text="Enter"
		android:textColor="#ff333333"
		android:textSize="30sp"
		android:textStyle="bold" />
</LinearLayout>
Notice that each numerical button also has a tag attribute representing its number - we will use this in Java to implement gameplay. That's the gameplay layout complete, if you are in any doubt about the overall structure, check yours against the one in the download folder.

5. Create the How to Play Layout
Step 1
Create a new file in your layout folder, naming it "activity_how.xml" and entering the following outline:
<ScrollView xmlns:android="http://schemas.android.com/apk/res/android"
	xmlns:tools="http://schemas.android.com/tools"
	android:layout_width="match_parent"
	android:layout_height="match_parent"
	android:background="@drawable/app_back"
	android:padding="10dp" >

	<RelativeLayout
		android:layout_width="match_parent"
		android:layout_height="wrap_content"
		android:gravity="center" >
	</RelativeLayout>

</ScrollView>
We use a containing Scroll View to ensure that the content will scroll if necessary. Inside the Relative Layout, add the operators image, a Text View header and a Text View for the How to Play information:
<ImageView
	android:id="@+id/operators"
	android:layout_width="wrap_content"
	android:layout_height="wrap_content"
	android:layout_centerHorizontal="true"
	android:contentDescription="operators"
	android:src="@drawable/operators" />

<TextView
	android:id="@+id/intro"
	android:layout_width="wrap_content"
	android:layout_height="wrap_content"
	android:layout_below="@id/operators"
	android:layout_centerHorizontal="true"
	android:padding="20dp"
	android:text="@string/app_name"
	android:textColor="#ffffffff"
	android:textSize="20sp"
	android:textStyle="bold" />

<TextView
	android:layout_width="match_parent"
	android:layout_height="match_parent"
	android:layout_below="@id/intro"
	android:layout_centerHorizontal="true"
	android:padding="10dp"
	android:text="@string/help_info"
	android:textColor="#ffffffff"
	android:textSize="16sp" />
That's the How to Play layout complete. In your "res/values" strings XML file, add the information string we refer to here:
<string name="help_info">You Do The Math! is an arithmetic game.\n\nChoose Easy, Medium or Hard level to begin.\n\nAnswer the question by typing on the number pad displayed and pressing enter. Press the C button to clear an existing answer. Each question may be an addition, subtraction, multiplication or division.\n\nYour ten best scores will automatically be saved into the High Scores.</string>
You can of course alter the information if you wish.
6. Create the High Scores Layout
Step 1
The only layout left to define is the one for the High Scores screen. Add another new file to your layout folder, this time naming it "activity_high.xml" and with the following initial content:
<ScrollView xmlns:android="http://schemas.android.com/apk/res/android"
	xmlns:tools="http://schemas.android.com/tools"
	android:layout_width="match_parent"
	android:layout_height="fill_parent"
	android:background="@drawable/app_back"
	android:padding="10dp" >

	<RelativeLayout
		android:layout_width="match_parent"
		android:layout_height="wrap_content"
		android:gravity="center" >
	</RelativeLayout>

</ScrollView>
Add the image and a couple of heading Text Views inside the Relative Layout:
<ImageView
	android:id="@+id/operators"
	android:layout_width="wrap_content"
	android:layout_height="wrap_content"
	android:layout_centerHorizontal="true"
	android:contentDescription="operators"
	android:src="@drawable/operators" />

<TextView
	android:id="@+id/intro"
	android:layout_width="wrap_content"
	android:layout_height="wrap_content"
	android:layout_below="@id/operators"
	android:layout_centerHorizontal="true"
	android:padding="20dp"
	android:text="@string/app_name"
	android:textColor="#ffffffff"
	android:textSize="26sp"
	android:textStyle="bold" />

<TextView
	android:id="@+id/high_head"
	android:layout_width="wrap_content"
	android:layout_height="wrap_content"
	android:layout_below="@id/intro"
	android:layout_centerHorizontal="true"
	android:padding="20dp"
	android:text="HIGH SCORES"
	android:textColor="#ffffffff"
	android:textSize="24sp"
	android:textStyle="bold" />
Finally, still inside the Relative Layout, add a Text View in which we will display the high scores:
<TextView
	android:id="@+id/high_scores_list"
	android:layout_width="match_parent"
	android:layout_height="match_parent"
	android:layout_below="@id/high_head"
	android:layout_centerHorizontal="true"
	android:gravity="center"
	android:padding="10dp"
	android:textColor="#ffffffff"
	android:textSize="22sp"
	android:textStyle="bold" />
We will populate the high score text from Java when the screen is launched, so at the moment your layout will not show much. That's all the app layouts complete - you can see their initial appearance in the Graphical Layout tab in Eclipse.
7. Create Activity Classes
Step 1
When you created the project Eclipse should have created a blank main Activity for you. Now create the other Activities for the app. Start with the gameplay Activity - select your package and right-click or choose "File" then "New" and "Class." Enter "PlayGame" as the class name and choose the Android Activity class as the superclass:
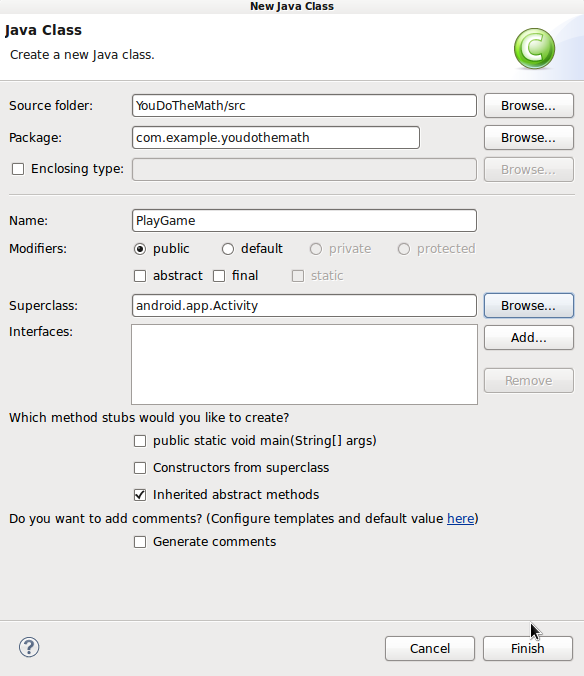
Do the same for the other two Activities, naming the How to Play Activity "HowToPlay" and the High Scores Activity "HighScores" to match what you listed in the Manifest file.
8. Setup Main Activity Class
Step 1
The last thing we will do in this tutorial is get the main Activity class started. Open your main Activity Java file. Eclipse should have already added the onCreate method in which the main layout is set:
protected void onCreate(Bundle savedInstanceState) {
	super.onCreate(savedInstanceState);
	setContentView(R.layout.activity_main);
}
Add the following import statements to your class:
import android.view.View;
import android.view.View.OnClickListener;
import android.widget.Button;
Add the following instance variables before your onCreate method:
private Button playBtn, helpBtn, highBtn;
We will use these to refer to the three buttons.
Step 2
Retrieve references to the button items after the existing code inside onCreate:
playBtn = (Button)findViewById(R.id.play_btn);
helpBtn = (Button)findViewById(R.id.help_btn);
highBtn = (Button)findViewById(R.id.high_btn);
Set the click listeners for these buttons next:
playBtn.setOnClickListener(this);
helpBtn.setOnClickListener(this);
highBtn.setOnClickListener(this);
Extend the opening line of the class declaration to implement click listening as follows:
public class MainActivity extends Activity implements OnClickListener
Step 3
Now let's add the onClick method for responding to user clicks, after the onCreate method:
@Override
public void onClick(View view) {
//respond to clicks
}
Inside this method, find out which button was clicked and create a code block to respond to each:
if(view.getId()==R.id.play_btn){
	//play button
}
else if(view.getId()==R.id.help_btn){
	//how to play button
}
else if(view.getId()==R.id.high_btn){
	//high scores button
}
We will implement these responses in the next part of the series.
Conclusion
That is the first part of the series complete. In this tutorial we have set the application Activities and layouts up ready for building the gameplay functionality. In the second part of the series we will code all of the application gameplay logic. In the final part we will implement the High Scores and How to Play screens as well as saving high scores during gameplay and saving the app instance state data for continuity.

Comments