In this series we are creating a simple arithmetic game for Android. The game is going to display a calculator-style interface to users, repeatedly presenting questions and keeping track of how many correct answers they score in a row. In the first part of the series we built the user interface, got the main Activity class setup, and laid the foundations for another three Activity class. In this part, we will work on the gameplay logic, with the user selecting from three possible levels of difficulty. We will implement the question and answer gameplay with four operators: addition, subtraction, multiplication, and division. The game will choose operator and operands randomly, with the process tweaked for each operator.
Series Format
This series on Creating an Arithmetic Game will be released in three parts:
Game Overview
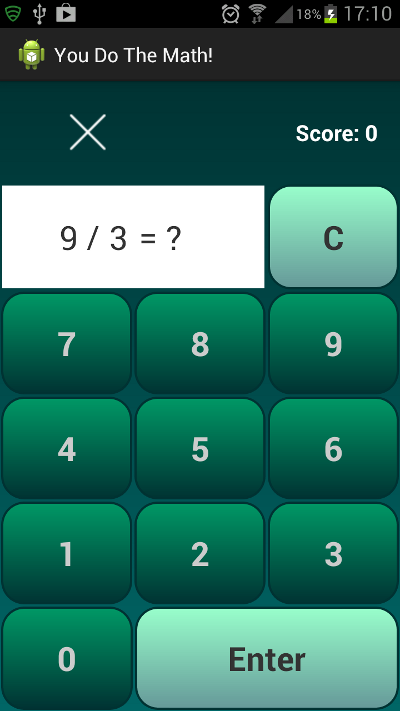
The following is a screenshot of the game I'll teach you how to build:

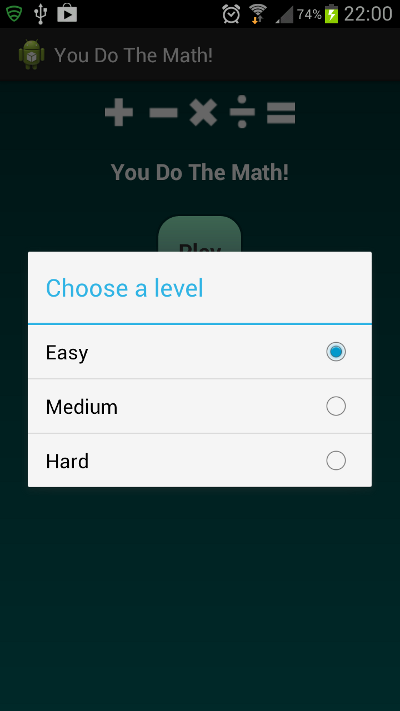
The main Activity presents three options: Play, How to Play, and High Scores. After pressing the Play option, the user must choose a difficulty level, and then gameplay will begin. Each answer entered by the user will be given a tick or cross as response, while the score will continue incrementing until the user enters a wrong answer or quits the game. We will complete the How to Play and High Scores functionality in the final part of the series, as well as saving the app instance's state.
1. Launch the Game
Step 1
Last time we prepared the main Activity class to listen for clicks on the three buttons - let's now implement what happens when the user clicks the Play button. First add the following imports to the app's main class:
import android.app.AlertDialog;
import android.content.DialogInterface;
import android.content.Intent;
We want the user to select one of three levels to start a game - add an instance variable to the class to store the level names in an array:
private String[] levelNames = {"Easy", "Medium", "Hard"};
In your onClick method create an Alert Dialog in the if statement we created for the Play button.
AlertDialog.Builder builder = new AlertDialog.Builder(this);
Now set the details of the dialog, passing the level names array and setting up the click listener for the options:
builder.setTitle("Choose a level")
	.setSingleChoiceItems(levelNames, 0, new DialogInterface.OnClickListener() {
		public void onClick(DialogInterface dialog, int which) {
			dialog.dismiss();
			//start gameplay
			startPlay(which);
		}
	});
When a level is selected, the onClick method for the Alert Dialog calls a helper method we will add next, passing the index of the selected level from the array. Before we implement the helper method, still inside the if statement for the Play button, create and show the dialog:
AlertDialog ad = builder.create();
ad.show();
Now add the helper method to the class, after the Activity onClick method:
private void startPlay(int chosenLevel)
{
    //start gameplay
    Intent playIntent = new Intent(this, PlayGame.class);
    playIntent.putExtra("level", chosenLevel);
    this.startActivity(playIntent);
}
We start the gameplay Activity, passing the level number to the Intent. We will implement clicks on the other two buttons in the final part of the series.
2. Prepare for Gameplay
Step 1
Last time we created an Activity class for gameplay. Eclipse should have inserted the following outline structure, with whatever names you chose:
package com.example.youdothemath;

import android.app.Activity;

public class PlayGame extends Activity {
//class content
}
Add the following import statements to your class:
import java.util.Random;
import android.os.Bundle;
import android.view.View;
import android.view.View.OnClickListener;
import android.widget.Button;
import android.widget.ImageView;
import android.widget.TextView;
Insert the onCreate method and set the content view to the layout we created last time:
@Override
protected void onCreate(Bundle savedInstanceState) {
	super.onCreate(savedInstanceState);
	setContentView(R.layout.activity_playgame);
}
Extend the class declaration opening line to implement click listening:
public class PlayGame extends Activity implements OnClickListener
Step 2
Let's add some instance variables to the class to facilitate gameplay. First, integers to represent the level, operands, operator and answer:
private int level = 0, answer = 0, operator = 0, operand1 = 0, operand2 = 0;
Next define some constants for the four operators, which will streamline the gameplay processing:
private final int ADD_OPERATOR = 0, SUBTRACT_OPERATOR = 1, MULTIPLY_OPERATOR = 2, DIVIDE_OPERATOR = 3;
Now add an array for the text to display for each of these operators, with the array index corresponding to the constant in each case:
private String[] operators = {"+", "-", "x", "/"};
The range of operators is going to depend on the level the user chose and on the operator being used (i.e. the addition operands for the easy level will have a different possible minimum and maximum number than the operands used with other operators and on other levels). We will use a random number generator to choose the operands, with a minimum and maximum in each case. Define the minimum and maximum numbers for each operator and each level using the following 2D arrays:
private int[][] levelMin = {
	{1, 11, 21},
	{1, 5, 10},
	{2, 5, 10},
	{2, 3, 5}};
private int[][] levelMax = {
	{10, 25, 50},
	{10, 20, 30},
	{5, 10, 15},
	{10, 50, 100}};
Each array represents the levels and operators, with the minimum or maximum listed for the three levels for addition, then subtraction, then multiplication, then division - using the same order as the constants we defined. For example, the minimum operand for addition at medium difficulty is 11, while the maximum operand for subtraction at hard difficulty is 30. The purpose of this will become clearer when we implement the part of gameplay where we generate the questions. You can change the minimum and maximum numbers later if you like.
Next add an instance variable for a random number generator we will use throughout the class:
private Random random;
Finally, add instance variables for the user interface elements we defined in the layout file last time, including the Text Views for question, answer and score, the Image View for the tick or cross response image and the buttons for digits 0-9 plus enter and clear:
private TextView question, answerTxt, scoreTxt;
private ImageView response;
private Button btn1, btn2, btn3, btn4, btn5, btn6, btn7, btn8, btn9, btn0, enterBtn, clearBtn;
Step 3
Now let's turn to the onCreate method. After the existing code, retrieve references to the Text and Image Views:
question =  (TextView)findViewById(R.id.question);
answerTxt = (TextView)findViewById(R.id.answer);
response =  (ImageView)findViewById(R.id.response);
scoreTxt =  (TextView)findViewById(R.id.score);
Set the tick/cross response image to be invisible initially:
response.setVisibility(View.INVISIBLE);
Next retrieve references to the number, clear, and enter buttons:
btn1 = (Button)findViewById(R.id.btn1);
btn2 = (Button)findViewById(R.id.btn2);
btn3 = (Button)findViewById(R.id.btn3);
btn4 = (Button)findViewById(R.id.btn4);
btn5 = (Button)findViewById(R.id.btn5);
btn6 = (Button)findViewById(R.id.btn6);
btn7 = (Button)findViewById(R.id.btn7);
btn8 = (Button)findViewById(R.id.btn8);
btn9 = (Button)findViewById(R.id.btn9);
btn0 = (Button)findViewById(R.id.btn0);
enterBtn = (Button)findViewById(R.id.enter);
clearBtn = (Button)findViewById(R.id.clear);
Listen for clicks on all of these buttons:
btn1.setOnClickListener(this);
btn2.setOnClickListener(this);
btn3.setOnClickListener(this);
btn4.setOnClickListener(this);
btn5.setOnClickListener(this);
btn6.setOnClickListener(this);
btn7.setOnClickListener(this);
btn8.setOnClickListener(this);
btn9.setOnClickListener(this);
btn0.setOnClickListener(this);
enterBtn.setOnClickListener(this);
clearBtn.setOnClickListener(this);
Now retrieve the level number we passed from the main Activity when launching this one:
Bundle extras = getIntent().getExtras();
if(extras != null)
{
    int passedLevel = extras.getInt("level", -1);
    if(passedLevel>=0) level = passedLevel;
}
The level variable was set initially to zero, so if no number is received the game defaults to easy level. After this if statement, still inside onCreate, initialize the random number generator:
random = new Random();
Finally call a helper method to start the game - we will implement the method next:
chooseQuestion();
3. Start Gameplay
Step 1
Add the method you called in onCreate to your class:
private void chooseQuestion(){
//get a question
}
This method is going to execute every time we need a new question. It will choose the operator and operands at random, within the range specified for the operator and level. The method will output the question to the user interface, ready for the user's answer.
Step 2
Inside the new method, first reset the answer Text View:
answerTxt.setText("= ?");
This is necessary because the answer Text View is going to display the user-entered answer, so it must be reset each time a new question is generated. Select an operator at random, making sure it is within the range of the operators array (it has four in it but you could potentially change this):
operator = random.nextInt(operators.length);
Select two operands at random, using another helper method:
operand1 = getOperand();
operand2 = getOperand();
Step 3
After your chooseQuestion method, add the new helper method to the class, for choosing operands:
private int getOperand(){
//return operand number
}
We use a helper method for this as it may be called repeatedly. The method will return an integer within the relevant range. Add the method content:
return random.nextInt(levelMax[operator][level] - levelMin[operator][level] + 1)
	+ levelMin[operator][level];
This code ensures that the integer is within the correct range for the current operator and level.
Step 4
Back in your chooseQuestion method, you now need to add some qualifications depending on the operator. For example, we don't want to allow negative answers, so the subtract operators must not produce a negative result. Add a conditional test:
if(operator == SUBTRACT_OPERATOR){
    while(operand2>operand1){
        operand1 = getOperand();
        operand2 = getOperand();
    }
}
If the second operand is greater than the first, we simply carry on generating operands until we get a pair in which the first operand is greater. With the divide operator, we only want answers that are whole numbers, so add a further conditional:
else if(operator==DIVIDE_OPERATOR){
    while((((double)operand1/(double)operand2)%1 > 0) || (operand1==operand2))
    {
        operand1 = getOperand();
        operand2 = getOperand();
    }
}
This time we continue until we have a division resulting in a whole number, also avoiding cases where the two operands are equal. You could of course tweak this code further to improve on the effectiveness of the game.
Step 5
Now we have a valid set of operands for the chosen operator, so let's calculate the answer using a switch statement:
switch(operator)
{
	case ADD_OPERATOR:
		answer = operand1+operand2;
		break;
	case SUBTRACT_OPERATOR:
		answer = operand1-operand2;
		break;
	case MULTIPLY_OPERATOR:
		answer = operand1*operand2;
		break;
	case DIVIDE_OPERATOR:
		answer = operand1/operand2;
		break;
	default:
		break;
}
We will use this to check the user's answer later. Now we can display the question to the user:
question.setText(operand1+" "+operators[operator]+" "+operand2);
4. Handle User Input
Step 1
Now we have a question being displayed to the user, we just have to respond to their clicks on the buttons. Add an onClick method to your class:
@Override
public void onClick(View view)
{
//button clicked
}
Find out which button was clicked:
if(view.getId()==R.id.enter){
	//enter button
}
else if(view.getId()==R.id.clear){
	//clear button
}
else {
	//number button
}
Remember that we setup click listeners for the number buttons, the enter button and the clear button. We check first for the enter then clear buttons. If the click event has fired and it wasn't either of those, it must have been a number button, which we will handle in the else block.
Step 2
Let's handle the clear button first. In the else if for the clear button, simply reset the answer Text View:
answerTxt.setText("= ?");
Step 3
Now let's handle the number buttons. In the else block, start by setting the tick/cross image to be hidden, as we don't want feedback displayed while the user is entering an answer:
response.setVisibility(View.INVISIBLE);
Remember that we set tags representing the relevant numbers in each number button when we added them to the layout. This means that we can handle all number buttons in the same way, retrieving the number pressed from the tag:
int enteredNum = Integer.parseInt(view.getTag().toString());
Now we have two possible scenarios, the user is entering the first digit of the answer, or a subsequent digit. Check the currently displayed answer and respond accordingly, either setting or appending the digit just pressed:
if(answerTxt.getText().toString().endsWith("?"))
	answerTxt.setText("= "+enteredNum);
else
	answerTxt.append(""+enteredNum);
Step 4
Finally, we can handle clicks on the enter button. In the if block for the enter button, first retrieve the answer entered by the user from the answer Text View:
String answerContent = answerTxt.getText().toString();
Check if we have an answer, if not, we do nothing:
if(!answerContent.endsWith("?"))
{
    //we have an answer
}
The answer text is always preceded with the text "= ", with "= ?" displayed until the user presses a number key, so we know we have an answer. Inside the if block, now we can retrieve the number entered:
int enteredAnswer = Integer.parseInt(answerContent.substring(2));
When we check the answer, we will update the score, so call another helper method to retrieve it:
int exScore = getScore();
After the onClick method, add this new method to return the current score by reading the score Text View:
private int getScore(){
    String scoreStr = scoreTxt.getText().toString();
    return Integer.parseInt(scoreStr.substring(scoreStr.lastIndexOf(" ")+1));
}
Back in the onClick block for the enter button, check whether the user's answer is correct:
if(enteredAnswer==answer){
    //correct
}
Inside this block, respond to the correct answer:
scoreTxt.setText("Score: "+(exScore+1));
response.setImageResource(R.drawable.tick);
response.setVisibility(View.VISIBLE);
We update the score text, display the tick image and set the Image View to display. After the if block, add an else for incorrect answers:
else{
    //incorrect
}
Inside this block, respond to the incorrect answer:
scoreTxt.setText("Score: 0");
response.setImageResource(R.drawable.cross);
response.setVisibility(View.VISIBLE);
We reset the score to zero and display the cross image. Finally, after the else, choose another question:
chooseQuestion();
And so the game continues...
Conclusion
We've now completed the second part of the series! At this stage, you should be able to run your app and play the game, although the How to Play and High Scores screens will not function yet - we will complete them in the final tutorial. In this tutorial we have implemented the gameplay logic, handling and responding to user interaction. In the final part of the series we will save and retrieve high scores using the application Shared Preferences. We will also save instance state data to ensure the app continues to function when gameplay is interrupted.

Comments