With the ZXing library, you can create Android applications with barcode scanning functionality. In Android SDK: Create a Barcode Reader, we implemented basic barcode reading with the library in a simple app. In this tutorial series, we will build on what we learned to create an app that will scan books and retrieve related information about them from Google Books API.
This series on Creating a Book Scanner App is in three parts:
- Google Books API and ZXing Setup
- Interface Creation and Book Search
- Retrieving and Displaying Book Information (Pending Publication)
In this part of the series, we will build the remainder of the user interface for the app and carry out a book search using data from the user scans. This will involve using an inner AsyncTask class to carry out the fetching of data over the Internet off the app's main UI thread.
Here is a preview of the app we are working toward:
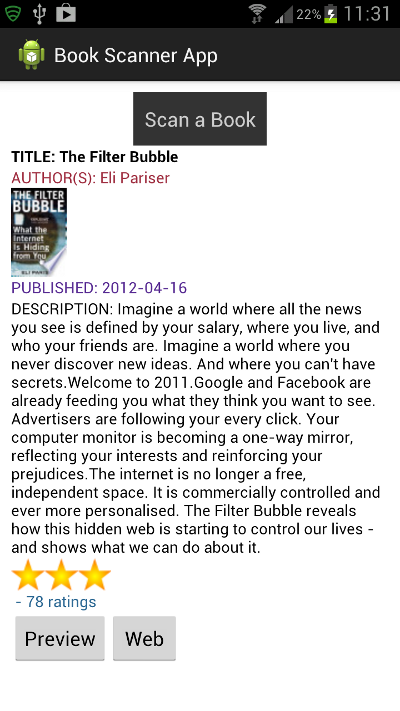
The app is going to let users scan book barcodes, then search for the scanned books in Google Books, presenting the results within the app interface. In the final part of the series we will process the JSON book search results returned. We will use a WebView to present a preview of the book, if one is available, and will link to the book page on the Google site.
1. Complete the User Interface
Step 1
We created the basic outline of the user interface and the scan button last time - let's complete the remaining elements now. As you can see from the preview image above, the user interface is going to display a selection of information from the Google Books search, including the book title, author, a thumbnail image, the publication date, a description, a star rating and the number of ratings. For the star rating, we will display a star image multiple times to match the rating for the book. We will also display a button linking to the preview for the book, if there is one, and another button linking to the book's page on Google Books.
Open your main layout file. After the scan button we added last time, inside the Relative Layout, add a Linear Layout for the book information:
<LinearLayout
	android:layout_width="match_parent"
	android:layout_height="match_parent"
	android:orientation="vertical"
	android:layout_below="@id/scan_button">
</LinearLayout>
Inside this Linear Layout, first add a Text View for the book title:
<TextView
	android:id="@+id/book_title"
	android:layout_width="wrap_content"
	android:layout_height="wrap_content"
	android:textColor="#ff000000"
	android:textIsSelectable="true"
	android:textStyle="bold" />
Each UI item in which we display retrieved information has an ID so that we can refer to it in the Activity Java code. You can of course alter the colors and styling properties if you wish. Next, still inside the Linear Layout, add a Text View for the author:
<TextView
	android:id="@+id/book_author"
	android:layout_width="wrap_content"
	android:layout_height="wrap_content"
	android:textColor="#ffa13143"
	android:textIsSelectable="true" />
Next add an Image View for the thumbnail image:
<ImageView
	android:id="@+id/thumb"
	android:layout_width="50dp"
	android:layout_height="80dp"
	android:contentDescription="@string/thumb" />
The image we are going to fetch is approximately 80 pixels in width according to the Google Books API documentation, so we are rounding it down a little - in reality the images are varying sizes, so this avoids any of them being stretched too much and resulting in poorer quality. Add the specified string to your "res/values/strings" XML file:
<string name="thumb">Book thumbnail</string>
Back in the layout file, after the Image View, add another Text View for the publication date:
<TextView
	android:id="@+id/book_date"
	android:layout_width="wrap_content"
	android:layout_height="wrap_content"
	android:textColor="#ff592d94"
	android:textIsSelectable="true" />
Next add a Text View for the description:
<TextView
	android:id="@+id/book_description"
	android:layout_width="wrap_content"
	android:layout_height="wrap_content"
	android:textColor="#ff000000"
	android:textIsSelectable="true" />
Now we want to add another Linear Layout inside the existing one. In this layout we will build the star rating display dynamically when the book information is retrieved. After the description Text View:
<LinearLayout
	android:id="@+id/star_layout"
	android:layout_width="wrap_content"
	android:layout_height="wrap_content"
	android:orientation="horizontal" >
</LinearLayout>
This time the layout is horizontal so that the stars will be displayed on a horizontal line. Leave this Linear Layout empty, as we will be populating it when the app runs. After it, but still inside the first Linear Layout we added, add a Text View for the number of ratings:
<TextView
	android:id="@+id/book_rating_count"
	android:layout_width="wrap_content"
	android:layout_height="wrap_content"
	android:textColor="#ff2d6994"
	android:textIsSelectable="true"
	android:textStyle="italic" />
Finally we need another Linear Layout inside the first one to hold the preview and Web link buttons. After the rating count Text View:
<LinearLayout
	android:layout_width="wrap_content"
	android:layout_height="wrap_content"
	android:orientation="horizontal" >
</LinearLayout>
Inside this, add the two buttons for the book preview and link to Google Books:
<Button
	android:id="@+id/preview_btn"
	android:layout_width="wrap_content"
	android:layout_height="wrap_content"
	android:text="@string/pre" />

<Button
	android:id="@+id/link_btn"
	android:layout_width="wrap_content"
	android:layout_height="wrap_content"
	android:text="@string/link" />
Complete the layout by adding these two specified strings to your "res/values/strings" XML file:
<string name="pre">Preview</string>
<string name="link">Web</string>
Step 2
Now let's get the app ready to refer to these user interface items. In your main Activity class, add the following import statements:
import java.io.BufferedReader;
import java.io.InputStream;
import java.io.InputStreamReader;

import org.apache.http.HttpEntity;
import org.apache.http.HttpResponse;
import org.apache.http.StatusLine;
import org.apache.http.client.HttpClient;
import org.apache.http.client.methods.HttpGet;
import org.apache.http.impl.client.DefaultHttpClient;

import android.os.AsyncTask;
import android.widget.ImageView;
import android.widget.LinearLayout;
import android.widget.TextView;
You should already have a single instance variable for the scan button. Extend the line in which you declared it to include the other two buttons we have just added:
private Button scanBtn, previewBtn, linkBtn;
After this line, add declarations for the Text Views:
private TextView authorText, titleText, descriptionText, dateText, ratingCountText;
Next add the Linear Layout for the star rating section:
private LinearLayout starLayout;
Add the thumbnail Image View:
private ImageView thumbView;
For the star rating section, we are going to display one star for each one the book has been awarded by contributors to the Google Books data. We will use the following image, which you can find in the source code download or download directly here:

Place this image in your app's drawables folder(s) or create an alternative image of your choice. In your Activity class, add an array instance variable for the star Image Views:
private ImageView[] starViews;
Step 3
Inside the onCreate method, we can now retrieve references to these items. You should already have code instantiating the scan button variable and setting the click listener for it. After that code, do the same for the preview and link buttons, setting them to be invisible initially, so that they are only displayed after the user has scanned a book:
previewBtn = (Button)findViewById(R.id.preview_btn);
previewBtn.setVisibility(View.GONE);
previewBtn.setOnClickListener(this);
linkBtn = (Button)findViewById(R.id.link_btn);
linkBtn.setVisibility(View.GONE);
linkBtn.setOnClickListener(this);
Next instantiate the remaining user interface items using the ID values we gave them in the layout:
authorText = (TextView)findViewById(R.id.book_author);
titleText = (TextView)findViewById(R.id.book_title);
descriptionText = (TextView)findViewById(R.id.book_description);
dateText = (TextView)findViewById(R.id.book_date);
starLayout = (LinearLayout)findViewById(R.id.star_layout);
ratingCountText = (TextView)findViewById(R.id.book_rating_count);
thumbView = (ImageView)findViewById(R.id.thumb);
Now instantiate the array for the star Image Views:
starViews=new ImageView[5];
for(int s=0; s<starViews.length; s++){
	starViews[s]=new ImageView(this);
}
We will set the star image to appear in the correct number of Image Views for the rating of each book scanned.
2. Search for a Book
Step 1
Last time we got an API key for Google Books, so let's use that to carry out a book search. In your onActivityResult method, you carried out a scan and received the results. The ZXing scanner is capable of scanning various types of barcode, but since this is a book scanner app, we are only interested in EAN barcodes. After the lines in which you instantiate the scanContent and scanFormat variables, but still inside the if statement, carry out a check on the scan result before proceeding:
if(scanContent!=null && scanFormat!=null && scanFormat.equalsIgnoreCase("EAN_13")){
//book search
}
else{
	Toast toast = Toast.makeText(getApplicationContext(),
		"Not a valid scan!", Toast.LENGTH_SHORT);
		toast.show();
}
If the scanned barcode is not an EAN we simply output an error message. We can now prepare the Google Books search string. You can search the API in various ways - we are going to search by ISBN since we have that scanned data. The ISBN search URL has the following structure:
https://www.googleapis.com/books/v1/volumes?q=isbn:0000000000000&key=your_key
Inside the new if block, build this string using the scan data and API key:
String bookSearchString = "https://www.googleapis.com/books/v1/volumes?"+
	"q=isbn:"+scanContent+"&key=your_key";
We include the scan content, which should be an EAN number. Add your own API key.
Step 2
We are going to use an AsyncTask class to request and retrieve the book search results. Inside your Activity class, after the onActivityResult method, add the class declaration:
private class GetBookInfo extends AsyncTask<String, Void, String> {
//fetch book info
}
The class doInBackground method is going to receive the URL string and return a string representing the search results. Inside the class, add the method:
@Override
protected String doInBackground(String... bookURLs) {
//request book info
}
This will ensure that the fetching of the data does not take place on the app's main UI thread. Inside doInBackground, create a String Builder to hold the results:
StringBuilder bookBuilder = new StringBuilder();
Although we know there is only going to be one search URL string, the method expects to potentially receive multiple parameters, so add a loop:
for (String bookSearchURL : bookURLs) {
//search urls
}
Inside the loop, create an HTTP client to request the data:
HttpClient bookClient = new DefaultHttpClient();
As always with I/O operations, there is a possibility of errors, so add try and catch blocks next:
try {
	//get the data
}
catch(Exception e){ e.printStackTrace(); }
Inside the try block, create an HTTP Get object, passing it the URL search string:
HttpGet bookGet = new HttpGet(bookSearchURL);
Execute the request:
HttpResponse bookResponse = bookClient.execute(bookGet);
Check the status of the response:
StatusLine bookSearchStatus = bookResponse.getStatusLine();
if (bookSearchStatus.getStatusCode()==200) {
	//we have a result
}
Inside this if block, get the message entity from the response:
HttpEntity bookEntity = bookResponse.getEntity();
Now read the content into a Buffered Reader so that we can process it:
InputStream bookContent = bookEntity.getContent();
InputStreamReader bookInput = new InputStreamReader(bookContent);
BufferedReader bookReader = new BufferedReader(bookInput);
Work through the response content, appending it to the String Builder a line at a time:
String lineIn;
while ((lineIn=bookReader.readLine())!=null) {
	bookBuilder.append(lineIn);
}
Now we can return this result. After the closing bracket of the for loop but still inside doInBackground:
return bookBuilder.toString();
This return string will be received by the onPostExecute method, which we will implement next time. In it we will process the returned book info and display it within the user interface. We will also create an instance of this AsyncTask class and pass the URL search string to it.
Conclusion
In this tutorial we have completed the user interface, prepared a URL search string and started to implement an AsyncTask class to fetch the book data in the background. At the moment when you run your app it will not fetch any data - we will implement the remaining functionality next time, in the last part of the series. We will also create a second AsyncTask to fetch the book thumbnail image, add a second Activity to the app for book previews and will take care of saving the application state.

Comments