With the ZXing library, you can create Android applications with barcode scanning functionality. In Android SDK: Create a Barcode Reader, we implemented basic barcode reading with the library in a simple app. In this tutorial series, we will build on what we learned to create an app that will scan books and retrieve related information about them from Google Books API.
Here is a preview of the app we are working toward:

This series on Creating a Book Scanner App is in three parts:
- Google Books API and ZXing Setup
- Interface Creation and Book Search
- Retrieving and Displaying Book Information (Pending Publication)
In this first part of the series, we will get the app set up for scanning - you will be able to use most of the code from the previous tutorial, with any changes necessary outlined below. We will also get setup for accessing Google Books API. In the second part we will create the rest of the user interface and carry out a book search via Google Books API. In the final part we will retrieve the results of the book search and present them within the interface.
When the app runs, the user will be able to scan books on clicking a button. When the app receives the scan result, it will check that the format is EAN. If it is, the app will build a search query for Google Books which it will attempt to execute. When the app receives the JSON book search results, it will pick particular details out and display them within the interface. We will use two inner AsyncTask classes, one for retrieving the book search results and one for retrieving an image thumbnail of the book, if one is available. We will also create a second class with a Web View in it, in which we will use the Embedded Viewer API to display a preview of the scanned book, again if one is available. We will use an asset file for the Web View, and will provide a link to the Web page for the book on Google Books site. The final app will also include steps to preserve the data displayed on state changes.
1. Create a Scanner Project
Step 1
If you have not already completed the previous tutorial Android SDK: Create a Barcode Reader, you may wish to do so first. If you did complete that tutorial, you can either create a new app for this tutorial or amend the code in the scanner app you already created. We will not be explaining the functionality outlined in that first tutorial again but will run through the code necessary for the book scanning app.
If you are working with the app you created during the previous tutorial you may be able to omit some of the steps below - just read through them and make sure you have the code outlined. We will be using the scan button as before, but do not need the two Text Views we created for that app as we will be using different views to display the book info - you can leave most of the Activity class the way it is, but should replace your XML layout file content with the code indicated below.
If you are creating a new Android Project, let Eclipse create a blank Activity plus layout for you. Create a second package in your project for the ZXing classes as we did in the previous tutorial, giving the package the name "com.google.zxing.integration.android" and copying the two scanning via Intent classes into it. In your main Activity class, add the following import statements (omitting any Eclipse has already added):
import android.os.Bundle;
import android.app.Activity;
import android.content.Intent;
import android.util.Log;
import android.view.View;
import android.view.View.OnClickListener;
import android.widget.Button;
import android.widget.Toast;

import com.google.zxing.integration.android.IntentIntegrator;
import com.google.zxing.integration.android.IntentResult;
We will be adding code to the main Activity class later in this tutorial and throughout the series, as well as creating a second class and adding to some resource files including the layout. For the moment a new blank Activity class should contain the default content, setting the layout file created when Eclipse created the project:
protected void onCreate(Bundle savedInstanceState) {
	super.onCreate(savedInstanceState);
	setContentView(R.layout.activity_main);
}
Step 2
Let's start getting our user interface set up. Open your layout file and replace the content with the following Relative Layout contained within a Scroll View:
<ScrollView xmlns:android="http://schemas.android.com/apk/res/android"
	android:layout_width="fill_parent"
	android:layout_height="fill_parent"
	android:background="#ffffffff" >

	<RelativeLayout
		android:layout_width="match_parent"
		android:layout_height="wrap_content"
		android:padding="10dp" >
	</RelativeLayout>

</ScrollView>
Inside the Relative Layout, add a Button for scanning as we did in the previous tutorial:
<Button android:id="@+id/scan_button"
	android:layout_width="wrap_content"
	android:layout_height="wrap_content"
	android:layout_centerHorizontal="true"
	android:padding="10dp"
	android:background="#ff333333"
	android:textColor="#ffcccccc"
	android:text="@string/scan"
	/>
Add the specified string to your "res/values/strings" XML file:
<string name="scan">Scan a Book</string>
Step 3
Let's turn to the Activity class. If you are working with the code you created for the previous scanning tutorial, you can remove all lines referencing the two Text Views we used in the Activity (formatTxt and contentTxt). Otherwise you can leave the Activity as it was when you completed that tutorial.
If you are creating the app from scratch, extend the opening Activity declaration line to implement the click listener interface:
public class MainActivity extends Activity implements OnClickListener
Add the outline of the onClick method to your class:
public void onClick(View v){
//handle clicks
}
At the top of the class declaration, before onCreate, add an instance variable for the scan button:
private Button scanBtn;
Inside onCreate, retrieve a reference to the button after the existing code:
scanBtn = (Button)findViewById(R.id.scan_button);
scanBtn.setOnClickListener(this);
Step 4
Let's initiate scanning when the user presses the button, as we did last time. In the onClick method, check for clicks on the scan button:
if(v.getId()==R.id.scan_button){
	IntentIntegrator scanIntegrator = new IntentIntegrator(this);
	scanIntegrator.initiateScan();
}
As before, we are scanning via Intent, which will prompt the user to download the ZXing barcode scanner if they do not already have it installed. The scanning result will be returned to onActivityResult, so add it to your class:
public void onActivityResult(int requestCode, int resultCode, Intent intent) {
	//retrieve result of scanning - instantiate ZXing object
	IntentResult scanningResult = IntentIntegrator.parseActivityResult(requestCode, resultCode, intent);
	//check we have a valid result
	if (scanningResult != null) {
		//get content from Intent Result
		String scanContent = scanningResult.getContents();
		//get format name of data scanned
		String scanFormat = scanningResult.getFormatName();
	}
	else{
		//invalid scan data or scan canceled
		Toast toast = Toast.makeText(getApplicationContext(),
				"No book scan data received!", Toast.LENGTH_SHORT);
		toast.show();
	}
}
This is virtually identical to the code we used in the last tutorial except for the reference to the two Text Views which we have removed. We will output information about scanned books in user interface items we create later in the series. For the moment you can add the following line to your onActivityResult method, inside the if block, outputting the scan content and format to the log if you wish to run the app in the meantime:
Log.v("SCAN", "content: "+scanContent+" - format: "+scanFormat);
2. Setup Google Books API Access
Step 1
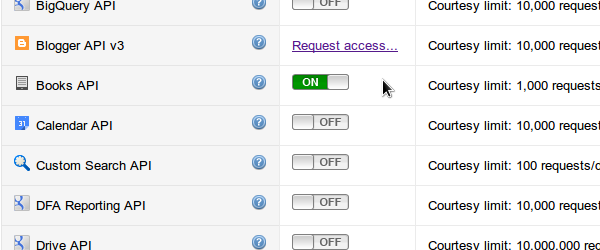
We are going to use Google Books API to retrieve information about books scanned by the user. Sign into your Google account and browse to the APIs Console. Select "Services" and scroll to the Books API listing. Click to turn Books API on for your account, accepting the terms if prompted.
You will need your API key to access the Books API in the app. In your Google APIs Console, select "API Access". If you already have a key it should be listed under "Key for browser apps". If not you can create one by selecting "Create new Browser key" and following the instructions. Copy your key for later reference - we will use it in the next tutorial.
Step 2
To use the Google Books API service, we will need Internet access, so finally add the permission to your app Manifest:
<uses-permission android:name="android.permission.INTERNET" >
</uses-permission>
Conclusion
In this first part of the series we have set the app up to use scanning functionality via ZXing. We have also retrieved an API key for accessing Google Books data. In the next part we will build a book search query and execute it. Over the second and third parts of the series we will fetch and retrieve information about scanned books. Check the source code download to ensure you have everything in the right place before you complete the next part.

Comments