The Android platform provides support for both speech recognition and speech synthesis. In this tutorial, we will create a simple Android app which allows the user to speak, attempts to recognize what they say, and then repeats what was recognized back to them using the Text To Speech engine.
We will use the same technique for the TTS engine as we did in Android SDK: Using the Text to Speech Engine, so the focus of this tutorial will be on the speech recognition element. Both speech recognition and synthesis are relatively easy to implement on the Android platform, so you should be able to achieve the steps in this tutorial even if you are an Android beginner.
Step 1: Start an Android Project
Create a new Android project in Eclipse. Alternatively, if you want to implement the speech recognition functionality in an existing app, open it instead. For this tutorial we have a minimum SDK version of 8, and you do not need to make any particular additions to your Manifest file, the default contents should suffice.
Step 2: Define the User Interface
Let's start by defining the user interface. When the app launches, the user will be presented with a button. On pressing the button, the app will prompt them to speak, listening for their voice input. When the speech recognition utility processes the speech input, the app will present a list of suggested words to the user. As you'll know if you've tried speech recognition as a user, the recognizer is not always accurate, so this list is essential. When the user selects an item from the list, the app will speak it back to them using the TTS engine. The TTS part of the application is optional, so you can omit it if you prefer.
The app is going to use a few text Strings as part of the interface, so define them by opening the "res/values/strings.xml" file and entering the following content:
<resources> <string name="intro">Press the button to speak!</string> <string name="app_name">SpeechRepeat</string> <string name="speech">Speak now!</string> <string name="word_intro">Suggested words…</string> </resources>
Of course, you can alter the String content in any way you like.
Open your "res/layout/main.xml" file to create the main app layout. Switch to the XML editor if the graphical editor is displayed by default. Enter a Linear Layout as the main layout for the app's launch Activity:
<LinearLayout xmlns:android="http://schemas.android.com/apk/res/android"
	android:layout_width="fill_parent"
	android:layout_height="fill_parent"
	android:orientation="vertical"
	android:background="#ff330066"
	android:paddingBottom="5dp" >

</LinearLayout>
The Linear Layout contains various style declarations including a background color. Inside the Linear Layout, first enter an informative Text View:
<TextView android:layout_width="fill_parent"
	android:layout_height="wrap_content"
	android:text="@string/intro"
	android:padding="5dp"
	android:textStyle="bold"
	android:textSize="16dp"
	android:gravity="center"
	android:textColor="#ffffff33" />
Notice that the Text View refers to one of the Strings we defined. It also sets various display properties which you can alter if you wish. After the Text View, add a button:
<Button android:id="@+id/speech_btn"
	android:layout_width="match_parent"
	android:layout_height="wrap_content"
	android:text="@string/speech" />
The user will press this button in order to speak. We give the button an ID so that we can identify it in the Java code and display one of the Strings we defined on it. After the button, add another informative Text View, which will precede the list of suggested words:
<TextView android:layout_width="fill_parent"
	android:layout_height="wrap_content"
	android:padding="5dp"
	android:text="@string/word_intro"
	android:textStyle="italic" />
Again, this Text View uses a String resource and contains style properties. The last item in our main.xml Linear Layout is the list of suggested words:
<ListView android:id="@+id/word_list"
	android:layout_width="fill_parent"
	android:layout_height="0dip"
	android:layout_weight="1"
	android:paddingLeft="10dp"
	android:paddingTop="3dp"
	android:paddingRight="10dp"
	android:paddingBottom="3dp"
	android:layout_marginLeft="20dp"
	android:layout_marginRight="20dp"
	android:layout_marginTop="5dp"
	android:layout_marginBottom="5dp"
	android:background="@drawable/words_bg" />
The List View will be populated with data when the app runs, so we give it an ID for identification in Java. The element also refers to a drawable resource, which you should add to each of the drawables folders in your app's "res" directory, saving it as "words_bg.xml" and entering the following content:
<shape xmlns:android="http://schemas.android.com/apk/res/android"
	android:dither="true">
	<gradient
	android:startColor="#ff000000"
	android:endColor="#ff000000"
	android:centerColor="#00000000"
	android:angle="180" />
	<corners android:radius="10dp" />
	<stroke
	android:width="2dp"
	android:color="#66ffffff" />
</shape>
This is a simple shape drawable to display behind the List View. You can of course alter this and the List View style properties if you wish. The only remaining user interface item we need to define now is the layout for a single item within the list, each of which will display a word suggestion. Create a new file in "res/layout" named "word.xml"and then enter the following code:
<TextView xmlns:android="http://schemas.android.com/apk/res/android"
	android:layout_width="fill_parent"
	android:layout_height="fill_parent"
	android:gravity="center"
	android:padding="5dp"
	android:textColor="#ffffffff"
	android:textSize="16dp" >
</TextView>
Each item in the list will be a simple Text View. That's our interface design complete. This is how the app appears on initial launch:
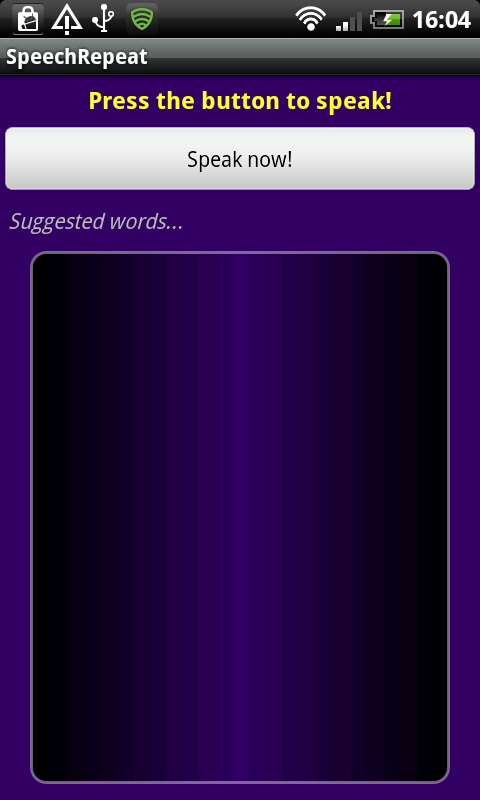
Note: don't worry about the lack of dithering, this is just how it looks in the DDMS screenshot. On the device itself, the gradient is perfectly smooth.
Step 3: Setup Speech Recognition
Now we can implement our Java code. Open your app's main Activity and add the following import statements at the top:
import java.util.ArrayList;
import java.util.List;
import java.util.Locale;

import android.app.Activity;
import android.content.Intent;
import android.content.pm.PackageManager;
import android.content.pm.ResolveInfo;
import android.os.Bundle;
import android.speech.RecognizerIntent;
import android.speech.tts.TextToSpeech.OnInitListener;
import android.speech.tts.TextToSpeech;
import android.util.Log;
import android.view.View;
import android.view.View.OnClickListener;
import android.widget.AdapterView;
import android.widget.AdapterView.OnItemClickListener;
import android.widget.ArrayAdapter;
import android.widget.Button;
import android.widget.ListView;
import android.widget.Toast;
import android.widget.TextView;
You may not need all of these if you do not implement the TTS functionality - Eclipse should highlight imports you have not used so check them when you finish coding. Extend your opening class declaration line as follows, altering the Activity name to suit your own:
public class SpeechRepeatActivity extends Activity implements OnClickListener, OnInitListener {
The "OnInitListener" is only required for the TTS function. Add the following instance variables inside your class declaration, before the "onCreate" method:
//voice recognition and general variables

//variable for checking Voice Recognition support on user device
private static final int VR_REQUEST = 999;

//ListView for displaying suggested words
private ListView wordList;

//Log tag for output information
private final String LOG_TAG = "SpeechRepeatActivity";//***enter your own tag here***

//TTS variables

//variable for checking TTS engine data on user device
private int MY_DATA_CHECK_CODE = 0;

//Text To Speech instance
private TextToSpeech repeatTTS;
Inside your "onCreate" method, your class should already be calling the superclass method and setting your main layout. If not, it should begin like this:
//call superclass
super.onCreate(savedInstanceState);
//set content view
setContentView(R.layout.main);
Next, still inside your "onCreate" method, retrieve a reference to the speech button and list we created, using their ID values:
//gain reference to speak button
Button speechBtn = (Button) findViewById(R.id.speech_btn);
//gain reference to word list
wordList = (ListView) findViewById(R.id.word_list);
The List View is an instance variable, accessible throughout the class. Now we need to find out whether the user device has speech recognition support:
//find out whether speech recognition is supported
PackageManager packManager = getPackageManager();
List<ResolveInfo> intActivities = packManager.queryIntentActivities(new Intent(RecognizerIntent.ACTION_RECOGNIZE_SPEECH), 0);
if (intActivities.size() != 0) {
	//speech recognition is supported - detect user button clicks
	speechBtn.setOnClickListener(this);
}
else
{
	//speech recognition not supported, disable button and output message
	speechBtn.setEnabled(false);
	Toast.makeText(this, "Oops - Speech recognition not supported!", Toast.LENGTH_LONG).show();
}
We query the environment to see if the Recognizer Intent is present. If it is, we instruct the app to listen for the user pressing the speech button. If speech recognition is not supported, we simply disable the button and output an informative message to the user.
Step 4: Listen for Speech Input
Let's setup the click listener for the speech button we've instructed the app to detect clicks for. Outside the "onCreate" method, but inside your Activity class declaration, add an "onClick" method as follows:
/**
 * Called when the user presses the speak button
 */
public void onClick(View v) {
	if (v.getId() == R.id.speech_btn) {
		//listen for results
		listenToSpeech();
	}
}
Now implement the method we've called here after the "onClick" method:
/**
 * Instruct the app to listen for user speech input
 */
private void listenToSpeech() {

	//start the speech recognition intent passing required data
	Intent listenIntent = new Intent(RecognizerIntent.ACTION_RECOGNIZE_SPEECH);
	//indicate package
	listenIntent.putExtra(RecognizerIntent.EXTRA_CALLING_PACKAGE, getClass().getPackage().getName());
	//message to display while listening
	listenIntent.putExtra(RecognizerIntent.EXTRA_PROMPT, "Say a word!");
	//set speech model
	listenIntent.putExtra(RecognizerIntent.EXTRA_LANGUAGE_MODEL, RecognizerIntent.LANGUAGE_MODEL_FREE_FORM);
	//specify number of results to retrieve
	listenIntent.putExtra(RecognizerIntent.EXTRA_MAX_RESULTS, 10);

	//start listening
	startActivityForResult(listenIntent, VR_REQUEST);
}
Some of this code is standard for setting up the speech recognition listening functionality. Areas to pay particular attention to include the line in which we specify the "EXTRA_PROMPT" - you can alter this to include text you want to appear for prompting the user to speak. Also notice the "EXTRA_MAX_RESULTS" line, in which we specify how many suggestions we want the recognizer to return when the user speaks. Since we are calling the "startActivityForResult" method, we will handle the recognizer results in the "onActivityResult" method.
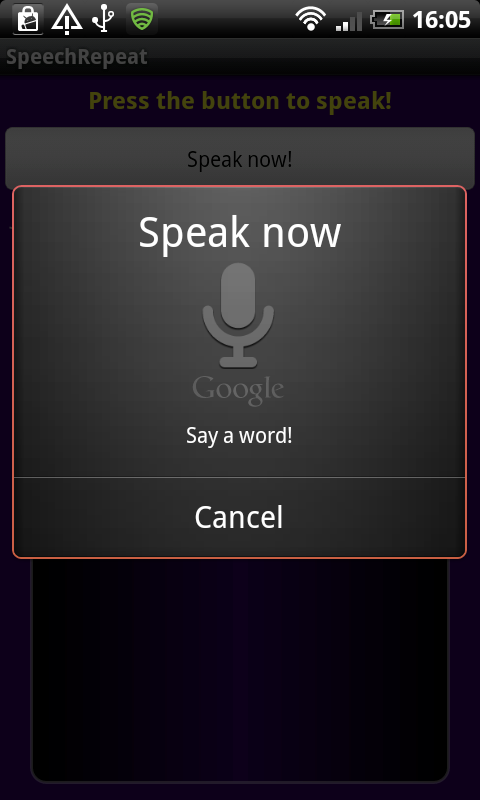
When the app is listening for user speech, it will appear as follows:
Step 5: Present Word Suggestions
Implement the "onActivityResult" method inside your class declaration as follows:
/**
 * onActivityResults handles:
 *  - retrieving results of speech recognition listening
 *  - retrieving result of TTS data check
 */
@Override
protected void onActivityResult(int requestCode, int resultCode, Intent data) {
	//check speech recognition result
	if (requestCode == VR_REQUEST && resultCode == RESULT_OK)
	{
		//store the returned word list as an ArrayList
		ArrayList<String> suggestedWords = data.getStringArrayListExtra(RecognizerIntent.EXTRA_RESULTS);
		//set the retrieved list to display in the ListView using an ArrayAdapter
		wordList.setAdapter(new ArrayAdapter<String> (this, R.layout.word, suggestedWords));
	}

	//tss code here

	//call superclass method
	super.onActivityResult(requestCode, resultCode, data);
}
Here we retrieve the result of the speech recognition process. Notice that the "if" statement checks to see if the request code is the variable we passed when calling "startActivityForResult", in which case we know this method is being called as a result of the listening Intent. The recognizer returns the list of 10 suggested words, which we store as an Array List. We then populate the List View with these words, by setting an Array Adapter object as Adapter for the View. Now each of the items in the List View will display one of the suggested words.
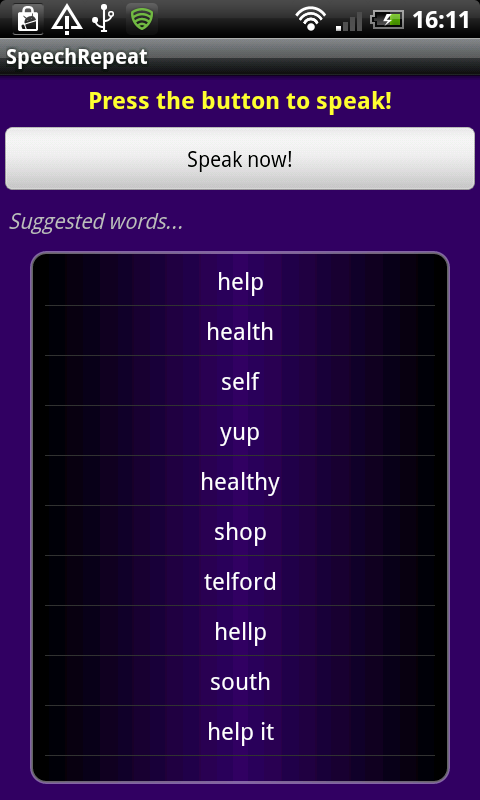
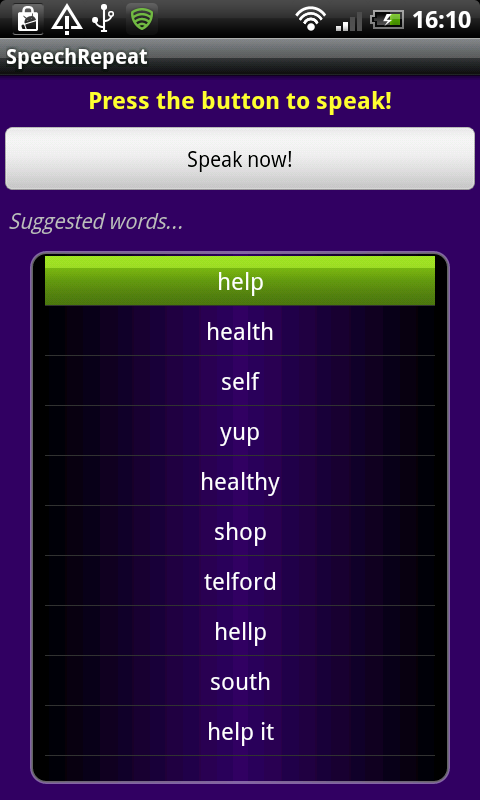
If the app successfully recognizes the user input speech and returns the list of words, it will appear as follows:
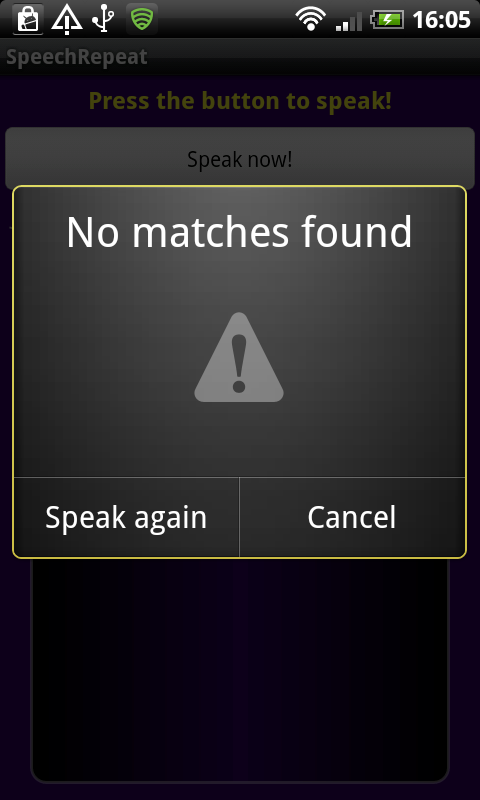
Alternatively, if the app does not recognize the user speech input, the following screen will appear:
Step 6: Detect User Word Choices
We want to detect the user selecting words from the list, so let's implement a click listener for the list items. Back in your "onCreate" method, after the existing code, set the listener for each item in the list as follows:
//detect user clicks of suggested words
wordList.setOnItemClickListener(new OnItemClickListener() {

	//click listener for items within list
	public void onItemClick(AdapterView<?> parent, View view, int position, long id)
	{
		//cast the view
		TextView wordView = (TextView)view;
		//retrieve the chosen word
		String wordChosen = (String) wordView.getText();
		//output for debugging
		Log.v(LOG_TAG, "chosen: "+wordChosen);
		//output Toast message
		Toast.makeText(SpeechRepeatActivity.this, "You said: "+wordChosen, Toast.LENGTH_SHORT).show();//**alter for your Activity name***
	}
});
We use the "setOnItemClickListener" method to assign a listener to each item in the list. Inside the new "OnItemClickListener", we implement the "onItemClick" method to respond to these clicks - this method will fire when the user selects a suggested word from the list. First, we cast the View that has been clicked to a Text View, then we retrieve the text from it. This text is the word the user has selected. We write the chosen word out to the Log for testing and output it back to the user as a Toast message. Depending on the needs of your own application, you may wish to carry out further processing on the chosen word - this code is purely for demonstration.
The user can press the touchscreen or use a trackball to select words in the list.
When the user selects a word, the Toast message appears confirming it.

Step 7: Setup TTS Functionality
If you do not want to implement the Text To Speech functionality, you can stop now and test your app. We only require a little more processing to make our app repeat the user's chosen word. First, to set up the TTS engine, add the following code to the section in your "onCreate" method where you queried the system for speech recognition support. Inside the "if" statement, after "speechBtn.setOnClickListener(this);":
//prepare the TTS to repeat chosen words
Intent checkTTSIntent = new Intent();
//check TTS data
checkTTSIntent.setAction(TextToSpeech.Engine.ACTION_CHECK_TTS_DATA);
//start the checking Intent - will retrieve result in onActivityResult
startActivityForResult(checkTTSIntent, MY_DATA_CHECK_CODE);
Like the speech listening process, we will receive the result of this code checking for TTS data in the "onActivityResult" method. In that method, before the line in which we call the superclass "onActivityResult" method, add the following:
//returned from TTS data check
if (requestCode == MY_DATA_CHECK_CODE)
{
	//we have the data - create a TTS instance
	if (resultCode == TextToSpeech.Engine.CHECK_VOICE_DATA_PASS)
		repeatTTS = new TextToSpeech(this, this);
	//data not installed, prompt the user to install it
	else
	{
		//intent will take user to TTS download page in Google Play
		Intent installTTSIntent = new Intent();
		installTTSIntent.setAction(TextToSpeech.Engine.ACTION_INSTALL_TTS_DATA);
		startActivity(installTTSIntent);
	}
}
Here we initialize the TTS if the data is already installed, otherwise we prompt the user to install it. For additional guidance on using the TTS engine, see the Android SDK: Using the Text to Speech Engine tutorial.
To complete TTS setup, add the "onInit" method to your class declaration, handling initialization of the TTS as follows:
/**
 * onInit fires when TTS initializes
 */
public void onInit(int initStatus) {
	//if successful, set locale
	if (initStatus == TextToSpeech.SUCCESS)
		repeatTTS.setLanguage(Locale.UK);//***choose your own locale here***
}
Here we simply set the Locale for the TTS, but you can carry out other setup tasks if you like.
Step 8: Repeat the User Choice
Finally, we can repeat the user's chosen word. Back in your "onCreate" method, inside the "OnItemClickListener" "onItemClick" method, after the line in which we output a Toast message, add the following:
//speak the word using the TTS
repeatTTS.speak("You said: "+wordChosen, TextToSpeech.QUEUE_FLUSH, null);
This will cause the app to repeat the user's chosen word as part of a simple phrase. This will occur at the same time the Toast message appears.
Conclusion
That's our complete Speak and Repeat app. Test it on an Android device with speech recognition and TTS support - the emulator does not support speech recognition so you need to test this functionality on an actual device. The source code is attached, so you can check if you have everything in the right place. Of course, your own apps may implement speech recognition as part of other processing, but this tutorial should have equipped you with the essentials of supporting speech input.

Comments