Parsing data from an XML file is a very common goal in mobile applications. This tutorial will provide you with a hands on approach for reading XML data with a SAX parser. SAX is an abbreviation for "Simple API for XML", and it is a very powerful tool for reading XML.
SAX Parser Pros and Cons
One of the biggest advantages that SAX parsers offer is a low memory footprint. They parse each line of XML data at a time and consequently do not need to load the entire XML document into memory prior to making the data accessible. This is a significant boost to performance, and this really becomes visible when working with large XML documents.
One of the disadvantages of using a SAX parser is that you must define an event-driven API that will respond to each element as it is received. This can become time consuming to build, but if you are willing to spend a little extra time to get it right, the outcome will be worthwhile.
Understanding XML
XML is a means of storing and transporting data. One of the main things you will need to know for this tutorial is the structure of an XML document. XML is made from a series of tags, just like HTML. An example of am opening tag would be <example>, and a complementary closing tag would be </example>. Between these tags we will find the data contained by the example tag (also called an element). In certain cases, we may have tags with attributes that we need to handle in our SAX parser. An example of this occurring in XML would be <example attr='value'>.
Step 1: Setting Up the Application
You will need to create a new project in Eclipse. Since we are working with XML and will be making use of the Internet for data transfer, we need to give the application permission to access the Internet. To do this you need to open the application's manifest file and add this line of code at the bottom, just before the closing </manifest> tag:
<uses-permission android:name="android.permission.INTERNET"></uses-permission>
While you are in your manifest file you should also make your application debuggable. This can be done by adding the following line of code in your application tag:
android:debuggable='true'
Now that the application has access to the Internet and is debuggable, we can begin implementing the SAX parser.
Step 2: Creating Classes and UI
First, you will need to create three classes. The first class that should be created when you created the project will be your activity. In this activity, all the data retrieved will be used and displayed to the screen. The second class required will be the handler, in this class all the extracting and setting of data will be done. The third class will contain all the getters and setters that we need to set the data and retrieve it.
The main.xml in your resource folder should be modified as shown below:
<?xml version="1.0" encoding="utf-8"?>
<LinearLayout xmlns:android="http://schemas.android.com/apk/res/android"
    android:layout_width="fill_parent"
    android:layout_height="fill_parent"
    android:orientation="vertical"
    android:id="@+id/layout">

    <TextView
        	android:layout_width="fill_parent"
        	android:layout_height="wrap_content"
        	android:text="@string/hello"
        	android:textSize="15dp"
android:gravity="center_horizontal"
        	android:id="@+id/layout_string"/>

</LinearLayout>
Step 3: The Content Handler
The content handler is where we need to handle each of the incoming events from the XML. So, basically what the content handler will do is read through the XML until it reaches the end.
When an opening tag such as <example> is reached, the startElement handler will be called. When closing tags such as </example> is reached, a closing method called endElement gets called. When the SAX parser reaches the closing tags, it calls a method called characters which will get all the content that is between the opening and closing tags.
We have a String that is called elementValue, which is set to null. Each time the parser goes through to start an end tag, we will set the elementValue string to the data in between those tags.
We will also make use of a Boolean value called elementOn. We use this to keep track of where the XML is being passed, so that when a tag is finished being read and data has been extracted, we set it to false so that we can read the next tag in the XML.
We have if statements to check when we reach a specific tag in order to use setters to set the data to an array list, so that we can display it later.
Below is the sample code used in the content handler:
package com.android.SAXParser;
import org.xml.sax.Attributes;
import org.xml.sax.SAXException;
import org.xml.sax.helpers.DefaultHandler;

public class XMLHandler extends DefaultHandler {

	String elementValue = null;
	Boolean elementOn = false;
	public static XMLGettersSetters data = null;

	public static XMLGettersSetters getXMLData() {
		return data;
	}

	public static void setXMLData(XMLGettersSetters data) {
		XMLHandler.data = data;
	}

	/**
	 * This will be called when the tags of the XML starts.
	 **/
	@Override
	public void startElement(String uri, String localName, String qName,
			Attributes attributes) throws SAXException {

		elementOn = true;

		if (localName.equals("CATALOG"))
		{
			data = new XMLGettersSetters();
		} else if (localName.equals("CD")) {
			/**
			 * We can get the values of attributes for eg. if the CD tag had an attribute( <CD attr= "band">Akon</CD> )
			 * we can get the value "band". Below is an example of how to achieve this.
			 *
			 * String attributeValue = attributes.getValue("attr");
			 * data.setAttribute(attributeValue);
			 *
			 * */
		}
	}

	/**
	 * This will be called when the tags of the XML end.
	 **/
	@Override
	public void endElement(String uri, String localName, String qName)
			throws SAXException {

		elementOn = false;

		/**
		 * Sets the values after retrieving the values from the XML tags
		 * */
		if (localName.equalsIgnoreCase("title"))
			data.setTitle(elementValue);
		else if (localName.equalsIgnoreCase("artist"))
			data.setArtist(elementValue);
		else if (localName.equalsIgnoreCase("country"))
			data.setCountry(elementValue);
		else if (localName.equalsIgnoreCase("company"))
			data.setCompany(elementValue);
		else if (localName.equalsIgnoreCase("price"))
			data.setPrice(elementValue);
		else if (localName.equalsIgnoreCase("year"))
			data.setYear(elementValue);
	}

	/**
	 * This is called to get the tags value
	 **/
	@Override
	public void characters(char[] ch, int start, int length)
			throws SAXException {

		if (elementOn) {
			elementValue = new String(ch, start, length);
			elementOn = false;
		}

	}

}
In the startElement I have included a comment to show how to retrieve the attribute of an opened tag.
Step 4: Getters, Setters, and Logcat
This is a very simple class which contains arraylists, getters and setters. Here the array lists are set from the content handler class by calling their respective setter methods.
In this example, it is simple because we are basically retrieving string types. However, in other XML files you may need to retrieve other types, such as date or URL, and you will need to make adjustments as needed. Take date for example: you might have to use a date formatter to format the date correctly before you set it.
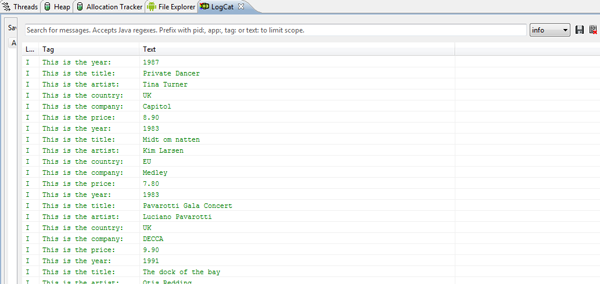
In each of the setter methods I have added logs like the one below:
Log.i('This is the value:', example);
This is very useful as you can use the Logcat that is located in the DDMS perspective to track all the data that you are retrieving for the XML. A great advantage of doing this is that if your code fails, you will know exactly at which tag the parser is failing and can make the necessary adjustments.
Below is a snippet of code from the getters and setters class showing just one of the getter and setter methods:
public class XMLGettersSetters {
private ArrayList<String> company = new ArrayList<String>();
	public ArrayList<String> getCompany() {
		return company;
	}
	public void setCompany(String company) {
		this.company.add(company);
		Log.i("This is the company:", company);
	}
Below is an image of Logcat showing all the retrieved data.
Step 5: Displaying the Retrieved Data
In the activity, we will need to create an instance of the SAX parser. We also need to create the handler for each of the XML tags. We also have the URL of the XML that we need to pass into the Handler. Here is the code used to implement this:
try {
    /**
    * Create a new instance of the SAX parser
    **/
    SAXParserFactory saxPF = SAXParserFactory.newInstance();
    SAXParser saxP = saxPF.newSAXParser();
    XMLReader xmlR = saxP.getXMLReader();


    URL url = new URL("http://www.xmlfiles.com/examples/cd_catalog.xml"); // URL of the XML

    /**
    * Create the Handler to handle each of the XML tags.
    **/
    XMLHandler myXMLHandler = new XMLHandler();
    xmlR.setContentHandler(myXMLHandler);
    xmlR.parse(new InputSource(url.openStream()));

} catch (Exception e) {
    System.out.println(e);
}
The final step is to display the data to an Activity. For each data category we need to create a different TextView array. For example:
TextView example[];
By doing this, we will be able to add all the retrieved data to these TextViews. We need to make the length of the TextView the size of the TextView, the following line of code will set the TextView length to the size of the TextView array:
example = new TextView[data.getExample().size()];
We need to get the layout of the Activity in order to set all the TextViews that are created for it programmatically. Using a view we can do this simply. Below is the line of code we require:
View layout = findViewById(R.id.layout);
Now that we have the length of the TextView, we can simply run a for loop to add the data to these TextViews. The for loop will end when the end of the TextView array is reached.
Here is the code used to implement the for loop to set the data to TextViews and then set the TextViews to the layout:
for (int i = 0; i < data.getExample().size(); i++) {

			example[i] = new TextView(this);
			example[i].setText("Example= "+data.getExample ().get(i));

			example2[i] = new TextView(this);
			example2[i].setText("Example2 ="+data.get Example2().get(i));

			((ViewGroup) layout).addView(example[i]);
			((ViewGroup) layout).addView(example2[i]);
		}
The last line of code would be used to set the layout:
setContentView(layout);
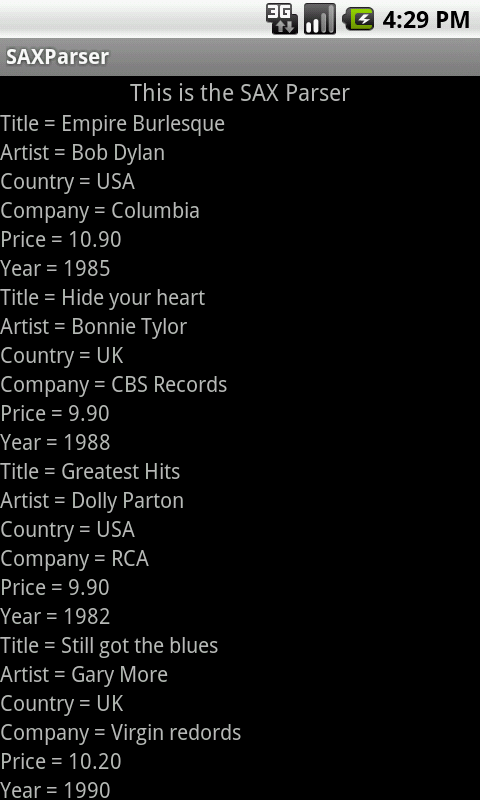
Conclusion
Now that everything is set up properly, you can run your app. The results should look like the image below. If you do get an error, the most likely reason would be that you are not handling the XML correctly. The best way to approach debugging that is by using the Logcat.

Comments