Adapter views are so ubiquitous that you'd have a hard time finding a popular Android app that doesn't use them. The name might sound unfamiliar, but if you think you've never seen an adapter view, you are probably wrong. Every time you see an Android app display user interface elements in the form of a list, a grid, or a stack, you're seeing an adapter view in action.
An adapter view, as its name suggests, is a View object. This means, you can add it to your activities the same way you add any other user interface widget. However, it is incapable of displaying any data on its own. Its contents are always determined by another object, an adapter. In this tutorial, I show you how to create adapters and use them to feed different types of adapter views such as ListView and GridView.
Do you find it easier to learn with video? Why not check out our course:

1. What Is an Adapter?
An adapter is an object of a class that implements the Adapter interface. It acts as a link between a data set and an adapter view, an object of a class that extends the abstract AdapterView class. The data set can be anything that presents data in a structured manner. Arrays, List objects, and Cursor objects are commonly used data sets.
An adapter is responsible for retrieving data from the data set and for generating View objects based on that data. The generated View objects are then used to populate any adapter view that is bound to the adapter.
You can create your own adapter classes from scratch, but most developers choose to use or extend adapter classes provided by the Android SDK, such as ArrayAdapter and SimpleCursorAdapter. In this tutorial, we focus on the ArrayAdapter class.
2. How Do Adapter Views Work?
Adapter views can display large data sets very efficiently. For instance, the ListView and GridView widgets can display millions of items without any noticeable lag while keeping memory and CPU usage very low. How do they do that? Different adapter views follow different strategies. However, here's what most of them usually do.
- They render only those
Viewobjects that are either already on-screen or that are about to move on-screen. This way, the memory consumed by an adapter view can be constant and independent of the size of the data set.
- They also allow developers to minimize expensive layout inflate operations and recycle existing
Viewobjects that have move off-screen. This keeps CPU consumption low.
3. Creating an ArrayAdapter
To create an adapter, you need the following:
- a data set
- a resource file containing the layout of the generated
Viewobjects
Additionally, because the ArrayAdapter class can only work with strings, you need to make sure the layout of the generated View objects contains at least one TextView widget.
Step 1: Create the Data Set
The ArrayAdapter class can use both arrays and List objects as data sets. For now, let's use an array as the data set.
String[] cheeses = {
            "Parmesan",
            "Ricotta",
            "Fontina",
            "Mozzarella",
            "Cheddar"
          };
Step 2: Create the Resource File
Create a new layout XML file whose root element is a LinearLayout and name it item.xml. Drag and drop a Large text widget in it and set the value of its id attribute to cheese_name. The layout XML file should look like this:
<?xml version="1.0" encoding="utf-8"?>
<LinearLayout xmlns:android="http://schemas.android.com/apk/res/android"
    android:orientation="vertical" android:layout_width="match_parent"
    android:layout_height="match_parent"
    android:padding="@dimen/activity_horizontal_margin">
    <TextView
        android:layout_width="wrap_content"
        android:layout_height="wrap_content"
        android:textAppearance="?android:attr/textAppearanceLarge"
        android:text="Large Text"
        android:id="@+id/cheese_name" />
</LinearLayout>
Step 3: Create the Adapter
In your activity, create a new instance of the ArrayAdapter class using its constructor. As its arguments, pass the name of the resource file, the identifier of the TextView, and a reference to the array. The adapter is now ready.
ArrayAdapter<String> cheeseAdapter =
    new ArrayAdapter<String>(this,
        R.layout.item,
        R.id.cheese_name,
        cheeses
    );
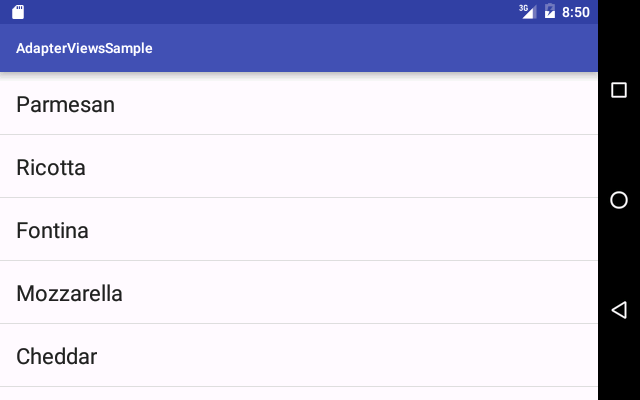
4. Creating a List
To display a vertically scrollable list of items, you can use the ListView widget. To add the widget to your activity, you can either drag and drop it inside the activity's layout XML file or create it using its constructor in your Java code. For now, let's do the latter.
ListView cheeseList = new ListView(this);
Usually, no other user interface widgets are placed inside a layout that contains a ListView. Therefore, pass the ListView to the setContentView() method of your activity so that it takes up the entire screen.
setContentView(cheeseList);
To bind the ListView to the adapter we created in the previous step, call the setAdapter() method as shown below.
cheeseList.setAdapter(cheeseAdapter);
If you run your app now, you should be able to see the contents of the array in the form of a list.
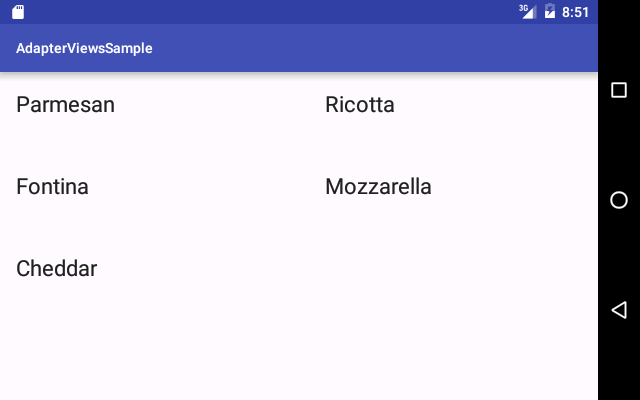
5. Creating a Grid
To display a vertically scrollable two-dimensional grid of items, you can use the GridView widget. Both ListView and GridView are subclasses of the abstract AbsListView class and they share many similarities. Therefore, if you know how to use one, you know how to use the other as well.
Use the constructor of the GridView class to create a new instance and pass it to the setContentView() method of your activity.
GridView cheeseGrid = new GridView(this);
setContentView(cheeseGrid);
To set the number of columns in the grid, call its setNumColumns() method. I'm going to make this a two-column grid.
cheeseGrid.setNumColumns(2);
Usually, you'd want to adjust the width of the columns and the spacing between them using the setColumnWidth(), setVerticalSpacing(), and setHorizontalSpacing() methods. Note that these methods use pixels as their units.
cheeseGrid.setColumnWidth(60);
cheeseGrid.setVerticalSpacing(20);
cheeseGrid.setHorizontalSpacing(20);
You can now bind the GridView to the adapter we created earlier using the setAdapter() method.
cheeseGrid.setAdapter(cheeseAdapter);
Run your app again to see what the GridView looks like.
6. Adding Event Listeners
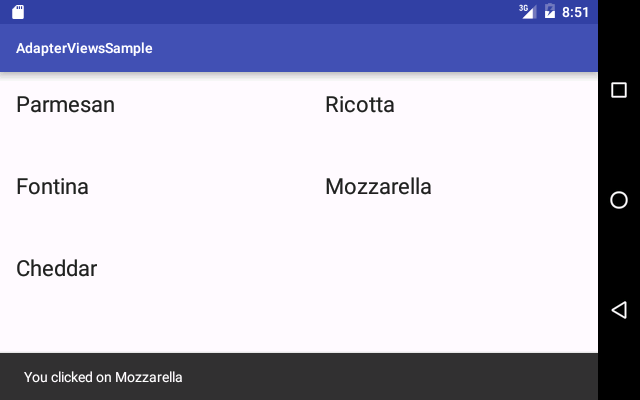
It is possible to listen for click and long click events on the items inside an adapter view. As an example, let's add a click event listener to the GridView.
Create a new instance of an anonymous class that implements the AdapterView.OnItemClickListener interface and pass it to the setOnItemClickListener() method of the GridView object. Android Studio automatically generates a stub for the onItemClick() method of the interface. You'll notice that the method's parameters include an integer specifying the position of the list item. You can use this integer to find out which item in the data set the user clicked.
The following code illustrates how to display a simple message as a snackbar every time an item in the GridView is clicked.
cheeseGrid.setOnItemClickListener(new AdapterView.OnItemClickListener() {
    @Override
    public void onItemClick(AdapterView<?> adapterView,
                            View view, int position, long rowId) {

        // Generate a message based on the position
        String message = "You clicked on " + cheeses[position];

        // Use the message to create a Snackbar
        Snackbar.make(adapterView, message, Snackbar.LENGTH_LONG)
                .show(); // Show the Snackbar
    }
});
If you run the app and click any item in the grid, a message appears at the bottom of the screen. Note that you can use the same code to listen for click events on items inside a ListView.
7. Extending the ArrayAdapter
An ArrayAdapter can handle only one TextView widget inside the layout of the View objects it generates. To broaden its capabilities you must extend it. Before we do that, however, let's create a slightly more complex data set.
Instead of strings, let's say our data set contains objects of the following class:
static class Cheese {
    String name;
    String description;

    public Cheese(String name, String description) {
        this.name = name;
        this.description = description;
    }
}
This is the data set we will be using:
Cheese[] cheeses = {
        new Cheese("Parmesan", "Hard, granular cheese"),
        new Cheese("Ricotta", "Italian whey cheese"),
        new Cheese("Fontina", "Italian cow's milk cheese"),
        new Cheese("Mozzarella", "Southern Italian buffalo milk cheese"),
        new Cheese("Cheddar", "Firm, cow's milk cheese"),
};
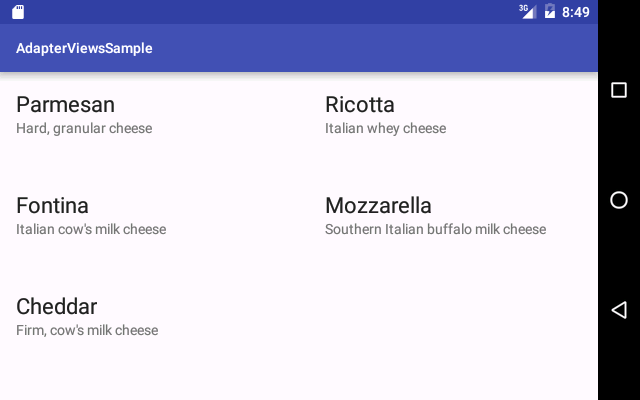
As you can see, the Cheese class contains two fields, name and description. To display both fields in a lists or grid, the layout of the items must contain two TextView widgets.
Create a new layout XML file and name it custom_item.xml. Add a Large text and a Small text widget to it. Set the id attribute of the first widget to cheese_name and that of the second one to cheese_description. The contents of the layout XML file should now look like this:
<?xml version="1.0" encoding="utf-8"?>
<LinearLayout xmlns:android="http://schemas.android.com/apk/res/android"
    android:orientation="vertical" android:layout_width="match_parent"
    android:layout_height="match_parent"
    android:padding="@dimen/activity_horizontal_margin">
    <TextView
        android:layout_width="wrap_content"
        android:layout_height="wrap_content"
        android:textAppearance="?android:attr/textAppearanceLarge"
        android:text="Large Text"
        android:id="@+id/cheese_name" />
    <TextView
        android:layout_width="wrap_content"
        android:layout_height="wrap_content"
        android:textAppearance="?android:attr/textAppearanceSmall"
        android:text="Small Text"
        android:id="@+id/cheese_description" />
</LinearLayout>
The ArrayAdapter must also be capable of handling two TextView widgets. Revisit your activity, create a new anonymous class that extends the ArrayAdapter class, and override its getView() method. Make sure that you pass the array as an argument to its constructor.
ArrayAdapter<Cheese> cheeseAdapter =
        new ArrayAdapter<Cheese>(this, 0, cheeses) {
            @Override
            public View getView(int position,
                                View convertView,
                                ViewGroup parent) {

            }
        };
Inside the getView() method, you must use the position parameter as an index of the array and fetch the item at that index.
Cheese currentCheese = cheeses[position];
The second parameter of the getView() method is what enables us to reuse View objects. If you ignore it, the performance of your adapter view will be poor. When the getView() method is called for the first time, convertView is null. You must initialize it by inflating the resource file that specifies the layout of the list items. To do so, obtain a reference to a LayoutInflater using the getLayoutInflater() method and invoke its inflate() method.
// Inflate only once
if(convertView == null) {
    convertView = getLayoutInflater()
                    .inflate(R.layout.custom_item, null, false);
}
At this point, you can use findViewById() to get a reference to the TextView widgets inside the layout and call their setText() methods to initialize them using data from the array.
TextView cheeseName =
    (TextView)convertView.findViewById(R.id.cheese_name);
TextView cheeseDescription =
    (TextView)convertView.findViewById(R.id.cheese_description);

cheeseName.setText(currentCheese.name);
cheeseDescription.setText(currentCheese.description);
Finally, return convertView so that it can be used to populate any adapter view associated with the adapter.
return convertView;
8. Using a View Holder
The getView() method is called repeatedly by the adapter view to populate itself. Therefore, you must try to minimize the number of operations you perform in it.
In the previous step, you might have noticed that, even though we made sure that the layout of the list items is inflated only once, the findViewById() method, which consumes many CPU cycles, is called every time the getView() method is called.
To avoid this and to improve the performance of the adapter view, we need to store the results of the findViewById() method inside the convertView object. To do so, we can use a view holder object, which is nothing more than an object of a class that can store the widgets present in the layout.
Because the layout has two TextView widgets, the view holder class must also have two TextView widgets. I have named the class ViewHolder.
static class ViewHolder{
    TextView cheeseName;
    TextView cheeseDescription;
}
In the getView() method, after you inflate the layout, you can now initialize the view holder object using the findViewById() method.
ViewHolder viewHolder = new ViewHolder();
viewHolder.cheeseName =
        (TextView)convertView.findViewById(R.id.cheese_name);
viewHolder.cheeseDescription =
        (TextView)convertView.findViewById(R.id.cheese_description);
To store the view holder object in convertView, use its setTag() method.
// Store results of findViewById
convertView.setTag(viewHolder);
And now, every time getView() is called, you can retrieve the view holder object from convertView using the getTag() method and update the TextView widgets inside it using their setText() methods.
TextView cheeseName =
    ((ViewHolder)convertView.getTag()).cheeseName;
TextView cheeseDescription =
    ((ViewHolder)convertView.getTag()).cheeseDescription;

cheeseName.setText(currentCheese.name);
cheeseDescription.setText(currentCheese.description);
If you run your app now, you can see the GridView displaying two lines of text in each cell.
Conclusion
In this tutorial, you learned how to create an adapter and use it to populate various adapter views. You also learned how to create your own custom adapter. Although we only focused on the ArrayAdapter, ListView, and GridView classes, you can use the same techniques for other adapters and adapter views the Android SDK offers.
The Android Support Library includes the RecyclerView class. It behaves much like an adapter view, but it isn't a subclass of the AdapterView class. You should consider using it if you want to create more complex lists, especially ones that use multiple layout files for their items. To learn more about it, you can refer to this Envato Tuts+ tutorial.
To learn more about the AdapterView class and its subclasses, you can refer to its documentation.

Comments