When a user interacts with an app on an Android device, they are almost always interacting with an Activity, a single, focused screen on the device. After Google released the Honeycomb version of Android, Fragment objects were added to the operating system to allow for easier code reuse and changing content on the screen without having to destroy/rebuild a new Activity every time.
In this tutorial, you learn more about Activity and Fragment objects on Android, their life cycles, and when and how you should use them in your own applications.
Do you find it easier to learn with video? Why not check out our course:

1. Activities
Activities are a key part of the Android ecosystem and one of the first concepts that you need to grasp as you become more familiar with Android development. Activities act as a single screen that is displayed to the user and they often encapsulate a lot of your program's logic.
When you have an Activity class created, manually or through one of the Android Studio templates, you need to define it in the project's AndroidManifest.xml file, if it wasn't already added, like so:
<activity android:name=".MainActivity">
    <intent-filter>
        <action android:name="android.intent.action.MAIN" />

        <category android:name="android.intent.category.LAUNCHER" />
    </intent-filter>
</activity>
In the above snippet, you also notice an intent-filter tag with an action and category item. While going into the details for these items is beyond the scope of this tutorial, you should know that those additional lines are how the system knows which Activity to open first when the user selects your app.
Once you have created an Activity, you likely want to associate it with a layout XML file so that you can easily use View objects from the layout. You can do this in the onCreate() method.
@Override
protected void onCreate(Bundle savedInstanceState) {
    super.onCreate(savedInstanceState);
    setContentView(R.layout.activity_main);
}
After calling setContentView(), you can begin referencing View objects from the layout XML file.
Activity Life Cycle
At this point, you are probably wondering what onCreate() is and why we are using it. The onCreate() method is one of the methods associated with the Activity life cycle. It is called when the Activity is first created. This is where you can do some of your general initialization steps within your Activity as it is guaranteed to be called first in the Activity life cycle as you can see below.
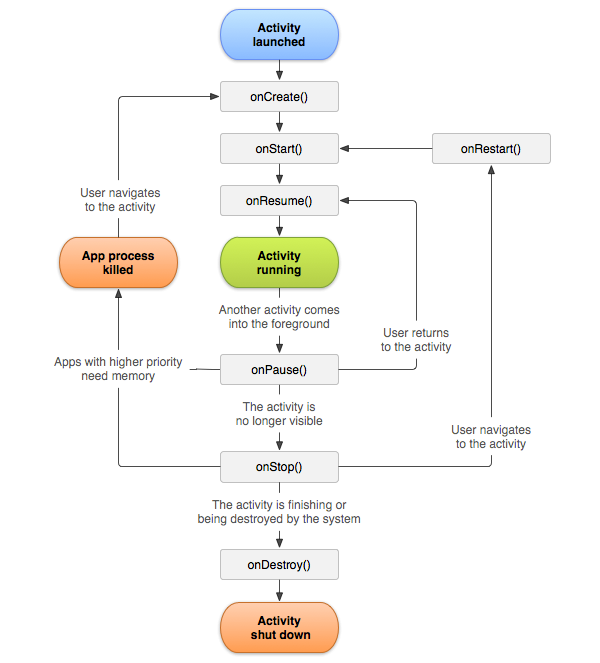
The above diagram shows the order of methods called as an Activity leaves or enters its various possible states:
-
onCreate()is called immediately when anActivityis, as the name implies, created.onDestroy()correlates to the opposite operation and is called when theActivityis removed from device memory. There are a few small instances whereonDestroy()may not be called, but those are beyond the scope of this tutorial. -
onStart()is called when anActivityis made visible to the user andonStop()is called when thatActivityis no longer visible. These two can be triggered when an app is placed into the background through the use of the device home button and when the app is brought back to the foreground. -
onResume()andonPause()are associated with theActivitybeing in the foreground. If another component enters the foreground, such as a dialog or anotherActivity, then this portion of the life cycle is triggered.
Understanding when each of these methods is called will save you a lot of headaches as you develop and need to tear down/reallocate resources within your applications.
Handling Configuration Changes
Now that you know a little bit about the Activity life cycle, it is time to dig into what happens when an Activity is destroyed and recreated by the system. This can happen in a few situations, the most common when the screen is rotated.
The Activity goes through the standard teardown process of onStop(), onPause(), onDestroy(), and then onCreate() as a new instance of that Activity is created.
Another method that isn't shown in the above diagram is onSaveInstanceState(). This method is called as an Activity is being destroyed and allows you to save simple information within the bundle. When onCreate() is called again, you can extract that information that you saved earlier. The same can also be done from the onRestoreInstanceState() method.
2. Fragments
Introduced with Android 3.0 (Honeycomb), Fragment objects are an amazing tool that handle multiple situations that were problematic when only Activity classes were available. Fragments allow for organizing a project's user interface components for different devices by giving you the ability to display multiple user interface segments on a larger screen, such as a tablet, or to show one at a time and link them together on smaller mobile devices.
They also help segment code into manageable chunks, rather than having to rely on large, complex Activity classes. One of the last, and arguably most valuable, features is that fragments allow for easy app navigation and provide a simple way to communicate across different sections of an app.
Life Cycle
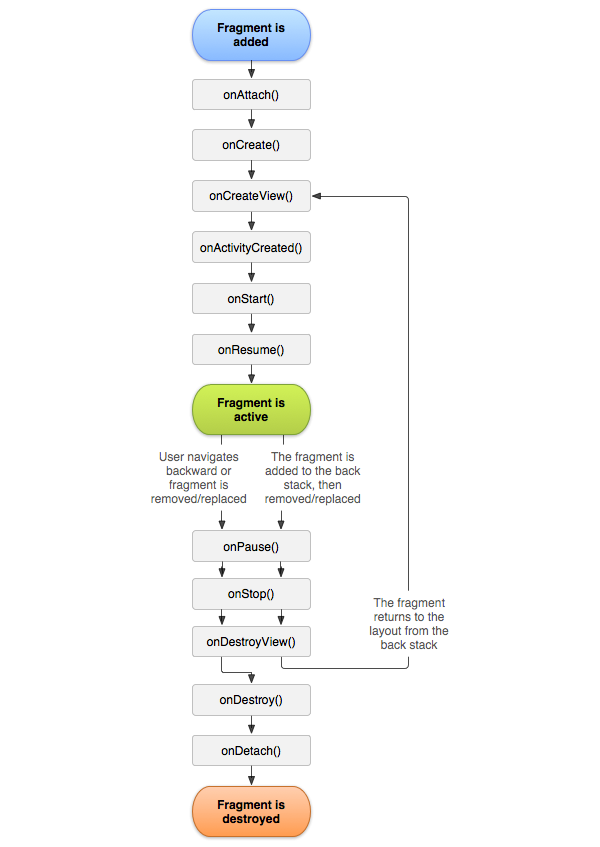
Just like the Activity class, the Fragment class has it's own life cycle that helps manage the Fragment from the time it is attached to an Activity until it is destroyed. Understanding this life cycle helps you create apps that are stable and it also helps you with debugging.
-
onAttach()andonDetach()signal when a fragment has been added to anActivityand the fragment is usable within the app. -
onCreate()is called as an initializing method forFragmentclasses andonDestroy()is the equivalent deinitializer. -
onCreateView()is the method in which you instantiate a layout andViewobjects for the fragment.onDestroyView()is called when the view hierarchy associated with the fragment is removed. -
onStart()andonStop()act similarly to theirActivitylife cycle counterparts. These methods are triggered when theFragmentbecomes or stops being visible respectively. -
onPause()andonStart()are also similar to theActivitycounterparts. When aFragmentis visible, but its focus has changed, one of these two methods is invoked.
Fragments Subclasses
While the Fragment class is powerful in its own ways, it can't reach its full potential without being extended to serve your application's purpose. Luckily, Google has provided a lot of different Fragment child classes to help developers quickly build great apps.
In this section, I want to highlight a few of them to inspire you to build your own great Fragment classes. It is important to know that these built-in fragments are available to you so you don't reinvent the wheel.
ListFragment
This Fragment has a built-in ListView and some helper methods to make this component stand out, such as an indeterminate ProgressBar (a circular, spinning loading widget) and a TextView for displaying text when the List is empty.
MapFragment
This is an invaluable Fragment that wraps a MapView for use with the Google Maps service. Rather than having to write all of your own boiler plate code, you can extend this Fragment to get the base map functionality into your app.
BrowseFragment and DetailsFragment
Both of these Fragment classes are available as a part of Android TV's Leanback Support Library and they handle user interface considerations and basic functionality for developing applications for a television device.
Conclusion
While this tutorial has just scratched the surface of how Activity and Fragment classes work, you should now know that they are key components for building the user interface of your applications. You have been introduced to the life cycle of activities and fragments, and we have looked at some convenient Fragment subclasses that can help you build amazing apps.
As you continue to work with Android, you will see and learn about many different Activity and Fragment classes that are available to you and you will, without a doubt, build your own.

Comments