In this quick tip tutorial, you'll learn how to use application logging support in your Android applications for diagnostic purposes.
This quick tip shows you the steps to incorporate logging support into your applications and then use the LogCat logging utility to monitor your application’s log output, either on the emulator or a device that is attached to Eclipse via the debugger. This skill is invaluable for debugging issues, even when great debuggers are available for stepping through code.
Step 1: Create an Android Application
Begin by creating an Android project. Implement your Android application as normal. Once you've setup your Android project, you are ready to proceed with this quick tip.
Step 2: Logging Options for Android Applications
The Android SDK includes a useful logging utility class called android.util.Log. Logging messages are categorized by severity (and verbosity), with errors being the most severe, then warnings, informational messages, debug messages and verbose messages being the least severe. Each type of logging message has its own method. Simply call the method and a log message is created. The message types, and their related method calls are:
- The Log.e() method is used to log errors.
- The Log.w() method is used to log warnings.
- The Log.i() method is used to log informational messages.
- The Log.d() method is used to log debug messages.
- The Log.v() method is used to log verbose messages.
- The Log.wtf() method is used to log terrible failures that should never happen. ("WTF" stands for "What a Terrible Failure!" of course.)
The first parameter of each Log method is a string called a tag. It’s common practice to define a global static string to represent the overall application or the specific activity within the application such that log filters can be created to limit the log output to specific data. For example, you could define a string called TAG, as follows:
private static final String TAG = "MyApp";
You will often find that the tag is defined as the class in which the Log statement occurs. This is a reasonable convention, but anything identifiable or useful to you will do.
Now anytime you use a Log method, you supply this tag. An informational logging message might look like this:
Log.i(TAG, "I am logging something informational!");
You can also pass a Throwable object, usually on Exception, that will allow the Log to print a stack trace or other useful information.
try {
// ...
} catch (Exception exception) {
    Log.e(TAG, "Received an exception", exception);
}
NOTE: Calling the Log.wtf() method will always print a stack trace and may cause the process to end with an error message. It is really intended only for extreme errors. For standard logging of exceptions, we recommend using the Log.e() method. The Log.wtf() method is available only in Android 2.2 or later. The rest are available in all versions of Android.
Step 3: Adding Log Support to an Activity Class
Now let’s add some logging to your Activity class. First, add the appropriate import statement for the logging class android.util.Log. Next, declare a logging tag for use within your class (or whole application); in this case, we call this variable DEBUG_TAG. Finally, add logging method calls wherever you want logging output. For example, you might add an informational log message within the onCreate() method of your Activity class.
Below is some sample code that illustrates how all these steps come together:
package com.mamlambo.simpleapp;

import android.app.Activity;
import android.os.Bundle;
import android.util.Log;

public class MySimpleAppActivity extends Activity {
    private static final String DEBUG_TAG= "MySimpleAppLogging";

    @Override
    public void onCreate(Bundle savedInstanceState) {
        super.onCreate(savedInstanceState);
        setContentView(R.layout.main);
        Log.i(DEBUG_TAG, "Info about MySimpleAppActivity.");
    }
}
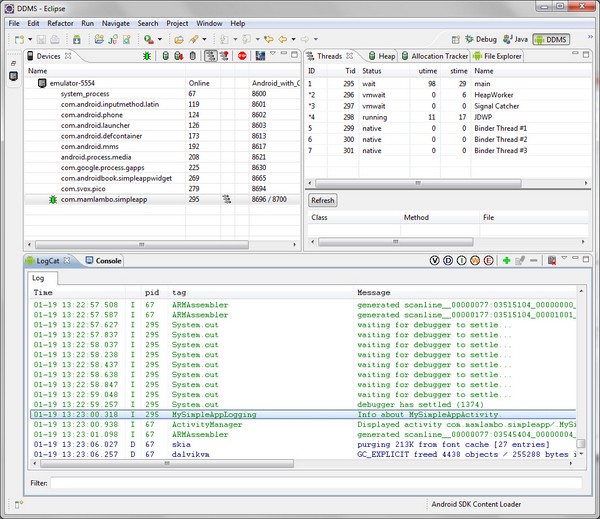
Step 4: Monitoring Application Log Output – The Easy Way
You can use the LogCat utility from within Eclipse to view the log output from an emulator or device. LogCat is integrated into Eclipse using the Android Development plug-in. You’ll find the LogCat panel integrated into the DDMS and Debug perspectives of Eclipse.
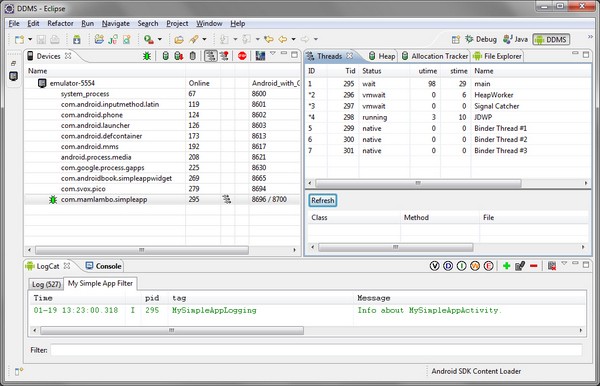
Step 5:Monitoring Application Log Output – Creating Log Filters
As you can see, the basic LogCat logging output includes log data from lots of different sources. For debugging purposes, it can be useful to filter the output to only the tags for your specific application. This way, you can focus on your application log output, amidst all the clutter.
You can use the LogCat utility from within Eclipse to filter your log messages to the tag string you supplied for your application. To add a new filter, click the green plus sign button in the LogCat pane of Eclipse. Name the filter—perhaps using the tag name—and fill in the tag you want to filter on. A new tab is created in LogCat that will show only log messages that contain this tag. You can create filters that display items by severity level.
Performance Considerations with Logging
Logging output puts a damper on application performance. Excessive use can result in decreased application performance. At minimum, debug and verbose logging should be used only for development purposes and removed before release. It’s also a good idea to review other logging output before publication as well.
Conclusion
Logging is a very handy debugging and diagnostic technique used by developers. Use the logging class provided as part of the Android SDK to log important information about your application to LogCat, but make sure you review your application’s logging implementation prior to publication, as logging has performance drawbacks.
About the Authors
Mobile developers Lauren Darcey and Shane Conder have coauthored several books on Android development: an in-depth programming book entitled Android Wireless Application Development and Sams TeachYourself Android Application Development in 24 Hours. When not writing, they spend their time developing mobile software at their company and providing consulting services. They can be reached at via email to [email protected], via their blog at androidbook.blogspot.com, and on Twitter @androidwireless.

Comments