The most popular Android apps have something in common: they all provide a great user experience. In this post, I'll share some tips that will help your app stand out.
Regardless of the kind of app you have in mind, or your target audience, designing a great user experience can help to ensure your app is a success. In this article, I’m going to share six things you should, and should not do, to make sure your app delivers the best possible experience to your end-users.
Since creating and launching an Android app is a multi-step process, I’ll be touching on every part of the Android development lifecycle—from making tough decisions about which versions of Android you should support, to creating a product that’ll appeal to a global audience, right through to analyzing your app’s post-launch performance.
1. Don’t Get Hung Up on Trying to Support Every Version of Android
While it’s natural to want to get your app in front of as many users as possible, don’t fall into the trap of assuming that supporting more versions of Android is always the best approach.
The key to attracting a large audience is to provide the best possible user experience, and setting your sights on supporting as many versions of Android as possible can actually damage the overall user experience.
The major issue is that as you continue to travel back through Android’s release history, it’s going to become harder to make your app play nicely with the earlier releases.
Sometimes, there may be a clear point where your app becomes incompatible with earlier releases of Android. For example, if your app absolutely requires access to Bluetooth Low Energy (BLE), then your app isn’t going to be able to run on anything earlier than Android 4.3—the version where BLE support was added to the Android platform.
However, sometimes this line may not be quite so clear-cut, and you may find yourself debating whether to modify or even remove non-critical features, in order to create something that can run on a particular version of Android. Small compromises can gradually chip away at the quality of the user experience, so always take stock of the impact these changes will have on your users.
In addition, customizing, optimizing and testing your app for each different version of Android requires time and effort, so you’ll also need to ask yourself whether this investment is worth the potential rewards. Basically, how many more users could you potentially gain by supporting each version of Android? You can get an indication of how many Android devices are running each release of the Android platform, by checking out the stats at Google's Dashboard.
Ultimately, there’s no universal right or wrong answer, so you’ll need to weigh up the pros and cons and decide what makes the most sense for your particular project.
Once you’ve decided which versions of Android you’re going to support, add this information to your module-level build.gradle file using minSdkVersion (the lowest API your app is compatible with), targetSdkVersion (the highest API level you’ve tested your app against), and compileSdkVersion (the version of the Android SDK that Gradle should use to compile your app).
To make sure your app benefits from the latest Android features while remaining compatible with earlier releases, it’s recommended that you set your minSdkValue as low as possible, while setting targetSdkVersion and compileSdkVersion to the latest version of the Android SDK.
2. Do Design for Multiple Screens
When you’re working on an Android app, it’s not uncommon to spend most of your time testing that app on your own Android smartphone or tablet. Particularly during the early stages of app development, creating multiple Android Virtual Devices (AVDs) will probably be the last thing on your mind.
However, don’t lose sight of the bigger picture! It’s easy to get hung up on designing for the one screen that’s physically in front of you, but it’s essential that your app looks good and functions correctly across a wide range of Android devices.
The Android system will automatically scale your layouts, drawables and other resources so they render at the appropriate size for the current screen, but for the best user experience you should aim to create the illusion that your app was designed for the user’s specific device. Relying on auto-scaling alone isn’t going to cut it!
To make sure your app delivers the best user experience across a wide range of devices, you’ll need to provide alternate resources that are optimized for different devices, such as drawables that target Android’s generalized density buckets, and alternate layouts that are optimized for landscape mode.
Once you’ve created your alternate resources, you’ll need to create alternate directories that are tagged with the appropriate configuration qualifiers, and then place the resources inside these directories—for example, a res/layout-land directory would contain layouts that are designed for landscape orientation. The Android system will then automatically load the resource that best matches the current screen configuration at runtime.
While most configuration qualifiers are relatively straightforward, providing resources that target different screen sizes is a bit more complex, requiring you to specify the exact dpi value where the system should start using this resource. So, you basically need to tell the system, “I want to use this layout when my app is being displayed on devices with 800dpi or more available screen width.”
You arrive at these values by testing your app across a wide range of different AVDs and making a note of all the screen sizes that your default resources are struggling with—for example, maybe your default layout starts to look cluttered once the device falls below a certain dpi threshold.
There are three screen size configuration qualifiers that you can use in your projects:
smallestWidth sw<value>dp. Allows you to specify the minimum horizontal space that must be available before the system can use the resources in this directory. For example, if you had a set of layouts that require 800dpi or more, you’d create a res/layout-sw800dp directory. Note that a device’s
smallestWidthis a fixed value that doesn’t change when the user switches their device between portrait and landscape orientation.Available screen width w<value>dp. The minimum horizontal space that must be available before the system can use these resources. A device’s
w<value>dpvalue does change when the user switches between portrait and landscape mode.Available screen height: h<value>dp. The minimum height that must be available before the system can use these resources. The device’s
h<value>dpvalue will change depending on whether the user is holding their device in landscape or portrait.
Designing for multiple screens is mostly about creating alternate versions of your project’s resources and adding them to the appropriate directories—then rinse and repeat. However, there are some additional tricks you can use when creating these alternate resources that can really help create the illusion that your app was designed for the user’s specific device:
Use density-specific drawables in combination with 9-patch images. If the system needs to resize an image to fit the current screen then by default it’ll resize the whole image, which can lead to blurry, pixelated or otherwise odd-looking images. For the best possible results, you should specify the exact pixels that the system should replicate if it needs to resize your image, by delivering your project’s drawables as 9-patch images. Provide multiple 9-patch versions of each drawable, where each 9-patch targets a different screen density, and the system will then load the 9-patch image that’s the best fit for the current screen density and stretch the 9-patch image’s ‘stretchable’ sections, if required. You can create 9-patch images using any PNG editor, or you can use the Draw 9-patch editor that’s included in the Android SDK (you’ll find it in sdk/tools/Draw9patch.bat).
Create multiple dimens.xml files. It’s recommended that you define your layout’s values in a separate dimens.xml file rather than hard-coding them into your project. However, you can take this one step further and create multiple dimens.xml files that target different screen sizes and densities. For example, you might create a values-ldpi/dimens.xml file where you define the values that your app should use when it’s installed on a device that falls into the ‘low’ density category. The system will then load the appropriate dimensions for the current device, and apply them to your layout.
Consider using fragments. Fragments provide you with a way of dividing a single
Activityinto separate components that you can then display in different ways, depending on the current screen configuration. For example, you may choose to display multiple fragments side-by-side in a multi-pane layout when your app is installed on a device with a larger screen, and as separate Activities when space is more limited. The simplest way to add a fragment to your layout is by inserting a<fragment>element into your layout resource file. Alternatively, you can add fragments to a layout via your application code—this method may be more complicated, but it gives you the added flexibility of being able to add, remove or replace fragments at runtime.
3. Do Consider Supporting Different Languages
Android is a global operating system, so if your app is going to provide the best user experience to this global audience then you should consider localizing your app for different languages, and potentially different regions.
Typically, the biggest part of localizing an app is translating your project’s strings.xml file into the different language(s) you want to support. Unless you happen to be fluent in your target languages, you’re going to need to enlist the help of a translator. If you don’t have anyone in mind, then the Developer Console’s Google Play App Translation services can point you in the direction of potential translators.
Once you’ve chosen a translator, you should take a critical look at your strings.xml file before sending it off for translation. Check for things like spelling mistakes and typos, and make sure your strings.xml is formatted in a way that makes it easy to read, bearing in mind that your translator may not be an Android developer themselves.
You should also provide as much context as possible, so make sure you add a comment to each string explaining what this string is for, where and when it’ll appear in your app, and any restrictions the translator needs to be aware of. For example, if a string needs to remain under 10 characters long in order to fit its allocated space in your layout, then this is something the translator needs to be aware of!
Once the translator has returned your translated strings.xml file(s), you’ll need to create a directory for each alternative file, which means you’ll need to work out what configuration qualifiers to use.
A locale configuration qualifier consists of an ISO code, which is essentially a language code, and an optional country or regional code, which is preceded by a lowercase r. For example, if you wanted to provide French (fr) text for people located in Canada (can), then you’d create a res/values-fr-rcan directory.
If you do provide localized text, then bear in mind that some strings may expand or shrink significantly during translation, so you’ll need to test that your layouts can accommodate all versions of your project’s strings.
The easiest way to test your localized resources is to install your app on an AVD and then emulate the different locations and language settings. At this point, the system will load the localized versions of your resources and display them in your app.
You can change the locale settings in a running AVD by issuing the following Android Debug Bridge (adb) commands:
adb shell
Followed by:
setprop persist.sys.locale fr-CAN;stop;sleep 5;start
Note, you’ll need to replace the fr-CAN with whatever configuration qualifier you want to test against.
If you’ve designed your app with best practices in mind, then your layouts should be flexible enough to display the majority of your localized strings. However, if the length of your strings varies dramatically then you may need to provide alternate layouts that are optimized for different locales.
While your project’s strings.xml file is generally the main resource you’ll need to localize, you should also consider whether there are other resources you might need to translate such as drawables that contain text, video or audio that contains dialogue, or any resources that might be inappropriate for the locale you’re targeting.
Once you’re confident that you’ve provided all the necessary localized resources and you’ve performed your own round of testing, you should consider arranging a beta test with native speakers in each of your target locales. Native speakers can often pick up on mistakes that even a translator may overlook, and may be able to give you some advice about how you can make your app more appealing to this particular section of your audience. You can arrange this kind of targeted beta testing via the Google Play Developer Console.
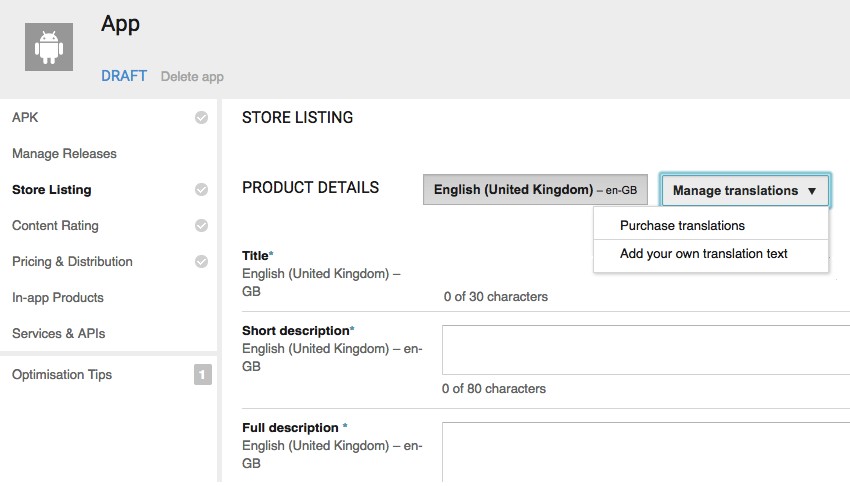
When you’re finally ready to launch your app, make sure you take the time to create localized versions of your app’s Google Play page, as this will instantly make your app more attractive to international users who are browsing the Google Play store. You should also try and provide screenshots that clearly show the localized text inside your app, so users aren’t left wondering whether you’ve just translated your app’s Google Play page, and not the actual text inside your app.
And the hard work doesn’t end once you’ve launched your app! Once you've attracted your international audience, you’ll need to hang onto them by providing ongoing support across multiple languages—even if that means resorting to machine translators like Google Translate. At the very least, you should keep an eye on your Google Play reviews, to see whether users in certain locales are reporting similar issues, which may indicate an issue with one or more of your app’s localized resources.
4. Don’t Forget About Accessibility!
As an app developer, you’ll want to make sure that everyone can enjoy using your app, so it’s important to consider how accessible your app is to people who may be experiencing it without sound, colour or other visuals, or anyone who interacts with their Android device via an accessibility tool such as a screen reader.
Android is designed with accessibility in mind, so it has a number of built-in accessibility features that you can utilize without having to make any fundamental changes to your application’s code.
Let's look at a number of minor tweaks you can make to your project, which will have a huge impact on your app’s accessibility:
Consider Supplying Additional Content Descriptions
Accessibility services such as TalkBack read onscreen text out loud, making them an important tool for helping users with vision-related problems interact with their Android devices.
When designing your Android app, you should consider how easy it'll be for users to navigate your app using its onscreen text alone. If you do need to provide some additional context, then you can add a content description to any of your app’s UI components, which will then be read aloud by services such as TalkBack. To add a content description, open your project’s layout resource file and add an android:contentDescription attribute to the UI component in question, followed by the description you want to use.
Support Focus Navigation
Users with limited vision or limited manual dexterity may find it easier to interact with their device using a directional controller, such as a trackpad, D-pad or keyboard, or software that emulates a directional controller. To make sure your app supports this kind of focus navigation, you’ll need to add the android:focusable="true” attribute to each of your app’s navigational components.
When users navigate your app using directional controls, focus gets passed from one UI element to another in an order that's determined automatically using an algorithm. However, you can override these defaults and specify which UI component should gain focus when the user moves in a particular direction, by adding the following XML attributes to any of your UI components: android:nextFocusUp, android:nextFocusDown, android:nextFocusLeft, and android:nextFocusRight. For example:
<?xml version="1.0" encoding="utf-8"?>
<LinearLayout xmlns:android="http://schemas.android.com/apk/res/android"
   xmlns:tools="http://schemas.android.com/tools"
   android:id="@+id/activity_main"
   android:layout_width="match_parent"
   android:layout_height="match_parent"
   tools:context="com.jessicathornsby.myapplication.MainActivity">

   <TextView
       android:layout_width="wrap_content"
       android:layout_height="74dp"
       android:text="Hello World!"
       android:id="@+id/textView"
       android:focusable="true"
       android:nextFocusDown="@+id/checkBox"
       />

   <CheckBox
       android:text="CheckBox"
       android:layout_width="wrap_content"
       android:layout_height="wrap_content"
       android:id="@+id/checkBox"
       android:layout_weight="1"
       android:focusable="true"
       android:nextFocusUp="@+id/textView"
       />

</LinearLayout>
Make Your Text Resizable
Users with vision impairments may choose to increase the size of the font that appears across their device. To make sure any font changes are reflected in your app, define your text in scale pixels—and don’t forget to test what impact Android’s various font sizes will have on your app’s UI, just in case you need to make some adjustments to your layout.
Use Recommended Touch Target Sizes
To help people with manual dexterity challenges navigate your app, it’s recommended that you set all touch targets to 48 x 48 dpi or higher, and make sure the space between these targets is at least 8 dpi.
Consider Disabling Timed-Out Controls
Some UI components may disappear automatically after a certain period of time has elapsed—for example, video playback controls often disappear once a video has been playing for a few moments.
The problem is that accessibility services such as Talkback don’t read controls until the user has focused on them, so if a timed-out control vanishes before the user has a chance to focus on it, then they won’t be aware that these controls even exist. For this reason, you should consider upgrading timed-out controls to permanent controls whenever accessibility services are enabled.
5. Do Put Your App’s Performance to the Test
Just because your app doesn’t crash or throw any errors during testing, doesn’t automatically mean it’s performing well, as some performance problems can be insidious and difficult to spot during regular testing. No-one enjoys using an app that takes forever to load, lags whenever you try and interact with it, and gobbles up the available memory, so you should always put your app through a number of performance-based tests before releasing it into the wild.
The Android SDK comes with a wide range of tools that you can use to specifically test your app’s performance. In this section, we’re going to look at a few of the ones you’ll definitely want to use; however, there are many more that are worth investigating (you’ll find more information in the official Android docs).
Note that all of these tools can only communicate with a running app, so you’ll need to make sure the app you want to test is installed on either an AVD or a physical device that’s connected to your development machine.
Before we get started, it’s worth noting that if you do identify a problem with your app’s performance, it’s recommended that you time your code before trying to fix this problem. You can then time your code again after you believe you’ve fixed the problem, and you'll be able to see exactly what impact your changes have had on your app’s performance.
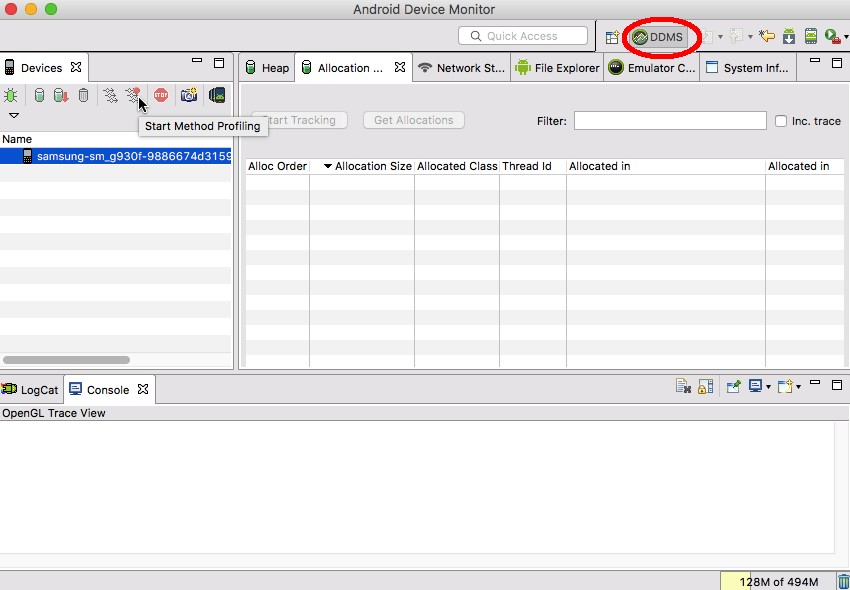
You can time your code using TraceView, which you access by selecting the Android Device Monitor’s DDMS tab, then selecting the device and the process you want to profile, and giving the Start Method Profiling icon a click (where the cursor is positioned in the following screenshot).
At this point you can select either Trace based profiling (traces the entry and exit of every method) or Sample based profiling (collects the call stacks at a frequency specified by you). Once you’ve made your selection, spend some time interacting with your app. When you’re ready to see the results, you can load the trace file into the viewer by giving the Stop Method Profiling icon a click. The trace file displays each thread’s execution as a separate row, so you can see exactly how long each part of your project takes to run.
Identifying Overdraw
When the system draws your app’s UI, it starts with the highest-level container and then works its way through your view hierarchy, potentially drawing views on top of one another in a process known as overdraw. While a certain amount of overdraw is inevitable, you can reduce the time it takes your app to render by identifying and removing any instances of excessive or unnecessary overdraw.
If you have a device running Android 4.2 or higher, you can check the amount of overdraw present in any app installed on that device, by selecting Settings > Developer Options > Debug GPU Overdraw > Select overdraw areas. The system will then add a coloured overlay to each area of the screen, indicating the number of times each pixel has been drawn:
No Color. This pixel was painted once.
Blue. An overdraw of 1x. These pixels were painted twice.
Green. An overdraw of 2x.
Light red. An overdraw of 3x.
Dark red. An overdraw of 4x or more.
Most apps include some level of overdraw, but if you spot large areas of overdraw in your app then you should look at whether there’s any way of reducing the number of times each pixel is being redrawn, and one of the effective methods is removing unnecessary views.
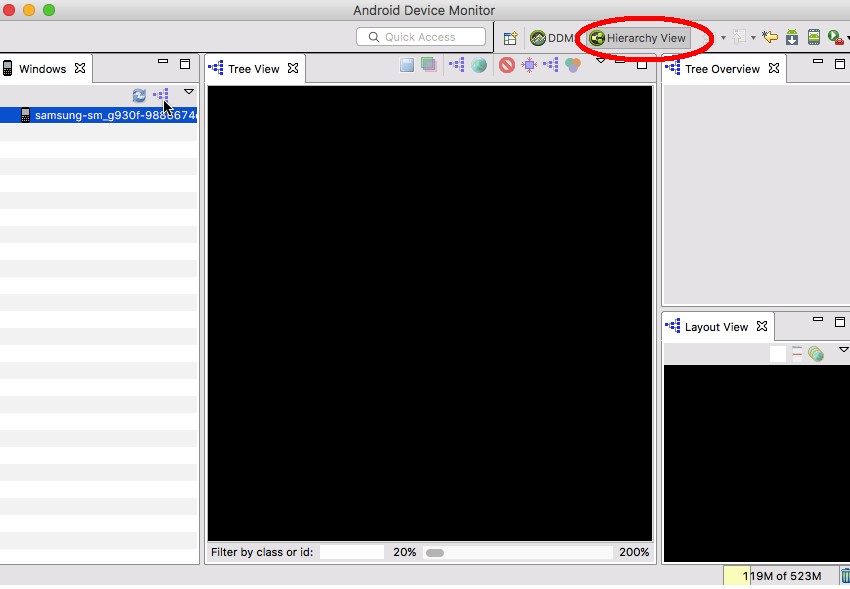
The Android Device Monitor’s Hierarchy Viewer provides a high-level overview of your app’s entire view hierarchy, which can help you identify views that aren’t contributing anything to the final rendered image the user sees onscreen.
To launch Hierarchy Viewer, click the Android Device Monitor’s Hierarchy View button, and then select the device and the Activity you want to inspect, followed by the blue Load the view hierarchy into the tree view icon.
You may also want to export the Hierarchy Viewer output as a Photoshop document. This is a particularly effective technique for identifying views that aren’t contributing anything to the final UI, as each view is displayed as a separate Photoshop layer, meaning you can hide and reveal each layer and see exactly what impact this will have on the final image the user sees onscreen.
To create a PSD document, simply give the Capture the window layers as a Photoshop document icon a click.
Spotting Memory Leaks
Garbage collection (GC) is a normal system behaviour that’s important for ensuring your app and the device as a whole continue to run smoothly.
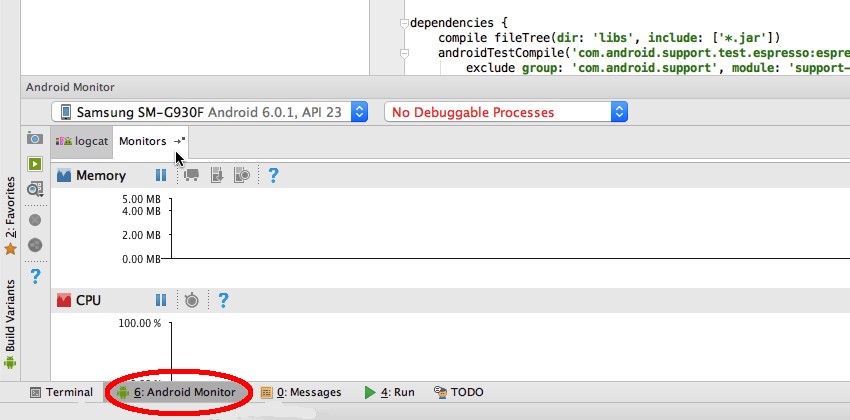
However, if your app isn’t managing memory properly—maybe it’s leaking memory or allocating a large number of objects in a short period of time—then this can trigger more frequent GC events that also run for longer. You can take a look at exactly what GC events are occurring in your app in the main Android Studio window; open the Android Monitor tab towards the bottom of the window, followed by the Monitors tab. The Memory Monitor tool will then start recording your app’s memory usage automatically.
If you keep interacting with your app, then eventually you’ll see a sudden drop in the amount of allocated memory, indicating that a GC event has occurred. Repeat this process, making sure you explore different areas of your app, and see what impact this has on the GC events. If you do spot any strange GC behaviour, then you’ll want to investigate further as this may indicate a problem with the way your app is using memory.
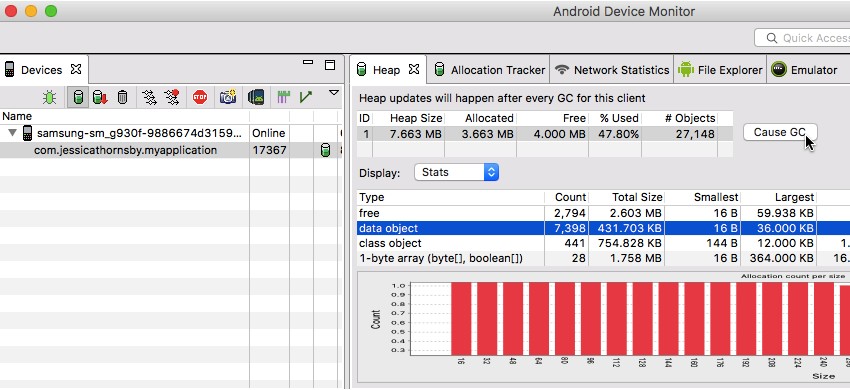
There are a couple of tools you can use to gather more information about your app’s memory usage. Firstly, you can use the Android Device Monitor’s Heap tab to see how much heap memory each process is using, which will flag up any processes that are gobbling up available memory.
To use the Heap tool, select the Android Device Monitor’s DDMS tab, followed by the process you want to examine, and then click the Update heap button. The Heap tab won’t display any data until after a GC event has occurred, but if you’re feeling impatient you can always trigger a GC event by giving the Cause GC button a click.
Another tool that can help you gather information about your app’s memory usage is Allocation Tracker, which lets you see exactly what objects your app is allocating to memory. To use Allocation Tracker, select the Android Device Monitor’s DDMS tab, followed by Allocation Tracker and the process you want to examine.
Click the Start Tracking button and spend some time interacting with your app, especially any parts that you suspect may be causing your app’s memory management problems. To see all the data Allocation Tracker has gathered during the sampling period, select the Start Tracking button, followed by the Get Allocations button.
6. Do Use Analytics Tools
Understanding your audience is a crucial part of creating a successful app.
Having access to data about who your audience is and how they’re using your app means you can make more informed decisions about how to build on your app’s success—and improve on the areas where your app isn’t doing quite so well.
Gathering this kind of user data is particularly useful for enabling you to identify trends across different sections of your audience. For example, you might decide that a certain segment of your audience is particularly valuable—maybe they’re racking up the largest percentage of in-app purchases, or they’re investing an above-average amount of time in your app. Armed with this information, you can take extra steps to support these users, making sure that your most valuable users remain engaged with your app.
At the other end of the scale, you might discover an area where your app is struggling. For example, maybe users who are running a particular version of Android have considerably lower engagement rates, or are more likely to uninstall your app. In this scenario, you might want to test your app on this particular version of Android to see whether there’s a bug or any other error that might be ruining the user experience for this section of your user base.
Basically, the more data you can gather about your audience and their behaviour, the greater your chances of keeping your existing user happy, attracting new users, and generally delivering an all-round great experience for everyone who comes into contact with your app.
In this section I’m going to look at two services that can put a wealth of information at your fingertips: Firebase Analytics and the Google Play Developer Console.
Firebase
You can use Firebase Analytics to gather data about your users, such as their age, gender and location, plus information on over 500 in-app events. You can even define your own custom events, if required.
To add Firebase Analytics to your project, you’ll need Google Play services 10.0.1 or higher and the Google Repository version 26 or higher, so open the SDK Manager and make sure these components are up to date. You’ll also need to be running Android Studio 1.5 or higher, and be signed up for a free Firebase account.
If you're running Android 2.2 or later, then you can connect your app to Firebase Analytics using the Firebase Assistant. Open Android Studio, launch the project in question, and:
Select Tools > Firebase from the Android Studio toolbar.
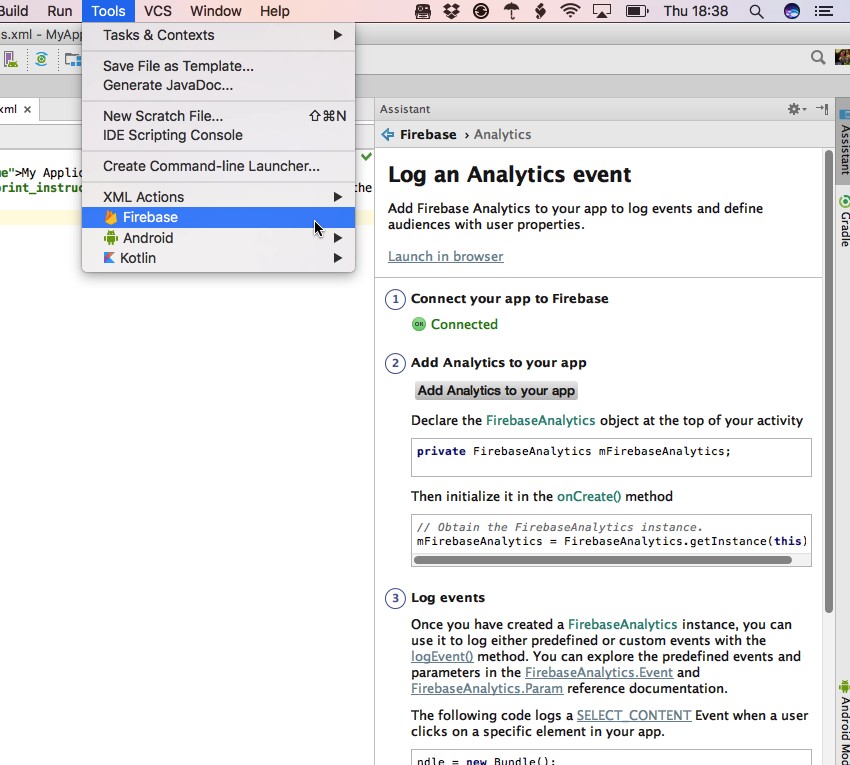
Click to expand the Analytics section, then select the Log an Analytics event link.
Click the Connect to Firebase button.
In the dialogue that appears, opt to create a new Firebase project.
Click the Connect to Firebase button.
After a few moments, you should see a Connected message.
Give the Add analytics to your app button a click.
In the subsequent dialogue, click Accept changes.
And that’s it! You can now view all your Firebase Analytics data by logging into the Firebase Console, selecting the project you want to examine, and then selecting Analytics. This data will update periodically throughout the day.
The Developer Console
You can also gain a valuable insight into your app’s performance and user behaviour via the Developer Console.
To view this data, log into your Developer Console account, select the app you want to examine, and then select Dashboard from the left-hand menu.
The Developer Console contains lots of useful information, so it’s well worth taking the time to explore its various sections in detail. However, there are a few areas that may be of particular interest:
User Acquisition Performance. This section contains a breakdown of how users are finding your app’s Google Play listing, for example the percentage of users who landed on your page via a UTM-tagged link, an AdWords ad, or the number of people who simply found your app by browsing the Google Play store.
Finance. If you’ve implemented a monetization strategy, such as in-app products or a subscription option, then you can use the Developer Console to review your app’s financial performance. The Finance section contains information such as the average amount each paying user is investing in your app, how much revenue is being generated by each product you offer through your app, and how much each section of your user base is spending, based on factors such as their geographical location, age, and the version of Android they’re using.
Crashes & ANRs. This section contains all the data users have submitted about application crashes and application not responding (ANR) errors, giving you a chance to identify and fix any issues that may be occurring in your app before users start leaving you negative reviews on Google Play. Note that crashes that aren’t reported by your users won’t appear in the Developer Console.
You may also want to consider downloading the Google Play Developer Console app, which lets you review all this information on the go.
Conclusion
In this article, we looked at six things you should and shouldn’t do when you’re developing an Android app. What are your golden rules for designing a great user experience? Leave a comment below and let us know.
In the meantime, check out some of our other courses and tutorials on Android programming!


Comments