1. Before Getting Started
Hopefully to this point, you have been following along with these introductory tutorials on what Xamarin is and how to use it. If you have, then you are primed and ready for the next step in your Xamarin training, cross-platform applications. If not, then head back and take a look at the previous tutorials to get a better grasp on how this fantastic technology works. Once you have that basic knowledge, you can come back and follow along.
2. Enter the Misconception
Several years ago, when many of the cross-platform solutions started to emerge, so did the misconception of Write Once Run Anywhere or WORA. Many developers started to salivate at the thought of being able to write their applications in a single language and have it run on various mobile platforms. The idea isn't incorrect, it merely was slightly misinformed in the beginning.
The dream of WORA comes true when you are considering the common logic of your application. What is considered common logic? Nearly anything that doesn't have to do with the user interface. This could mean your domain objects or models, data access layer, service layer, etc. All of these components are kept separate from the user interface. They are the pieces of the puzzle that make your application important to users.
The dreams of WORA start to break down when you begin looking at the cosmetic aspects of your app. At this point you start dealing with different SDKs with different ways of describing user interface elements. A button is no longer just a button. A button is now a Button object described using XAML and C# (among other possible languages) on Windows Phone. A button is a Button object described in AXML and Java on Android. A button is a UIButton instance described in a proprietary XML format and Objective-C on iOS.
Given the tools that you have at your disposal, the best you can do is create a separation of these user interface components from your functional code. This all starts to change with the introduction of Xamarin.Forms in the recent release of Xamarin 3, but we'll cover that in another tutorial.
When you want to create a cross-platform app in the Xamarin ecosystem, you will generally go with the formula of creating at least n+1 projects for each app that targets n platforms. Why at least? Why n+1? The n+1 is the easy part. The generally accepted way is to divide your application up into separate projects like this:
- App.Core
- App.iOS (Xamarin.iOS project)
- App.Android (Xamarin.Android project)
You will want to create a specific project for each platform. In your case you would create a Xamarin.iOS project and a Xamarin.Android project. Best practices would tell you to append the name of the platform onto the end of the project name just to make the breakdown more obvious. The third project is the +1, the project in which you keep all of your platform independent code that can be reused by other projects in your solution or in other solutions.
The at least part is more of a personal preference. Depending on how you typically like to break up your code, the third project (Core) could either be one class library or several. It is completely up to you. That is where you get to flex your creative muscle. But it isn't just as easy as creating a new class library project and banging out some code. If it were that easy, everyone would be doing it. Luckily, you have some tried and true options for sharing this code.
3. Sharing Code
If you want to write code in C# and share it across multiple platforms in a Xamarin project, you have three basic options:
- File Linking
- Portable Class Libraries
- Shared Projects
As Xamarin continues to evolve, File Linking tends to fall off the map, but we'll discuss every option separately to let you choose the most appropriate one.
File Linking
File linking is a viable option in Xamarin Studio and has been around in Visual Studio for quite some time. It's an option that allows you to write code in one physical file and have all other projects have access to that one file. This means that any changes you make to the linked file, will cause changes in the original file. This is because there's really only one file.
The opposite approach of file linking is to create copies of the original file in any other project in your solution that needs access to that particular code. That way, when you make changes to these files in any of the projects, the changes are restricted to that physical file and not the original.
How To Link Files
The process of linking files to different projects in your solution is very similar, whether you're using Xamarin Studio or Visual Studio. Let's start by creating a new class library project in either IDE.
For this example, name your first project SourceLibrary. Within this class library, create a new class and name it User. Replace the class's implementation with the following:
public class User
{
	public string FirstName { get; set; }
	public string LastName { get; set; }
}
You now have a basic class that represents a User within your application. If you wanted to share that concept with another project within your solution, you could add a link. First, you need to create a new class library project within your solution. Let's name this one LinkLibrary. After creating the project, you can add a link to your User class by right-clicking your LinkLibrary project and selecting Add Files in Xamarin Studio or Add Existing Files in Visual Studio. Navigate to the file you want to link to in the Open File dialog box. When you click the Open button in Xamarin Studio you will be presented with a dialog box that looks like this:
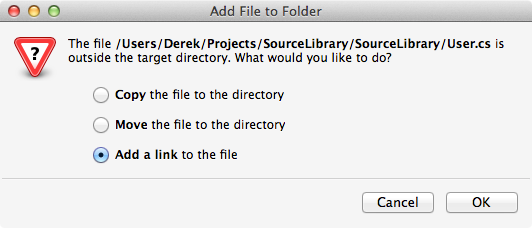
To add a link, select the last option, Add a link to the file, and click OK. You have now successfully created a link to the original file.
In Visual Studio, when you find the file you want to link to in the Open File dialog, you'll notice that there's a little drop-down menu on the right edge of the Add button. If you click that menu, you'll be presented with a couple of options:

- Add, the default option that creates a copy of this file in the current project
-
Add As Link, creates a link to the original file in the current project
After clicking Add As Link, Visual Studio will create a link to the User file in your LinkLibrary project. Once you create a link to a file, you will see that linked file in your current solution with a strange icon in the corner to signify that it's a linked file.
Now, edit the User class in your LinkLibrary project to look like this.
public class User
{
	public string FirstName { get; set; }
	public string LastName { get; set; }
	public string UserName { get; set; }
}
After saving the changes and navigating back to the User class in your SourceLibrary project, you should see that both versions have changed.
This may seem like a lot of work. Why not create all this shared logic in a typical class library project and add references to this assembly from your platform specific assemblies? The answer is that you can't.
When you create an iOS or Android application from the Xamarin.iOS or Xamarin.Android project templates, you're very limited to the assemblies that you can reference. The assemblies that are created during this process are restricted in the functionality and libraries that are supported. The problem is that, by default, the typical class library project contains access to way more functionality than the Xamarin libraries support. Fear not, there are some workarounds.
Portable Class Libraries
Portable Class Libraries or PCLs are the next evolution in creating cross-platform code in the world of .NET. PCLs are stripped down versions of class library projects that only contain bare-bones functionality capable of being referenced and run, without modification, in several different types of projects. The list of supported platforms and features continues to grow. To get more detail on PCLs and to see the supported platforms and features, take a look at the Portable Class Library page on MSDN.
Generally speaking, the way that PCLs work is by creating all of your shared logic in a PCL project and then adding references to that project from your platform specific projects. The only difference in this process from creating a normal class library project is one extra step.
Creating a PCL
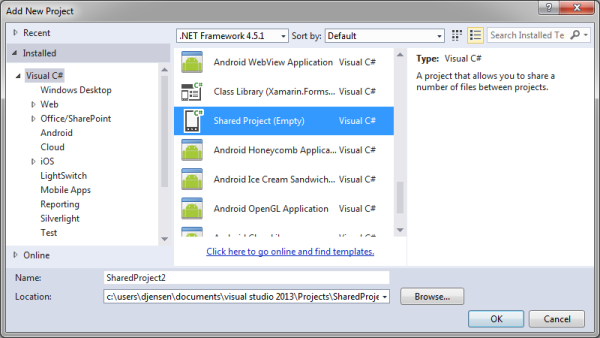
Start by creating a new project in Xamarin Studio or Visual Studio, select Class Library as the project template, and name the project TypicalLibrary. Next, add a new project to your solution. Select Class Library (Portable) as the template and name it PortableLibrary. Depending on your IDE, this process may differ slightly.
If you create your new Portable Class Library project in Visual Studio, a dialog similar to the one below will appear.
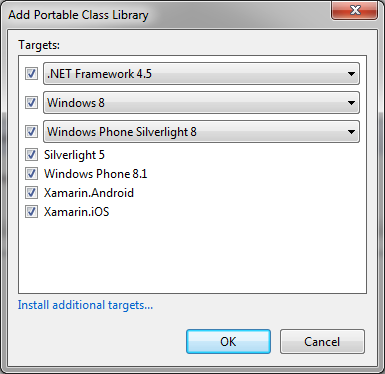
Depending on your version of Visual Studio, .NET Framework, and Xamarin tools installed, you may see different options, but the concepts are the same. You have the choice of selecting the different platforms you want to support. The combinations of platforms you choose here are only limited by your imagination. Just be sure to only select the platforms that you need. The more platforms you select, the more limited the range of features you can access within your PCL.
If you're using Xamarin Studio, you won't see the above dialog box. Xamarin Studio will set similar options for you by default. To change the supported platforms, right-click the PortableLibrary project and select Options. In the Project Options dialog, select General under the Build section. You should see a set of options similar to those shown below.
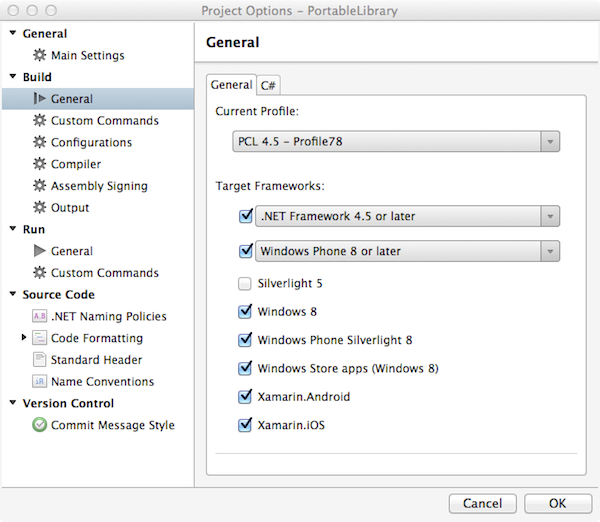
Since this is merely a demonstration, you can select any of the platforms that you like. To prove the point though, make sure that you have at least selected Xamarin.Android as one of the supported platforms.
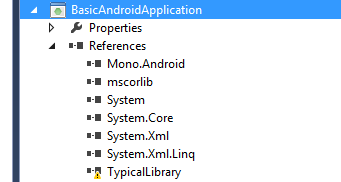
Finally, add another project to your solution. Select the Android Application template and name the project BasicAndroidApplication. To use the functionality you've created in a class library, add a reference to it from your Android application. If you're using Xamarin Studio, you do this by right-clicking the References folder under your BasicAndroidApplication project and selecting Edit References. In the Edit References dialog, select the Projects tab to reference an assembly within your current solution. This is what you'll see:
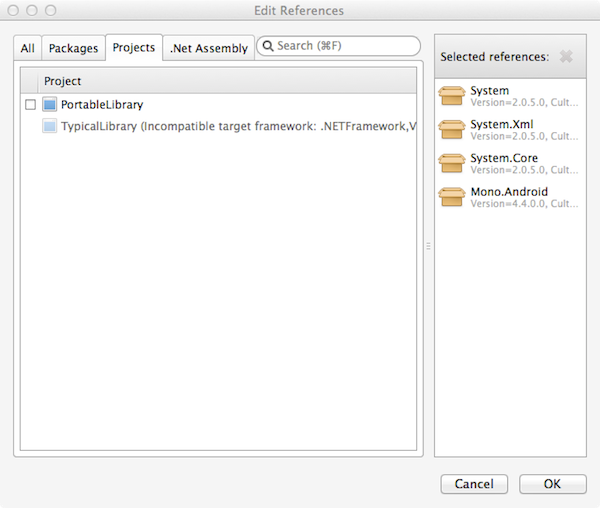
You are able to select the PCL (PortableLibrary), but as you can see the normal class library (TypicalLibrary) is incompatible.
Attempting this exercise in Visual Studio will ultimately end in the same place, but Visual Studio is going to be a little less obvious. It will let you add a reference to the normal class library, but under the BasicAndroidApplication Refereces you'll see the TypicalLibrary listed with a warning icon.
When you build the project, you'll receive a warning in the Error List similar to the one shown below.

Even though this may seem a little nicer than Xamarin Studio just slamming the door in your face, but this will cause other issues down the road when you try to test and debug your application. You'll run into errors and other problems that may make debugging difficult, so you'll definitely want to be aware of these types of warnings when using a PCL.
Using PCLs
When using PCLs in your solution, there are very few differences with using normal class libraries. During development, when you want to use any classes defined within your PCL, you simply add a reference to it and away you go. During the build process, the output of a PCL is a DLL file, just like a normal class library.
When you create and reference PCLs in your project, that physical DLL file is included with the application, so the primary application assembly always has access to it. This may come as no surprise to you, but it is a distinguishing characteristic when comparing it with the third option, which we'll discuss now.
Shared Projects
Shared Projects and support for their corresponding project templates were added in Xamarin Studio 5 and Visual Studio 2013 Update 2. While the name is rather unassuming, these projects work quite differently than their class library and PCL cousins. These projects don't have the limitations that a PCL does. They have full access to built-in libraries and assemblies in the .NET Framework, with the exception that you're not able to add additional references and components to these projects.
Creating a Shared Project
Start by creating a new Solution/Project in Xamarin Studio or Visual Studio. Select C# as your language and select the Shared Project template. If you're using Visual Studio and you don't see this as an option, then you'll need to download and install the Shared Project Reference Manager extension. Once the installation is complete and you've restarted Visual Studio, you should see this option.
After creating the project, you'll notice that it's a bit empty. There are no Resources or Components folders. There are no Properties or default classes created. You just get a blank slate.

You'll also notice that there are fewer properties when you right-click your project and select Properties from the contextual menu.
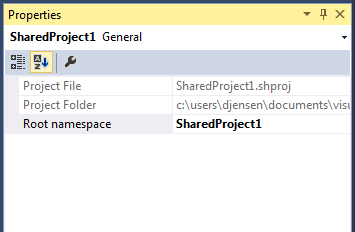
The only choice you have for changing options in a Shared Project is the Root Namespace. The Root Namespace is the default namespace given to all classes created within your Shared Project so you don't have to manually update them.
Support for Compiler Directives
One of the important aspects of Shared Projects is their support for compiler directives. This is one of the reasons they fit so well into cross-platform projects. There are a number of directives that are included in Xamarin and Windows Phone projects.
-
__MOBILE__, defined in both Xamarin.iOS and Xamarin.Android projects -
__IOS__, defined in Xamarin.iOS projects -
__ANDROID__, defined in Xamarin.Android projects -
WINDOWS_PHONE, defined in Windows Phone projects -
SILVERLIGHT, defined in Windows Phone projects
In addition to these generic directives, Xamarin.Android provides a number of specific directives to target a specific version of the Android SDK. It's not uncommon to see a directive similar to __ANDROID_11__, for example. These directives can be used in conditional preprocessor statements to let the compiler know to only attempt to compile the code within them if the special directives are defined. Take a look at the following example.
public class User
{
#if __ANDROID__
    public string FirstName { get; set; }
#endif

    public string LastName { get; set; }
}
This may be a bit of a contrived example, but it serves a purpose. When the compiler comes across this block of code in a Xamarin.Android project, the User class will have both the FirstName and LastName properties. If you were building this in a Xamarin.iOS project, the User class would contain only the LastName property.
This process of conditional compilation comes in handy when dealing with platform specific differences. These differences could come into play when using device or platform specific features such as local storage. With directives, you have the ability to write platform specific code in one file as opposed to multiple files across multiple projects. Very nice.
Using Shared Projects
When you use Shared Projects in an application, there are a few things you need to look out for. You may have noticed when looking at the properties associated with a Shared Project that there were no choices for selecting a Target framework or Output type. That's because these little beauties aren't actually compiled in their own assemblies. Code that is written in a Shared Project is compiled into any project that references it.
What happens if you have a Shared Project in your solution that isn't referenced by any other projects? Nothing. The code is not compiled and subsequently not included anywhere. The same will happen if you add a reference to a Xamarin.iOS project that points to a Shared Project that contains the User class above. Since the __ANDROID__ directive is not defined within Xamarin.iOS, the FirstName property will not be compiled into the Xamarin.iOS project.
4. Sharing Code Guidelines
Based on the above strategies to share code among cross-platform applications, you have some decisions to make. The following discussion outlines the pros and cons of each strategy and presents a number of guidelines to help you with this decision. Keep in mind that there is no right or best strategy. Any of these options works, but one may be slightly more desirable over another.
File Linking
File Linking is the process of creating logical links from one project to a physical file in another project or directory.
Pros
- only one physical file to maintain
- code changes only need to be made once
Cons
- changes made to linked files will effect all code referencing them
- linking multiple files and directories is a multistep process
Portable Class Libraries
A PCL is a specialized class library project that can be included and run on several different platforms without modification.
Pros
- generates an assembly that can be referenced by other projects
- all refactoring and testing can be done in one location
Cons
- cannot reference any non-PCL or platform specific assemblies
- only includes a subset of features of the .NET Framework
Shared Projects
A Shared Project is a specialized project template enabling you to write code that is directly compiled into any project that references it. It allows the use of preprocessor directives to include all platform specific code to live in the same project.
Pros
- can use directives to target specific platforms in a single file
- have access to other referenced assemblies projects referencing them
Cons
- there is no output file so code cannot be shared with projects outside the solution
- refactorings inside inactive compiler directives will not update the project
Rules of Thumb
With the evolution of Xamarin and the introduction of the Shared Project strategy, the File Linking option has all but fallen to the wayside. That doesn't mean you can't or shouldn't use this option, it simply means that in most circumstances the Portable Class Library or Shared Project strategies may be the best fit. Here are simple scenarios for determining which one to go with.
- Portable Class Library, creating a cross platform application in which the shared code is not platform specific and is intended to be shared or reused outside the current solution
-
Shared Project, creating a cross-platform application with code that can be platform specific and only belong in your solution and is not intended to be shared or reused outside that context
5. Let's Build An App
That's enough theory for now. Let's get write some code. In the previous two introductory tutorials on Xamarin, you created the same RSS reader. While that may have seemed redundant at the time, we did it for two reasons.
- show the similarities in creating Xamarin.iOS and Xamarin.Android applications
- lead up to merging common code in a single cross-platform application
Project Setup
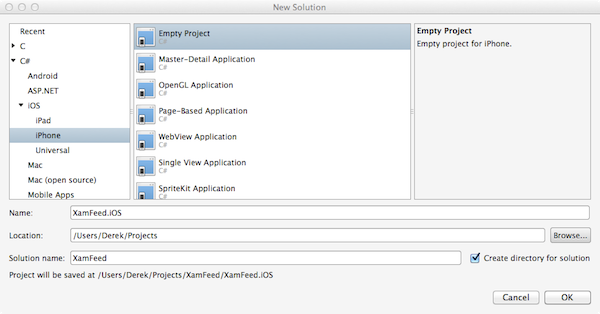
To create this version of your application, you will follow the basic n+1 guideline. Start by creating a new iOS project using the Empty Project template, naming the project XamFeed.iOS and the solution XamFeed.
Next, add a new Android project to your solution using the Android Application project template. Name the new project XamFeed.Android.

Now it's time for the +1. You can choose any of the code sharing options described in this tutorial to create this application. Since the code that's going to be shared between the iOS and Android applications isn't specific to any one platform and may be useful to other projects and applications, I will take the Portable Class Library route. Add a new C# project to your solution using the Portable Library template and name it XamFeed.Core.

If you're using Visual Studio, you'll see a dialog box that lets you select the supported platforms. If you're using Xamarin Studio, you'll need to look into the project properties for the XamFeed.Core project. You can select just about any combination of platforms as long as you include .NET Framework 4.5 or later, Xamarin.iOS, and Xamarin.Android, and make sure not to select Windows Phone 8 and Windows Phone Silverlight 8. The reason you can't choose those two platforms is because they don't support the HttpClient class that we'll use in our application.

You can delete the default class file in the XamFeed.Core library, because we won't be needing it. Finally, be sure to add a reference to the XamFeed.Core project in both the XamFeed.iOS and XamFeed.Android projects. You are now ready to add some code.
Adding Shared Code
We'll start by creating the domain object, RssItem. This class will contain four properties. You can add more if you like.
-
Title, the name of the article -
PubDate, the date the article was published -
Creator, the author of the article -
Link, the URL of the article
Add a new class to your XamFeed.Core project named RssItem. Replace the default implementation with the following:
public class RssItem
{
    public string Title { get; set; }
    public string PubDate { get; set; }
    public string Creator { get; set; }
    public string Link { get; set; }
}
Create another class and name it FeedRetriever. The task of this class will be fetching an array of RssItem objects from a given URL. Once you've created this class, add a new method to it with the following implementation:
public async Task<RssItem[]> GetItems(string feedUrl)
{
	using (var client = new HttpClient())
	{
		var xmlFeed = await client.GetStringAsync(feedUrl);
		var doc = XDocument.Parse(xmlFeed);
		XNamespace dc = "http://purl.org/dc/elements/1.1/";

		var items = (from item in doc.Descendants("item")
			select new RssItem
			{
				Title = item.Element("title").Value,
				PubDate = item.Element("pubDate").Value,
				Creator = item.Element(dc + "creator").Value,
				Link = item.Element("link").Value
			}).ToArray();

		return items;
	}
}
To get this method to compile into your project, you'll need to add four using statements to the top of the FeedRetriever file:
-
using System.Linq; using System.Net.Http;using System.Xml.Linq;using System.Threading.Tasks;
You now have a handy little class that can be used to retrieve the articles from a given RSS feed URL. This functionality will be added to the iOS and Android applications. Let's start with the Android application.
XamFeed.Android
Putting the RssItem objects into a list requires a custom adapter. In the XamFeed.Android project, create a new class, name it FeedAdapter, and replace it's implementation with the following:
public class FeedAdapter : BaseAdapter<RssItem>
{
    private RssItem[] _items;
    private Activity _context;

    public FeedAdapter( Activity context, RssItem[] items) : base()
    {
        _context = context;
        _items = items;
    }

    public override RssItem this[int position]
    {
        get { return _items[position]; }
    }

    public override int Count
    {
        get { return _items.Count(); }
    }

    public override long GetItemId(int position)
    {
        return position;
    }

    public override View GetView(int position, View convertView, ViewGroup parent)
    {
        var view = convertView;
        if (view == null)
        {
            view = _context.LayoutInflater.Inflate(Android.Resource.Layout.SimpleListItem2, null);
        }

        view.FindViewById<TextView>(Android.Resource.Id.Text1).Text = _items[position].Title;
        view.FindViewById<TextView>(Android.Resource.Id.Text2).Text = string.Format("{0} on {1}", _items[position].Creator, _items[position].PubDate);

        return view;
    }
}
Depending on how you created this class, you may have to add some or all of the following using statements to the class. Double-check that they're all included.
-
using Android.Widget; using XamFeed.Core;using Android.App;using Android.Views;using Android.OS;using System.Linq;
You now have a mechanism for retrieving RssItem objects and an Adapter to display them. All you need is a ListView. Replace the contents of Main.axml (Resources > layout) with the following:
<?xml version="1.0" encoding="utf-8"?>
<LinearLayout xmlns:android="http://schemas.android.com/apk/res/android"
    android:orientation="vertical"
    android:layout_width="fill_parent"
    android:layout_height="fill_parent">
    <ListView
        android:id="@+id/TutsFeedListView"
        android:layout_width="fill_parent"
        android:layout_height="fill_parent" />
</LinearLayout>
The above layout adds a ListView to the screen, so you can populate it with data. All that's left for us to do is wiring up the MainActivity class to the layout, populate the list with RssItem objects, open each of the links when one of the items is tapped by the user. To accomplish this, you only need to modify the contents of MainActivity.cs as shown below.
[Activity(Label = "XamFeed", MainLauncher = true, Icon = "@drawable/icon")]
public class FeedActivity : ListActivity
{
	private FeedRetriever _retriever;
	private RssItem[] _items;

	protected async override void OnCreate(Bundle bundle)
	{
		base.OnCreate(bundle);
		_retriever = new FeedRetriever ();

		_items = await _retriever.GetItems ("http://blog.xamarin.com/feed");

		ListAdapter = new FeedAdapter (this, _items);

	}

	protected override void OnListItemClick(ListView l, View v, int position, long id)
	{
		base.OnListItemClick(l, v, position, id);
		var uri = global::Android.Net.Uri.Parse (_items [position].Link);

		var intent = new Intent (Intent.ActionView, uri);
		StartActivity(intent);
	}
}
You will have to add a using statement to include the XamFeed.Core namespace to get this to compile.
There you have it. You now have a fully functional Android application that is utilizing core functionality that resides in a Portable Class Library. Now it's time to turn our attention to the XamFeed.iOS project.
XamFeed.iOS
The basic process of getting the iOS project up and running is going to be similar to the Android project. We'll use the FeedRetriever class to get the RssItem objects and then write custom user interface code to display it to the user. To accomplish this, we'll create a view controller containing a list of RssItem objects and set that view controller as the root view controller of the application.
Start by adding a new iOS Table View Controller to the XamFeed.iOS project and name it RssItemView. This results in the creation of the RssItemViewController, RssItemViewSource, and RssItemViewCell classes.
These classes make up the table view that will display the RssItem objects. Replace the default implementation of the RssItemViewController class with the following:
public class RssItemViewController : UITableViewController
{
	private FeedRetriever _retriever;
	private RssItem[] _items;
	public RssItemViewController () : base ()
	{
		_retriever = new FeedRetriever ();
	}

	public override void DidReceiveMemoryWarning ()
	{
		// Releases the view if it doesn't have a superview.
		base.DidReceiveMemoryWarning ();

		// Release any cached data, images, etc that aren't in use.
	}

	public async override void ViewDidLoad ()
	{
		base.ViewDidLoad ();
		_items = await _retriever.GetItems ("http://blog.xamarin.com/feed");
		// Register the TableView's data source
		TableView.Source = new RssItemViewSource (_items);
		TableView.ReloadData ();

	}
}
In the ViewDidLoad method, we use the FeedRetriever class to get the RssItem objects from the Xamarin blog, assign them to the RssItemViewSource object, and call the ReloadData method on the TableView instance. This method ensures that the table view is refreshed after it is shown, so that the data appears on the screen.
Next, update the RssItemViewSource class to handle the RssItem[] that we're passing to it. To do that, replace the default implementation with the following:
public class RssItemViewSource : UITableViewSource
{
	private RssItem[] _items;

	public RssItemViewSource (RssItem[] items)
	{
		_items = items;
	}

	public override int NumberOfSections (UITableView tableView)
	{
		// TODO: return the actual number of sections
		return 1;
	}

	public override int RowsInSection (UITableView tableview, int section)
	{
		// TODO: return the actual number of items in the section
		return _items.Length;
	}

	public override UITableViewCell GetCell (UITableView tableView, NSIndexPath indexPath)
	{
		var cell = tableView.DequeueReusableCell (RssItemViewCell.Key) as RssItemViewCell;
		if (cell == null)
			cell = new RssItemViewCell ();

		// TODO: populate the cell with the appropriate data based on the indexPath

		cell.TextLabel.Text = _items[indexPath.Row].Title;
		cell.DetailTextLabel.Text = string.Format ("{0} on {1}", _items [indexPath.Row].Creator, _items [indexPath.Row].PubDate);

		return cell;
	}

	public override void RowSelected (UITableView tableView, NSIndexPath indexPath)
	{
		var item = _items [indexPath.Row];

		var url = new NSUrl (item.Link);
		UIApplication.SharedApplication.OpenUrl (url);
	}
}
Most of the work here is done in the GetCell method. This is where we either create a new cell if one doesn't exist or reuse one that has gone out of view. Once we have a cell, we populate it with the Title, Creator, and PubDate properties of the corresponding RssItem object.
Lastly, we need to define the look of the cells within the UITableView. For that, we use the RssItemViewCell class. Replace the default implementation with the following:
public class RssItemViewCell : UITableViewCell
{
	public static readonly NSString Key = new NSString ("FeedItemViewControllerCell");

	public RssItemViewCell () : base (UITableViewCellStyle.Subtitle, Key)
	{
		// TODO: add subviews to the ContentView, set various colors, etc.
		TextLabel.Text = "TextLabel";
	}
}
You may have noticed that it looks almost exactly like the default implementation with only one minor change, we pass a UITableViewCell.Subtitle to the base constructor. This gives each cell two text fields that you can populate.
We now have everything we need to show the list of RssItem objects to the user. There's only one problem. We haven't added the view of the view controller to the view hierarchy of our application. This is easy to fix though. Update the FinishedLaunching method in the AppDelegate class as shown below.
public override bool FinishedLaunching (UIApplication app, NSDictionary options)
{
	// create a new window instance based on the screen size
	window = new UIWindow (UIScreen.MainScreen.Bounds);
	var controller = new RssItemViewController ();
	controller.View.BackgroundColor = UIColor.White;
	controller.Title = "Xamarin Feeds";

	var navController = new UINavigationController (controller);
	window.RootViewController = navController;
	// If you have defined a root view controller, set it here:
	// window.RootViewController = myViewController;

	// make the window visible
	window.MakeKeyAndVisible ();

	return true;
}
We first create a new instance of the RssItemViewController and set a couple of its properties. We then create a new UINavigationViewController instance, passing it the view controller we created a moment ago. Finally, we set the new navigation controller as the RootViewController of the UIWindow instance. That's it.
We now have an Android and an iOS application that displays the RSS feed of the Xamarin blog. You can run these applications one at a time and see them work individually, or you can run them both in one debugging session. To do this, you just need to go into your XamFeed solution properties or options, depending on your IDE. In here, you can choose which projects you want to start up when you run the application. In your solution, select both XamFeed.Android and XamFeed.iOS.
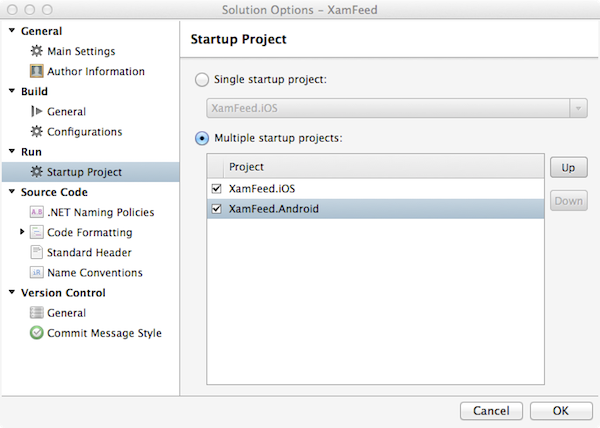
Save the changes and now, when you run your application, both the iOS Simulator and Android Emulator start up and run your application.

Conclusion
Congratulations. You've successfully created a cross-platform mobile application with a single code base. It's important to understand that creating these applications doesn't necessarily coincide with the Write Once Run Anywhere mindset. There will always be customization needed. Luckily, with a combination of Xamarin and some very cool code sharing strategies, you can get very close. If you simply start to think of your mobile apps in terms of platform specific code and platform agnostic code, you are well on your way.
Next Step: Watch the Course
If you'd like to learn more about Xamarin, then check out our course Building Multi-Platform Apps With C# in Xamarin.
In the course, you will learn how to create a cross-platform application from a single code base that will run on three distinctly different platforms: iOS, Android, and Windows Phone 8. Think it can’t be done? In just a little while you will be doing it yourself. Let’s get to work.
You can take the straight away with a completely free 14 day trial of a Tuts+ subscription. Take a look at our subscription options to get started or, if you're just interested in this course, you can buy it individually for $15! Here's a preview to get you started:

Comments