Today, you’ll be learning about a web technology that is known as Canvas and how it's related to the the Document Object Model, commonly referred to as the DOM. This technology is tremendously powerful as it enables web developers to access and modify HTML elements through the use of JavaScript.
Now you may wonder why we even need to bother with JavaScript. To put it simply, HTML and JavaScript are mutual and interdependent. Some HTML components, such as the canvas element, are nothing without the use of JavaScript. After all, what good is a canvas if we can't draw on it?
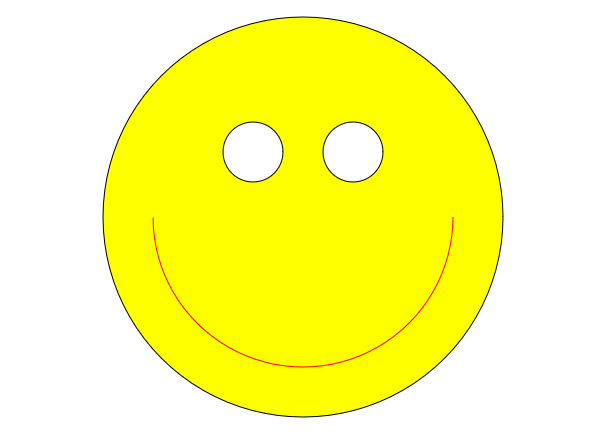
In order to grasp the concept, I thought that we could work through an example project together in which we'll attempt to draw a simple smiley face. So let's dive right into it.
Getting Started
First make a new directory to hold your project's files, and then go ahead and open your favorite text editor or web development tool. Once you've done so, you should create an empty index.html and an empty script.js, which we'll continue to edit as we move forward.
Next, we'll move on to modify our index.html, which shouldn’t take very long, as the bulk of our project will be written in JavaScript. All we need to do in our HTML is create a canvas element and reference script.js. It’s pretty straightforward:
<!DOCTYPE html><body>

   <canvas id='canvas' width='640' height='480'></canvas>
   <script type='text/javascript' src='script.js'></script>

</body></html>
So to explain, I used a set of tags for both <html> and <body>, and thus, we can add more elements to our document via the body. Seizing this opportunity, I do exactly that with a 640 by 480 canvas element with the attribute id='canvas'.
This attribute simply attaches a string to an element for the purposes of identification, and we’ll be using it later to locate our canvas element in our JavaScript file. I then referenced our JavaScript file using the <script> tag, in which I specified JavaScript as the type of language and script.js as the path to our desired file.
Manipulating the DOM
As the name Document Object Model implies, we’ll need to use an interface to the HTML document through the use of another language, in this case, JavaScript. For this, we’ll need a brief primer on the built-in document object. This object directly corresponds to our <html> tags, and similarly, it is the basis of our whole project, as we can use it to get elements and push changes.
var canvas = document.getElementById('canvas');
Remember how we defined a canvas element with the id='canvas'? Now we’re grabbing it from the HTML document through the use of the document.getElementById method, in which we simply pass the string matching the id of the desired element. Now that we’ve grabbed it, we can begin to use it for drawing.
In order to actually draw with the canvas, we must manipulate its context. Surprisingly, a canvas does not contain any methods or attributes for drawing, but its context object has all the methods we need. A context is defined like so:
var context = canvas.getContext('2d');
Every canvas has a few different contexts, and for the purpose of our program, we’ll only need the one that is two-dimensional. This context that we made will have all the drawing methods that we will need to create our face.
Before we begin, I must inform you that the context stores two colors as attributes, one for stroke and one for fill. For our smiley face, we’ll need to set the fill to yellow and the stroke to black.
context.fillStyle = 'yellow';
context.strokeStyle = 'black';
After setting the context to the desired colors, we must actually draw a circle for the face. Unfortunately, the context does not have a predefined method for circles, so we’ll need to use what is known as a path. A path is simply a series of conjoined lines and curves, and this path is then closed when the drawing has been completed.
context.beginPath();
context.arc(320, 240, 200, 0, 2 * Math.PI);
context.fill();
context.stroke();
context.closePath();
So to explain, we instructed the context to begin a new path. Next, we created an arc at the point (320, 240) with a radius of 200 pixels. The last two arguments specify the initial and terminal angle to construct the arc. So we pass 0 and 2 * Math.PI radians in order to make a full circle. Finally, we instruct the context to fill and stroke the path according to the colors we set already.
Although closing the path is not a requirement for the function of the script, we will need to end the path so we can begin new ones for the eyes and the mouth of our smiley face. The eyes are done in exactly the same way, each with a smaller radius and different position. But first we must remember to set the fill color to white.
context.fillStyle = 'white';

context.beginPath();
context.arc(270, 175, 30, 0, 2 * Math.PI);
context.fill();
context.stroke();
context.closePath();

context.beginPath();
context.arc(370, 175, 30, 0, 2 * Math.PI);
context.fill();
context.stroke();
context.closePath();
And that’s all that’s going on with the eyes. Now the mouth is very similar, but this time we won’t fill the arc, and our angle will be configured as a semicircle. To do this, we’ll need to set the starting angle to zero and the ending angle to -1 * Math.PI. And remember, don’t forget to set the stroke color to red.
context.fillStyle = 'red';

context.beginPath();
context.arc(320, 240, 150, 0, -1 * Math.PI);
context.fill()
context.stroke();
context.closePath();
Congratulations
Nice job. You’ve made it to the end of the tutorial and you’ve made an awesome smiley face while learning much more about Canvas, HTML, JavaScript, and the Document Object Model. If you have any questions, feel free to leave a comment. Click here to see the program in action.

Comments